bonnet CITROEN DS7 CROSSBACK 2020 Owners Manual
[x] Cancel search | Manufacturer: CITROEN, Model Year: 2020, Model line: DS7 CROSSBACK, Model: CITROEN DS7 CROSSBACK 2020Pages: 244, PDF Size: 6.87 MB
Page 5 of 244

3
Contents
137 Parking sensors
138 Reversing camera
140 360 Vision
07 Practical information
143 Compatibility of fuels
143 Refuelling
144 Misfuel prevention (Diesel)
145 Rechargeable hybrid system
153 Charging the traction battery
(Rechargeable hybrid)
155
Towing device
156 Towing device with retractable ball joint
157 Roof bars
158 Very cold climate screens
158 Snow chains
159 Energy economy mode
159 Bonnet
160 Engine compartment
161 Checking levels
163 Checks
165 AdBlue® (BlueHDi)
166 Free-wheeling
167 Advice on care and maintenance
08 In the event of a breakdown
170 Warning triangle
170 Running out of fuel (Diesel)
170 Tool kit
172 Temporary puncture repair kit
175 Spare wheel
178 Changing a bulb
180 Fuses
181 12 V battery/Accessory batteries
186 Towing the vehicle
09 Technical data
189 Engine technical data and towed loads
190 Petrol engines
191 Diesel engines
192 Rechargeable hybrid engines
193 Dimensions
193 Identification markings
10 DS IRIS SYSTEM - 12" touch screen Infotainment
system
194
First steps
197 Customisation
198 Steering mounted controls
198 Applications
199 Voice commands
200 Navigation
201 Connectivity
203 Mirror Screen
204 Media
206 Phone
207 Settings
208 Help
11 Vehicle data recording and privacy
Alphabetical index
Appendix
Page 6 of 244

4
Overview
Presentation
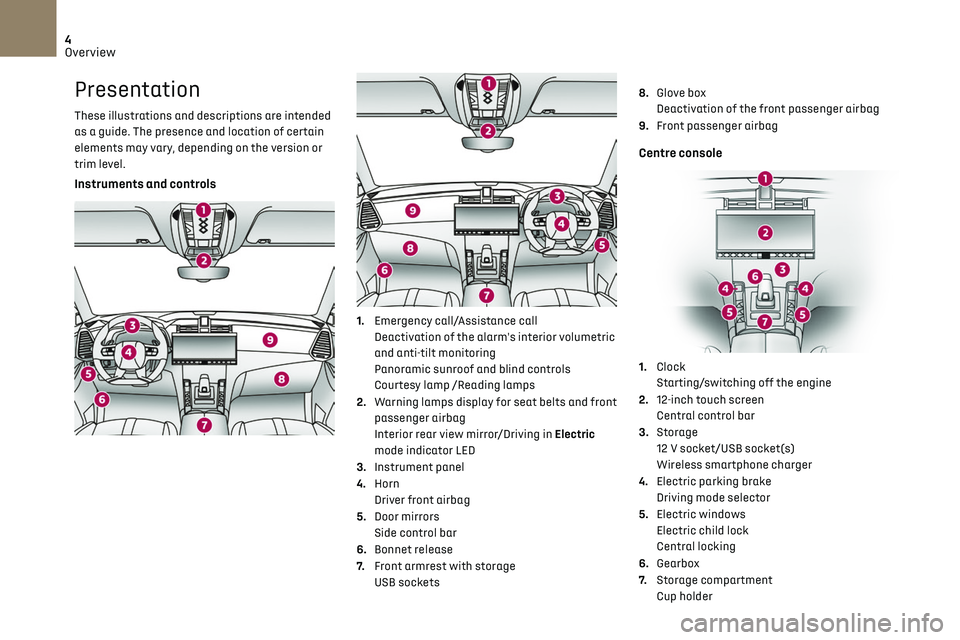
These illustrations and descriptions are intended
as a guide. The presence and location of certain
elements may vary, depending on the version or
trim level.
Instruments and controls
1. Emergency call/Assistance call
Deactivation of the alarm's interior volumetric
and anti-tilt monitoring
Panoramic sunroof and blind controls
Courtesy lamp /Reading lamps
2. Warning lamps display for seat belts and front
passenger airbag
Interior rear view mirror/Driving in Electric
mode indicator LED
3. Instrument panel
4. Horn
Driver front airbag
5. Door mirrors
Side control bar
6. Bonnet release
7. Front armrest with storage
USB sockets 8.
Glove box
Deactivation of the front passenger airbag
9. Front passenger airbag
Centre console
1.Clock
Starting/switching off the engine
2. 12-inch touch screen
Central control bar
3. Storage
12 V socket/USB socket(s)
Wireless smartphone charger
4. Electric parking brake
Driving mode selector
5. Electric windows
Electric child lock
Central locking
6. Gearbox
7. Storage compartment
Cup holder
Page 8 of 244

6
Overview
Rechargeable hybrid
system
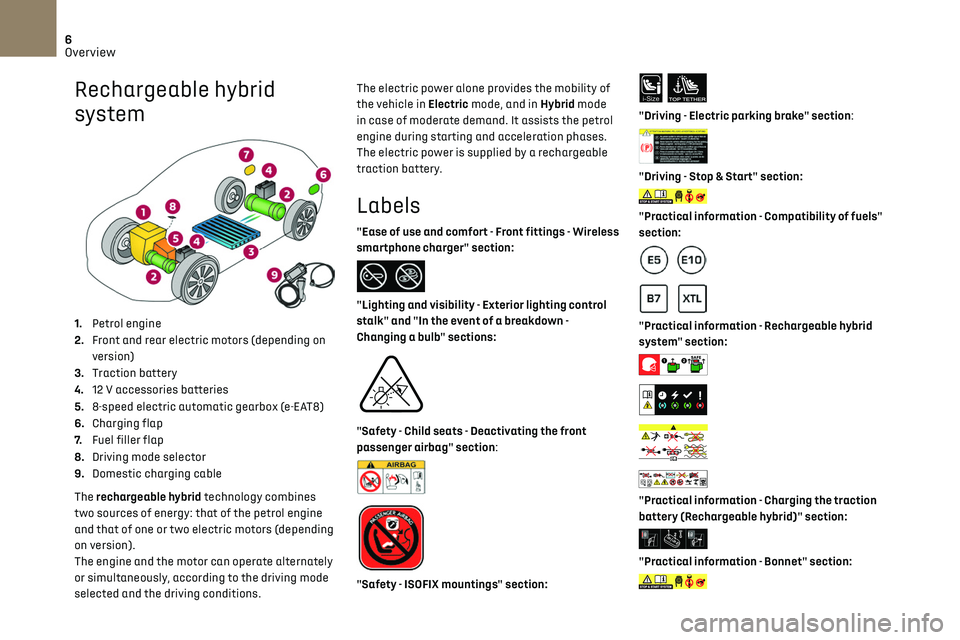
1.Petrol engine
2. Front and rear electric motors (depending on
version)
3. Traction battery
4. 12 V accessories batteries
5. 8-speed electric automatic gearbox (e-EAT8)
6. Charging flap
7. Fuel filler flap
8. Driving mode selector
9. Domestic charging cable
The rechargeable hybrid technology combines
two sources of energy: that of the petrol engine
and that of one or two electric motors (depending
on version).
The engine and the motor can operate alternately
or simultaneously, according to the driving mode
selected and the driving conditions. The electric power alone provides the mobility of
the vehicle in Electric mode, and in Hybrid mode
in case of moderate demand. It assists the petrol
engine during starting and acceleration phases.
The electric power is supplied by a rechargeable
traction battery.
Labels
"Ease of use and comfort - Front fittings - Wireless
smartphone charger" section:
"Lighting and visibility - Exterior lighting control
stalk" and "In the event of a breakdown -
Changing a bulb" sections:
"Safety - Child seats - Deactivating the front
passenger airbag" section:
"Safety - ISOFIX mountings" section:
i-SizeTOP TETHER
"Driving - Electric parking brake" section:
"Driving - Stop & Start" section:
"Practical information - Compatibility of fuels"
section:
"Practical information - Rechargeable hybrid
system" section:
"Practical information - Charging the traction
battery (Rechargeable hybrid)" section:
"Practical information - Bonnet" section:
Page 21 of 244

19
Dashboard instruments01
Coolant temperature indicator
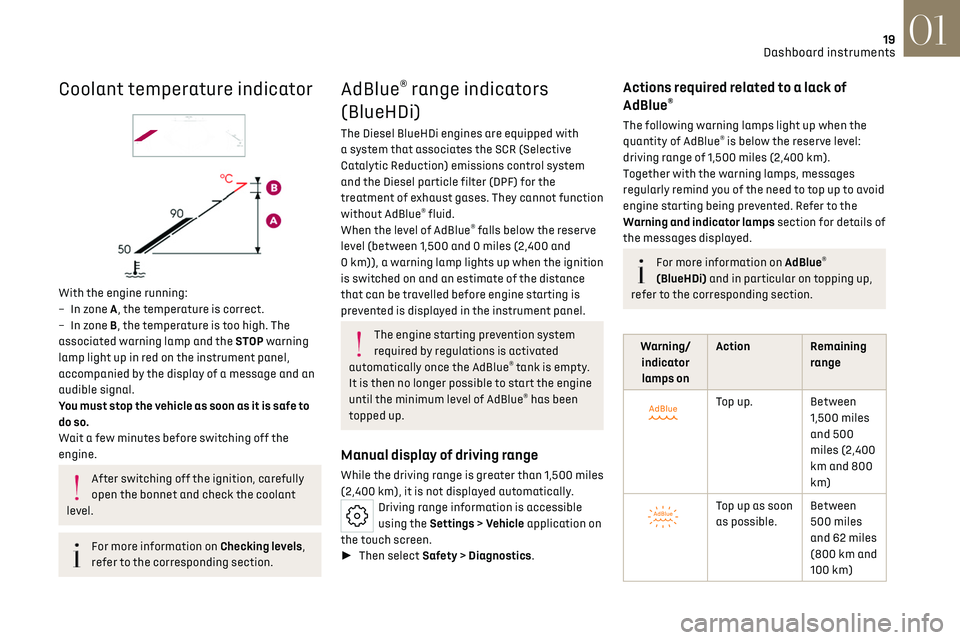
With the engine running:
–
In z one A, the temperature is correct.
–
In z
one B, the temperature is too high. The
associated warning lamp and the STOP warning
lamp light up in red on the instrument panel,
accompanied by the display of a message and an
audible signal.
You must stop the vehicle as soon as it is safe to
do so.
Wait a few minutes before switching off the
engine.
After switching off the ignition, carefully
open the bonnet and check the coolant
level.
For more information on Checking levels,
refer to the corresponding section.
AdBlue® range indicators
(BlueHDi)
The Diesel BlueHDi engines are equipped with
a system that associates the SCR (Selective
Catalytic Reduction) emissions control system
and the Diesel particle filter (DPF) for the
treatment of exhaust gases. They cannot function
without AdBlue
® fluid.
When the level of AdBlue® falls below the reserve
level (between 1,500 and 0 miles (2,400 and
0 km)), a warning lamp lights up when the ignition
is switched on and an estimate of the distance
that can be travelled before engine starting is
prevented is displayed in the instrument panel.
The engine starting prevention system
required by regulations is activated
automatically once the AdBlue
® tank is empty.
It is then no longer possible to start the engine
until the minimum level of AdBlue
® has been
topped up.
Manual display of driving range
While the driving range is greater than 1,500 miles
(2,400 km), it is not displayed automatically.
Driving range information is accessible
using the Settings > Vehicle application on
the touch screen.
► Then select Safety > Diagnostics.
Actions required related to a lack of
AdBlue®
The following warning lamps light up when the
quantity of AdBlue® is below the reserve level:
driving range of 1,500 miles (2,400 km).
Together with the warning lamps, messages
regularly remind you of the need to top up to avoid
engine starting being prevented. Refer to the
Warning and indicator lamps section for details of
the messages displayed.
For more information on AdBlue®
(BlueHDi) and in particular on topping up,
refer to the corresponding section.
Warning/ indicator lamps on Action Remaining
range
Top up. Between 1,500 miles
and 500
miles (2,400
km and 800
km)
Top up as soon
as possible.Between
500 miles
and 62 miles
(800 km and
100 km)
Page 39 of 244

37
Access02
► remove the electronic key from the
recognition zone, with the tailgate closed.
For more information on the Towing device
with quickly detachable towball, refer to the
corresponding section.
Alarm
(Depending on version)
System which protects and provides a deterrent
against theft and break-ins.
Exterior perimeter monitoring
The system checks for opening of the vehicle.
The alarm is triggered if anyone tries to open a
door, the boot or the bonnet, for example.
Interior volumetric monitoring
The system checks for any variation in volume in
the passenger compartment.
The alarm is triggered if anyone breaks a window,
enters the passenger compartment or moves
inside the vehicle.
Anti-tilt monitoring
The system checks for any change in the attitude
of the vehicle.
The alarm goes off if the vehicle is lifted or moved.
When the vehicle is parked, the alarm will
not be triggered if the vehicle is knocked.
Self-protection function
The system checks whether any of its
components are out of service.
The alarm is triggered if the battery, the central
control or the siren wiring is put out of service or
damaged.
Work on the alarm system
Contact a dealer or a qualified workshop.
Locking the vehicle with full
alarm system
Activation
► Switch off the ignition and exit the vehicle.
► Lock or deadlock the vehicle using the remote
control or with the Keyless Entry and Start
system.
When the monitoring system is active, the red
indicator lamp in the button flashes once per
second and the direction indicators come on for
about 2 seconds.
The exterior perimeter monitoring is activated
after 5 seconds and the interior volumetric and
anti-tilt monitoring after 45 seconds.
Door, boot or bonnet
If an opening is not properly closed, the
vehicle is not locked, but the exterior perimeter
monitoring will be activated after 45 seconds,
at the same time as the interior volumetric and
anti-tilt monitoring.
Sunroof
If the sunroof remains open, the vehicle
is locked with exterior perimeter monitoring
activated but without interior volumetric or
anti-tilt monitoring.
Deactivation
► Press one of the remote control unlocking
buttons:
short press
long press
or
► Unlock the vehicle with the Keyless Entry and
Start system.
The monitoring system is deactivated: the
indicator lamp in the button goes off and the
direction indicators flash for about 2 seconds.
If the vehicle automatically locks itself
again (as happens if a door or the boot is
Page 68 of 244

66
Lighting and visibility04
dipped beam headlamps come on automatically
when the ignition is switched off.
You can activate/deactivate and adjust
the duration of the guide-me-home lighting
in the Settings > Vehicle touch screen application.
Manual
► With the ignition off, pull the lighting control
stalk toward you ("headlamp flash") to activate/
deactivate the function.
Manual guide-me-home lighting goes off
automatically after a period of time.
Welcome lighting
When the vehicle is unlocked in low light
conditions and the "Automatic illumination of
headlamps" function is activated, this system
automatically switches on:
–
O
n the outside, sidelamps, dipped beam
headlamps and door mirror spotlamps.
–
Inside
, courtesy lamps and footwell lighting.
You can activate/deactivate and adjust
the duration of the welcome lighting in the
Settings > Vehicle touch screen application.
Door mirror spotlamps
These spotlamps facilitate access to the vehicle
by lighting the ground near the front doors.
The spotlamps come on automatically:
–
when the v
ehicle is unlocked.
–
when a door is opened.
–
when a reque
st to locate the vehicle is received
from the remote control.
They also come on with the welcome lighting and
guide-me-home lighting functions.
They go off automatically after 30 seconds.
Automatic lighting
systems - General
recommendations
The automatic lighting systems use a detection
camera, located at the top of the windscreen.
Operating limits
The system may be disrupted or not work
correctly:
–
When visibility c
onditions are poor
(e.g. snowfall, heavy rain).
–
If the windscreen is dirty
, misted-up or
masked (e.g. sticker) in front of the camera.
–
If the v
ehicle is facing highly reflective signs
or safety barrier reflectors.
The system is not able to detect:
– R oad users that do not have their own
lighting, such as pedestrians.
–
V
ehicles with hidden lighting (e.g. travelling
behind a safety barrier on the motorway).
–
V
ehicles at the top or bottom of a steep
slope, on winding roads, on crossroads.
Maintenance
Clean the windscreen regularly,
particularly the area in front of the camera.
The internal surface of the windscreen can
also become misted around the camera.
In humid and cold weather, demist the
windscreen regularly.
Do not allow snow to accumulate on the
bonnet or roof of the vehicle as this could
obstruct the camera.
Automatic headlamp
dipping
For more information, refer to the General
recommendations for automatic lighting
systems.
With the ring of the lighting control stalk in the
"AUTO" position and the function activated on the
touch screen, this system automatically switches
between dipped and main beam headlamps,
Page 111 of 244

109
Driving06
instrument panel, accompanied by the display of
a message.
Have it checked by a dealer or a qualified
workshop.
Gear shift indicator
(Depending on engine)
This system is designed to reduce fuel
consumption by recommending the most suitable
gear.
Operation
Depending on the driving situation and the
vehicle's equipment, the system may recommend
skipping one or more gears.
Gear engagement recommendations are not to be
considered mandatory. Indeed, the configuration
of the road, the traffic density and safety remain
determining factors when choosing the best
gear. Therefore, the driver remains responsible
for deciding whether or not to follow the system’s
advice.
The system cannot be deactivated.
The system is only active in mode M of the
automatic gearbox.
The information appears on the instrument
panel, in the form of an arrow and the
recommended gear.
The system adapts the gear change
instructions according to the driving
conditions (e.g. slope, load) and driving style
(e.g. power demand, acceleration, braking).
The system never suggests:
–
engaging first gear
.
–
engaging re
verse gear.
Stop & Start
The Stop & Start function puts the engine
temporarily into standby - STOP mode - during
phases when the vehicle is stationary (e.g. red
lights, traffic jams). The engine automatically
restarts - START mode - as soon as the driver
indicates the intention of moving off again.
Primarily designed for urban use, the function
is intended to reduce fuel consumption and
exhaust emissions as well as the noise level when
stationary.
The function does not affect the functionalities of
the vehicle, in particular the braking.
Deactivation/Reactivation
By default, the function is activated when the
ignition is switched on.
It is configured in the ADAS touch screen
application.
or
Direct access to the Shortcuts for driving aids.
The display of a message on the instrument panel
confirms the change of state.
If the function is deactivated while the engine is
in STOP mode, it will restart immediately.
Associated indicator lamps
Function activated: engine on standby
(STOP mode)
Function deactivated or malfunction
Opening the bonnet
Before doing anything under the bonnet,
deactivate the Stop & Start system to avoid
any risk of injury caused by the engine
restarting automatically.
Driving on flooded roads
Before entering into a flooded area, it is
strongly recommended that you deactivate the
Stop & Start system.
For more information on Driving
recommendations, particularly on flooded
roads, refer to the corresponding section.
Operation
Main conditions for operation
– The driver’s door must be closed.
– The driv er's seat belt must be fastened.
–
The le
vel of charge in the battery must be
sufficient.
–
The t
emperature of the engine must be within
its nominal operating range.
Page 156 of 244

154
Practical information07
the connector on the vehicle. A warning is
displayed on the instrument panel.
While charging is in progress, unlocking the
vehicle will cause the charging to stop.
If no action is taken on one of the openings
(door or boot) or on the charging nozzle, the
vehicle will lock again after 30 seconds and
charging will resume automatically.
Never work under the bonnet:
–
Some areas remain v
ery hot, even an hour
after charging ends - risk of burns!
–
The fan ma
y start at any time - risk of cuts or
strangulation!
After charging
Check that the charging flap is closed.
Do not leave the cable connected to the
domestic power socket - risk of short-circuit
or electrocution in the event of contact with or
immersion in water!
Charging procedure
Connection
► Before charging, check that the gear selector
is in mode P and the ignition is off, otherwise
charging is impossible.
► Press on the rear of the charging flap to open
it and check that there are no foreign bodies on
the vehicle's charging connector.
The light guides in the flap come on white.
Domestic charging (mode 2)
► First, connect the charging cable from the
control unit to the domestic socket.
When the connection is made, all of the indicator
lamps on the control unit light up, then only the
POWER indicator lamp remains on in green.
► Remove the protective cover from the
charging nozzle.
► Insert the nozzle into the vehicle's charging
connector.
The start of charging is confirmed by the flashing
of the green light guides in the flap and the
flashing of the CHARGE indicator lamp in green on
the control unit.
If this is not the case, charging has not started;
restart the procedure, ensuring that all of the
connections are properly established.
The red indicator lamp in the flap comes on to
indicate that the nozzle is locked.
Accelerated charging (mode 3)
► Follow the accelerated charging unit (Wallbox)
user instructions.
► Remove the protective cover from the
charging nozzle.
► Insert the nozzle into the vehicle's charging
connector.
The start of charging is confirmed by the flashing
of the green light guides in the flap.
If this is not the case, charging has not
started; restart the procedure ensuring that all
connections are properly established.
The red indicator lamp in the flap comes on to
indicate that the nozzle is locked.
Disconnection
Before disconnecting the nozzle from the
charging connector:
► If the vehicle is locked, unlock it.
Page 161 of 244

159
Practical information07
For more information, contact a dealer or a
qualified workshop.
Installation tips
► To fit the snow chains during a journey, stop
the vehicle on a flat surface at the side of the
road.
► Apply the parking brake and position any
wheel chocks under the wheels to prevent
movement of the vehicle.
► Fit the snow chains following the instructions
provided by the manufacturer.
► Move off gently and drive for a few moments,
without exceeding 31 mph (50 km/h).
► Stop the vehicle and check that the snow
chains are correctly tightened.
It is strongly recommended that you
practise fitting the snow chains on a level
and dry surface before setting off.
Avoid driving with snow chains on roads
that have been cleared of snow to avoid
damaging the vehicle's tyres and the road
surface. If the vehicle is fitted with alloy
wheels, check that no part of the chain or its
fixings is in contact with the wheel rim.
Rechargeable hybrid vehicles
The use of snow chains is only authorised
on the front wheels.
The driving mode selector must be on the 4WD
position (depending on version).
Energy economy mode
This system manages the duration of use of
certain functions, in order to conserve a sufficient
level of charge in the battery with the ignition off.
After switching off the engine and for a maximum
cumulative period of around 30 minutes, you can
continue to use functions such as the audio and
telematics system, dipped beam headlamps or
courtesy lamps.
Selecting the mode
A confirmation message is displayed when
energy economy mode is entered, and the active
functions are placed on standby.
If a telephone call is in progress at the
time, it will be maintained for around 10
minutes via the audio system’s hands-free
system.
Exiting the mode
These functions are automatically reactivated the
next time the vehicle is used.
To restore the use of these functions immediately,
start the engine and let it run:
–
For le
ss than 10 minutes, to use the equipment
for approximately 5 minutes.
–
For more than 10 minut
es, to use the equipment
for approximately 30 minutes.
Let the engine run for the specified duration to
ensure that the battery charge is sufficient.
To recharge the battery, avoid repeatedly or
continuously restarting the engine.
A flat battery prevents the engine from
starting.
For more information on the 12 V battery, refer
to the corresponding section.
Load reduction mode
This system manages the use of certain functions
according to the level of charge remaining in the
battery.
When the vehicle is being driven, the load
reduction function temporarily deactivates
certain functions, such as the air conditioning
and the heated rear screen.
The deactivated functions are reactivated
automatically as soon as conditions permit.
Bonnet
Stop & Start
Before doing anything under the bonnet,
you must switch off the ignition to avoid any
risk of the engine restarting automatically.
Take care with objects or clothing that could
be caught in the blades of the cooling fan
Page 162 of 244

160
Practical information07
or in certain moving components - risk of
strangulation and serious injury!
Rechargeable hybrid vehicles
Before any work is carried out under the
bonnet, it is essential to switch off the ignition
and disconnect the charging connector nozzle
if it is connected, check that the READY
indicator lamp is off on the instrument panel
and wait 4 minutes - risk of serious injury!
The location of the interior bonnet release
lever prevents the bonnet being opened
when the left-hand front door is closed.
When the engine is hot, handle the
exterior safety catch with care (risk of
burns), using the protected area.
When the bonnet is open, take care not to
damage the safety catch.
Do not open the bonnet under very windy
conditions.
Cooling of the engine when stopped
The engine cooling fan may start after the
engine has been switched off.
Take care with objects or clothing that could
be caught in the blades of the fan!
Opening
► From the inside: pull the control lever, located
on the left below the dashboard, towards you.
► From the outside: lift the safety catch and
raise the bonnet.
A bonnet strut opens the bonnet and holds it
open.
Closing
► Lower the bonnet and release it near the end
of its travel.
► Check the locking.
Because of the presence of electrical
equipment under the bonnet, it is strongly
recommended that exposure to water (rain,
washing, etc.) be limited.
Engine compartment
The engine shown here is an example for
illustrative purposes only.
The locations of the following components may
vary:
–
Air filt
er.
–
Engine oil dip
stick.
–
Engine oil filler c
ap.
–
Priming pump
.
–
Degas
sing screw.