towing CITROEN DS7 CROSSBACK 2020 Owners Manual
[x] Cancel search | Manufacturer: CITROEN, Model Year: 2020, Model line: DS7 CROSSBACK, Model: CITROEN DS7 CROSSBACK 2020Pages: 244, PDF Size: 6.87 MB
Page 5 of 244
3
Contents
137 Parking sensors
138 Reversing camera
140 360 Vision
07 Practical information
143 Compatibility of fuels
143 Refuelling
144 Misfuel prevention (Diesel)
145 Rechargeable hybrid system
153 Charging the traction battery
(Rechargeable hybrid)
155
Towing device
156 Towing device with retractable ball joint
157 Roof bars
158 Very cold climate screens
158 Snow chains
159 Energy economy mode
159 Bonnet
160 Engine compartment
161 Checking levels
163 Checks
165 AdBlue® (BlueHDi)
166 Free-wheeling
167 Advice on care and maintenance
08 In the event of a breakdown
170 Warning triangle
170 Running out of fuel (Diesel)
170 Tool kit
172 Temporary puncture repair kit
175 Spare wheel
178 Changing a bulb
180 Fuses
181 12 V battery/Accessory batteries
186 Towing the vehicle
09 Technical data
189 Engine technical data and towed loads
190 Petrol engines
191 Diesel engines
192 Rechargeable hybrid engines
193 Dimensions
193 Identification markings
10 DS IRIS SYSTEM - 12" touch screen Infotainment
system
194
First steps
197 Customisation
198 Steering mounted controls
198 Applications
199 Voice commands
200 Navigation
201 Connectivity
203 Mirror Screen
204 Media
206 Phone
207 Settings
208 Help
11 Vehicle data recording and privacy
Alphabetical index
Appendix
Page 36 of 244

34
Access02
– monitor the activity of the rear passengers,
particularly any children.
Bicycle carrier/Towing device
The motorised tailgate is not designed to support
a bicycle carrier.
When installing a bicycle carrier on the towing
device with connection of the cable to the trailer
socket, the motorised operation of the tailgate
will be automatically deactivated.
If using a towing device or bicycle carrier
not recommended by the Manufacturer, it
is essential to deactivate the motorised
operation of the tailgate.
Motorised operation
The motorised operation of the tailgate is
configured in the Settings > Vehicle touch
screen application.
There are several ways of operating the tailgate:
A. Using the Keyless Entry and Start system’s
electronic key
B. Using the exterior tailgate control
C. Using the interior tailgate control
D. Using the control on the dashboard
Opening
► A long press on the central button A of the
electronic key.
or
► A short press on the exterior tailgate control B,
with the electronic key on your person.
or
► Two consecutive presses on the control D on
the dashboard.
The tailgate opens, either completely by
default, or to the position memorised
beforehand.
If motorised operation is not activated, these
actions release the tailgate (partially-open
position).
When the vehicle is locked, the request to open
the boot with one of the controls A or B unlocks
the vehicle, or only the boot if selective
unlocking is activated, prior to the opening of
the boot.
Closing
► A short press on the interior tailgate control C.
It is possible to interrupt the operation of
the tailgate at any point.
Pressing one of these controls again interrupts
the movement that is underway.
Memorising an opening
position
To limit the opening angle of the motorised
tailgate:
► move the tailgate to the desired position
manually or by pressing the button.
► press button C or the exterior control B for
more than 3 seconds (memorisation is confirmed
by a brief audible signal).
A new memorisation operation cancels the
previous one.
Page 38 of 244
36
Access02
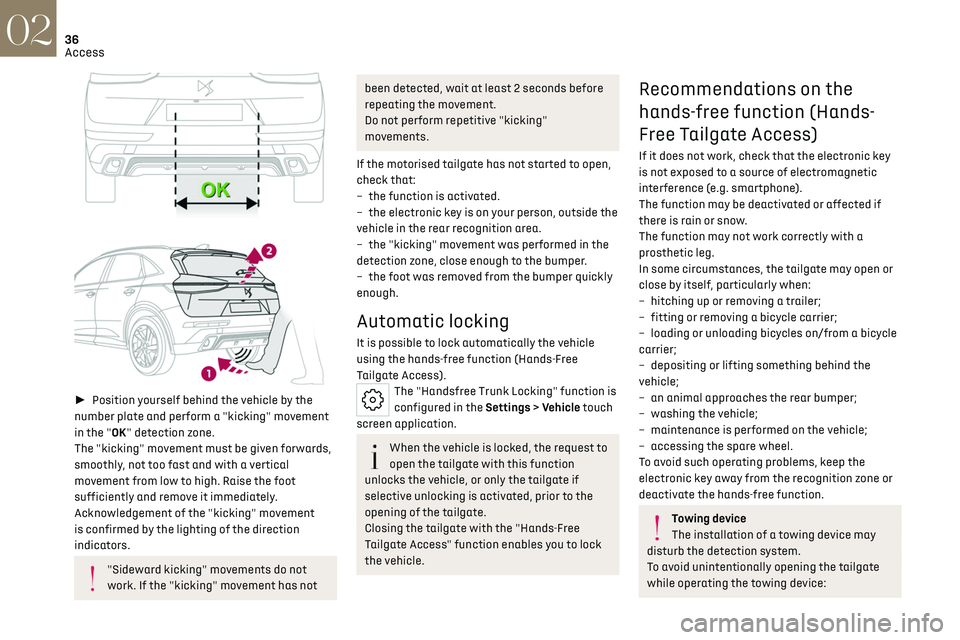
► Position yourself behind the vehicle by the
number plate and perform a "kicking" movement
in the "OK" detection zone.
The "kicking" movement must be given forwards,
smoothly, not too fast and with a vertical
movement from low to high. Raise the foot
sufficiently and remove it immediately.
Acknowledgement of the "kicking" movement
is confirmed by the lighting of the direction
indicators.
"Sideward kicking" movements do not
work. If the "kicking" movement has not
been detected, wait at least 2 seconds before
repeating the movement.
Do not perform repetitive "kicking"
movements.
If the motorised tailgate has not started to open,
check that:
–
the function is activ
ated.
–
the electronic k
ey is on your person, outside the
vehicle in the rear recognition area.
–
the "kicking" mo
vement was performed in the
detection zone, close enough to the bumper.
–
the foo
t was removed from the bumper quickly
enough.
Automatic locking
It is possible to lock automatically the vehicle
using the hands-free function (Hands-Free
Tailgate Access).
The "Handsfree Trunk Locking" function is
configured in the Settings > Vehicle touch
screen application.
When the vehicle is locked, the request to
open the tailgate with this function
unlocks the vehicle, or only the tailgate if
selective unlocking is activated, prior to the
opening of the tailgate.
Closing the tailgate with the "Hands-Free
Tailgate Access" function enables you to lock
the vehicle.
Recommendations on the
hands-free function (Hands-
Free Tailgate Access)
If it does not work, check that the electronic key
is not exposed to a source of electromagnetic
interference (e.g. smartphone).
The function may be deactivated or affected if
there is rain or snow.
The function may not work correctly with a
prosthetic leg.
In some circumstances, the tailgate may open or
close by itself, particularly when:
–
hit
ching up or removing a trailer;
–
fitting or remo
ving a bicycle carrier;
–
loading or unloading bic
ycles on/from a bicycle
carrier;
–
depo
siting or lifting something behind the
vehicle;
–
an animal approache
s the rear bumper;
–
w
ashing the vehicle;
–
main
tenance is performed on the vehicle;
–
ac
cessing the spare wheel.
To avoid such operating problems, keep the
electronic key away from the recognition zone or
deactivate the hands-free function.
Towing device
The installation of a towing device may
disturb the detection system.
To avoid unintentionally opening the tailgate
while operating the towing device:
Page 39 of 244

37
Access02
► remove the electronic key from the
recognition zone, with the tailgate closed.
For more information on the Towing device
with quickly detachable towball, refer to the
corresponding section.
Alarm
(Depending on version)
System which protects and provides a deterrent
against theft and break-ins.
Exterior perimeter monitoring
The system checks for opening of the vehicle.
The alarm is triggered if anyone tries to open a
door, the boot or the bonnet, for example.
Interior volumetric monitoring
The system checks for any variation in volume in
the passenger compartment.
The alarm is triggered if anyone breaks a window,
enters the passenger compartment or moves
inside the vehicle.
Anti-tilt monitoring
The system checks for any change in the attitude
of the vehicle.
The alarm goes off if the vehicle is lifted or moved.
When the vehicle is parked, the alarm will
not be triggered if the vehicle is knocked.
Self-protection function
The system checks whether any of its
components are out of service.
The alarm is triggered if the battery, the central
control or the siren wiring is put out of service or
damaged.
Work on the alarm system
Contact a dealer or a qualified workshop.
Locking the vehicle with full
alarm system
Activation
► Switch off the ignition and exit the vehicle.
► Lock or deadlock the vehicle using the remote
control or with the Keyless Entry and Start
system.
When the monitoring system is active, the red
indicator lamp in the button flashes once per
second and the direction indicators come on for
about 2 seconds.
The exterior perimeter monitoring is activated
after 5 seconds and the interior volumetric and
anti-tilt monitoring after 45 seconds.
Door, boot or bonnet
If an opening is not properly closed, the
vehicle is not locked, but the exterior perimeter
monitoring will be activated after 45 seconds,
at the same time as the interior volumetric and
anti-tilt monitoring.
Sunroof
If the sunroof remains open, the vehicle
is locked with exterior perimeter monitoring
activated but without interior volumetric or
anti-tilt monitoring.
Deactivation
► Press one of the remote control unlocking
buttons:
short press
long press
or
► Unlock the vehicle with the Keyless Entry and
Start system.
The monitoring system is deactivated: the
indicator lamp in the button goes off and the
direction indicators flash for about 2 seconds.
If the vehicle automatically locks itself
again (as happens if a door or the boot is
Page 50 of 244
48
Ease of use and comfort03
Rechargeable hybrid vehicles
An LED, located below the interior
rear view mirror and visible from outside
the vehicle, lights up blue to indicate that
the vehicle is being driven in Electric mode
(depending on country of sale).
Rear seats
Rear head restraints
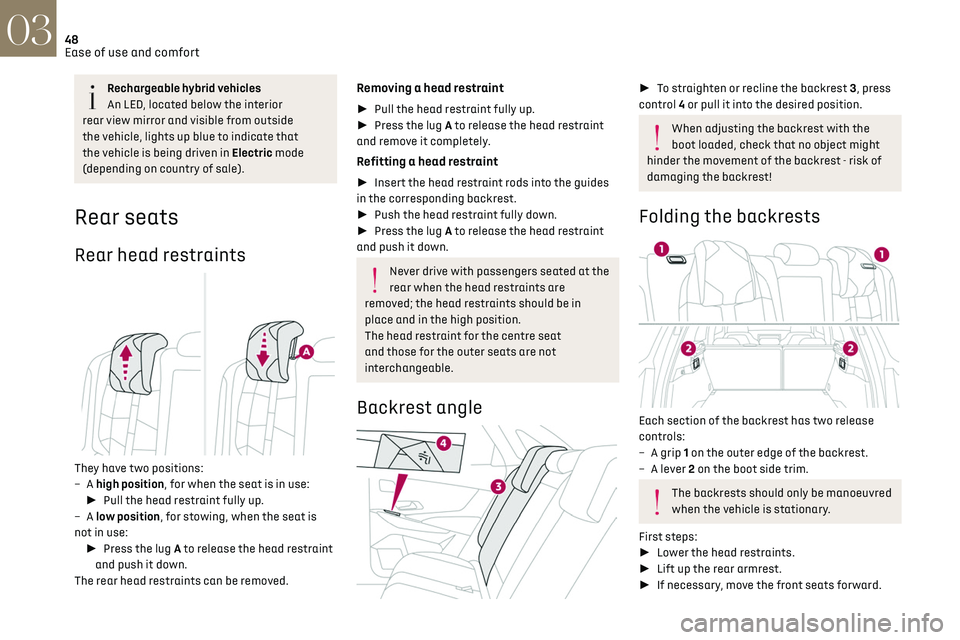
They have two positions:
– A high position, for when the seat is in use:
► Pull the head restraint fully up.
–
A low position, for stowing, when the seat is
not in use: ► Press the lug A to release the head restraint
and push it down.
The rear head restraints can be removed.
Removing a head restraint
► Pull the head restraint fully up.
► Press the lug A to release the head restraint
and remove it completely.
Refitting a head restraint
► Insert the head restraint rods into the guides
in the corresponding backrest.
► Push the head restraint fully down.
► Press the lug A to release the head restraint
and push it down.
Never drive with passengers seated at the
rear when the head restraints are
removed; the head restraints should be in
place and in the high position.
The head restraint for the centre seat
and those for the outer seats are not
interchangeable.
Backrest angle
► To straighten or recline the backrest 3, press
control 4 or pull it into the desired position.
When adjusting the backrest with the
boot loaded, check that no object might
hinder the movement of the backrest - risk of
damaging the backrest!
Folding the backrests
Each section of the backrest has two release
controls:
–
A grip
1 on the outer edge of the backrest.
–
A le
ver 2 on the boot side trim.
The backrests should only be manoeuvred
when the vehicle is stationary.
First steps:
► Lower the head restraints.
► Lift up the rear armrest.
► If necessary, move the front seats forward.
Page 52 of 244
50
Ease of use and comfort03
Air distribution
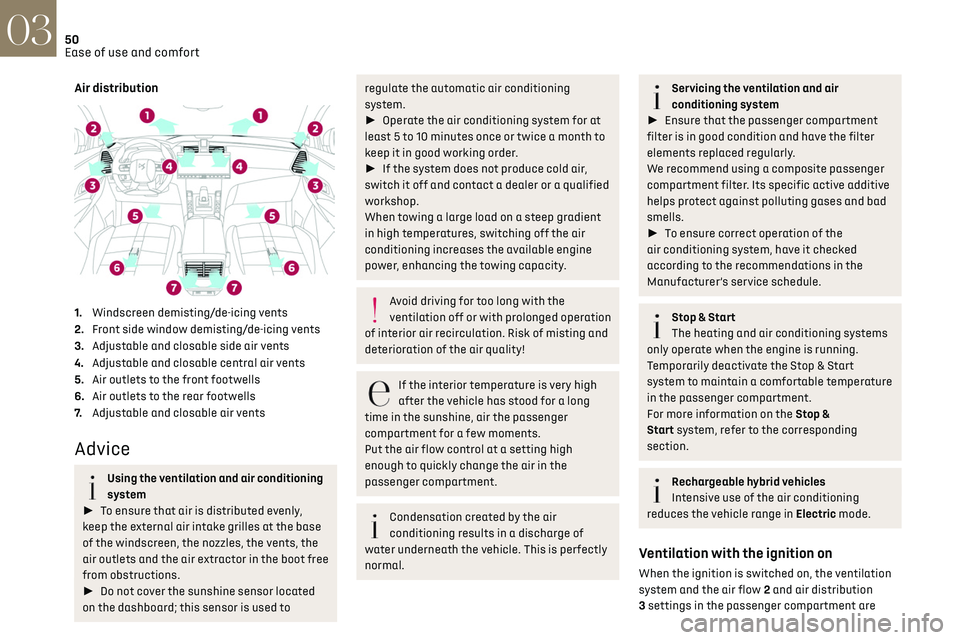
1.Windscreen demisting/de-icing vents
2. Front side window demisting/de-icing vents
3. Adjustable and closable side air vents
4. Adjustable and closable central air vents
5. Air outlets to the front footwells
6. Air outlets to the rear footwells
7. Adjustable and closable air vents
Advice
Using the ventilation and air conditioning
system
► To ensure that air is distributed evenly,
keep the external air intake grilles at the base
of the windscreen, the nozzles, the vents, the
air outlets and the air extractor in the boot free
from obstructions.
► Do not cover the sunshine sensor located
on the dashboard; this sensor is used to
regulate the automatic air conditioning
system.
► Operate the air conditioning system for at
least 5 to 10 minutes once or twice a month to
keep it in good working order.
► If the system does not produce cold air,
switch it off and contact a dealer or a qualified
workshop.
When towing a large load on a steep gradient
in high temperatures, switching off the air
conditioning increases the available engine
power, enhancing the towing capacity.
Avoid driving for too long with the
ventilation off or with prolonged operation
of interior air recirculation. Risk of misting and
deterioration of the air quality!
If the interior temperature is very high
after the vehicle has stood for a long
time in the sunshine, air the passenger
compartment for a few moments.
Put the air flow control at a setting high
enough to quickly change the air in the
passenger compartment.
Condensation created by the air
conditioning results in a discharge of
water underneath the vehicle. This is perfectly
normal.
Servicing the ventilation and air
conditioning system
► Ensure that the passenger compartment
filter is in good condition and have the filter
elements replaced regularly.
We recommend using a composite passenger
compartment filter. Its specific active additive
helps protect against polluting gases and bad
smells.
► To ensure correct operation of the
air conditioning system, have it checked
according to the recommendations in the
Manufacturer’s service schedule.
Stop & Start
The heating and air conditioning systems
only operate when the engine is running.
Temporarily deactivate the Stop & Start
system to maintain a comfortable temperature
in the passenger compartment.
For more information on the Stop &
Start system, refer to the corresponding
section.
Rechargeable hybrid vehicles
Intensive use of the air conditioning
reduces the vehicle range in Electric mode.
Ventilation with the ignition on
When the ignition is switched on, the ventilation
system and the air flow 2 and air distribution
3 settings in the passenger compartment are
Page 62 of 244
60
Ease of use and comfort03
By default, the colour of the interior ambient
lighting is linked to that of the screens, depending
on the driving mode selected.
Activation/deactivation and adjustment of
the brightness are set via the Settings >
Brightness touch screen application.
The colour is selected via the Settings >
Customization touch screen application.
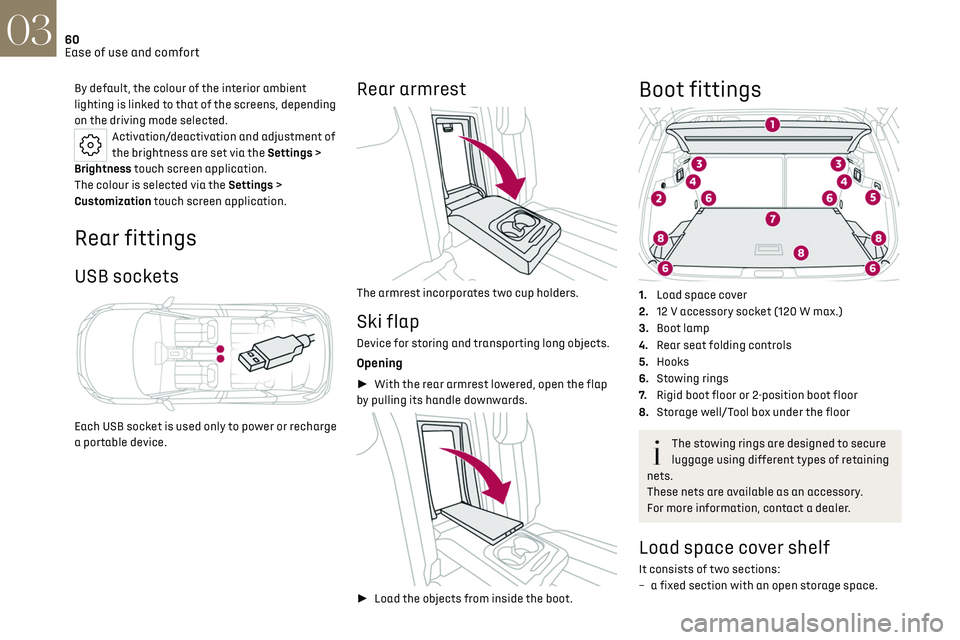
Rear fittings
USB sockets
Each USB socket is used only to power or recharge
a portable device.
Rear armrest
The armrest incorporates two cup holders.
Ski flap
Device for storing and transporting long objects.
Opening
► With the rear armrest lowered, open the flap
by pulling its handle downwards.
► Load the objects from inside the boot.
Boot fittings
1.Load space cover
2. 12 V accessory socket (120 W max.)
3. Boot lamp
4. Rear seat folding controls
5. Hooks
6. Stowing rings
7. Rigid boot floor or 2-position boot floor
8. Storage well/Tool box under the floor
The stowing rings are designed to secure
luggage using different types of retaining
nets.
These nets are available as an accessory.
For more information, contact a dealer.
Load space cover shelf
It consists of two sections:
– a fix ed section with an open storage space.
Page 75 of 244

73
Lighting and visibility04
Windscreen wash
► Pull the wiper control stalk towards you and
hold.
A final wiping cycle is performed when
screenwashing ends.
The windscreen wash jets are
incorporated into the tip of each wiper
arm.
Screenwash fluid is sprayed along the length
of the wiper blade. This improves visibility and
reduces screenwash fluid consumption.
To avoid damaging the wiper blades, do
not operate the screenwash if the
screenwash reservoir is empty.
Only operate the screenwash if there is no risk
of the fluid freezing on the windscreen and
hindering visibility. During the winter period,
use "very cold climate" rated products.
Never top up with water.
Rear wiper
► Turn the ring to align the desired symbol with
the marking.
Off
Intermittent wiping
Screenwash-wipe
Reverse
When reverse gear is engaged, the rear wiper will
come into operation automatically if the front
windscreen wipers are operating.
It is configured in the Settings > Vehicle
touch screen application.
In the event of accumulation of snow or
hard frost or if a bicycle carrier is fitted to
a towing system, deactivate the automatic
rear wiper via theSettings > Vehicle touch
screen application.
Rear screenwash
► Turn the ring as far as it will go and hold it in
position.
The screenwash and the wiper operate for as long
as the ring remains turned.
A final wiping cycle is performed when screen
washing ends.
Special position of the
windscreen wipers
This maintenance position is used while cleaning
or replacing the wiper blades. It can also be
useful, in wintry weather (ice, snow), to release
the wiper blades from the windscreen.
To maintain the effectiveness of the flat
wiper blades, it is advisable to:
–
handle them with c
are.
–
clean them regularly using soap
y water.
–
a
void using them to hold cardboard on the
windscreen.
–
replac
e them at the first signs of wear.
Before removing a windscreen wiper blade
Operating the wiper control stalk immediately
after switching off the ignition will place the
wiper blades in a vertical position.
► Proceed with the desired operation or the
replacement of the wiper blades.
After refitting a windscreen wiper blade
► To return the wiper blades to their initial
position after the operation, switch on the ignition
and operate the wiper control stalk.
Page 83 of 244
81
Safety05
All tyre specifications are listed on the
tyre/paint label. For more information
on Identification markings, refer to the
corresponding section.
Trailer stability assist (TSA)
When towing, this system reduces the risk of the
vehicle or trailer snaking.
Operation
The system is activated automatically when the
ignition is switched on.
The electronic stability control system (ESC) must
not have any faults.
The vehicle speed must be between 37 and 99
mph (60 and 160 km/h).
If the system detects that the trailer is
snaking, it applies the brakes to stabilise
the trailer and reduces engine power, if necessary,
to slow the vehicle (indicated by the flashing of
this warning lamp on the instrument panel and
the brake lamps coming on).
For information on weights and towed loads, refer
to the Engine technical data and towed loads
section or your vehicle’s registration certificate.
To ensure safe driving with a Towing device, refer
to the corresponding section.
Malfunction
If a fault occurs, this warning lamp lights
up on the instrument panel, accompanied
by a message and an audible signal.
To continue towing a trailer, reduce speed and
drive carefully!
Have it checked by a dealer or a qualified
workshop.
The trailer stability control system
provides an extra safety feature under
normal driving conditions, when following the
recommendations for use of trailers and
current legislation in force in your country. It
must not encourage the driver to take extra
risks, such as using a trailer in unsuitable
conditions of operation (e.g. excessive load,
exceeded nose weight, worn or under-inflated
tyres, faulty braking system) or driving at
excessive speed.
In certain cases, the system may not detect
trailer snaking, particularly with a light trailer.
When driving on slippery or poor surfaces, the
system may not be able to prevent sudden
trailer snaking.
Seat belts
Inertia reel
The seat belts are equipped with an inertia
reel which allows the strap length to adjust
automatically to the shape of the user. The seat
belt returns to its storage automatically when it
is not used.
The inertia reels are fitted with a device which
automatically locks the strap in the event of a
collision, emergency braking or if the vehicle rolls
over. It can be released by pulling the strap firmly
and then releasing it so that it reels in slightly.
Pyrotechnic pretensioning
This system improves safety in the event of a
frontal or side impact.
Depending on the severity of the impact, the
pyrotechnic pretensioning system instantly
tightens the seat belts against the body of the
occupants.
The pyrotechnic pretensioning seat belts are
enabled when the ignition is on.
Force limiting system
This system reduces the pressure of the seat belt
on the chest of the occupant, thus improving their
protection.
In the event of an impact
Depending on the nature and seriousness
of the impacts, the pyrotechnic device may
trigger before and independently of airbag
deployment. Deployment of the pretensioners
is accompanied by a slight discharge of
harmless smoke and a noise, due to the
activation of the pyrotechnic cartridge
incorporated in the system.
In all cases, the airbag warning lamp comes
on.
Following an impact, have the seat belt system
checked, and if necessary replaced, by a dealer
or a qualified workshop.
Page 99 of 244
97Driving06
► Do not stop and do not switch off the engine.
On leaving the flooded road, as soon as safety
conditions allow, make several light brake
applications to dry the brake discs and pads.
If in doubt about the state of your vehicle, contact
a dealer or a qualified workshop.
Towing
Driving with a trailer places greater
demands on the towing vehicle and
particular care must be taken.
Do not exceed the maximum towable
weights.
At altitude: reduce the maximum load by 10%
per 1,000 metres of altitude; the lower air
density at high altitudes decreases engine
performance.
New vehicle: do not tow a trailer until the
vehicle has driven at least 620 miles
(1,000 kilometres).
If the outside temperature is high, let the
engine idle for 1 to 2 minutes after the
vehicle comes to a stop, to help it to cool.
Before setting off
Nose weight
► Distribute the load in the trailer so that the
heaviest items are as close as possible to the axle
and the nose weight (at the point where it joins
your vehicle) approaches the maximum permitted
without exceeding it.
Tyres
► Check the tyre pressures of the towing vehicle
and of the trailer, observing the recommended
pressures.
Lighting
► Check the electrical signalling on the trailer
and the headlamp beam height of your vehicle.
If a genuine towing device is used, the
rear parking sensors will be deactivated
automatically to avoid the audible signal.
When driving
Cooling
Towing a trailer uphill causes the coolant
temperature to increase. The maximum towable
load depends on the gradient and the exterior
temperature. The fan’s cooling capacity does not
increase with engine speed.
► Reduce speed and lower the engine speed to
limit the amount of heating produced.
► Pay constant attention to the coolant
temperature.
If this warning lamp and the STOP
warning lamp come on, stop the
vehicle and switch off the engine as soon as
possible.
Brakes
Using the engine brake is recommended to limit
the overheating of the brakes. Braking distances
are increased when towing a trailer.
Side wind
Bear in mind that the vehicle will be more
susceptible to wind when towing.
Anti-theft protection
Electronic immobiliser
The keys contain a code, which must be
recognised by the vehicle before starting is
possible.
If the system malfunctions, indicated by the
display of a message, the engine will not start.
Contact a dealer.
Starting/switching off the
engine
The electronic key must be present in the
passenger compartment.
If the electronic key is not detected, a message
is displayed.