ESP CITROEN DS7 CROSSBACK 2022 Manual Online
[x] Cancel search | Manufacturer: CITROEN, Model Year: 2022, Model line: DS7 CROSSBACK, Model: CITROEN DS7 CROSSBACK 2022Pages: 244, PDF Size: 6.87 MB
Page 177 of 244

175
In the event of a breakdown08
Spare wheel
Visit this link to view explanatory videos:
http://q-r.to/bagGl9
For more information on the Tool kit, refer
to the corresponding section.
Accessing the spare wheel
The spare wheel is stored in the boot, under the
floor.
To access the spare wheel, first refer to the Tool
kit section.
Depending on version, the spare wheel
may be a standard size steel or alloy
wheel.
In some countries, it is a ‘space saver’ wheel.
Removing the spare wheel
► Slacken the central nut.
► Remove the fastening device (nut and bolt).
► Lift the spare wheel towards the back of the
boot.
► Take the wheel out of the boot.
Putting the spare wheel back in place
► Put the spare wheel back in place in its
housing.
► Slacken the nut on the bolt by a few turns.
► Position the fastening device (nut and bolt) in
the middle of the wheel.
► Tighten the central nut sufficiently to retain
the wheel correctly.
► Put the tool box back in place in the middle of
the wheel and clip it in place.
Removing a wheel
Parking the vehicle
Immobilise the vehicle where it does not
obstruct traffic: the ground must be level,
stable and non-slippery.
Select mode P on the automatic gearbox to
lock the wheels, apply the parking brake,
unless it is set to automatic mode, and switch
off the ignition.
Page 182 of 244
180
In the event of a breakdown08
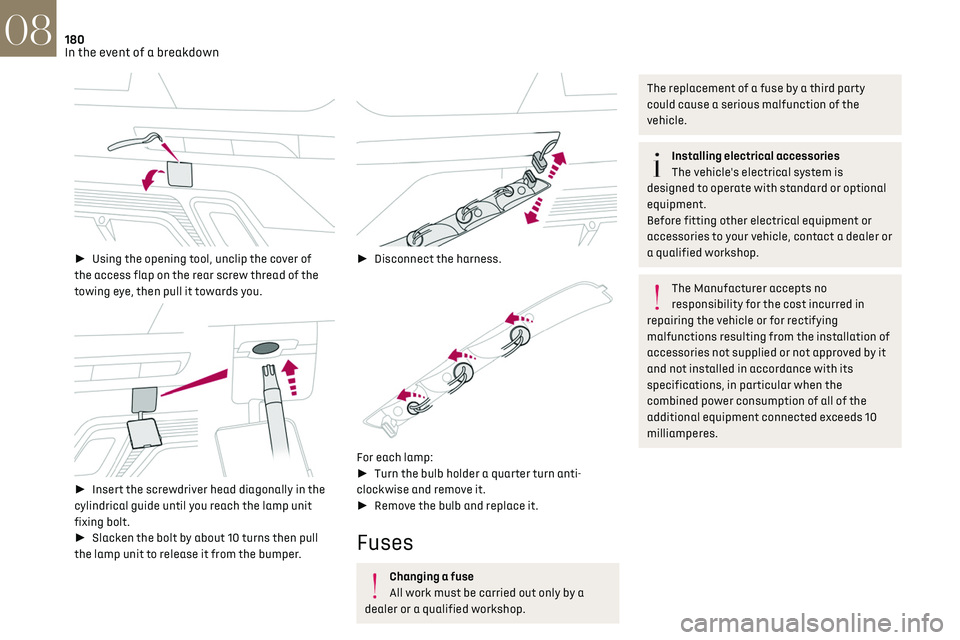
► Using the opening tool, unclip the cover of
the access flap on the rear screw thread of the
towing eye, then pull it towards you.
► Insert the screwdriver head diagonally in the
cylindrical guide until you reach the lamp unit
fixing bolt.
► Slacken the bolt by about 10 turns then pull
the lamp unit to release it from the bumper.
► Disconnect the harness.
For each lamp:
► Turn the bulb holder a quarter turn anti-
clockwise and remove it.
► Remove the bulb and replace it.
Fuses
Changing a fuse
All work must be carried out only by a
dealer or a qualified workshop.
The replacement of a fuse by a third party
could cause a serious malfunction of the
vehicle.
Installing electrical accessories
The vehicle's electrical system is
designed to operate with standard or optional
equipment.
Before fitting other electrical equipment or
accessories to your vehicle, contact a dealer or
a qualified workshop.
The Manufacturer accepts no
responsibility for the cost incurred in
repairing the vehicle or for rectifying
malfunctions resulting from the installation of
accessories not supplied or not approved by it
and not installed in accordance with its
specifications, in particular when the
combined power consumption of all of the
additional equipment connected exceeds 10
milliamperes.
Page 189 of 244

187
In the event of a breakdown08
Towing constraints
Type of vehicle
(engine/gearbox) Front wheels on the
ground Rear wheels on the ground
Flatbed4 wheels on the ground
with towbar
Hybrid 4WD
2WD: 2-wheel drive.
4WD: 4-wheel drive.
In case of battery or electric parking brake failure, it is essential to call a professional using flatbed recovery vehicles.
Accessing the tools
The opening tool for the rear protective cover is
secured to the towing eye.
For more information on accessing the Tool kit,
refer to the corresponding section.
Towing your vehicle
To access the front screw thread:
►
Unclip the cover by pressing at its top left-
hand corner.
► Release the cover.
To be towed:
► Screw the towing eye in fully.
► Install the towbar.
► Put the gearbox into neutral.
Failure to observe this instruction could
result in damage to certain components
(e.g. braking, transmission) and to the absence
of braking assistance the next time the engine
is started.
Never tow the vehicle with the driving
wheels on the ground and the engine off.
► Unlock the steering and release the parking
brake.
► Switch on the hazard warning lamps on both
vehicles in accordance with the legislation in
force in the country in which you are driving.
► Move off gently, drive slowly and only for a
short distance.
Towing another vehicle
To access the rear screw thread:
Page 191 of 244
189Technical data09
Engine technical data and
towed loads
Engines
The engine characteristics are given in the
vehicle's registration document, as well as in
sales brochures.
Only the values available at the time of
publication are presented in the tables.
Contact a dealer or a qualified workshop to obtain
missing values.
The maximum power corresponds to the
value type-approved on a test bed, under
conditions defined by European legislation
(Directive 1999/99/EC).
For more information, contact a dealer or a
qualified workshop.
Weights and towed loads
The weights and towed loads relating to
the vehicle are indicated on the registration
document, as well as in sales brochures.
These values are also indicated on the
manufacturer's plate or label.
For more information, contact a dealer or a
qualified workshop.
The GTW (Gross Train Weight) and towed load
values indicated are valid up to a maximum
altitude of 1,000 metres. The towed load value
must be reduced by 10% for each additional 1,000
metres of altitude.
The maximum authorised nose weight
corresponds to the weight permitted on the
towball.
When exterior temperatures are high, the
vehicle performance may be limited in
order to protect the engine. When the exterior
temperature is higher than 37°C, reduce the
towed weight.
Towing even with a lightly loaded vehicle
can adversely affect its road holding.
Braking distances are increased when towing
a trailer.
When using a vehicle to tow, never exceed a
speed of 62 mph (100 km/h) (observe the local
legislation in force).
Page 192 of 244
190Technical data09
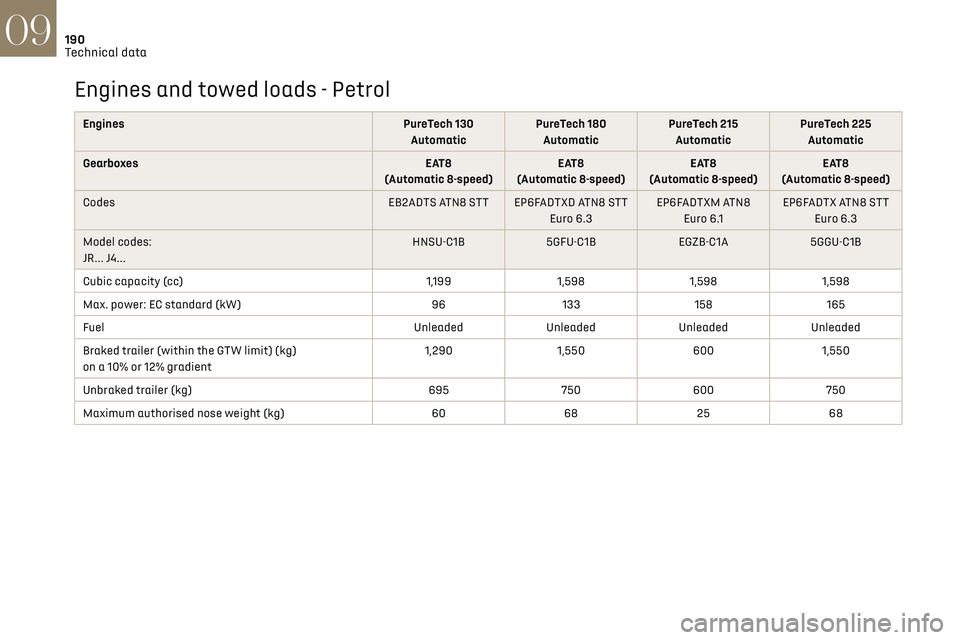
Engines and towed loads - Petrol
EnginesPureTech 130
Automatic PureTech 180
Automatic PureTech 215
Automatic PureTech 225
Automatic
Gearboxes EAT8
(Automatic 8-speed) EAT8
(Automatic 8-speed) EAT8
(Automatic 8-speed) EAT8
(Automatic 8-speed)
Codes EB2ADTS ATN8 STT EP6FADTXD ATN8 STT
Euro 6.3EP6FADTXM ATN8
Euro 6.1 EP6FADTX ATN8 STT
Euro 6.3
Model codes:
JR... J4... HNSU-C1B
5GFU-C1BEGZB-C1A5GGU-C1B
Cubic capacity (cc) 1,1991,598 1,5981,598
Max. power: EC standard (kW) 96133 158165
Fuel UnleadedUnleadedUnleadedUnleaded
Braked trailer (within the GTW limit) (kg)
on a 10% or 12% gradient 1,290
1,550 6001,550
Unbraked trailer (kg) 695750600 750
Maximum authorised nose weight (kg) 6068 2568
Page 197 of 244
195DS IRIS SYSTEM - 12" touch screen Infotainment system10
– Time.
– Q uick access to the Mirror Screen® functions
(associated with a connected smartphone).
Swipe down from the upper edge of the touch
screen to access the notifications centre and
display a list of quick settings :Guest, Privacy
Settings, Brightness, My Devices, night mode, etc.
Principles
► Use this button (HOME) to display the
most recent home page used; a second
press displays the first home page, then press the
virtual buttons displayed on the touch screen.
Scroll through the home pages by sliding
your finger along the screen to the right or
to the left.
Principle of movement in the system
Depending on the pages displayed on the screen,
scroll through the text or the menu (on the left
side of the screen) by sliding your finger, as with
a smartphone.
Touch buttons
Display/hide the context menu.
Return to the previous page.
► To change the status of a function, press the
description for the corresponding line (change
confirmed by the slider moving to the right/left:
function activated/deactivated).
Access to additional information about the
function.
Access to a function’s settings.
Add/delete shortcuts.
Configuring profiles
Press the "Settings" application.
In the list, select the "Profile" tab.
The screen displays a "Guest" profile built
into the system and allows you to create and
personalise several new profiles with or without
an associated mobile device.
The "Guest" profile has a default display
with the possibility of adding to it and/or
returning it to its initial configuration. This profile
is built into the system and cannot be deleted.
Each profile created can be associated
with a mobile device of your choice
connected via Bluetooth
®; the Bluetooth® function
of the mobile device must first be activated. This
association allows the system to detect your
presence in the vehicle when it starts and to
propose the activation of your personalised
profile.
The connected mobile device serves as an access
key to the profile and restores the last value of the
associated Private Mode.
If a profile is not connected to the mobile device,
the last profile used will be highlighted.
Select "Create Profile", then follow the
procedure.
Creating a new profile allows you to personalise: –
Language
, units, Privacy Settings.
–
Screen c
onfiguration, appearance, SMART
TOUCH (depending on equipment).
–
Audio settings, fa
vourite radio stations.
–
Ligh
ting, interior ambience (refer to the "Ease
of use and comfort" section).
–
Na
vigation history, favourite points of interest
(POIs), navigation settings.
–
Some driving aids and the list o
f favourites.
To delete a profile, select it from the list of
profiles then press the bin.
Privacy Settings
"Privacy Settings" management is associated
with each profile. This function is used with:
a "Guest" profile configured by default in "Sharing
Data and Location" mode,
or
a profile to be created in the system, with or
without connection to a mobile device.
If there is no connection to a mobile device, the
mode value will be set to "Sharing Data and
Location" mode.
The connected mobile device serves as an access
key to personal information. First activate the
Bluetooth
® function on the mobile device. The last
saved mode value will be restored.
"Sharing Data and Location"
This mode allows the vehicle to externally
transmit all the personal data needed for each
valid available connected service.
Page 199 of 244
197DS IRIS SYSTEM - 12" touch screen Infotainment system10
connected service will be carried out remotely,
in particular using "Over the Air" technology.
To do this, a secure connection via radio
network is established between the vehicle
and the Manufacturer's device management
server each time the ignition is switched on,
when a mobile telephone network is available.
Depending on the vehicle's equipment,
the connection configuration must be set
to "Connected vehicle" to enable to the
connection to the radio network.
Irrespective of a valid subscription to a
connected service, the remote management
of devices relating to or connected with
the security of devices, and the updating of
software and firmware, will be carried out
when necessary in order to comply with a legal
requirement applicable to the Manufacturer
(e.g. the applicable law in terms of product
liability, the regulations governing e-call) or
when necessary to protect the respective
vital interests of the vehicle's users and
passengers.
The establishment of a secure connection via
radio network and the corresponding remote
updates are not affected by the privacy
settings and are intended to be carried out
after being initialised by the user in response
to a related notification.
The system can notify the receipt of an update
when it is connected to an exterior Wi-Fi network
or a mobile telephone network.Large updates are downloaded only via the Wi-Fi
network.
The availability of an update is notified on the
screen at the end of the journey with an option
of immediate installation or postponement of
installation.
The installation time is variable and can take
several minutes with a maximum of about 30
minutes. A notification will give an estimate of the
duration and a description of the update.
Update information is available through the
"Settings" application.
Press the "Settings" application.
In the list, select the "Updates" tab.
This button allows you to change the
authorisation for automatic downloading
of updates via an exterior Wi-Fi network.
For safety reasons and because it
requires sustained attention on the part
of the driver, the installation must be carried
out with the ignition on but without starting
the engine.
The installation cannot be carried out in the
following cases:
–
engine running.
–
emergenc
y call in progress.
–
insufficien
t battery level.
–
when charging for electric v
ehicles.
If an update has failed or has expired, contact a
dealer or a qualified workshop.
The Manufacturer does not charge for the
use of this service.
However, the use of Wi-Fi and/or mobile
telephone networks by your smartphone may
incur extra charges if you exceed the data
allowance included in your contract.
Any associated costs will be billed to you by
your mobile telephone operator.
Personalisation
Press and hold the screen from one of the
system's home pages.
Or
Press the "Settings" application.
In the list, select the "Customization" tab.
Press the "Displays" field.
A page divided into 2 parts is displayed.
Press the HOME button at any time to leave this
page.
Personalising the screen
Press the pencil in the "Customize
Touchscreen" part.
A representation of the organisation of the
different home page (HOME) Widgets is
displayed.
A Widget is a reduced window of an
application or service.
Page 205 of 244

203
DS IRIS SYSTEM - 12" touch screen Infotainment system10
Mirror Screen®
When a smartphone is connected using
Mirror Screen®, the vehicle's location and
some vehicle data is sent to the smartphone
(e.g. brand, left-hand or right-hand drive, day/
night mode, physical speed).
Apple®CarPlay® smartphone
connection
Connecting just one Apple®CarPlay® smartphone
can be carried out either by USB cable or using a
wireless connection.
First activate the Siri® function on your
Apple® smartphone.
If the device fails to connect, refer to the Apple
website to check that the device is compatible
with this function.
If the problem persists, delete all saved
connections on the smartphone and on the
system before attempting a new connection.
The cable connection requires that you deactivate
the CarPlay function in the Settings, Bluetooth
menu of your smartphone.
In the Bluetooth menu, click on the "i" next to the
relevant vehicle and deactivate CarPlay.
Connect the smartphone to the system
using the USB socket compatible with
Mirror Screen.
Apple®CarPlay® is automatically launched a few
seconds after the USB connection has been
established. In some cases, it may be necessary
to unlock your device.
The smartphone charges when connected by the
USB cable.
The cable connection allows you to avoid
disconnections, especially when passing through
toll booths.
Only one USB socket enables the Mirror
Screen® connection (Apple®CarPlay®);
refer to the "Ease of use and comfort - Fittings"
section.
It is recommended that you use the device's
original USB cables, preferably with a short
cable to ensure optimum performance.
The wireless connection of an Apple
®CarPlay®
smartphone can be initiated from the "My
Devices" menu.
First activate the smartphone’s CarPlay
® function.
In the Bluetooth menu, click on the "i" next to the
relevant vehicle and activate CarPlay.
Press the "Settings" application.
In the list, select the "Connectivity".
Select "My Devices" to display the device
to be connected to Apple®CarPlay®.
If the device has already been connected to the
system via Bluetooth
®, select the device settings
from the list of known devices and choose
Apple
®CarPlay® as the wireless connection mode.
If the device has never been connected to the
system before, it will have to be paired (refer to
the "Bluetooth
® connection" section).
The system detects if the smartphone is
compatible with Apple
®CarPlay® and offers to
connect to it following the pairing process.
Subsequent automatic connection of the
smartphone requires activation of the Bluetooth
®
on your device.
As soon as the connection is established,
press this button to display the
"Apple
®CarPlay®" interface.To initiate the smartphone voice
commands, press and hold the steering-
mounted control button.
Android Auto smartphone
connection
Connecting just one Android Auto smartphone
can be carried out either by USB cable or using a
wireless connection.
First install the "Android Auto" application
via "Play Store" on your smartphone.
The "Android Auto" function requires a
compatible smartphone.
If the device fails to connect, refer to the
Android Auto website to check that the device
is compatible with this function.
If the problem persists, delete all saved
connections on the smartphone and on the
system before attempting a new connection.
Page 206 of 244

204
DS IRIS SYSTEM - 12" touch screen Infotainment system10
To ensure an optimum wireless connection, we
recommend avoiding placing your smartphone
too close to other Wi-Fi networks to which it
can connect automatically.
The cable connection requires that you deactivate
the Android Auto wireless function, in the
Settings menu of the "Android Auto" application
of your smartphone.
Connect the smartphone to the system
using the USB socket compatible with
Mirror Screen
®.
Android Auto is automatically launched a few
seconds after the USB connection has been
established. A validation procedure on the
smartphone has to be followed for the first
connection, with the vehicle stationary.
The smartphone charges when connected by the
USB cable.
The cable connection allows you to avoid
disconnections, especially when passing through
toll booths.
Only one USB socket enables the Mirror
Screen® connection (Android Auto); refer
to the "Ease of use and comfort - Fittings"
section.
It is recommended that you use the device's
original USB cables, preferably with a short
cable to ensure optimum performance.
The wireless connection of an Android Auto
smartphone can be initiated from the "My
Devices" menu. First activate the smartphone’s Android Auto
®
wireless function, in the Settings menu of the
"Android Auto" application of your smartphone.
Press the "Settings" application.
In the list, select the "Connectivity" tab.
Select "My Devices" to display the device
to be connected to Android Auto.
If the device has never been connected to the
system before, it will have to be paired (refer to
the "Bluetooth
® connection" section).
The system detects if the smartphone is
compatible with Android Auto and offers to
connect to it following the pairing process.
If the device has already been connected to the
system via Bluetooth
®, select the device settings
from the list of known devices and choose Android
Auto as the wireless connection mode.
The subsequent automatic connection of the
smartphone requires activation of Bluetooth
® on
your device.
As soon as the connection is established,
press this button to display the "Android
Auto" interface.
To initiate the smartphone voice
commands, press and hold the steering-
mounted control button.
Media
Changing source
Press the "Media" application.
Press this button to change source (radio,
audio streaming via a USB socket,
Bluetooth
® or Mirror Screen®).
Selecting a radio station
Press the "Media" application.
In the list, select the "Player" tab.
Press one of the buttons to perform
an automatic search for radio
stations.
Or
Move the slider to manually search for
frequencies up or down.
Or
Press this button.
Enter the frequency values using the
virtual keypad.
Press this button to confirm.
A list of stations is available by pressing the
“Stations” tab.
Press “Mute” to activate/deactivate the
sound.
Page 210 of 244

208
DS IRIS SYSTEM - 12" touch screen Infotainment system10
Press the back arrow to return to the
previous page.
Setting the date and time
Select “Date and Time” to modify the date and
time.
“Automatic Date and Time” is activated by
default, so that the setting is made
automatically according to your geolocation.
To adjust manually, deactivate “Automatic Date
and Time”.
Press the “Select Time Zone” field then define a
time zone.
Press the back arrow to return to the
previous page.
Press the “Time Settings” line then set the time.
Press "OK" to confirm.
Press the “Date” line then set the date.
Press "OK" to confirm.
Select the Time Format (12h/24h).
Select the Date Format.
The system does not automatically
change between winter and summer time
(depending on the country of sale).
Help
Press the "Help" application.
In the list, select the “User Manual” tab to consult
the vehicle’s handbook.
or
In the list, select the “Tutorials” tab to watch
explanatory videos for a quick start on screen
management, certain driving aids and voice
recognition.
User Manual
Select the display language.
The handbook home page is displayed.
It presents the different possibilities for
accessing the information sought:
Visual search
Access to subjects via pictures
representing the exterior and interior of the
vehicle.
Indicator lamps
Access to the descriptions/operation of
the instrument panel warning/indicator lamps.
System
Access to sections dedicated to the
various audio equipment and telematics systems.
Contents
Access to subjects via the main sections
of the handbook.
Visual search
Press Visual search.
Press one of the pictures located at the bottom of
the screen.
Press one of the bullet points in the
enlarged view.
There are two cases:
–
Direct displa
y of the subject, if only one subject
is associated with the bullet point.
–
Displa
y of a list of subjects, if several subjects
are associated with the bullet point.
Indicator lamps
Press Indicator lamps.
The mosaic of warning/indicator lamps is
displayed.
The warning/indicator lamps are sorted by colour.
Press the warning/indicator lamp concerned; the
corresponding content is displayed.
Back to the mosaic of warning/indicator
lamps.
System
Press System.
The list of audio and telematics systems is
displayed.
Press on the section concerned; the list of
subjects is displayed.
Press on the subject concerned;
the corresponding content is displayed.