Trip CITROEN DS7 CROSSBACK 2022 Owners Manual
[x] Cancel search | Manufacturer: CITROEN, Model Year: 2022, Model line: DS7 CROSSBACK, Model: CITROEN DS7 CROSSBACK 2022Pages: 244, PDF Size: 6.87 MB
Page 4 of 244
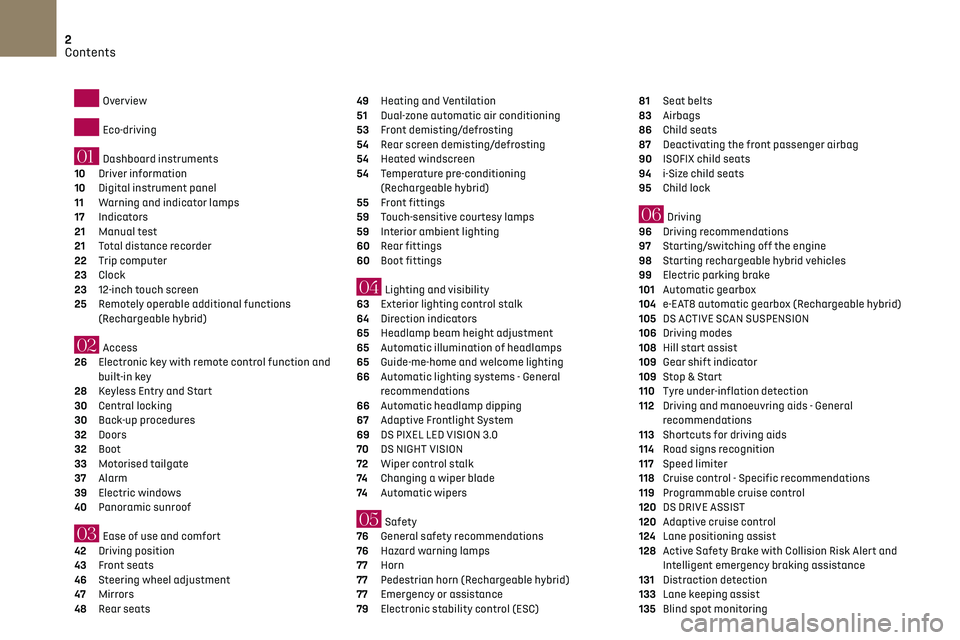
2
Contents
Overview
Eco-driving
01 Dashboard instruments
10 Driver information
10 Digital instrument panel
11 Warning and indicator lamps
17 Indicators
21 Manual test
21 Total distance recorder
22 Trip computer
23 Clock
23 12-inch touch screen
25 Remotely operable additional functions
(Rechargeable hybrid)
02 Access
26 Electronic key with remote control function and
built-in key
28
Keyless Entry and Start
30 Central locking
30 Back-up procedures
32 Doors
32 Boot
33 Motorised tailgate
37 Alarm
39 Electric windows
40 Panoramic sunroof
03 Ease of use and comfort
42 Driving position
43 Front seats
46 Steering wheel adjustment
47 Mirrors
48 Rear seats
49 Heating and Ventilation
51 Dual-zone automatic air conditioning
53 Front demisting/defrosting
54 Rear screen demisting/defrosting
54 Heated windscreen
54 Temperature pre-conditioning
(Rechargeable hybrid)
55
Front fittings
59 Touch-sensitive courtesy lamps
59 Interior ambient lighting
60 Rear fittings
60 Boot fittings
04 Lighting and visibility
63 Exterior lighting control stalk
64 Direction indicators
65 Headlamp beam height adjustment
65 Automatic illumination of headlamps
65 Guide-me-home and welcome lighting
66 Automatic lighting systems - General
recommendations
66
Automatic headlamp dipping
67 Adaptive Frontlight System
69 DS PIXEL LED VISION 3.0
70 DS NIGHT VISION
72 Wiper control stalk
74 Changing a wiper blade
74 Automatic wipers
05 Safety
76 General safety recommendations
76 Hazard warning lamps
77 Horn
77 Pedestrian horn (Rechargeable hybrid)
77 Emergency or assistance
79 Electronic stability control (ESC)
81 Seat belts
83 Airbags
86 Child seats
87 Deactivating the front passenger airbag
90 ISOFIX child seats
94 i-Size child seats
95 Child lock
06 Driving
96 Driving recommendations
97 Starting/switching off the engine
98 Starting rechargeable hybrid vehicles
99 Electric parking brake
101 Automatic gearbox
104 e-EAT8 automatic gearbox (Rechargeable hybrid)
105 DS ACTIVE SCAN SUSPENSION
106 Driving modes
108 Hill start assist
109 Gear shift indicator
109 Stop & Start
110 Tyre under-inflation detection
112 Driving and manoeuvring aids - General
recommendations
113
Shortcuts for driving aids
114 Road signs recognition
117 Speed limiter
118 Cruise control - Specific recommendations
119 Programmable cruise control
120 DS DRIVE ASSIST
120 Adaptive cruise control
124 Lane positioning assist
128 Active Safety Brake with Collision Risk Alert and
Intelligent emergency braking assistance
131
Distraction detection
133 Lane keeping assist
135 Blind spot monitoring
Page 7 of 244
5
Overview
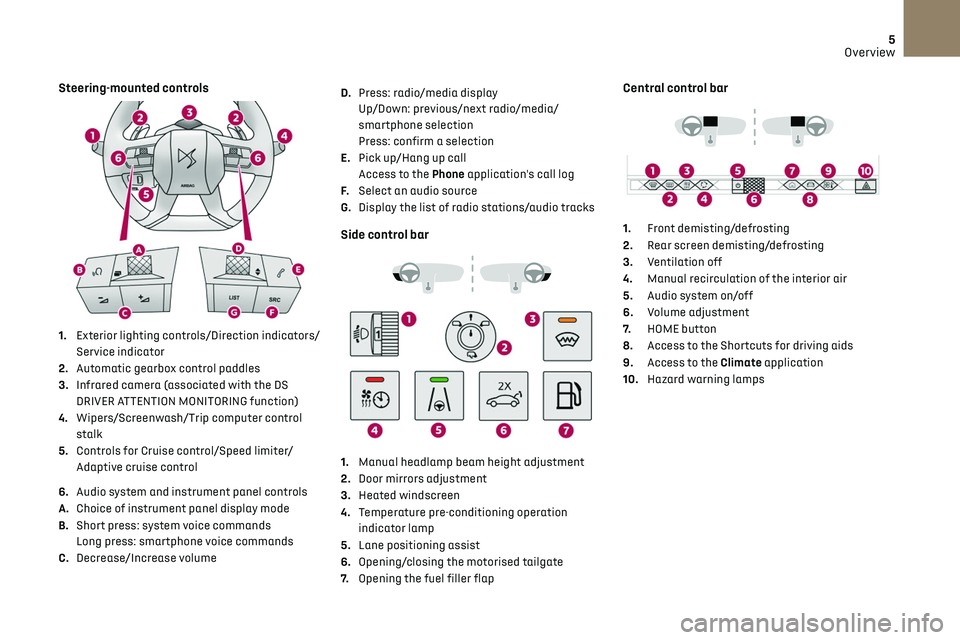
Steering-mounted controls
1. Exterior lighting controls/Direction indicators/
Service indicator
2. Automatic gearbox control paddles
3. Infrared camera (associated with the DS
DRIVER ATTENTION MONITORING function)
4. Wipers/Screenwash/Trip computer control
stalk
5. Controls for Cruise control/Speed limiter/
Adaptive cruise control
6. Audio system and instrument panel controls
A. Choice of instrument panel display mode
B. Short press: system voice commands
Long press: smartphone voice commands
C. Decrease/Increase volume D.
Press: radio/media display
Up/Down: previous/next radio/media/
smartphone selection
Press: confirm a selection
E. Pick up/Hang up call
Access to the Phone application's call log
F. Select an audio source
G. Display the list of radio stations/audio tracks
Side control bar
1.Manual headlamp beam height adjustment
2. Door mirrors adjustment
3. Heated windscreen
4. Temperature pre-conditioning operation
indicator lamp
5. Lane positioning assist
6. Opening/closing the motorised tailgate
7. Opening the fuel filler flap
Central control bar
1. Front demisting/defrosting
2. Rear screen demisting/defrosting
3. Ventilation off
4. Manual recirculation of the interior air
5. Audio system on/off
6. Volume adjustment
7. HOME button
8. Access to the Shortcuts for driving aids
9. Access to the Climate application
10. Hazard warning lamps
Page 13 of 244
11
Dashboard instruments01
► Turn the thumbwheel on the left of the
steering wheel to display and scroll through the
various pages on the instrument panel.
► Press the thumbwheel to confirm the page.
The new page is applied immediately.
If there is no action on the thumbwheel, the
selected display page is applied automatically
after a few moments.
When a message is displayed in a
temporary window, pressing this
thumbwheel will cause this window to
disappear immediately.
Settings for displayed pages
The available settings operations are: addition,
deletion and layout of pages.
It is possible to memorise up to 5 pages.
The colour can also be configured according to
the selected driving mode.
The settings are changed via the Settings
> Customization touch screen application.
Settings for a "Personal" display page
In the two additional personal pages, the types of
information available are as follows:
–
Dynamic (T
orque, Boost, Power).
–
G-metres.
–
Engine t
emperatures (Petrol or Diesel).
–
R
ev counter (Petrol or Diesel).
–
Energy flo
ws (Rechargeable hybrid).
–
Po
wer indicator (Rechargeable hybrid).
–
Ac
cessories consumption (Rechargeable
hybrid).
– Media.
– Trip c omputer.
–
Vigilanc
e level (with the DS DRIVER ATTENTION
MONITORING function only).
–
D
riving aids.
–
Navigation.
The type of information selected in the
"Personal 1" page is not available in the
"Personal 2" page.
The settings are changed via the Settings
> Customization touch screen application.
For further information on Personalisation -
Instrument Panel, refer to the corresponding
section for the Audio equipment and telematics
systems.
Warning and indicator
lamps
Displayed as symbols, the warning and indicator
lamps inform the driver of the occurrence of a
malfunction (warning lamps) or of the operating
status of a system (operation or deactivation
indicator lamps). Certain lamps light up in two
ways (fixed or flashing) and/or in several colours.
Associated warnings
The illumination of a lamp may be accompanied
by an audible signal and/or a message displayed
in a screen.
Relating the type of alert to the operating status
of the vehicle allows you to determine whether the situation is normal or whether a fault has
occurred: refer to the description of each lamp for
further information.
When the ignition is switched on
Certain red or orange warning lamps come on for
a few seconds when the ignition is switched on.
These warning lamps should go off as soon as the
engine is started.
For more information on a system or a function,
refer to the corresponding section.
Persistent warning lamp
If a red or orange warning lamp comes on, there
may be fault which needs further investigation.
If a lamp remains lit
The references (1), (2) and (3) in the warning and
indicator lamp description indicate whether you
should contact a qualified professional in addition
to the immediate recommended actions.
(1): You must stop the vehicle.
Stop as soon as it is safe to do so and switch off
the ignition.
(2): Contact a dealer or a qualified workshop.
(3): Visit a dealer or a qualified workshop.
Page 24 of 244
22
Dashboard instruments01
► In the "Cockpit" category, press or move the
slider to the desired setting.
Trip computer
Displays information related to the current trip
(range, fuel consumption, average speed, etc.).
Data displayed on the
instrument panel
Trip computer data is permanently displayed
when the "Personal" display mode is selected.
In all other display modes, pressing the end of the
wiper control stalk will cause this data to appear
temporarily in a specific window.
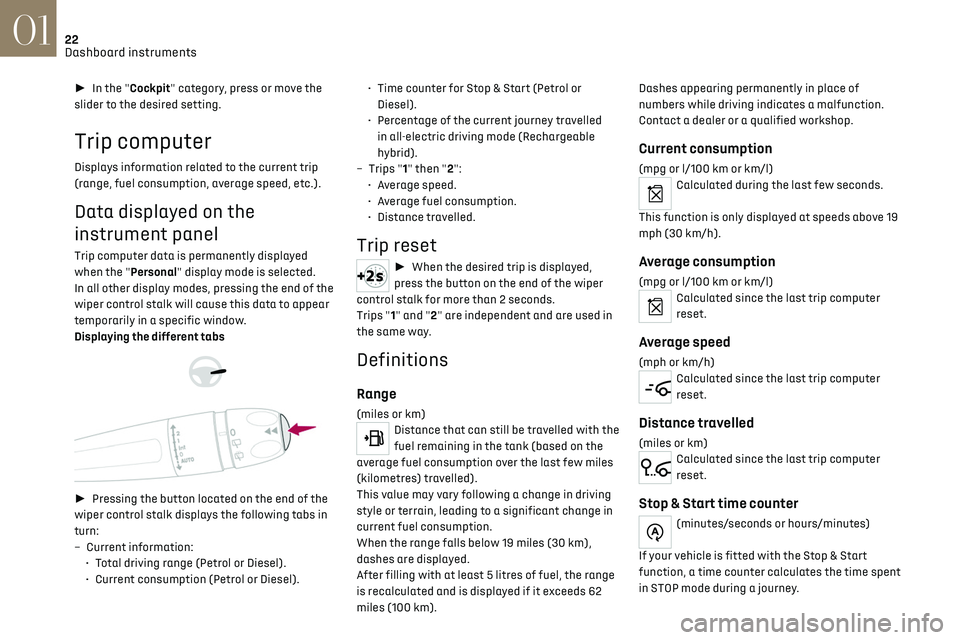
Displaying the different tabs
► Pressing the button located on the end of the
wiper control stalk displays the following tabs in
turn:
–
Curren
t information:
•
T
otal driving range (Petrol or Diesel).
•
Curren
t consumption (Petrol or Diesel). •
Time c
ounter for Stop & Start (Petrol or
Diesel).
•
Perc
entage of the current journey travelled
in all-electric driving mode (Rechargeable
hybrid).
–
Trip
s "1" then "2":
•
A
verage speed.
•
A
verage fuel consumption.
•
Dist
ance travelled.
Trip reset
►
When the desired trip is displayed,
press the button on the end of the wiper
control stalk for more than 2 seconds.
Trips "1" and "2" are independent and are used in
the same way.
Definitions
Range
(miles or km)
Distance that can still be travelled with the
fuel remaining in the tank (based on the
average fuel consumption over the last few miles
(kilometres) travelled).
This value may vary following a change in driving
style or terrain, leading to a significant change in
current fuel consumption.
When the range falls below 19 miles (30 km),
dashes are displayed.
After filling with at least 5 litres of fuel, the range
is recalculated and is displayed if it exceeds 62
miles (100 km). Dashes appearing permanently in place of
numbers while driving indicates a malfunction.
Contact a dealer or a qualified workshop.
Current consumption
(mpg or l/100 km or km/l)Calculated during the last few seconds.
This function is only displayed at speeds above 19
mph (30 km/h).
Average consumption
(mpg or l/100 km or km/l)Calculated since the last trip computer
reset.
Average speed
(mph or km/h)Calculated since the last trip computer
reset.
Distance travelled
(miles or km)Calculated since the last trip computer
reset.
Stop & Start time counter
(minutes/seconds or hours/minutes)
If your vehicle is fitted with the Stop & Start
function, a time counter calculates the time spent
in STOP mode during a journey.
Page 26 of 244
24
Dashboard instruments01
Long press, ignition on: start standby mode (mute
sound, screens and clock display off).
Volume adjustment.
Applications
Press this button to access the
applications wall.
From any page, press the touch screen
with three fingers to display the
applications wall.
To obtain information about the other
applications not listed here, refer to the sections
describing the audio and telematic systems.
ADAS
Activation/Deactivation and configuration
of the driving aid functions.
Climate
Settings for temperature, air flow, etc.
For more information on Dual-zone automatic air
conditioning, refer to the corresponding section.
Seats
Activation/Deactivation and configuration
of the seat comfort functions (heating, ventilation
and massages).
For more information on the Heated and/or
ventilated seats or on the Multi-point massages,
refer to the corresponding section.
Settings
Main settings for the audio system, touch
screen and digital instrument panel. Activation/Deactivation and configuration of
the exterior lighting, vehicle access and safety
functions.
Energy
Access to the rechargeable hybrid system
features (energy flow, consumption statistics,
deferred charging, e
- SAVE function).
Energy application
Energy Flow
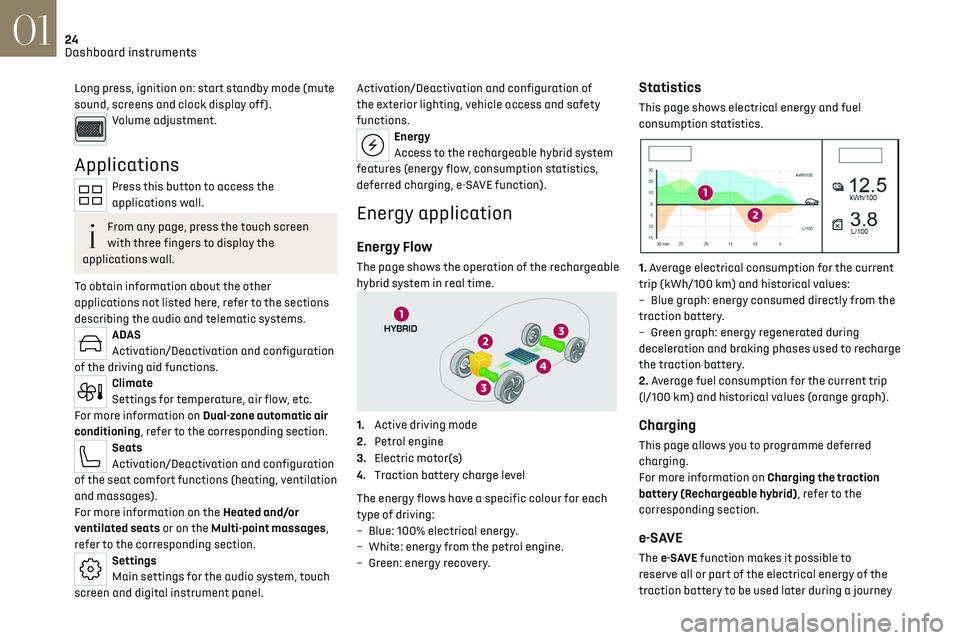
The page shows the operation of the rechargeable
hybrid system in real time.
1.Active driving mode
2. Petrol engine
3. Electric motor(s)
4. Traction battery charge level
The energy flows have a specific colour for each
type of driving:
–
Blue
: 100% electrical energy.
–
Whit
e: energy from the petrol engine.
–
G
reen: energy recovery.
Statistics
This page shows electrical energy and fuel
consumption statistics.
1. Average electrical consumption for the current
trip (kWh/100 km) and historical values:
–
Blue graph
: energy consumed directly from the
traction battery.
–
G
reen graph: energy regenerated during
deceleration and braking phases used to recharge
the traction battery.
2. Average fuel consumption for the current trip
(l/100 km) and historical values (orange graph).
Charging
This page allows you to programme deferred
charging.
For more information on Charging the traction
battery (Rechargeable hybrid), refer to the
corresponding section.
e-SAVE
The e-SAVE function makes it possible to
re serve all or part of the electrical energy of the
traction battery to be used later during a journey
Page 60 of 244

58
Ease of use and comfort03
State of the
indicator lampMeaning
Off Engine switched off.
No compatible devices
detected.
Charging complete.
Fixed green Compatible portable device detected.
Charging.
Flashing orange Foreign object detected in the charging zone.
Portable device not well
centred in the charging
zone.
Fixed orange Malfunction of the portable device's battery
meter.
Device battery
temperature too high.
Charger malfunction.
If the indicator lamp is fixed orange:
– remo ve the device, then place it back in the
centre of the charging zone.
or
–
remo
ve the device and try again in a quarter of
an hour.
If the problem persists, have the system checked
by a dealer or a qualified workshop.
Front armrest
It includes a storage space.
Opening
► Press the lever beneath the cover.
The cover opens in two parts.
Closing
► Fold back the two parts of the cover.
Hi-Fi System FOCAL Electra®
The vehicle is equipped with a high-fidelity
acoustic system from the French brand FOCAL®.
14 speakers incorporating exclusive FOCAL®
technologies offer the pleasure of pure and
detailed sound inside the vehicle:
–
Poly
glass technology central speaker/mid-
range satellite speakers: sound immersion and
spatialisation.
–
Poly
glass technology woofers/mid-ranges with
high excursion: balance, dynamics and precision
of sound.
–
Aluminium TNF in
verted dome tweeter: optimal
sound dispersion, detailed treble.
–
12 channel activ
e amplification - 515 Watts
Hybrid Class AB/Class D technology: breadth and
finesse in the high frequency signals, as well as
real power in the bass.
–
Sub
woofer with high excursion Power Flower
TM
triple coil technology: deep and controlled
reproduction of low frequencies.
Page 98 of 244

96Driving06
Driving recommendations
► Observe the driving regulations and remain
vigilant whatever the traffic conditions.
► Monitor your environment and keep your
hands on the wheel to be able to react to anything
that may happen any time.
► Drive smoothly, anticipate the need for braking
and maintain a longer safety distance, especially
in bad weather.
► Stop the vehicle before performing operations
that require sustained attention (e.g. settings).
► During long trips, take a break every 2 hours.
Important!
Never leave the engine running in a closed
space without sufficient ventilation.
Internal combustion engines emit toxic
exhaust gases such as carbon monoxide.
Danger of poisoning and death!
In very severe wintry conditions
(temperature below -23°C), let the engine
run for 4 minutes before moving off, to ensure
the correct operation and durability of the
mechanical components of your vehicle
(engine and gearbox).
Never drive with the parking brake
applied. Risk of overheating and
damaging the braking system!
Never park the vehicle and never leave the
engine running on a flammable surface
(e.g. dry grass, dead leaves).The vehicle
exhaust system is very hot, even several
minutes after the engine stops. Risk of fire!
Never drive on surfaces covered with
vegetation (e.g. tall grass, accumulated
dead leaves, crops, debris) such as a field, a
country lane overgrown with bushes or a
grassy verge.
This vegetation could come into contact with
the vehicle's exhaust system or other systems
which are very hot. Risk of fire!
Make sure you do not leave any item in the
passenger compartment which could act
like a magnifying glass under the effect of the
sun's rays and cause a fire. Risk of fire or
damage to interior surfaces!
Never leave the vehicle unattended, with
the engine running. If you have to leave
your vehicle with the engine running, apply the
parking brake and put the automatic gearbox
into position N or P.
Never leave children inside the vehicle
unsupervised.
E-TENSE 4X4 360
Repeated hard braking in this vehicle
can generate loud banging noises which are
completely normal.
Continue driving but with lighter braking so
that the braking system can cool down.
The performance of the braking system
remains unaffected.
On flooded roads
We strongly advise against driving on flooded
roads, as this could cause serious damage to the
internal combustion engine or electric motor, the
gearbox and the electrical systems of the vehicle.
If the vehicle absolutely must drive through a
flooded section of road:
► Check that the depth of the water does not
exceed 15 cm, taking account of waves that might
be generated by other users.
► Deactivate the Stop & Start function.
► For rechargeable hybrid engines, place the
mode selector in 4WD position (depending on
version).
► Drive as slowly as possible without stalling. In
all cases, do not exceed 6 mph (10 km/h).
Page 152 of 244

150
Practical information07
Type 2POWER
Green: electrical connection established;
charging can begin.
CHARGE
Flashing green: charging in progress or
temperature pre-conditioning activated.
Fixed green: charging complete.
FA U LT
Red: fault; charging not permitted or must
be stopped immediately. Check that everything
is connected correctly and that the electrical
system is not faulty.
If the indicator lamp does not go off, contact a
dealer or a qualified workshop.
Upon plugging the charging cable into a domestic
socket, all of the indicator lamps come on briefly.
If no indicator lamps come on, check the domestic
socket's circuit-breaker. –
If the circ
uit-breaker has tripped, contact a
professional to check that your electricity supply
is compatible and carry out any necessary repairs.
–
If the circ
uit-breaker has not tripped, stop
using the charging cable and contact a dealer or a
qualified workshop.
Type 1 control unit label - Recommendations
1. Refer to the handbook before use.
2. Incorrect use of this charging cable may
result in fire, property damage and serious
injury or death by electrocution!
3. Always use a correctly earthed power socket,
protected by a 30 mA residual current device.
4. Always use an electrical socket protected
by a circuit-breaker appropriate for the
electrical circuit’s current rating.
5. The weight of the control unit must not be
borne by the electrical socket, plug and
cables.
6. Never use this charging cable if it is defective
or in any way damaged. 7.
Never attempt to repair or open this charging
cable. It contains no repairable parts -
replace the charging cable if it is damaged.
8. Never immerse this charging cable in water.
9. Never use this charging cable with an
extension cable, a multi-plug socket,
a conversion adaptor or on a damaged
electrical socket.
10. Do not unplug the plug from the wall as a
means of stopping charging.
11. Do not force the connector if it is locked into
the vehicle.
12. Immediately stop charging, by locking and
then unlocking the vehicle using the remote
control key, if the charging cable or wall
socket feel burning hot to the touch.
13. This charging cable includes components
liable to cause electrical arcing or sparks. Do
not expose to flammable vapours.
14. Only use this charging cable with DS
AUTOMOBILES vehicles.
15. Never plug the cable into the wall socket (or
unplug it) with wet hands.
Type 2 control unit label - State of indicator
lamps
State of the indicator
lamp
Off
Page 160 of 244
158
Practical information07
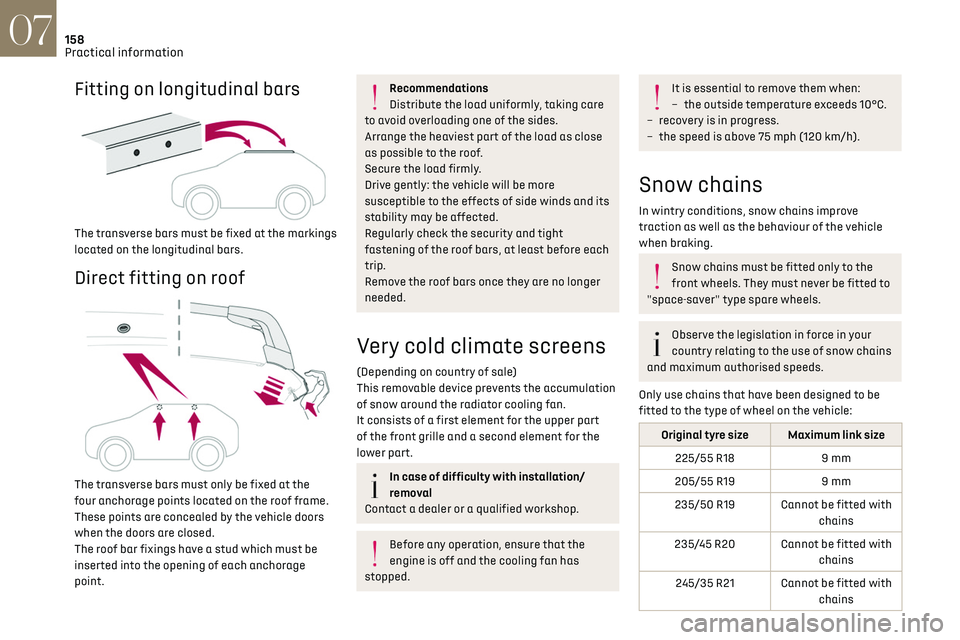
Fitting on longitudinal bars
The transverse bars must be fixed at the markings
located on the longitudinal bars.
Direct fitting on roof
The transverse bars must only be fixed at the
four anchorage points located on the roof frame.
These points are concealed by the vehicle doors
when the doors are closed.
The roof bar fixings have a stud which must be
inserted into the opening of each anchorage
point.
Recommendations
Distribute the load uniformly, taking care
to avoid overloading one of the sides.
Arrange the heaviest part of the load as close
as possible to the roof.
Secure the load firmly.
Drive gently: the vehicle will be more
susceptible to the effects of side winds and its
stability may be affected.
Regularly check the security and tight
fastening of the roof bars, at least before each
trip.
Remove the roof bars once they are no longer
needed.
Very cold climate screens
(Depending on country of sale)
This removable device prevents the accumulation
of snow around the radiator cooling fan.
It consists of a first element for the upper part
of the front grille and a second element for the
lower part.
In case of difficulty with installation/
removal
Contact a dealer or a qualified workshop.
Before any operation, ensure that the
engine is off and the cooling fan has
stopped.
It is essential to remove them when:
– the outside t emperature exceeds 10°C.
–
rec
overy is in progress.
–
the speed is abo
ve 75 mph (120 km/h).
Snow chains
In wintry conditions, snow chains improve
traction as well as the behaviour of the vehicle
when braking.
Snow chains must be fitted only to the
front wheels. They must never be fitted to
"space-saver" type spare wheels.
Observe the legislation in force in your
country relating to the use of snow chains
and maximum authorised speeds.
Only use chains that have been designed to be
fitted to the type of wheel on the vehicle:
Original tyre size Maximum link size 225/55 R18 9 mm
205/55 R19 9 mm
235/50 R19 Cannot be fitted with chains
235/45 R20 Cannot be fitted with chains
245/35 R21 Cannot be fitted with chains
Page 185 of 244

183
In the event of a breakdown08
► Lift the plastic cover on the (+) terminal, if the
vehicle has one.
► Connect the cables of charger B as follows:
•
the po
sitive (+) red cable to the (+) terminal
of battery A,
•
the nega
tive (-) black cable to earth point C on
the vehicle.
► At the end of the charging operation, switch
off charger B before disconnecting the cables
from battery A.
If this label is present, use only a 12 V
charger to avoid causing irreversible
damage to the electrical components.
24V
12V
Disconnecting/reconnecting the battery
In order to maintain an adequate state of
charge for starting the engine, we recommend
disconnecting the battery if the vehicle is to be
unused for an extended period.
Before disconnecting the battery:
► Close all openings (doors, boot, windows,
roof).
► Switch off all electricity-consuming devices
(audio system, wipers, lamps, etc.).
► Switch off the ignition and wait for 4 minutes. After accessing the battery, it is only necessary to
disconnect the (+) terminal.
Quick-release terminal clamp
Disconnecting the (+) terminal
►
Depending on equipment, lift the plastic cover
on the (+) terminal.
► Raise lever A fully to release clamp B.
► Remove clamp B by lifting it off.
Reconnecting the (+) terminal
► Raise lever A fully.
► Refit open clamp B on the (+) terminal.
► Push clamp B fully down.
► Lower lever A to lock clamp B.
► Depending on equipment, lower the plastic
cover on the (+) terminal.
Do not force the lever when pressing on it,
as if the clamp is not positioned correctly,
locking will then not be possible. Start the
procedure again.
The Stop & Start system may not be
operational during the trip following the
first engine start.
In this case, the system will only be available
again after a continuous period with the
vehicle immobilised, the duration of which
depends on the exterior temperature and the
state of charge of the battery (up to about 8
hours).
With Rechargeable hybrid
engines
The rechargeable hybrid system has two
accessory batteries: one at the front and one at
the rear of the vehicle.
Replacing the accessory batteries
Contact a dealer or a qualified workshop.