Port Citroen GRAND C4 PICASSO 2017 2.G Owner's Guide
[x] Cancel search | Manufacturer: CITROEN, Model Year: 2017, Model line: GRAND C4 PICASSO, Model: Citroen GRAND C4 PICASSO 2017 2.GPages: 527, PDF Size: 12.91 MB
Page 252 of 527

250
C4-Picasso-II_en_Chap06_securite_ed02-2016
Child seat at the rear
Rearward facing
When a rear ward facing child seat is installed
on a rear passenger seat, move the vehicle's
front seat for ward and straighten the backrest
so that the rear ward facing child seat does not
touch the vehicle's front seat. When a child seat is installed on a 3
rd row
passenger seat , move the 2nd row seat
for wards and straighten the backrest so that
the child seat and the legs of the child do not
touch the 2
nd row seat.
A child seat with a support leg must never be
installed on a 3
rd row passenger seat .
Seats in the 3rd rowForward facing
When a for ward facing child seat is installed
on a rear passenger seat , move the vehicle's
front seat for ward and straighten the backrest
so that the legs of the child in the for ward
facing child seat do not touch the vehicle's front
seat.
Ensure that the seat belt is correctly
tensioned.
For child seats with a support leg,
ensure that this is in firm contact with
the floor. If necessary, adjust the front
seat of the vehicle.
Safety
Page 257 of 527

255
C4-Picasso-II_en_Chap06_securite_ed02-2016
"RÖMER Baby- Safe Plus" and its ISOFIX base
(size category: E )
Group 0+: from bir th to 13 kg
Installed rear ward facing using an ISOFIX
base which is attached to the rings A .
The base has a support leg, adjustable for
height, which sits on the vehicle's floor.
This child seat can also be secured with a
seat belt. In this case, only the shell is used
and attached to the vehicle's seat by the
three-point seat belt.
ISOFIX child seats recommended by CITROËN
CITROËN offers a range of ISOFIX child seats listed and type approved for your vehicle.
Refer also to the child seat manufacturer's fitting instructions for information on installing and removing the seat.
Baby P2C Mini and its ISOFIX base(size categories: C, D, E)
Group 0+: from bir th to 13 kg
Installed rear ward facing using an ISOFIX
base which is attached to the rings A .
The base has a support leg, adjustable for
height, which sits on the vehicle's floor.
This seat can also be secured with a seat
belt.
In this case only the seat shell is used and is
attached to the vehicle's seat by the three-
point seat belt. "Baby P2C Midi" and its ISOFIX base
(size
c
ategories: D, C, A, B, B1 )
Group 1: from 9 to 18 kg
Installed rear ward facing using an ISOFIX
base which is attached to the rings A .
The base has a support leg, adjustable for
height, which sits on the vehicle's floor.
This child seat can also be used for ward
facing.
This seat can not be secured with a seat
belt.
We recommend that you use the seat in
the rear ward facing position up to the age
of
3 years.
6
Safety
Page 259 of 527

257
C4-Picasso-II_en_Chap06_securite_ed02-2016
I UF: seat suitable for the installation of an
ISOFIX U niversal seat, F or ward facing
secured using the upper strap to the top
tether on ISOFIX seats.
IL- SU:
s
eat suitable for the installation of an
I sofix S emi-Universal seat either:
-
r
ear ward facing fitted with an upper strap
or a support leg,
-
f
or ward facing fitted with a support leg,
-
a s
leeper cot fitted with an upper strap or a
support leg.
Remove and stow the head restraint
before installing a child seat on a
passenger seat. Refit the head restraint
once the child seat has been removed.
For more information on ISOFIX mountings
and in particular on securing the upper strap,
refer to the corresponding section.
X:
s
eat not suitable for the installation of a
child seat or sleeper cot for the weight group
indicated.
(1) :
T
he outer seat in row 2 must be adjusted
to 3 notches back from the fully for ward
position.
6
Safety
Page 261 of 527

259
C4-Picasso-II_en_Chap06_securite_ed02-2016
I UF: seat suitable for the installation of an
ISOFIX U niversal seat, F or ward facing
secured using the upper strap to the top
tether on ISOFIX seats.
IL- SU:
s
eat suitable for the installation of an
I sofix S emi-Universal seat either:
-
r
ear ward facing fitted with an upper strap
or a support leg,
-
f
or ward facing fitted with a support leg,
-
a s
leeper cot fitted with an upper strap or a
support leg.
Remove and stow the head restraint
before installing a child seat on a
passenger seat. Refit the head restraint
once the child seat has been removed.
For more information on ISOFIX mountings
and in particular on securing the upper strap,
refer to the corresponding section.
X:
s
eat not suitable for the installation of a
child seat or sleeper cot for the weight group
indicated.
6
Safety
Page 271 of 527

269
C4-Picasso-II_en_Chap07_info-pratiques_ed02-2016
Towing a trailer
We recommend the use of genuine
CITROËN towbars and their harnesses
that have been tested and approved
from the design stage of your vehicle,
and that the fitting of the towbar is
entrusted to a CITROËN dealer or a
qualified workshop.
If the towbar is not fitted by a
CITROËN dealer, it must still be
fitted in accordance with the vehicle
manufacturer's instructions.
Your vehicle is primarily designed for
transporting people and luggage, but it may
also be used for towing a trailer.
Driving with a trailer places greater
demands on the towing vehicle and the
driver must take particular care.
For more information on Driving
advice
, particularly when towing, refer
to the corresponding section.
For more information on Weights (and
the towed loads which apply to your
vehicle) refer to the corresponding
section.
You must observe the maximum trailer
weight, indicated on the registration
certificate or in the technical
specification for your vehicle. When not towing a trailer, remove the
quickly-detachable tow ball before
driving.
The lane departure warning system is
deactivated while a trailer is connected.
7
Practical information
Page 276 of 527

274
C4-Picasso-II_en_Chap07_info-pratiques_ed02-2016
Bonnet
F Open the left hand front door.
F
L
ift the safety catch and raise the bonnet. F
U nclip the stay from its housing and place
it in the support slot to hold the bonnet
open.
Opening
F Pull the release lever, located at the bottom of the door aperture, towards you. Before doing anything under the
bonnet, switch off the Stop & Start
system to avoid any risk of injury
resulting from an automatic change to
START mode.
The cooling fan may star t after switching off the engine: take care with ar ticles and
clothing that might be caught by the fan blades. Do not open the bonnet under very
windy conditions.
The location of the interior bonnet
release lever prevents opening of the
bonnet when the left hand front door
is shut.
When the engine is hot, handle the
exterior safety catch and the stay with
care (risk of burns), using the protected
area.
When the bonnet is open, take care not
to damage the safety catch.
Because of the presence of electrical equipment under the bonnet, it is recommended that
exposure to water (rain, washing, ...) be limited.
Closing
F Take the stay out of its support slot.
F C lip the stay back into its housing.
F
L
ower the bonnet and release it at the end
of its travel.
F
P
ull on the bonnet to check that it has
latched correctly.
Practical information
Page 283 of 527

281
C4-Picasso-II_en_Chap07_info-pratiques_ed02-2016
Brake wear depends on the style
of driving, particularly in the case
of vehicles used in town, over short
distances. It may be necessary to have
the condition of the brakes checked,
even between vehicle services.
Brake pads
For information on checking brake
disc wear, contact a CITROËN dealer
or a qualified workshop.
Brake disc wear
Only use products recommended by
CITROËN or products of equivalent
quality and specification.
In order to optimise the operation of
units as important as those in the
braking system, CITROËN selects and
offers very specific products.
After washing the vehicle, dampness,
or in wintry conditions, ice can form
on the brake discs and pads: braking
efficiency may be reduced. Make light
brake applications to dry and defrost
the brakes.
Electric parking brake
For more information, refer to the "Electric
parking brake - Operating faults " section.
This system does not require any
routine servicing. However, in the
event of a problem, have the system
checked by a CITROËN dealer or a
qualified workshop.
Manual gearbox
The gearbox does not require any
maintenance (no oil change).
Refer to the manufacturer's service
schedule for the checking interval for
this component.
Automatic gearbox
The gearbox does not require any
maintenance (no oil change).
Refer to the manufacturer's service
schedule for details of the level
checking interval for this component.
To avoid damaging the electrical units,
never use a high pressure jet wash in
the engine compartment.
Unless there is a leak in the circuit, a drop in
the brake fluid level indicates that the brake
pads are worn.
7
Practical information
Page 287 of 527

285
C4-Picasso-II_en_Chap07_info-pratiques_ed02-2016
Important: if your vehicle's AdBlue®
tank is completely empty - which is
confirmed by the alert messages and
the impossibility of starting the engine,
you must add at least 3.8 litres of fluid. Important:
when topping-up after
running out of AdBlue®, signalled
by the message "Top-up AdBlue:
Starting prevented", you must wait
for approximately 5 minutes before
switching on the ignition, without
opening the driver's door, unlocking
the vehicle, placing the key of the
"Keyless Entr y and Star ting" system
inside the vehicle or inser ting the
electronic key in the reader.
Switch on the ignition, wait for
10
seconds, then start the engine.
If any fluid is spilt or splashed, wash
immediately with cold water or wipe with
a damp cloth.
If the fluid has crystallised, clean it off
using a sponge and hot water.
F
A
fter emptying the bottle, wipe away any
spillage around the tank filler using a damp
cloth. F
R
efit the blue cap to the tank and turn it a
6th of a turn clockwise, to its stop.
F
R
efit the black cap and turn it a quarter of
a turn clockwise without pressing. Ensure
that the indicator on the cap lines up with
the indicator on the support.
F
D
epending on equipment, return the spare
wheel and/or the storage box to the bottom
of the boot.
F
R
efit the boot carpet and close the tailgate.
Do not dispose of AdBlue
® bottles or
containers in the household waste.
Place them in a container provided
for this purpose or take them to your
dealer.
7
Practical information
Page 294 of 527
292
C4-Picasso-II_en_Chap08_en-cas-panne_ed02-2016
Removing the pipe and cartridge
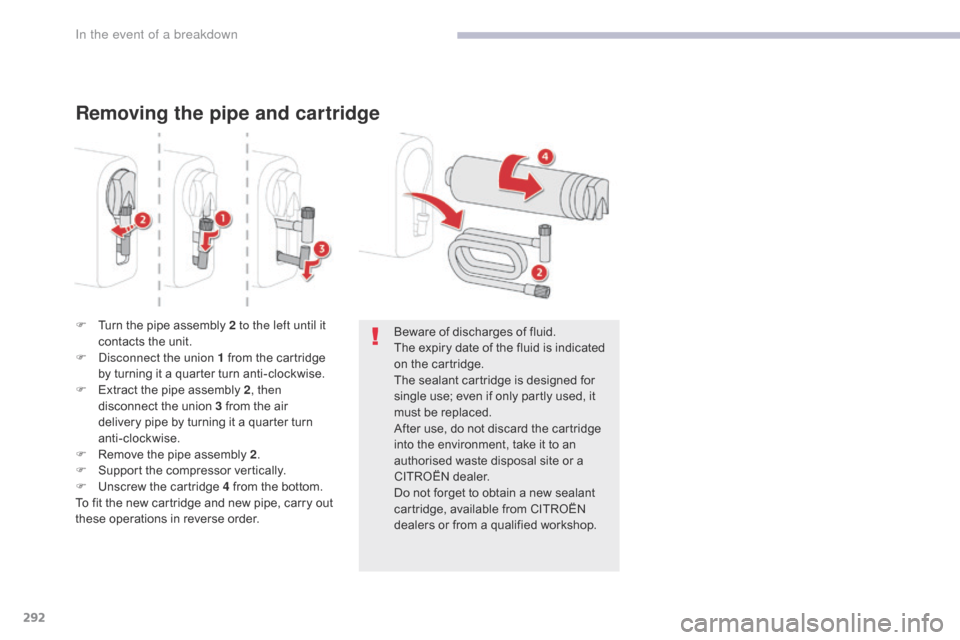
F Turn the pipe assembly 2 to the left until it contacts the unit.
F
D
isconnect the union 1 from the cartridge
by turning it a quarter turn anti-clockwise.
F
E
xtract the pipe assembly 2 , then
disconnect the union 3 from the air
delivery
pipe by turning it a quarter turn
anti-clockwise.
F
R
emove the pipe assembly 2 .
F
S
upport the compressor vertically.
F
U
nscrew the cartridge 4 from the bottom.
To fit the new cartridge and new pipe, carry out
these operations in reverse order. Beware of discharges of fluid.
The expiry date of the fluid is indicated
on the cartridge.
The sealant cartridge is designed for
single use; even if only partly used, it
must be replaced.
After use, do not discard the cartridge
into the environment, take it to an
authorised waste disposal site or a
CITROËN dealer.
Do not forget to obtain a new sealant
cartridge, available from CITROËN
dealers or from a qualified workshop.
In the event of a breakdown
Page 299 of 527
297
C4-Picasso-II_en_Chap08_en-cas-panne_ed02-2016
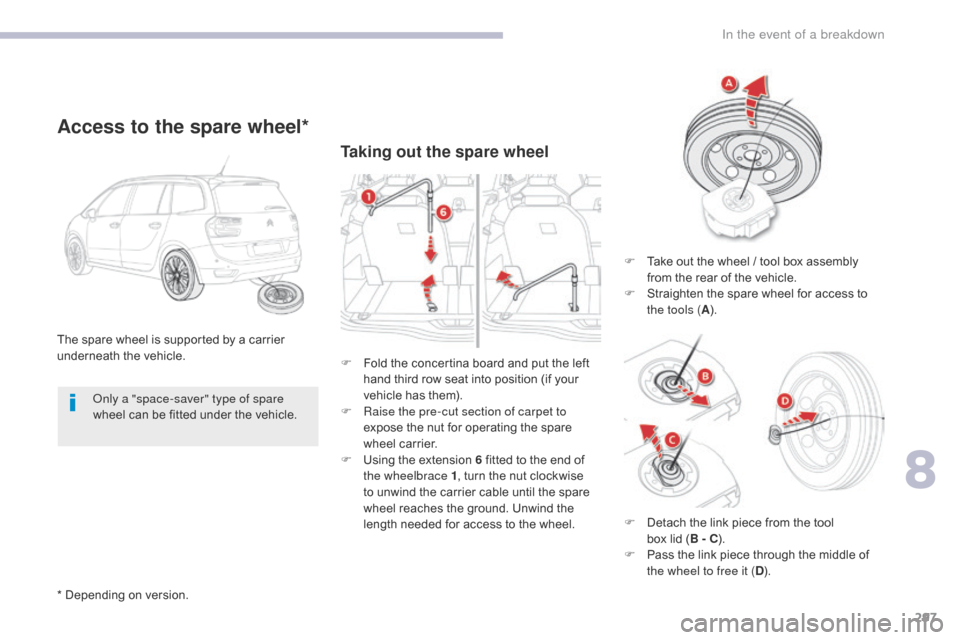
Taking out the spare wheel
The spare wheel is supported by a carrier
underneath the vehicle.
Access to the spare wheel*
F Take out the wheel / tool box assembly from the rear of the vehicle.
F
S
traighten the spare wheel for access to
the tools ( A).
F
F
old the concertina board and put the left
hand third row seat into position (if your
vehicle has them).
F
R
aise the pre-cut section of carpet to
expose the nut for operating the spare
wheel carrier.
F
U
sing the extension 6 fitted to the end of
the wheelbrace 1 , turn the nut clockwise
to unwind the carrier cable until the spare
wheel reaches the ground. Unwind the
length needed for access to the wheel.
Only a "space-saver" type of spare
wheel can be fitted under the vehicle.
* Depending on version. F
D
etach the link piece from the tool
box
lid (B - C ).
F
P
ass the link piece through the middle of
the wheel to free it ( D).
8
In the event of a breakdown