keyless Citroen GRAND C4 PICASSO RHD 2016 2.G User Guide
[x] Cancel search | Manufacturer: CITROEN, Model Year: 2016, Model line: GRAND C4 PICASSO RHD, Model: Citroen GRAND C4 PICASSO RHD 2016 2.GPages: 523, PDF Size: 13.63 MB
Page 73 of 523
71
OFF
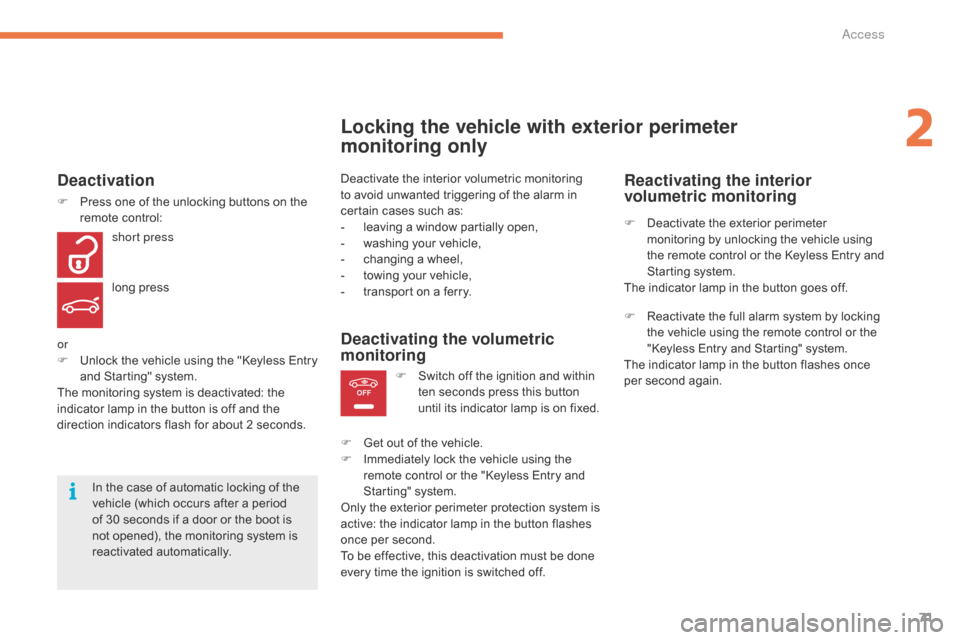
Locking the vehicle with exterior perimeter
monitoring only
Deactivate the interior volumetric monitoring to avoid unwanted triggering of the alarm in
c
ertain cases such as:
-
l
eaving a window partially open,
-
w
ashing your vehicle,
-
c
hanging a wheel,
-
t
owing your vehicle,
-
t
ransport on a ferry.
Deactivating the volumetric
monitoring
F Switch off the ignition and within t
en seconds press this button
u
ntil its indicator lamp is on fixed.
F
G
et
out of the vehicle.
F
I
mmediately lock the vehicle using the
r
emote control or the "Keyless Entry and
S
tarting" system.
Only
the
exterior perimeter protection system is
a
ctive:
the indicator lamp in the button flashes
o
nce
per
second.
To
be
effective, this deactivation must be done
e
very
time the ignition is switched off.
In
the
case
of
automatic
locking
of
the
v
ehicle
(which
occurs
after
a
period
o
f
30
seconds
if
a
door
or
the
boot
is
n
ot
opened),
the
monitoring
system
is
r
eactivated
a
utomatically.
Deactivation
F Press one of the unlocking buttons on the r
emote control:
short press
long
press
or
F
U
nlock the vehicle using the "Keyless Entry
a
nd Starting" system.
The
monitoring system is deactivated: the
i
ndicator lamp in the button is off and the
d
irection indicators flash for about 2 seconds.
Reactivating the interior
volumetric monitoring
F Deactivate the exterior perimeter m
onitoring by unlocking the vehicle using
t
he remote control or the Keyless Entry and
S
tarting system.
The
indicator lamp in the button goes off.
F
R
eactivate the full alarm system by locking
t
he vehicle using the remote control or the
"
Keyless Entry and Starting" system.
The
indicator lamp in the button flashes once
p
er second again.
2
Access
Page 74 of 523
72
Triggering of the alarm
This is indicated by sounding of the siren and flashing of the direction indicators for
t
hirty seconds.
The
monitoring functions remain active until
t
he alarm has been triggered eleven times in
s
uccession.
When
the vehicle is unlocked using the remote
c
ontrol or the Keyless Entry and Starting
s
ystem, rapid flashing of the indicator lamp
i
n the button informs you that the alarm was
t
riggered during your absence. When the
i
gnition is switched on, this flashing stops
i
mmediately.
Failure of the remote control
To deactivate the monitoring functions:
F
U
nlock the vehicle using the key (integral
w
ith the remote control) in the driver's door
l
ock.
F
O
pen the door; the alarm is triggered.
F
S
witch on the ignition; the alarm stops. The
i
ndicator lamp in the button goes off.
Locking the vehicle without
activating the alarm
F Lock or deadlock the vehicle using the key (
integral with the remote control) in the
d
river's door lock.
Operating fault
When the ignition is switched on, fixed illumination of the indicator lamp in the button
i
ndicates a fault in the system.
Have
it checked by a CITROËN dealer or a
q
ualified
w
orkshop.
Automatic activation*
2 minutes after the last door or the boot is closed, the system is activated automatically.
F
T
o avoid triggering the alarm on entering
t
he vehicle, first press the unlocking button
o
n the remote control or unlock the vehicle
u
sing the Keyless Entry and Starting
s
ystem.
*
Depending on the country of sale.
Access
Page 76 of 523
74
Reinitialising the electric
windows
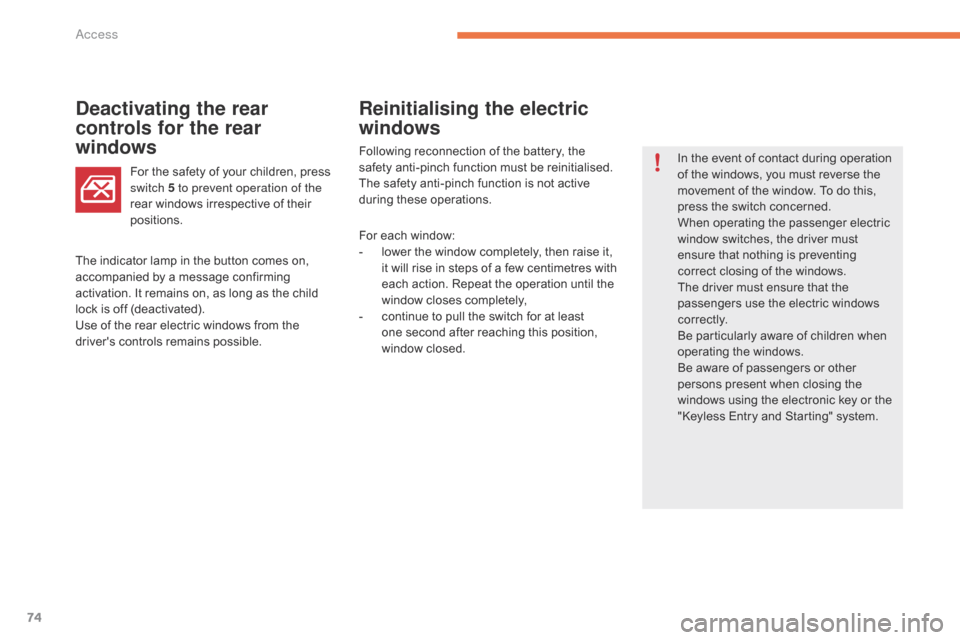
Deactivating the rear
controls for the rear
windows
In the event of contact during operation o
f the windows, you must reverse the
m
ovement of the window. To do this,
p
ress the switch concerned.
When
operating the passenger electric
w
indow switches, the driver must
e
nsure that nothing is preventing
c
orrect closing of the windows.
The
driver must ensure that the
p
assengers use the electric windows
c
o r r e c t l y.
Be
particularly aware of children when
o
perating
t
he
w
indows.
Be
aware of passengers or other
p
ersons present when closing the
w
indows using the electronic key or the
"
Keyless Entry and Starting" system.
Following
reconnection
of
the
battery,
the
s
afety
anti-pinch
function
must
be
reinitialised.
The
safety
anti-pinch
function
is
not
active
d
uring
these
operations.
For
the
safety
of
your
children,
press
s
witch 5 to prevent operation of the
rear
windows
irrespective
of
their
p
ositions.
The
indicator
lamp
in
the
button
comes
on,
a
ccompanied
by
a
message
confirming
a
ctivation.
It
remains
on,
as
long
as
the
child
l
ock
is
off
(deactivated).
Use
of
the
rear
electric
windows
from
the
d
river's
controls
remains
possible. For
each
window:
-
l
ower
the
window
completely,
then
raise
it,
i
t
will
rise
in
steps
of
a
few
centimetres
with
e
ach
action.
Repeat
the
operation
until
the
w
indow
closes
completely,
-
c
ontinue
to
pull
the
switch
for
at
least
o
ne second
after
reaching
this
position,
w
indow
c
losed.
Access
Page 127 of 523
125
Starting-switching off the engine with Keyless Entry and Starting
F Place the gear selector lever at P or N for
vehicles with an automatic gearbox, or
n
eutral with a manual gearbox.
F
W
ith the electronic key inside the vehicle,
p
ress the brake pedal for vehicles with an
a
utomatic gearbox, or fully declutch for
v
ehicles with a manual gearbox.
Diesel vehicles
In temperatures below zero the engine will not start until the
p
reheater warning lamp has
g
one off.
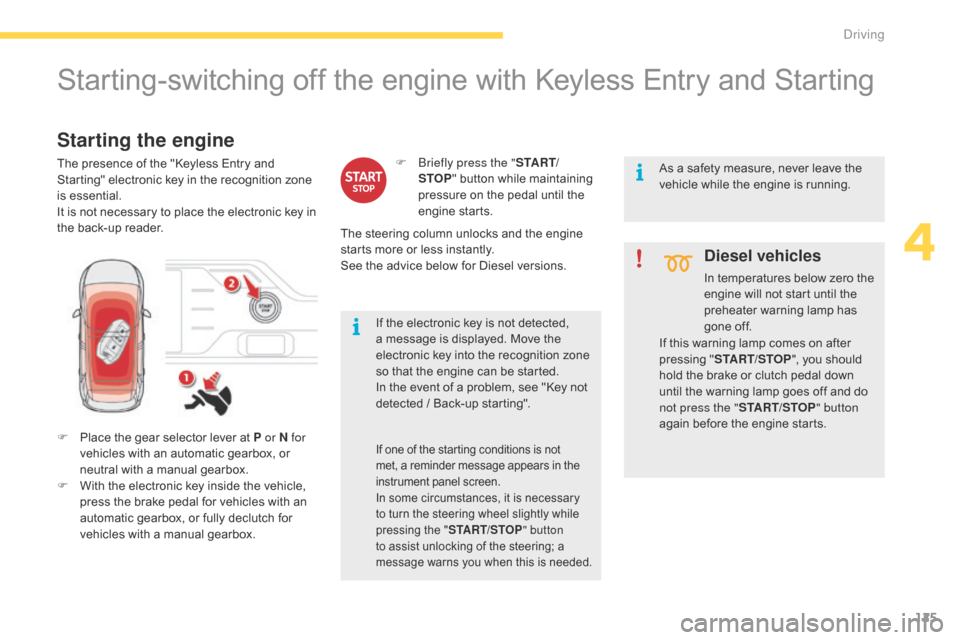
Starting the engine
The presence of the "Keyless Entry and Starting" electronic key in the recognition zone
i
s
e
ssential.
It
is not necessary to place the electronic key in
t
he back-up reader.
If
the electronic key is not detected,
a
message is displayed. Move the
e
lectronic key into the recognition zone
s
o that the engine can be started.
In
the event of a problem, see "Key not
d
etected / Back-up starting".
F
B riefly press the "
S TA R T/
STOP "
button while maintaining
p
ressure on the pedal until the
e
ngine
s
tarts.
If one of the starting conditions is not met, a reminder message appears in the i
nstrument panel screen.
In
some circumstances, it is necessary
t
o turn the steering wheel slightly while
p
ressing the "START/STOP " button
to
assist unlocking of the steering; a
m
essage warns you when this is needed.
As a safety measure, never leave the vehicle while the engine is running.
The
steering
column
unlocks
and
the
engine
s
tarts
more
or
less
instantly.
See
the
advice
below
for
Diesel
versions. If
this warning lamp comes on after
p
ressing "START/STOP ",
you should
h
old the brake or clutch pedal down
u
ntil the warning lamp goes off and do
n
ot press the " START/STOP " button
again
before the engine starts.
4
Driving
Page 203 of 523
201
Mirrors
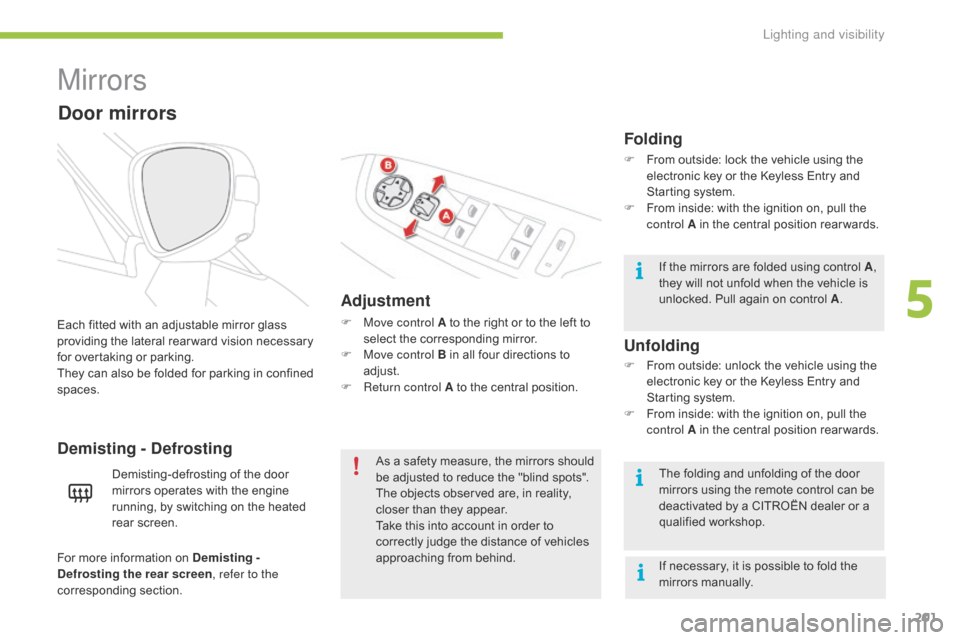
Adjustment
F Move control A to the right or to the left to s
elect the corresponding mirror.
F
M
ove control B in all four directions to
adj
ust.
F
R
eturn control A to the central position.
Each
fitted
with
an
adjustable
mirror
glass
p
roviding
the
lateral
rear ward
vision
necessary
f
or
overtaking
or
parking.
They
can
also
be
folded
for
parking
in
confined
spa
ces.
Demisting - Defrosting
Door mirrors
Demisting-defrosting of the door m irrors operates with the engine
r
unning, by switching on the heated
re
ar
sc
reen. As
a safety measure, the mirrors should b
e adjusted to reduce the "blind spots".
The
objects observed are, in reality,
c
loser than they appear.
Take
this into account in order to
c
orrectly judge the distance of vehicles
a
pproaching from behind.
Folding
F From outside: lock the vehicle using the e
lectronic key or the Keyless Entry and
S
tarting system.
F
F
rom inside: with the ignition on, pull the
c
ontrol A in the central position rear wards.
If
the mirrors are folded using control A,
they
will not unfold when the vehicle is
u
nlocked. Pull again on control A.
The
folding and unfolding of the door
m
irrors using the remote control can be
d
eactivated by a CITROËN dealer or a
q
ualified
w
orkshop.
F
F
rom outside: unlock the vehicle using the
e
lectronic key or the Keyless Entry and
S
tarting system.
F
F
rom inside: with the ignition on, pull the
c
ontrol A in the central position rear wards.
Unfolding
If necessary, it is possible to fold the mirrors m anually.
For
more
information
on
Demisting -
Defrosting the rear screen , refer to the
corresponding
s
ection.
5
Lighting and visibility
Page 214 of 523

212
To make your approach to the vehicle easier, these illuminate:
-
t
he zones facing the driver’s and
p
assenger’s
do
ors,
-
t
he zones for ward of the door mirrors and
r
ear ward of the front doors.
Door mirror spotlamps
Switching on
Switching off
They go off automatically after 30 seconds.
Exterior welcome lighting
Switching on
F Press the open padlock on the r
emote control or one of the front
d
oor handles with Keyless Entry
an
d
S
tarting.
Front daytime running
lamps
(light-emitting diodes)
They come on automatically when the engine is started, when the lighting control stalk is in
p
osition " 0" or " AUTO ".
In
some weather conditions (e.g. low
t
emperature or humidity), the presence
o
f misting on the internal sur face of the
g
lass of the headlamps and rear lamps
i
s normal; it disappears after the lamps
h
ave been on for a few minutes. The
remote switching on of the lighting makes
y
our approach to the vehicle easier in poor
light. It is activated when the lighting control
i
s in the "
AUTO" position and the level of light
d
etected by the sunshine sensor is low.
Switching off
The exterior welcome lighting switches off a
utomatically after a set time, when the ignition
i
s switched on or on locking the vehicle.
When
the
courtesy
lamp
is
in
this
p
osition,
the
spotlamps
come
on
au
tomatically:
-
w
hen
you
unlock
the
vehicle,
-
w
hen
you
remove
the
electronic
key
from
t
he
r
eader,
-
w
hen
you
open
a
door,
-
when you use the remote control to locate the vehicle.
The dipped beam headlamps and sidelamps c ome on; your vehicle is also unlocked.
Lighting and visibility
Page 282 of 523
280
Important: if your vehicle's AdBlue®
tank
is
completely
empty
-
which
is
c
onfirmed
by
the
alert
messages
and
t
he
impossibility
of
starting
the
engine,
y
ou
must
add
at
least
3.8
litres
of
fluid. Important: w
hen topping-up after
running out of AdBlue®, signalled b
y
the
message
"Top-up
AdBlue :
S
tarting
prevented",
you
must wait
f
or
approximately
5
minutes before
s
witching
on
the
ignition,
without
opening the driver's door, unlocking
the vehicle, placing the key of the
"Keyless Entr y and Star ting" system
inside the vehicle or inser ting the
electronic key in the reader.
Switch
on
the
ignition,
wait for
1
0 seconds,
then
start
the engine.
If
any
fluid
is
spilt
or
splashed,
wash
i
mmediately
w
ith
c
old
w
ater
o
r
w
ipe
w
ith
a
damp
cloth.
If
the
fluid
has
crystallised,
clean
it
off
u
sing
a
sponge
and
hot
water.
F
A
fter
emptying
the
bottle,
wipe
away
any
s
pillage
around
the
tank
filler
using
a
damp
c
loth. F
R
efit
the
blue
cap
to
the
tank
and
turn
it
a
6th of a turn clockwise, to its stop.
F
R
efit the black cap and turn it a quarter of
a
turn clockwise without pressing. Ensure
t
hat the indicator on the cap lines up with
t
he indicator on the support.
F
D
epending on equipment, return the spare
w
heel and/or the storage box to the bottom
o
f
the boot.
F
R
efit the boot carpet and close the tailgate.
Do
not dispose of AdBlue
® bottles in
the
household
waste.
Place them in a
c
ontainer
provided
for
this
purpose or
t
ake
them
to
your
dealer.
Practical information
Page 336 of 523
334
Jack .......................................................289-292
Jump starting .............................. ..................314
Key, electronic
......................................... 5
1,
12
8
Keyless
Entry and Starting
.....................5
3, 128
Kit,
temporary puncture repair
......................28
2Lamps,
par
king
.............................................
20
8
Lane departure warning,
assisted
................
.......................................
176
LEDs - light-emitting diodes
........ 2
99, 303, 305
Leg rest, electric
..............................
...............
80
Level, AdBlue
® additive ...........................3
5, 277
Level,
brake
fluid ..................................... 3 1, 273
Level,
Diesel
additive
.............................. 2
9, 274
Level,
engine
coolant
.............................. 4
0, 274
Level,
engine
oil
...............................
....... 41, 272
Level,
headlamp wash
.................................. 2
74
Levels
and
checks
..............................
...270-274
Level,
screenwash fluid
................................ 2
74
Light-emitting
diodes - LEDs
....... 2
99, 303, 305
Lighting
................
....................................23, 204
Lighting,
d
irectional
............................... 21
4,
21
5
Lighting,
gu
ide-me-home
............................. 20
8
Lighting,
i
nterior
............................................ 11
9
Lighting,
m
ood
..............................
................120
Lighting,
welcome
......................................... 2
12
Loading
..............................
............................... 9
Load
reduction mode
.................................... 26
3
Localised
Assistance Call
............................. 33
0
Locating
your
vehicle
...................................... 52
L
ocking
from
the inside
................................... 60
L
ow fuel level
..............................
..................255
Lumbar
...............................
.......................32, 80
Maintenance, routine
........................................ 9
M
ap
reading
lamps
....................................... 11
9
Markings,
id
entification
................................. 32
9
Massage
function
...............................
............80
Mats
...............................
................................ 109Memorising
a speed
.....................................
14
7
Mirror, child surveillance
...............................
20
3
Mirror, rear view
............................................
2
02
Mirrors, door..........................102, 180, 201, 202
Misfuel prevention ............................... ..........
256
Modularity, s eats ............................... ..............
89
Motorised t ailgate .....................................6
4-66
Mountings,
I
sofix
...............................
............247
J
K
M
Net ................................................................. 11 6
Number plate lamps ...................................... 3
07
N
Immobiliser, electronic ............................ 5 9, 128
Indicator, AdBlue® range ................................. 42
I
ndicator,
coolant
temperature ........................ 40
I
ndicators,
d
irection
...................................... 2
13
Indicator,
engine
oil level
........................ 4
1, 274
Indicator
and
warning lamps
..................... 21
-36
Inflating
tyres
..............................
..............9, 329
Inflating
tyres
and
accessories
(using
the
kit)
..............................
................288
Instrument
p
anels
...............................
.......17-19
Intelligent
T
raction
C
ontrol
............................ 2
24
ISOFIX
...............
........................................... 246
Labels,
i
dentification
..................................... 32
9
Lamp,
boot
...............................
..................... 118
L
Oil consumption ............................................ 2 72
OIl, eng ine ............................... ......................272
Opening
the bonnet
...................................... 26
9
Opening
the boot
..............................
.. 51, 53, 63
Opening
the doors
...............................
..... 51, 53
Opening
the panoramic sunroof blind
..........2
21
O
Pads, brake ...................................................2 76
Paint colour code .......................................... 32
9
Panoramic
glass sunroof
..............................2
21
P
Alphabetical index