ESP Citroen GRAND C4 PICASSO RHD 2016 2.G Owner's Guide
[x] Cancel search | Manufacturer: CITROEN, Model Year: 2016, Model line: GRAND C4 PICASSO RHD, Model: Citroen GRAND C4 PICASSO RHD 2016 2.GPages: 523, PDF Size: 13.63 MB
Page 70 of 523
68
Hands-free tailgate access
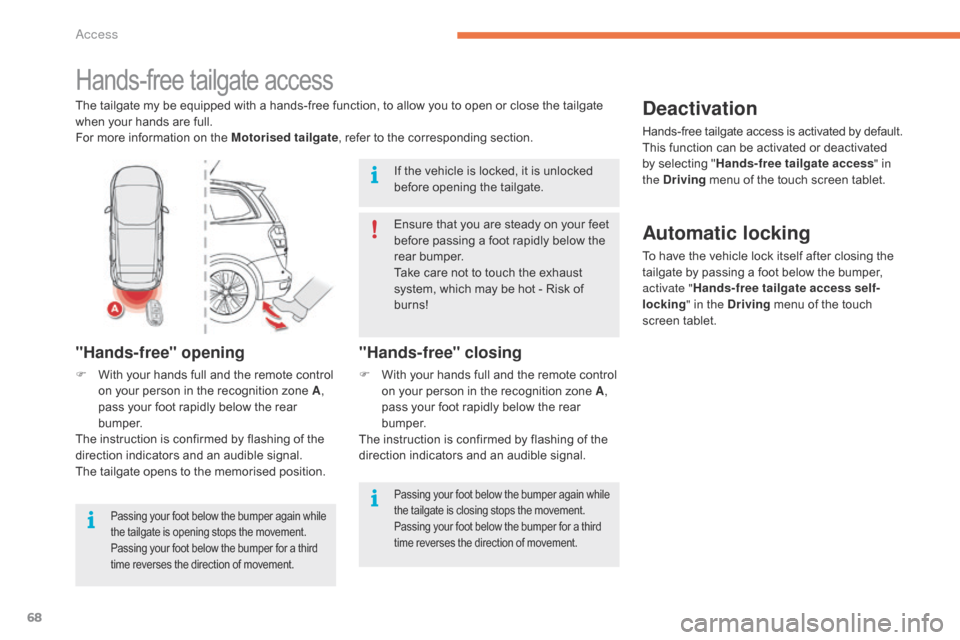
The tailgate my be equipped with a hands-free function, to allow you to open or close the tailgate when your hands are full.
For
more information on the Motorised tailgate,
refer to the corresponding section.
"Hands-free" opening
F With your hands full and the remote control o
n your person in the recognition zone A,
pass
your foot rapidly below the rear
b
u m p e r.
The
instruction is confirmed by flashing of the
d
irection indicators and an audible signal.
The
tailgate opens to the memorised position.
Passing your foot below the bumper again while the tailgate is opening stops the movement. P
assing your foot below the bumper for a third
t
ime reverses the direction of movement.
"Hands-free" closing
F With your hands full and the remote control o
n your person in the recognition zone A,
pass
your foot rapidly below the rear
b
u m p e r.
The
instruction is confirmed by flashing of the
d
irection indicators and an audible signal.
Deactivation
Hands-free tailgate access is activated by default.
T his function can be activated or deactivated
b
y selecting "Hands-free tailgate access " in
the Driving
menu of the touch screen tablet.
Ensure
that
you
are
steady
on
your
feet
b
efore
passing
a
foot
rapidly
below
the
r
ear
bumper.
Take
care
not
to
touch
the
exhaust
s
ystem,
which
may
be
hot
-
Risk
of
b
urns!
If
the
vehicle
is
locked,
it
is
unlocked
b
efore
opening
the
tailgate.
Automatic locking
To have the vehicle lock itself after closing the t ailgate by passing a foot below the bumper,
a
ctivate " Hands-free tailgate access self-
locking " in the Driving
menu of the touch
s
creen
t
ablet.
Passing your foot below the bumper again while the tailgate is closing stops the movement. P
assing your foot below the bumper for a third
t
ime reverses the direction of movement.
Access
Page 76 of 523
74
Reinitialising the electric
windows
Deactivating the rear
controls for the rear
windows
In the event of contact during operation o
f the windows, you must reverse the
m
ovement of the window. To do this,
p
ress the switch concerned.
When
operating the passenger electric
w
indow switches, the driver must
e
nsure that nothing is preventing
c
orrect closing of the windows.
The
driver must ensure that the
p
assengers use the electric windows
c
o r r e c t l y.
Be
particularly aware of children when
o
perating
t
he
w
indows.
Be
aware of passengers or other
p
ersons present when closing the
w
indows using the electronic key or the
"
Keyless Entry and Starting" system.
Following
reconnection
of
the
battery,
the
s
afety
anti-pinch
function
must
be
reinitialised.
The
safety
anti-pinch
function
is
not
active
d
uring
these
operations.
For
the
safety
of
your
children,
press
s
witch 5 to prevent operation of the
rear
windows
irrespective
of
their
p
ositions.
The
indicator
lamp
in
the
button
comes
on,
a
ccompanied
by
a
message
confirming
a
ctivation.
It
remains
on,
as
long
as
the
child
l
ock
is
off
(deactivated).
Use
of
the
rear
electric
windows
from
the
d
river's
controls
remains
possible. For
each
window:
-
l
ower
the
window
completely,
then
raise
it,
i
t
will
rise
in
steps
of
a
few
centimetres
with
e
ach
action.
Repeat
the
operation
until
the
w
indow
closes
completely,
-
c
ontinue
to
pull
the
switch
for
at
least
o
ne second
after
reaching
this
position,
w
indow
c
losed.
Access
Page 80 of 523
78
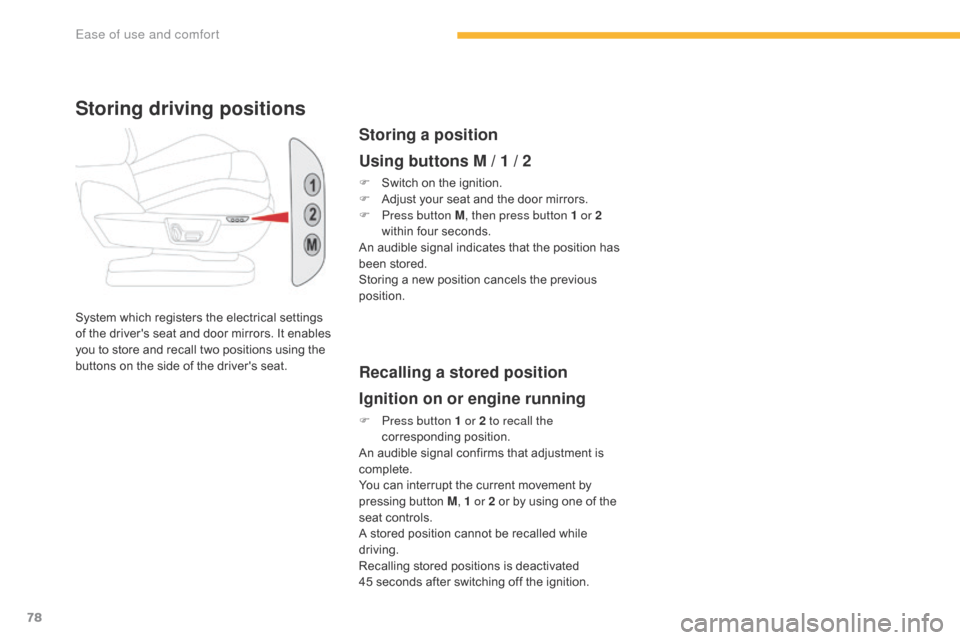
System which registers the electrical settings of the driver's seat and door mirrors. It enables
y
ou to store and recall two positions using the
b
uttons on the side of the driver's seat.
Storing driving positions
Storing a position
Using buttons M / 1 / 2
F Switch on the ignition.
F A djust your seat and the door mirrors.
F
P
ress button M , then press button 1 or 2
within
four seconds.
An
audible signal indicates that
t
he position has
b
een stored.
Storing
a new position cancels the previous
p
osition.
Recalling a stored position
Ignition on or engine running
F Press button 1 or 2 to recall the corresponding p osition.
An
audible signal confirms that adjustment is
c
omplete.
You
can interrupt the current movement by
p
ressing button M, 1 or 2
or by using one of the
s
eat controls.
A
stored position cannot be recalled while
d
riving.
Recalling
stored positions is deactivated
4
5 seconds after switching off the ignition.
Ease of use and comfort
Page 89 of 523
87
Third-row seats
Concertina boards
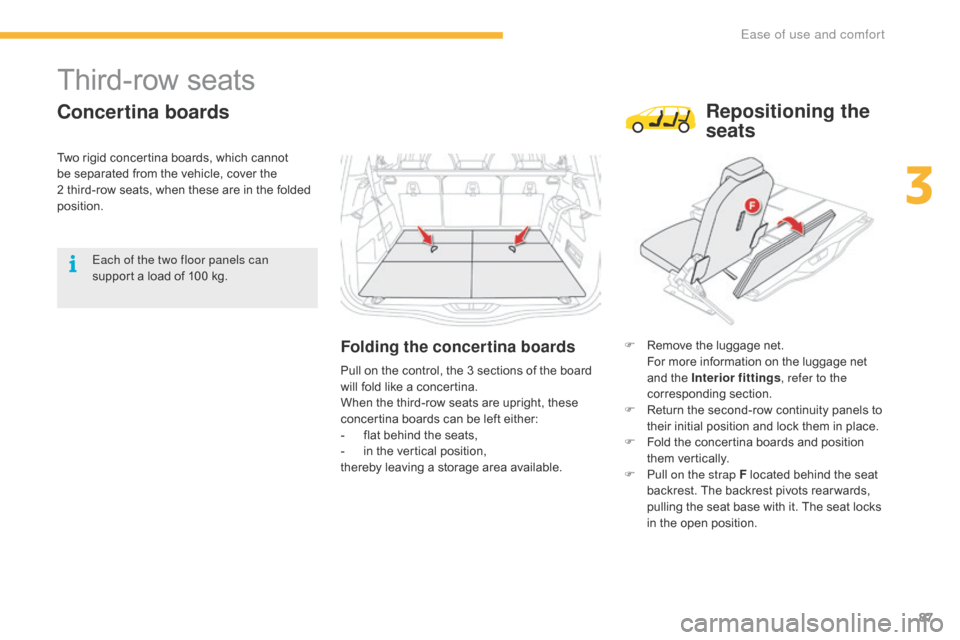
Folding the concertina boardsF Remove the luggage net. F
or more information on the luggage net
a
nd the Interior fittings , refer to the
corresponding
s
ection.
F
R
eturn the second-row continuity panels to
t
heir initial position and lock them in place.
F
F
old the concertina boards and position
t
hem
v
ertically.
F
P
ull on the strap F located behind the seat
b
ackrest. The backrest pivots rear wards,
p
ulling the seat base with it. The seat locks
i
n the open position.
Each of the two floor panels can
support
a
load
of
100
kg.
Pull
on
the
control,
the
3
sections
of
the
board
w
ill
fold
like
a
concertina.
When
the
third-row
seats
are
upright,
these
c
oncertina
boards
can
be
left
either:
-
f
lat
behind
the
seats,
-
i
n
the
vertical
position,
thereby
leaving
a
storage
area
available.
Repositioning the
seats
Two rigid concertina boards, which cannot b e separated from the vehicle, cover the
2 t
hird-row seats, when these are in the folded
p
osition.
3
Ease of use and comfort
Page 95 of 523
93
In order for these systems to be fully effective, follow the operation and maintenance guidelines belo w:
F
T
o obtain an even air distribution, take care not to obstruct the exterior air intake grilles
l
ocated at the base of the windscreen, the nozzles, the vents and the air outlets, as well
a
s the air extractor located in the boot.
F
D
o not cover the sunshine sensor, located on the dashboard; this is used for regulation
o
f the air conditioning system.
F
O
perate the air conditioning system for at least 5 to 10 minutes, once or twice a month
t
o keep it in per fect working order.
F
E
nsure that the passenger compartment filter is in good condition and have the filter
e
lements replaced regularly.
W
e recommend the use of a combined passenger compartment filter. Thanks to its
s
pecial active additive, it contributes to the purification of the air breathed by the
o
ccupants and the cleanliness of the passenger compartment (reduction of allergic
s
ymptoms, bad odours and greasy deposits).
F
T
o ensure correct operation of the air conditioning system, you are also advised to have
i
t checked regularly as recommended in the maintenance and warranty guide.
F
I
f the system does not produce cold air, switch it off and contact a CITROËN dealer or a
q
ualified
w
orkshop.
Recommendations for ventilation and air conditioning
If after an extended stop in sunshine, the i nterior t emperature i s v ery h igh, f irst
v
entilate the passenger compartment for
a
few moments.
Put
the air flow control at a setting high
e
nough to quickly change the air in the
p
assenger
c
ompartment.
The
air conditioning system does not
c
ontain chlorine and does not present
a
ny danger to the ozone layer.
The
condensation created by the air
c
onditioning results in a discharge
o
f water under the vehicle which is
p
er fectly normal.
When
towing
the
maximum
load
on
a
steep
gradient
in
high
temperatures,
switching
off
the
a
ir
conditioning
increases
the
available
engine
power
and
so
improves
the
towing
ability.
Stop & Start
The heating and air conditioning s ystems only work when the engine is
r
unning.
To
maintain a comfortable temperature
i
n the passenger compartment, you can
t
emporarily deactivate the Stop & Start
s
ystem.
For
more information on Stop & Star t,
refer
to the corresponding section.
3
Ease of use and comfort
Page 97 of 523
95
Dual-zone manual air conditioning with temperature regulation
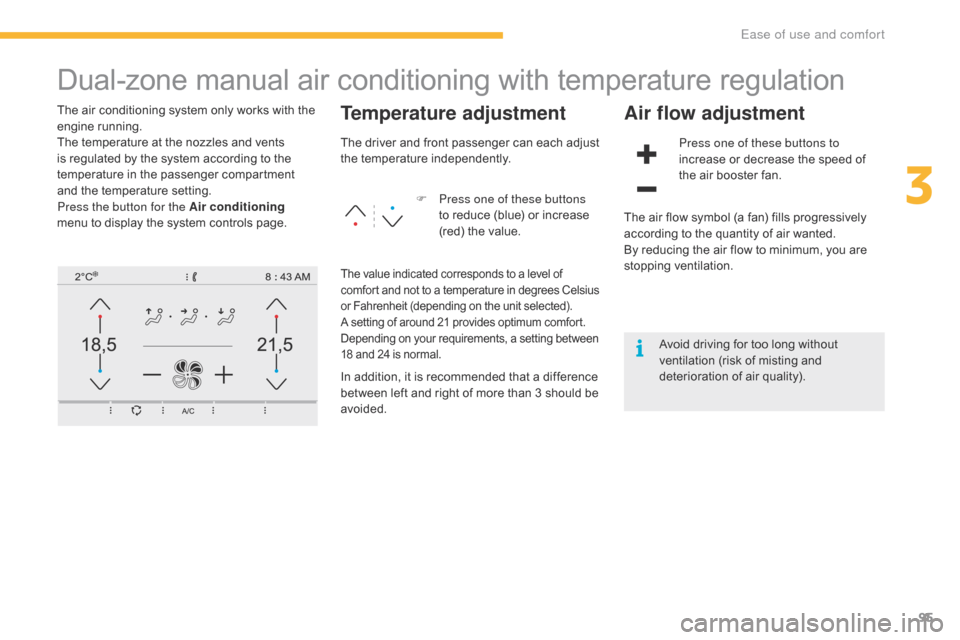
The air conditioning system only works with the engine r unning.
The
temperature at the nozzles and vents
i
s regulated by the system according to the
t
emperature in the passenger compartment
a
nd the temperature setting.
Press the button for the Air conditioning
menu
to display the system controls page.Temperature adjustment
F Press one of these buttons to reduce (blue) or increase
(
red) the value.
Air flow adjustment
Press one of these buttons to
increase or decrease the speed of
t
he air booster fan.
The
driver
and
front
passenger
can
each
adjust
t
he t
emperature i
ndependently.
The value indicated corresponds to a level of c
omfort and not to a temperature in degrees Celsius o
r Fahrenheit (depending on the unit selected).
A
setting of around 21 provides optimum comfort.
D
epending on your requirements, a setting between
1
8 and 24 is normal.
In addition, it is recommended that a difference between left and right of more than 3 should be
av
oided. The
air flow symbol (a fan) fills progressively
a
ccording to the quantity of air wanted.
By reducing the air flow to minimum, you are
s
topping
v
entilation.
Avoid driving for too long without
v
entilation (risk of misting and d
eterioration of air quality).
3
Ease of use and comfort
Page 99 of 523
97
Dual-zone automatic air conditioning
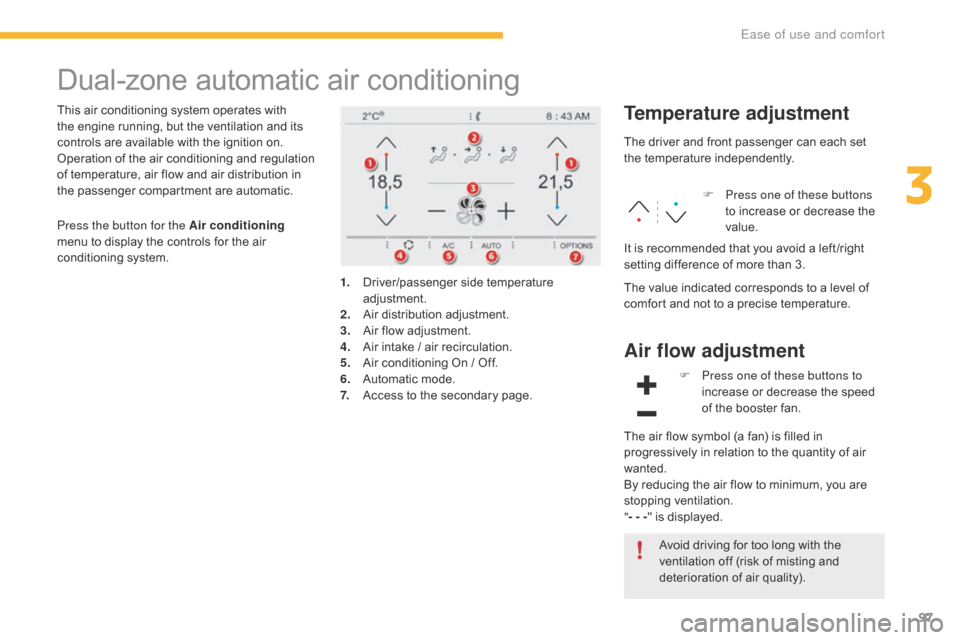
This air conditioning system operates with the engine running, but the ventilation and its
c
ontrols are available with the ignition on.
Operation
of the air conditioning and regulation
o
f temperature, air flow and air distribution in
t
he passenger compartment are automatic.Temperature adjustment
1. Driver/passenger side t emperature adj
ustment.
2.
A
ir
d
istribution
a
djustment.
3.
A
ir flow adjustment.
4.
A
ir intake / air recirculation.
5.
A
ir conditioning On / Off.
6.
A
utomatic mode.
7.
A
ccess to the secondary page.The
driver and front passenger can each set
t
he
t
emperature
i
ndependently.
F
P
ress one of these buttons
to increase or decrease the
va
lue.
The value indicated corresponds to a level of
c
omfort and not to a precise temperature.
It
is recommended that you avoid a left /right
s
etting difference of more than 3.
Press the button for the Air conditioning
menu
to
display
the
controls
for
the
air
c
onditioning
system.
Air flow adjustment
Avoid driving for too long with the v
entilation off (risk of misting and
d
eterioration of air quality).
F
P
ress one of these buttons to
increase or decrease the speed
o
f the booster fan.
The
air flow symbol (a fan) is filled in
p
rogressively in relation to the quantity of air
w
anted.
By
reducing the air flow to minimum, you are
s
topping
v
entilation.
" - - - "
is displayed.
3
Ease of use and comfort
Page 121 of 523
119
Courtesy lamps
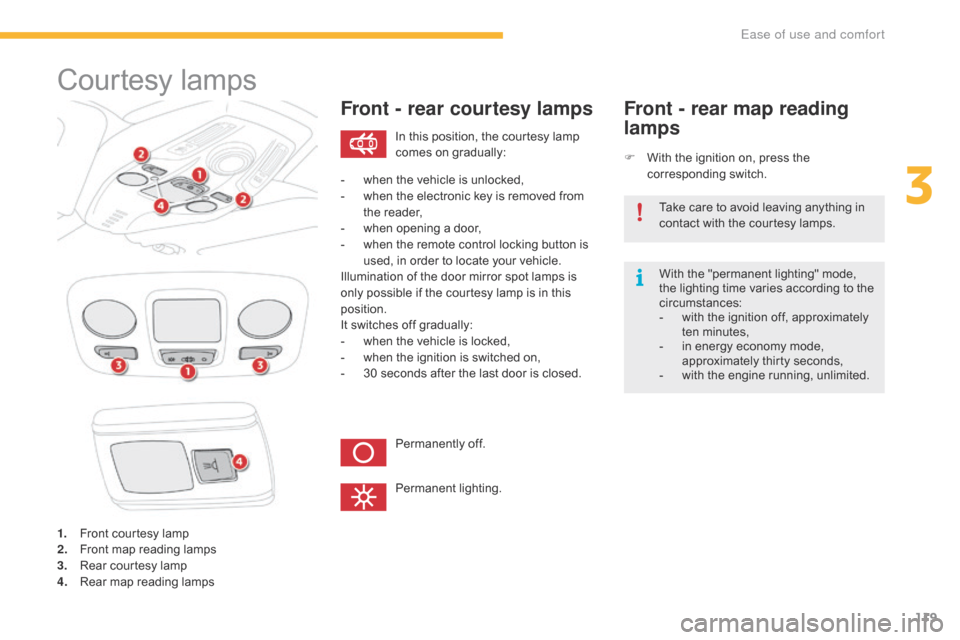
1. Front courtesy lamp
2. F ront map reading lamps
3.
R
ear courtesy lamp
4.
R
ear map reading lamps
Front - rear courtesy lamps
F With the ignition on, press the c
orresponding s witch.
Front - rear map reading
lamps
With the "permanent lighting" mode, the lighting time varies according to the
c
ircumstances:
-
w
ith the ignition off, approximately
t
en
m
inutes,
-
i
n energy economy mode,
a
pproximately thirty seconds,
-
w
ith the engine running, unlimited.
In
this
position,
the
courtesy
lamp
c
omes
on
gradually:
Permanently
off.
Permanent
l
ighting.
-
w
hen
the
vehicle
is
unlocked,
-
w
hen
the
electronic
key
is
removed
from
t
he
r
eader,
-
w
hen
opening
a
door,
-
w
hen
the
remote
control
locking
button
is
u
sed,
in
order
to
locate
your
vehicle.
Illumination
of
the
door
mirror
spot
lamps
is
o
nly
possible
if
the
courtesy
lamp
is
in
this
p
osition.
It
switches
off
gradually:
-
w
hen
the
vehicle
is
locked,
-
w
hen
the
ignition
is
switched
on,
-
3
0
seconds
after
the
last
door
is
closed. Take
care to avoid leaving anything in
c
ontact with the courtesy lamps.
3
Ease of use and comfort
Page 124 of 523
122
When towing
Distribution of loads
F Distribute the load in the trailer so that the h
eaviest items are as close as possible to t
he axle and the nose weight approaches the
m
aximum permitted without exceeding it.
Air
density decreases with altitude, thus
r
educing engine per formance. Above
1 0
00 metres, the maximum towed load must
b
e reduced by 10 % for every 1 000 metres of
al
titude.
Side wind
F Take into account the increased sensitivity t
o side wind.
For
more information on Weights
, refer
to the corresponding section.
The rear parking sensors will be
d
eactivated automatically to avoid the
a
udible signal if a genuine CITROËN
t
owbar is used.
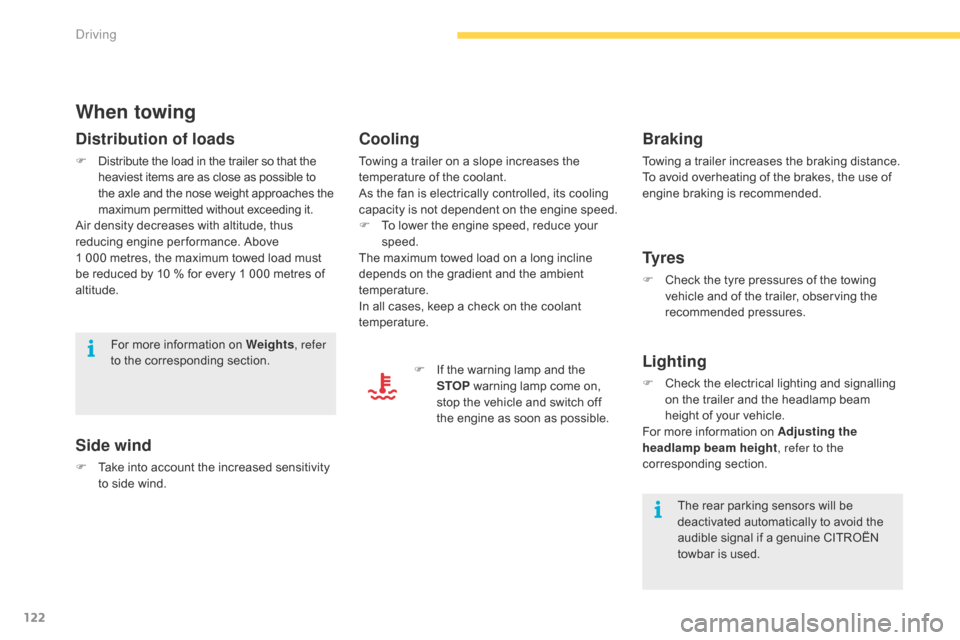
Cooling
Towing a trailer on a slope increases the temperature of the coolant.
As
the fan is electrically controlled, its cooling
c
apacity is not dependent on the engine speed.
F
T
o lower the engine speed, reduce your
s
peed.
The
maximum towed load on a long incline
d
epends on the gradient and the ambient
t
emperature.
In
all cases, keep a check on the coolant
t
emperature. F
I
f the warning lamp and the
S
TOP
warning lamp come on,
s
top the vehicle and switch off
t
he engine as soon as possible.
Braking
Towing a trailer increases the braking distance.
T o avoid overheating of the brakes, the use of
e
ngine braking is recommended.
Ty r e s
F Check the tyre pressures of the towing v
ehicle and of the trailer, observing the
re
commended
p
ressures.
Lighting
F Check the electrical lighting and signalling o
n the trailer and the headlamp beam
h
eight of your vehicle.
For
more information on Adjusting the
headlamp beam height , refer to the
corresponding
s
ection.
Driving
Page 141 of 523
139
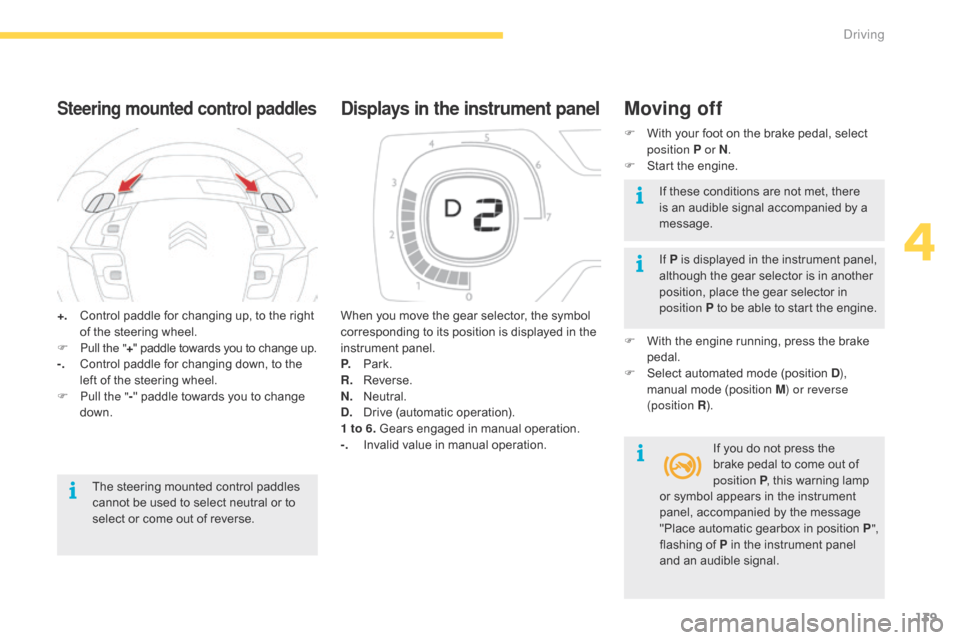
+. Control paddle for changing up, to the right o
f the steering wheel.
F
P
ull the " +"
paddle towards you to change up.
-.
C
ontrol paddle for changing down, to the
l
eft of the steering wheel.
F
P
ull the " -"
paddle towards you to change
d
own.
Steering mounted control paddles
The steering mounted control paddles cannot be used to select neutral or to
s
elect or come out of reverse. When
you move the gear selector, the symbol
c
orresponding to its position is displayed in the
in
strument
pan
el.
P.
Pa
rk.
R.
R
everse.
N.
N
eutral.
D.
D
rive
(
automatic
ope
ration).
1 to 6. Gears engaged in manual operation.
-.
I
nvalid value in manual operation.
Displays in the instrument panelMoving off
F With
your foot on the brake pedal, select p
osition P or N .
F
S
tart the engine.
If P
is displayed in the instrument panel,
a
lthough the gear selector is in another
p
osition, place the gear selector in
p
osition P to be able to start the engine.
F
W
ith the engine running, press the brake
ped
al.
F
S
elect automated mode (position D),
manual
mode (position M) or reverse
(position R ).
If
you do not press the
b
rake pedal to come out of
p
osition P,
this warning lamp
I
f these conditions are not met, there
i
s an audible signal accompanied by a
m
essage.
or
symbol appears in the instrument
p
anel, accompanied by the message
"
Place automatic gearbox in position P",
flashing
of P in the instrument panel
a
nd an audible signal.
4
Driving