audio Citroen GRAND C4 PICASSO RHD 2016 2.G Owner's Manual
[x] Cancel search | Manufacturer: CITROEN, Model Year: 2016, Model line: GRAND C4 PICASSO RHD, Model: Citroen GRAND C4 PICASSO RHD 2016 2.GPages: 523, PDF Size: 13.63 MB
Page 5 of 523
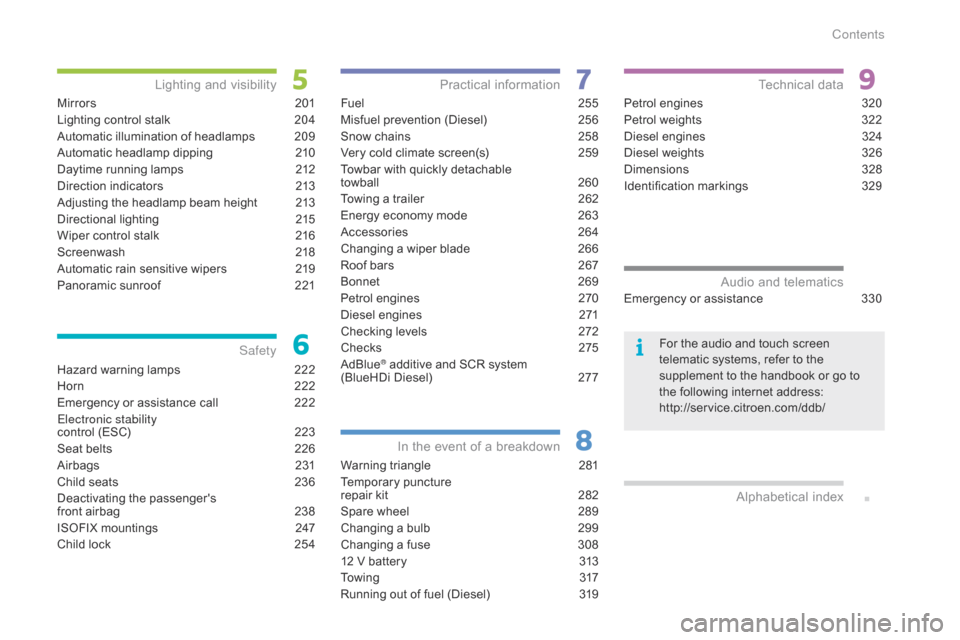
Hazard warning lamps 222
Horn
2
22
Emergency
or assistance call
2
22
Electronic stability
control
(ESC)
2
23
Seat
bel
ts
2
26
Airbags
2
31
Child
seats
2
36
Deactivating
t
he
p
assenger's
f
ront airbag
2
38
ISOFIX
mountings
2
47
Child
lock
2
54
Safety
Fuel 2 55
Misfuel prevention (Diesel)
2
56
Snow
chains
2
58
Very
cold climate screen(s)
2
59
Towbar
with quickly detachable
towball
2
60
Towing
a trailer
2
62
Energy
economy mode
2
63
Accessories
2
64
Changing
a wiper blade
2
66
Roof
bars
2
67
Bonnet
26
9
Petrol
engines
2
70
Diesel
engines
2
71
Checking
levels
2
72
Checks
2
75
AdBlue
® additive and SCR system
(
BlueHDi Diesel) 2 77
Practical information
Warning triangle 2 81
Temporary
pu
ncture
r
epair kit
2
82
Spare
wheel
2
89
Changing
a bulb
2
99
Changing
a fuse
3
08
12
V battery
3
13
To w i n g
3
17
Running
out of fuel (Diesel)
3
19
In the event o f a b reakdown
Petrol engines 3 20
Petrol weights
3
22
Diesel
engines
3
24
Diesel
weights
3
26
Dimensions
3
28
Identification
ma
rkings
3
29
Technical data
Emergency or assistance 3 30Audio and telematics
Mirrors 2 01
Lighting control stalk
2
04
Automatic
illumination of headlamps
2
09
Automatic
headlamp dipping
2
10
Daytime
running lamps
2
12
Direction
indicators
2
13
Adjusting
the headlamp beam height
2
13
Directional
l
ighting
2
15
Wiper
control stalk
2
16
Screenwash
2
18
Automatic
rain sensitive wipers
2
19
Panoramic
sunroof
2
21
Lighting and v isibility
Alphabetical
in
dex
For the audio and touch screen telematic systems, refer to the
s
upplement to the handbook or go to
t
he following internet address:
http://service.citroen.com/ddb/
Contents
Page 14 of 523
12
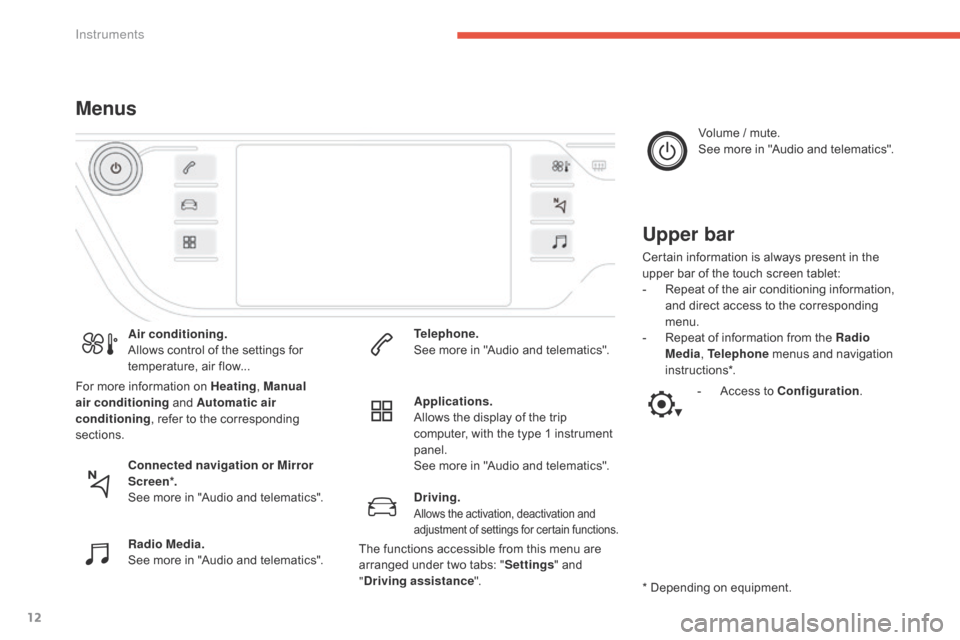
MenusUpper bar
Certain information is always present in the upper bar of the touch screen tablet:
-
R
epeat of the air conditioning information,
a
nd direct access to the corresponding
m
enu.
-
R
epeat of information from the Radio
Media , Telephone
menus and navigation
i
nstructions*.
*
Depending on equipment.
Air conditioning.
Allows
control
of
the
settings
for
t
emperature,
air
flow...
Connected navigation or Mirror
Scre en*.
See
more
in
"Audio
and
telematics".
Radio Media.
See
more
in
"Audio
and
telematics". Telephone.
See
more
in
"Audio
and
telematics".
Driving.
Allows the activation, deactivation and a djustment of settings for certain functions.
Applications.
Allows the display of the trip
c
omputer, with the type 1 instrument
pan
el.
See
more in "Audio and telematics". Volume
/ mute.
See more in "Audio and telematics".
- A ccess to Configuration
.
For
more
information
on
Heating
, Manual
air conditioning
and
Automatic air
conditioning ,
refer
to
the
corresponding
s
ections.
The
functions accessible from this menu are
a
rranged
under two tabs: "Settings "
and
"D
riving assistance ".
Instruments
Page 107 of 523
105
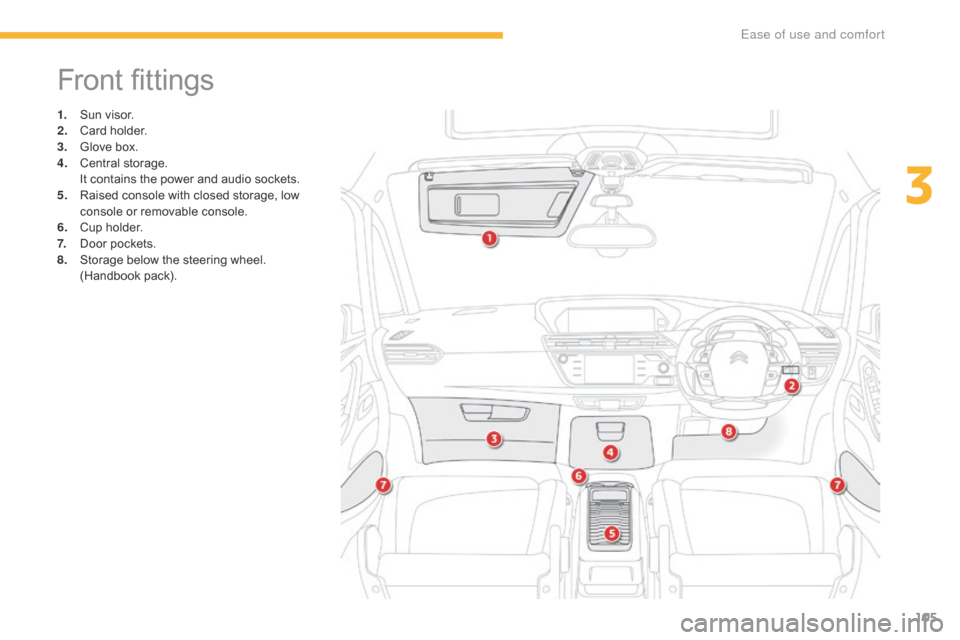
Front fittings
1. Sun visor.
2. C ard holder.
3.
G
love box.
4.
C
entral
s
torage.
I
t contains the power and audio sockets.
5.
R
aised console with closed storage, low
c
onsole or removable console.
6.
C
up holder.
7.
D
oor pockets.
8.
S
torage below the steering wheel.
(
Handbook pack).
3
Ease of use and comfort
Page 110 of 523
108
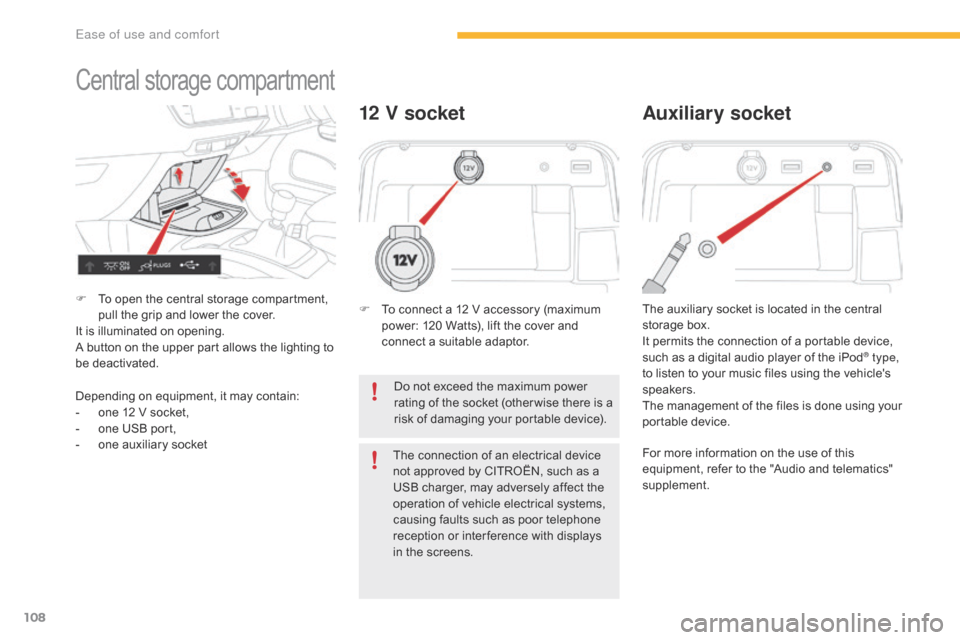
12 V socket
The auxiliary socket is located in the central storage box.
It
permits the connection of a portable device,
s
uch as a digital audio player of the iPod
® type,
to
listen
to
your
music
files
using
the
vehicle's
s
peakers.
The
management
of
the
files
is
done
using your
p
ortable
d
evice.
Auxiliary socket
For more information on the use of this e quipment, refer to the "Audio and telematics"
s
upplement.
F
T
o
connect
a
12
V
accessory
(maximum
p
ower:
120
Watts),
lift
the
cover
and
c
onnect
a
suitable
adaptor.
Do
not
exceed
the
maximum
power
r
ating
of
the
socket
(other wise
there
is
a
r
isk
of
damaging
your
portable
device).
The
connection
of
an
electrical
device
n
ot
approved
by
CITROËN,
such
as
a
U
SB
charger,
may
adversely
affect
the
o
peration
of
vehicle
electrical
systems,
c
ausing
faults
such
as
poor
telephone
r
eception
or
inter ference
with
displays
i
n
the
screens.
Central storage c ompartment
F To open the central storage compartment, p
ull the grip and lower the cover.
It
is illuminated on opening.
A
button on the upper part allows the lighting to
b
e deactivated.
Depending
on equipment, it may contain:
-
o
ne 12 V socket,
-
o
ne USB port,
-
o
ne auxiliary socket
Ease of use and comfort
Page 111 of 523
109
When the USB port is used, the portable device charges automatically.
A
message is displayed if the power
c
onsumption of the portable device
e
xceeds the current supplied by the
v
ehicle.
The
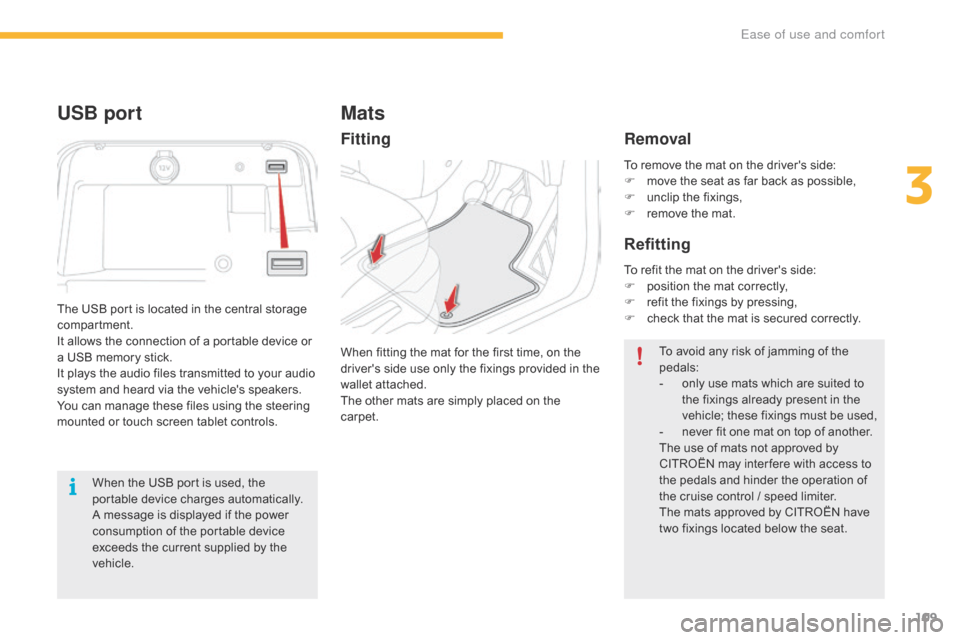
USB port is located in the central storage
c
ompartment.
It
allows the connection of a portable device or
a
USB memory stick.
It
plays the audio files transmitted to your audio
s
ystem and heard via the vehicle's speakers.
You
can manage these files using the steering
m
ounted or touch screen tablet controls.
USB port
To remove the mat on the driver's side:
F m ove the seat as far back as possible,
F
u
nclip the fixings,
F
r
emove the mat.
Mats
When fitting the mat for the first time, on the driver's side use only the fixings provided in the
w
allet attached.
The
other mats are simply placed on the
c
arpet. To
avoid any risk of jamming of the ped
als:
-
o
nly use mats which are suited to
t
he fixings already present in the
v
ehicle; these fixings must be used,
-
n
ever fit one mat on top of another.
The
use of mats not approved by
C
ITROËN may inter fere with access to
t
he pedals and hinder the operation of
t
he cruise control / speed limiter.
The
mats approved by CITROËN have
t
wo fixings located below the seat.
To
refit the mat on the driver's side:
F
p
osition the mat correctly,
F
r
efit the fixings by pressing,
F
c
heck that the mat is secured correctly.
Fitting
Removal
Refitting
3
Ease of use and comfort
Page 224 of 523
222
Hazard warning lamps
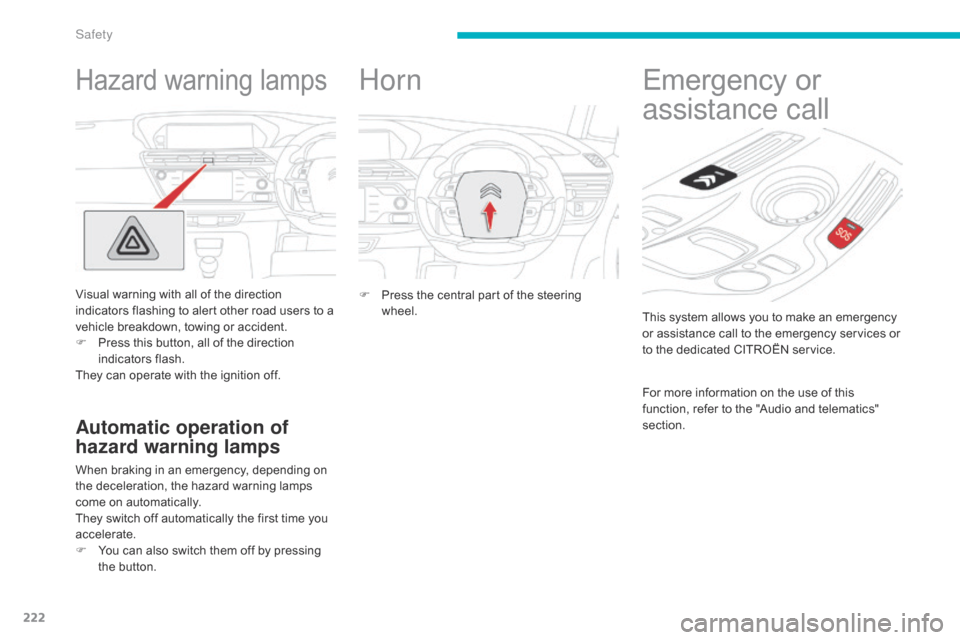
Visual warning with all of the direction i
ndicators flashing to alert other road users to a
v
ehicle breakdown, towing or accident.
F
P
ress this button, all of the direction
in
dicators
f
lash.
They
can operate with the ignition off.
Automatic operation of
hazard warning lamps
When braking in an emergency, depending on the deceleration, the hazard warning lamps
c
ome on automatically.
They
switch off automatically the first time you
a
ccelerate.
F
Y
ou can also switch them off by pressing
t
he button.
Horn
F Press the central part of the steering w
heel. This
system allows you to make an emergency
o
r assistance call to the emergency services or
t
o the dedicated CITROËN service.
Emergency or
a
ssistance call
For more information on the use of this f
unction, refer to the "Audio and telematics"
s
ection.
Safety
Page 265 of 523
263
Exiting economy mode
These functions are reactivated automatically next time the vehicle is driven.
In
order to restore the use of these functions
i
mmediately, start the engine and let it run:
-
f
or less than ten minutes, to use the
e
quipment for approximately five minutes,
-
f
or more than ten minutes, to use the
e
quipment for up to approximately
t
hirty minutes.
Let
the engine run for the duration specified to
e
nsure that the battery charge is sufficient.
Do
not repeatedly and continuously restart the
e
ngine in order to charge the battery.
A
flat battery prevents the engine from starting.
For
more information on the 12 V batter y, refer
to
the corresponding section.
Load reduction mode
System which manages the use of certain functions according to the level of charge
r
emaining in the battery.
When
the vehicle is being driven, the load
r
eduction function temporarily deactivates
c
ertain functions, such as the air conditioning,
t
he heated rear screen...
The
deactivated functions are reactivated
a
utomatically as soon as conditions permit.
Energy economy mode
Switching to economy
mode
A message appears in the instrument panel s
creen indicating that the vehicle has switched
t
o economy mode and the active functions are
p
ut on standby.
If
a telephone call is being made at this time, it
w
ill be maintained for around 10 minutes with
t
he Bluetooth hands-free system of your audio
s
ystem.
System
which manages the duration of use of certain functions to conserve a sufficient level of
c
harge in the battery.
After the engine has stopped, you can still use functions such as the audio and telematics
s
ystem, windscreen wipers, dipped beam headlamps, courtesy lamps, etc. for a maximum
c
ombined duration of about forty minutes.
7
Practical information
Page 313 of 523
311
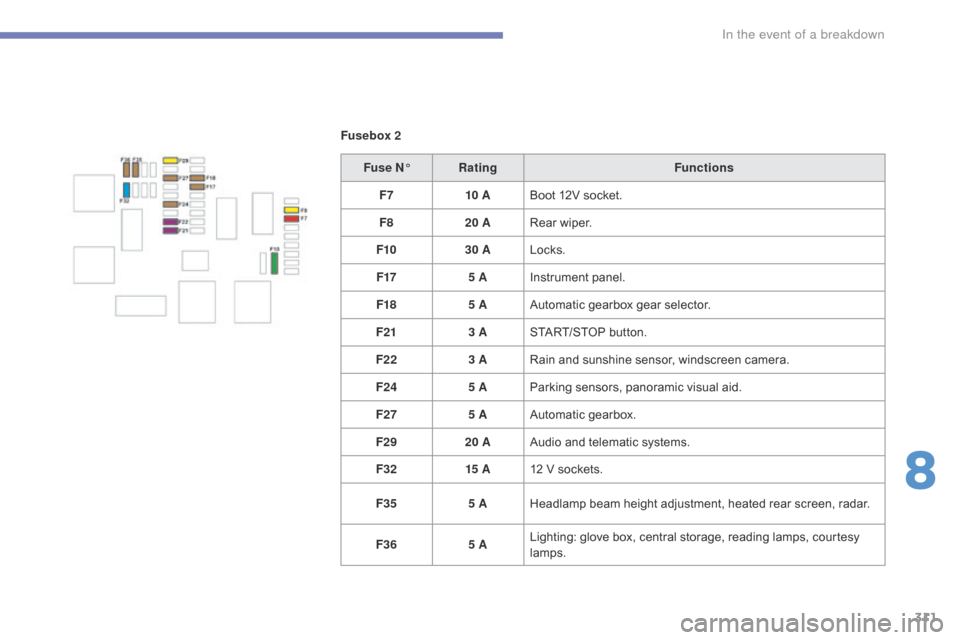
Fusebox 2Fuse N° Rating Functions
F7 10 ABoot
12V socket.
F8 20 ARear
wiper.
F10 30 ALocks.
F17 5 AInstrument
panel.
F18 5 AAutomatic
gearbox gear selector.
F21 3 ASTART/STOP
button.
F22 3 ARain
and sunshine sensor, windscreen camera.
F24 5 AParking
sensors, panoramic visual aid.
F27 5 AAutomatic
gearbox.
F29 20 AAudio
and telematic systems.
F32 15 A12
V sockets.
F35 5 AHeadlamp
beam height adjustment, heated rear screen, radar.
F36 5 ALighting:
glove box, central storage, reading lamps, courtesy
lam
ps.
8
In the event of a breakdown
Page 316 of 523
314
F Start the engine of the vehicle with the g
ood battery and leave it running for a few
m
inutes.
F
O
perate the starter on the broken down
v
ehicle and let the engine run.
I
f the engine does not start straight away,
s
witch off the ignition and wait a few
m
oments before trying again.
F
W
ait until the engine returns to idle then
d
isconnect the jump lead cables in the
r
everse
o
rder.
F
R
efit the plastic cover to the (+) terminal, if
y
our vehicle has one.
F
A
llow the engine to run for at least
3
0 minutes, by driving or with the vehicle
s
tationary, so that the battery reaches an
adequate
state of charge.
Starting using another battery
Some functions, including Stop & Start, are not available if the battery is not
sufficiently
c
harged.
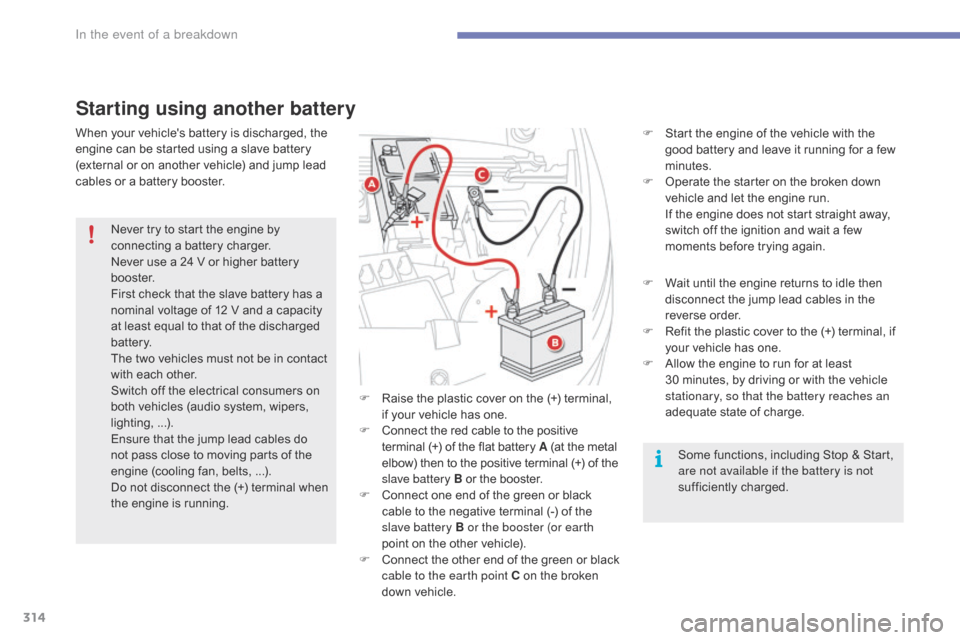
F
R
aise
the
plastic
cover
on
the
(+)
terminal,
i
f
your
vehicle
has
one.
F
C
onnect
the
red
cable
to
the
positive
t
erminal
(+)
of
the
flat
battery
A
(at
the
metal e
lbow)
then
to
the
positive
terminal (+)
of
the s
lave battery B
or
the
booster.
F
C
onnect
one
end
of
the
green
or
black
c
able
to
the
negative
terminal
(-)
of
the
s
lave battery B or the booster (or earth
point
on
the
other
vehicle).
F
C
onnect
t
he
o
ther
e
nd
o
f
t
he
g
reen
o
r
b
lack
c
able to the earth point C
on
the
broken
d
own
vehicle.
Never
try
to
start
the
engine
by
c
onnecting
a
battery
charger.
Never
use
a
24
V
or
higher
battery
b
o o s t e r.
First
check
that
the
slave
battery
has
a
n
ominal
voltage
of
12
V
and
a
capacity
a
t
least
equal
to
that
of
the
discharged
b
attery.
The
two
vehicles
must
not
be
in
contact
w
ith
each
other.
Switch
off
the
electrical
consumers
on
b
oth
vehicles
(audio
system,
wipers,
l
ighting, ...).
Ensure
that
the
jump
lead
cables
do
n
ot
pass
close
to
moving
parts
of
the
e
ngine
(cooling
fan,
belts, ...).
Do
not
disconnect
the
(+)
terminal
when
t
he
engine
is
running.
When
your
vehicle's
battery
is
discharged,
the
e
ngine
can
be
started
using
a
slave
battery
(
external
or
on
another
vehicle)
and
jump
lead
c
ables
or
a
battery
booster.
In the event of a breakdown
Page 317 of 523
315
Never try to charge a frozen battery.
I f the battery has been frozen, have
i
t checked by a CITROËN dealer or a
q
ualified workshop, who will check that
t
he internal components have not been
d
amaged and the casing is not cracked,
w
hich could cause a leak of toxic and
c
orrosive acid.
F
S
witch
off
the
ignition.
F
S
witch
off
all
electrical
consumers
(audio
s
ystem,
lighting,
wipers, ...).
F
S
witch
off
the
charger
B
before
connecting
t
he
cables
to
the
battery,
so
as
to
avoid
any
d
angerous
spar
ks.
F
E
nsure
that
the
charger
cables
are
in
good
c
ondition.
F
R
aise the plastic cover, if your vehicle has
one,
on
the
(+)
terminal.
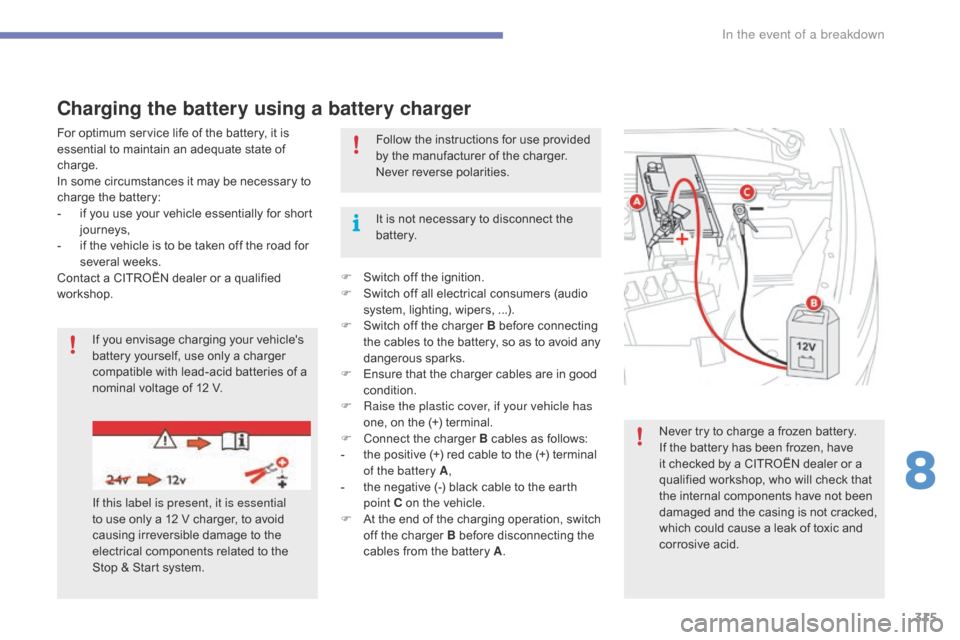
F
C
onnect
the
charger
B
cables
as
follows:
-
t
he
positive
(+)
red
cable
to
the
(+)
terminal
o
f the battery A ,
-
t
he
negative
(-)
black
cable
to
the
earth
p
oint C
on
the
vehicle.
F
A
t
the
end
of
the
charging
operation,
switch
o
ff
the
charger
B
before
disconnecting
the
c
ables
from
the
battery
A .
It
is
not
necessary
to
disconnect
the
b
attery.
If
you
envisage
charging
your
vehicle's
b
attery
yourself,
use
only
a
charger
c
ompatible
with
lead-acid
batteries
of
a
n
ominal
voltage
of
12
V. Follow
the
instructions
for
use
provided
b
y
the
manufacturer
of
the
charger.
Never
reverse
polarities.
Charging the battery using a battery charger
If this label is present, it is essential
to
use only a 12 V charger, to avoid
c
ausing irreversible damage to the
e
lectrical components related to the
S
top & Start system.
For
optimum service life of the battery, it is
e
ssential to maintain an adequate state of
c
harge.
In
some circumstances it may be necessary to
c
harge the battery:
-
i
f
you use your vehicle essentially for short
j
ourneys,
-
i
f
the vehicle is to be taken off the road for
s
everal weeks.
Contact a CITROËN dealer or a qualified
w
orkshop.
8
In the event of a breakdown