warning light Citroen GRAND C4 PICASSO RHD 2016 2.G Owner's Manual
[x] Cancel search | Manufacturer: CITROEN, Model Year: 2016, Model line: GRAND C4 PICASSO RHD, Model: Citroen GRAND C4 PICASSO RHD 2016 2.GPages: 523, PDF Size: 13.63 MB
Page 4 of 523
Touch screen tablet 11
Instrument panels
1
7
Indicator
and warning lamps
2
1
Gauges
and indicators
3
7
Adjustment
buttons
4
5
Trip
computer
4
8
InstrumentsOver view
Electronic key - remote control 5
1
Keyless Entry and Starting
5
3
Central
locking
6
0
Doors
61
Boo
t
6
3
Motorised
tailgate
6
4
Hands-free
tailgate access
6
8
Alarm
7
0
Electric
windows
7
3
Access
Front seats 75
Rear seats
8
2
Seat
modularity
8
9
Steering
wheel adjustment
9
1
Ventilation
9
2
Heating
9
4
Dual-zone
m
anual
a
ir
c
onditioning
9
5
Dual-zone
automatic air conditioning
9
7
Front
demist - defrost
1
02
Rear
screen demist -
d
efrost
1
02
Scented
air freshener
1
03
Interior
fittings
1
05
Courtesy
lamps
1
19
Interior
mood lighting
1
20
Ease of use a nd c omfort
Driving recommendations 1 21
Starting-switching off the engine with
the
electronic key
1
23
Starting-switching
off the engine with
Keyless
Entry and Starting
1
25
Electric
parking brake
1
29
Hill
start assist
1
36
5 -speed
manual gearbox
1
37
6 -speed
manual gearbox
1
37
Automatic
gearbox
1
38
Gear
ef ficiency indicator
1
43
Stop & Start
1
44
Memorising
speeds
1
47
Speed
limit recognition
1
48
Speed
limiter
1
52
Cruise
control
1
55
Dynamic
cruise control
1
58
Dynamic
cruise control
with
Stop function
1
65
Collision
risk alert
1
74
Assisted
lane departure
warning
system
1
76
Blind
spot monitoring system
1
80
Fatigue
detection system
1
83
Parking
sensors
1
85
Reversing
camera
1
87
360
Vision
1
88
Park
Assist
1
90
Under-inflation
d
etection
1
98
Driving
Eco-driving
Contents
Page 5 of 523
Hazard warning lamps 222
Horn
2
22
Emergency
or assistance call
2
22
Electronic stability
control
(ESC)
2
23
Seat
bel
ts
2
26
Airbags
2
31
Child
seats
2
36
Deactivating
t
he
p
assenger's
f
ront airbag
2
38
ISOFIX
mountings
2
47
Child
lock
2
54
Safety
Fuel 2 55
Misfuel prevention (Diesel)
2
56
Snow
chains
2
58
Very
cold climate screen(s)
2
59
Towbar
with quickly detachable
towball
2
60
Towing
a trailer
2
62
Energy
economy mode
2
63
Accessories
2
64
Changing
a wiper blade
2
66
Roof
bars
2
67
Bonnet
26
9
Petrol
engines
2
70
Diesel
engines
2
71
Checking
levels
2
72
Checks
2
75
AdBlue
® additive and SCR system
(
BlueHDi Diesel) 2 77
Practical information
Warning triangle 2 81
Temporary
pu
ncture
r
epair kit
2
82
Spare
wheel
2
89
Changing
a bulb
2
99
Changing
a fuse
3
08
12
V battery
3
13
To w i n g
3
17
Running
out of fuel (Diesel)
3
19
In the event o f a b reakdown
Petrol engines 3 20
Petrol weights
3
22
Diesel
engines
3
24
Diesel
weights
3
26
Dimensions
3
28
Identification
ma
rkings
3
29
Technical data
Emergency or assistance 3 30Audio and telematics
Mirrors 2 01
Lighting control stalk
2
04
Automatic
illumination of headlamps
2
09
Automatic
headlamp dipping
2
10
Daytime
running lamps
2
12
Direction
indicators
2
13
Adjusting
the headlamp beam height
2
13
Directional
l
ighting
2
15
Wiper
control stalk
2
16
Screenwash
2
18
Automatic
rain sensitive wipers
2
19
Panoramic
sunroof
2
21
Lighting and v isibility
Alphabetical
in
dex
For the audio and touch screen telematic systems, refer to the
s
upplement to the handbook or go to
t
he following internet address:
http://service.citroen.com/ddb/
Contents
Page 8 of 523
6
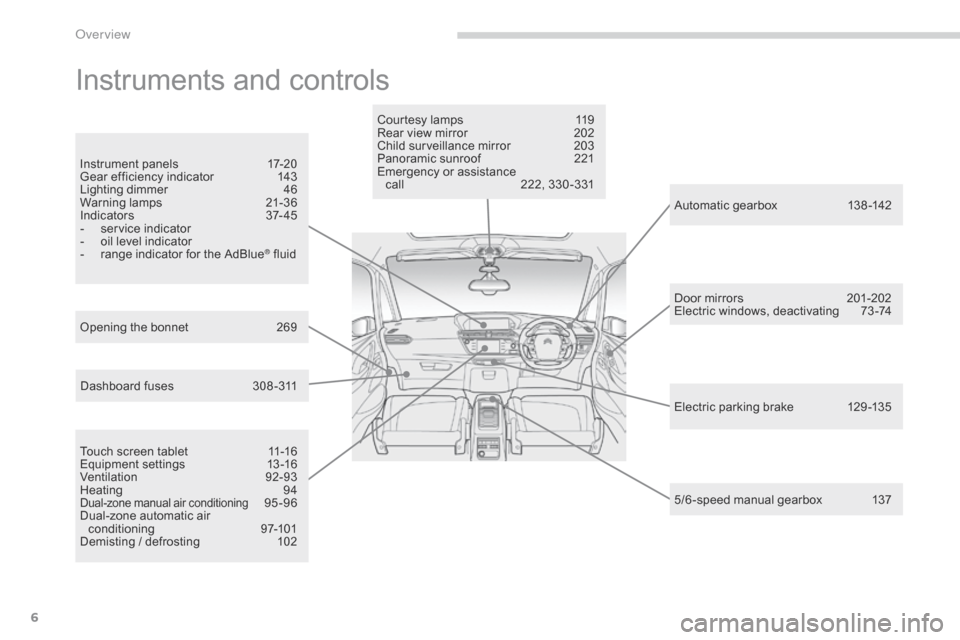
Instruments and controls
Touch screen tablet 11-16
Equipment se ttings 1 3-16
Ventilation
9
2-93
Heating
9
4
Dual-zone manual a ir c onditioning 95-96
Dual-zone
automatic
air
c
onditioning
9
7-101
Demisting
/
defrosting
1
02 Door
mirrors
2
01-202
Electric windows, deactivating
7
3 -74
5/6 -speed manual gearbox 1 37
Automatic gearbox
1
38 -142
Opening
the
bonnet
2
69 Courtesy lamps
1
19
Rear view mirror
2
02
Child surveillance mirror
2
03
Panoramic sunroof
2
21
Emergency or assistance
c
all
2
22, 330 -331
Instrument
panels
1
7-20
Gear
efficiency
indicator
1
43
Lighting
dimmer
4
6
Warning
lam
ps
2
1-36
I n di c ato r s
3
7- 4 5
-
s
ervice
indicator
-
o
il
level
indicator
-
r
ange
indicator
for
the
AdBlue
® fluid
E lectric parking brake
1
29 -135
Dashboard
fuses
3
08 -311
Over view
Page 9 of 523
7
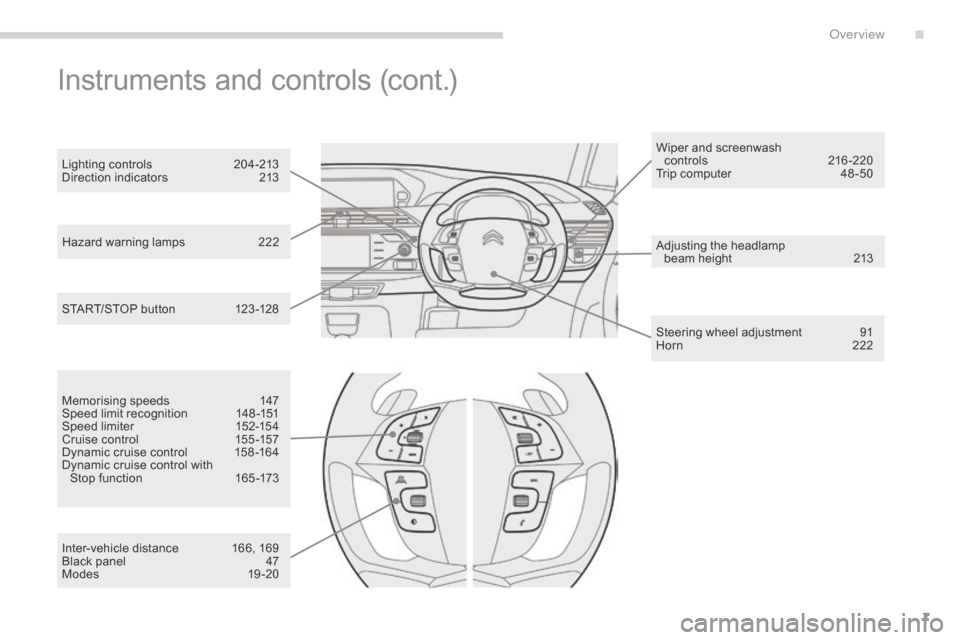
Hazard warning lamps 222
Adjusting the headlamp
beam
height
2
13
Steering
wheel adjustment
9
1
Horn
2
22
START/STOP
button
1
23 -128 Wiper
and screenwash
controls
2
16-220
Trip computer
4
8 -50
Lighting controls
2
04-213
Direction indicators
2
13
Instruments and controls (cont.)
Memorising speeds 1
47
Speed limit recognition 1 48 -151
Speed
limiter
1
52-154
Cruise
control
1
55 -157
Dynamic
cruise control
1
58 -164
Dynamic
cruise control with
S
top function
1
65 -173
Inter-vehicle
distance
1
66, 169
Black
panel
4
7
Modes
19
-20
.
Over view
Page 13 of 523
11
Touch screen tablet
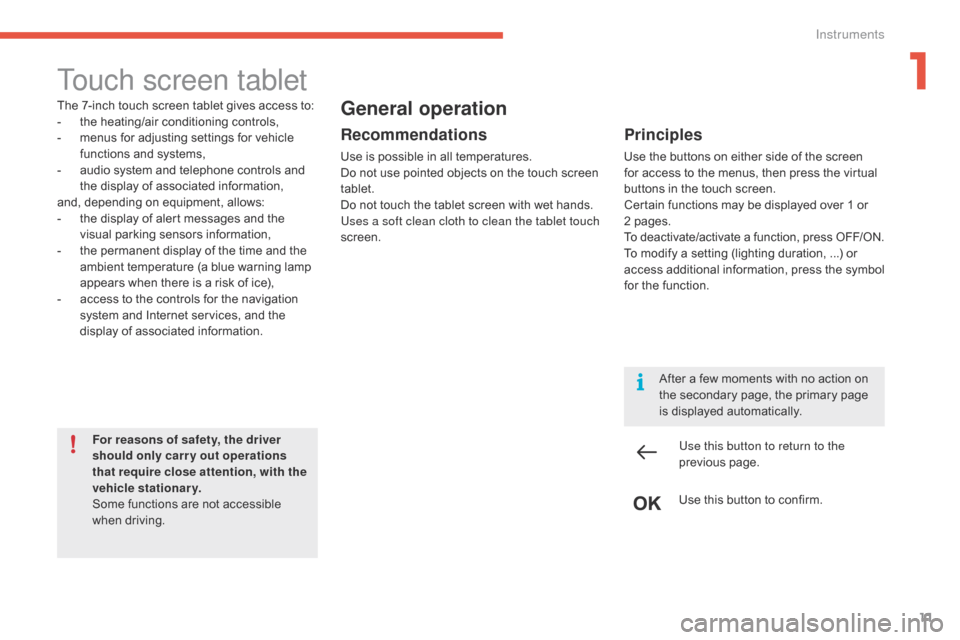
The 7-inch touch screen tablet gives access to:
- t he heating/air conditioning controls,
-
m
enus for adjusting settings for vehicle
f
unctions and systems,
-
a
udio system and telephone controls and
t
he display of associated information,
and,
depending on equipment, allows:
-
t
he display of alert messages and the
v
isual
par
king
s
ensors
in
formation,
-
t
he permanent display of the time and the
a
mbient temperature (a blue warning lamp
a
ppears when there is a risk of ice),
-
a
ccess to the controls for the navigation
s
ystem and Internet services, and the
d
isplay of associated information.
For reasons of safety, the driver
should only carr y out operations
that require close attention, with the
vehicle stationary.
Some
functions are not accessible
w
hen
d
riving.General operation
Recommendations
Use is possible in all temperatures.
D o not use pointed objects on the touch screen
t
ablet.
Do
not touch the tablet screen with wet hands.
Uses a soft clean cloth to clean the tablet touch
screen.
Use this button to return to the
previous
pag
e.
Use
this button to confirm.
Principles
Use the buttons on either side of the screen for access to the menus, then press the virtual
b
uttons in the touch screen.
Certain
functions may be displayed over 1 or
2
pages.
To
d
eactivate/activate
a f
unction,
p
ress
O
FF/ON.
To
modify a setting (lighting duration, ...) or
a
ccess additional information, press the symbol
f
or the function.
After
a few moments with no action on
t
he secondary page, the primary page
i
s displayed automatically.
1
Instruments
Page 25 of 523
23
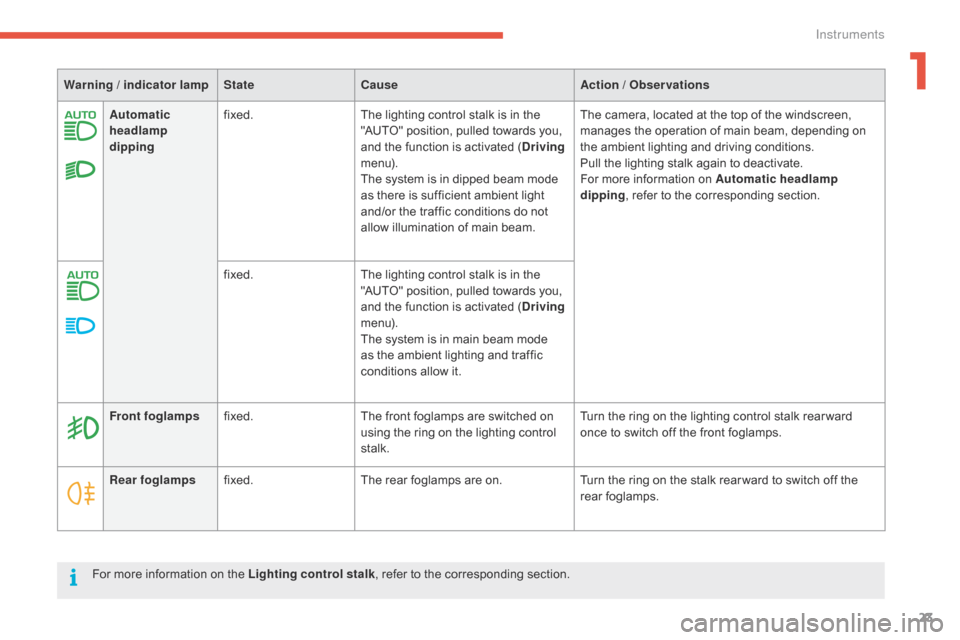
Automatic
headlamp
dippingfixed.
The lighting control stalk is in the "
AUTO" position, pulled towards you,
a
nd the function is activated (Driving
m e n u).
The
system is in dipped beam mode
a
s there is sufficient ambient light
a
nd/or the traffic conditions do not
a
llow illumination of main beam.The
camera, located at the top of the windscreen, m
anages the operation of main beam, depending on
t
he ambient lighting and driving conditions.
Pull
the lighting stalk again to deactivate.
For
more information on Automatic headlamp
dipping ,
refer to the corresponding section.
fixed. The
lighting control stalk is in the
"
AUTO" position, pulled towards you,
a
nd the function is activated (Driving
m e n u).
The
system is in main beam mode
a
s the ambient lighting and traffic
c
onditions allow it.
Warning / indicator lamp
StateCause Action / Observations
Rear foglamps fixed. The
rear foglamps are on.Turn
the ring on the stalk rear ward to switch off the
r
ear
fo
glamps.
Front foglamps
fixed. The
front foglamps are switched on
u
sing the ring on the lighting control
st
alk.Turn
the ring on the lighting control stalk rear ward
o
nce to switch off the front foglamps.
For
more information on the Lighting control stalk,
refer to the corresponding section.
1
Instruments
Page 27 of 523
25
Warning / indicator lampStateCause Action / Observations
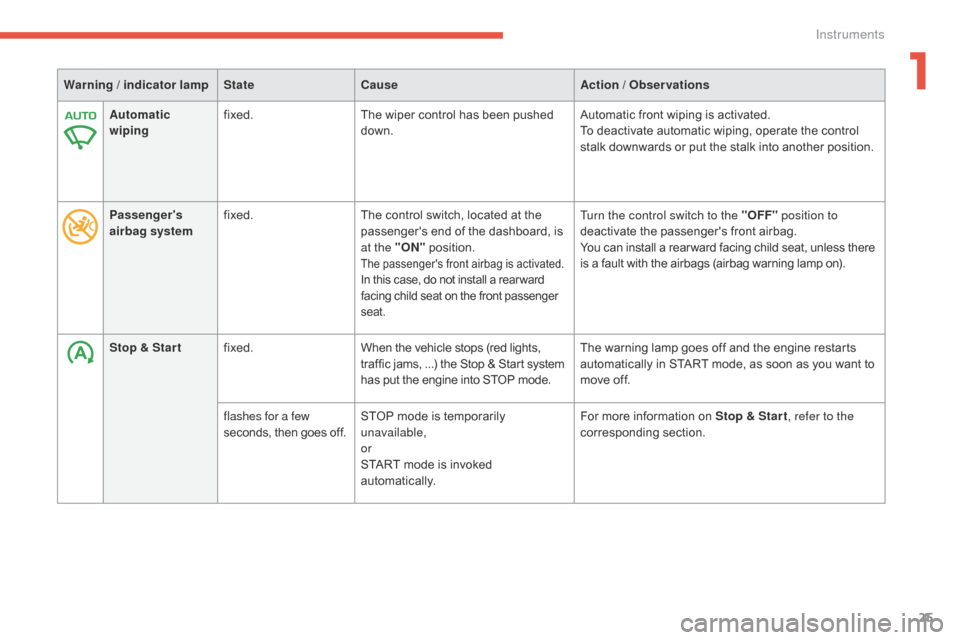
Automatic
wiping fixed.
The
wiper control has been pushed
d
own.Automatic
front wiping is activated.
To
deactivate automatic wiping, operate the control
s
talk downwards or put the stalk into another position.
Passenger 's
airbag system fixed.
The
control switch, located at the
p
assenger's end of the dashboard, is
a
t the "ON"
p
osition.
The passenger's front airbag is activated.In this case, do not install a rear ward facing child seat on the front passenger sea
t.
Turn the control switch to the "OFF " position to
deactivate the passenger's front airbag.
You
can install a rear ward facing child seat, unless there
i
s a fault with the airbags (airbag warning lamp on).
Stop & Star t fixed. When
the
vehicle
stops
(red
lights,
t
raffic
jams,
...)
the
Stop
&
Start
system
h
as
put
the
engine
into
STOP
mode. The
warning lamp goes off and the engine restarts
a
utomatically in START mode, as soon as you want to
m
ove off.
flashes for a few
seconds,
then
goes
off. STOP
mode
is
temporarily
u
navailable,
or
START
mode
is
invoked
au
tomatically. For
more information on Stop & Star t, refer to the
corresponding
s
ection.
1
Instruments
Page 42 of 523
40
* Only with the type 2 instrument panel.
Coolant temperature gauge*
After driving for a few minutes, the temperature and pressure in the cooling system increase.
To
top-up the level:
F
w
ait for the engine to cool,
F
u
nscrew the cap slightly to allow the
p
ressure to drop,
F
w
hen the pressure has dropped, remove
t
he cap,
F
t
op-up the level to the "MA X" mark.
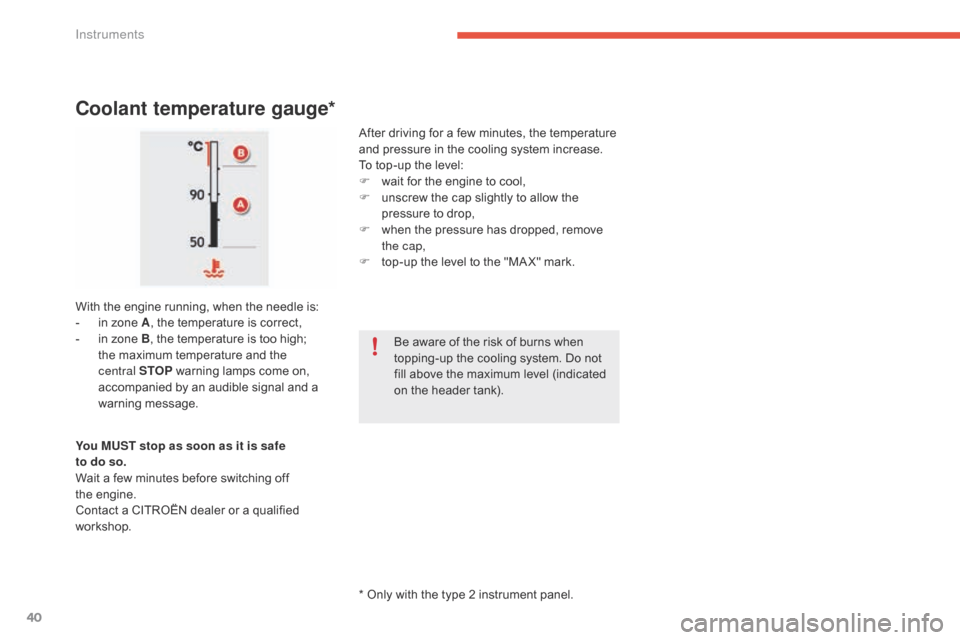
With
the
engine
running,
when
the
needle
is:
-
i
n
zone
A ,
the
temperature
is
correct,
-
i
n
zone
B,
the
temperature
is
too
high;
t
he
maximum
temperature
and
the
c
entral STOP
warning
lamps
come
on,
a
ccompanied
by
an
audible
signal
and
a
w
arning
m
essage. Be
aware of the risk of burns when
t
opping-up the cooling system. Do not
f
ill above the maximum level (indicated
o
n the header tank).
You MUST stop as soon as it is safe
to do so.
Wait
a
few
minutes
before
switching
off
t
he engine.
Contact
a
CITROËN
dealer
or
a
qualified
w
orkshop.
Instruments
Page 124 of 523
122
When towing
Distribution of loads
F Distribute the load in the trailer so that the h
eaviest items are as close as possible to t
he axle and the nose weight approaches the
m
aximum permitted without exceeding it.
Air
density decreases with altitude, thus
r
educing engine per formance. Above
1 0
00 metres, the maximum towed load must
b
e reduced by 10 % for every 1 000 metres of
al
titude.
Side wind
F Take into account the increased sensitivity t
o side wind.
For
more information on Weights
, refer
to the corresponding section.
The rear parking sensors will be
d
eactivated automatically to avoid the
a
udible signal if a genuine CITROËN
t
owbar is used.
Cooling
Towing a trailer on a slope increases the temperature of the coolant.
As
the fan is electrically controlled, its cooling
c
apacity is not dependent on the engine speed.
F
T
o lower the engine speed, reduce your
s
peed.
The
maximum towed load on a long incline
d
epends on the gradient and the ambient
t
emperature.
In
all cases, keep a check on the coolant
t
emperature. F
I
f the warning lamp and the
S
TOP
warning lamp come on,
s
top the vehicle and switch off
t
he engine as soon as possible.
Braking
Towing a trailer increases the braking distance.
T o avoid overheating of the brakes, the use of
e
ngine braking is recommended.
Ty r e s
F Check the tyre pressures of the towing v
ehicle and of the trailer, observing the
re
commended
p
ressures.
Lighting
F Check the electrical lighting and signalling o
n the trailer and the headlamp beam
h
eight of your vehicle.
For
more information on Adjusting the
headlamp beam height , refer to the
corresponding
s
ection.
Driving
Page 125 of 523
123
Starting-switching off the engine with the electronic key
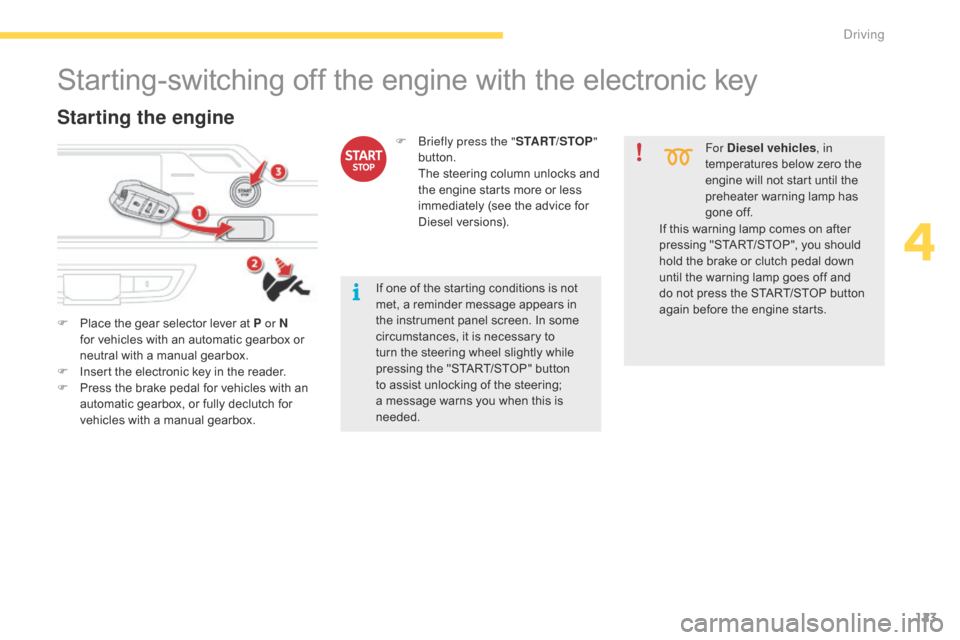
F Place the gear selector lever at P or N
for vehicles with an automatic gearbox or
n
eutral with a manual gearbox.
F
I
nsert the electronic key in the reader.
F
P
ress the brake pedal for vehicles with an
a
utomatic gearbox, or fully declutch for
v
ehicles with a manual gearbox.
Starting the engine
For Diesel vehicles, in
temperatures below zero the
e
ngine will not start until the
p
reheater warning lamp has
g
one off.
If
one
of
the
starting
conditions
is
not
m
et,
a
reminder
message
appears
in
t
he
instrument
panel
screen.
In
some
c
ircumstances,
it
is
necessary
to
t
urn
the
steering
wheel
slightly
while
p
ressing
the
"START/STOP"
button
t
o
assist
unlocking
of
the
steering;
a
message
warns
you
when
this
is
ne
eded. F
B
riefly press the "
START/STOP"
button.
T
he
steering
column
unlocks
and
t
he
engine
starts
more
or
less
i
mmediately
(see
the
advice
for
D
iesel
v
ersions). If
this
warning lamp comes on after
p
ressing "START/STOP", you should
h
old
the
brake or clutch pedal down
u
ntil
the
warning lamp goes off and
d
o
not
press the START/STOP button
a
gain
before the engine starts.
4
Driving