Citroen JUMPER 2014 2.G Owner's Manual
JUMPER 2014 2.G
Citroen
Citroen
https://www.carmanualsonline.info/img/9/4393/w960_4393-0.png
Citroen JUMPER 2014 2.G Owner's Manual
Trending: sport mode, wheel, roof rack, coolant temperature, clutch, wiper fluid, fuse box diagram
Page 151 of 240
Puncture
149
QUICK HELP
8
JUMPER-PAPIER_EN_CHAP08_AIDE RAPIDE_ED01-2014
- If a pressure of at least 3 bars is not
reached within 5 minutes, disconnect
the compressor from the valve and the
power socket, then move the vehicle
forward by approximately 10 metres
to distribute the sealant fluid inside
the tyre.
- Then repeat the inflating operation: ● if a pressure of at least 3 bars is not
reached within 10 minutes, switch off
your vehicle: the tyre has suffered
too much damage and repair has not
been possible.Contact a CITROËN
dealer or a qualified workshop.
● if the tyre has been inflated to a pressure of 4 bars , set off again
immediately.
After driving for approximately 10 minutes,
stop and check the pressure of the tyre
again.
Adjust the pressure if necessary and contact
a CITROËN dealer or a qualified workshop
as soon as possible.
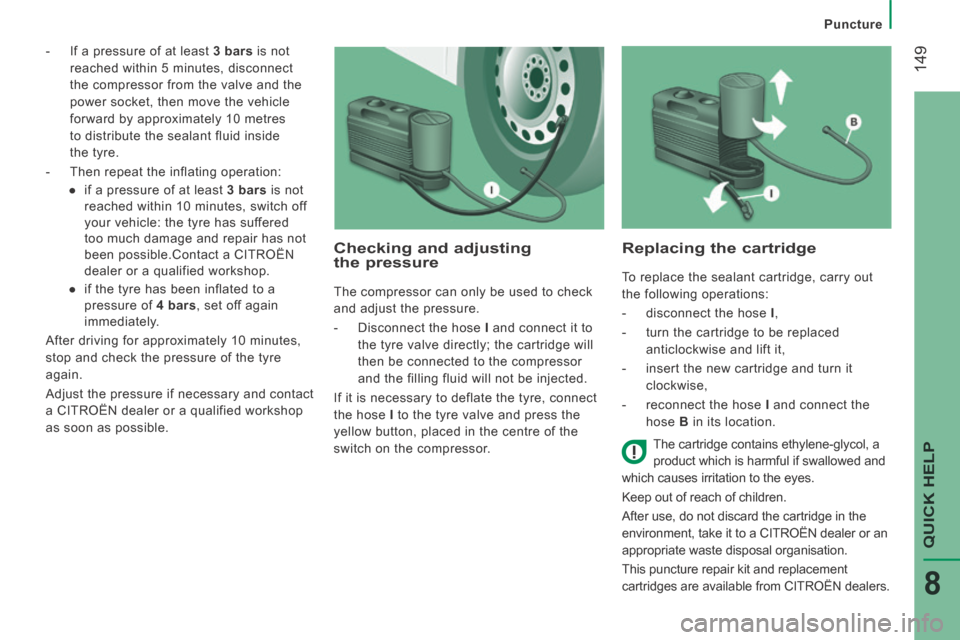
Checking and adjusting the pressure
The compressor can only be used to check
and adjust the pressure.
- Disconnect the hose I and connect it to
the tyre valve directly; the cartridge will
then be connected to the compressor
and the filling fluid will not be injected.
If it is necessary to deflate the tyre, connect
the hose I to the tyre valve and press the
yellow button, placed in the centre of the
switch on the compressor.
Replacing the cartridge
To replace the sealant cartridge, carry out
the following operations:
- disconnect the hose I ,
- turn the cartridge to be replaced anticlockwise and lift it,
- insert the new cartridge and turn it clockwise,
- reconnect the hose I and connect the
hose B in its location.
The cartridge contains ethylene-glycol, a
product which is harmful if swallowed and
which causes irritation to the eyes.
Keep out of reach of children.
After use, do not discard the cartridge in the
environment, take it to a CITROËN dealer or an
appropriate waste disposal organisation.
This puncture repair kit and replacement
cartridges are available from CITROËN dealers.
Page 152 of 240
Being towed or towing
150
JUMPER-PAPIER_EN_CHAP08_AIDE RAPIDE_ED01-2014
TOWING
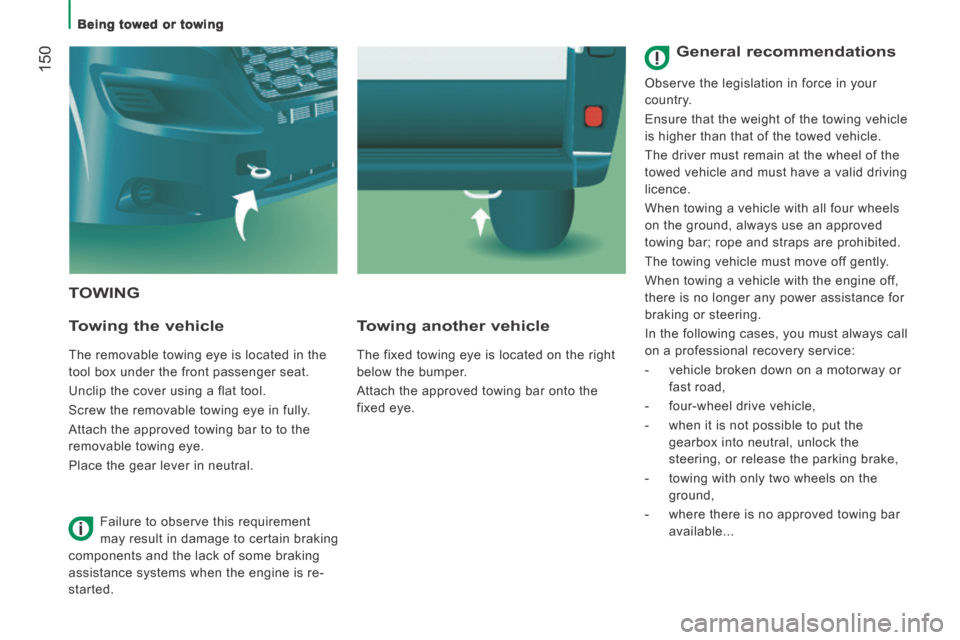
Towing the vehicle
The removable towing eye is located in the
tool box under the front passenger seat.
Unclip the cover using a flat tool.
Screw the removable towing eye in fully.
Attach the approved towing bar to to the
removable towing eye.
Place the gear lever in neutral.
Towing another vehicle
The fixed towing eye is located on the right
below the bumper.
Attach the approved towing bar onto the
fixed eye.
Failure to observe this requirement
may result in damage to certain braking
components and the lack of some braking
assistance systems when the engine is re-
started.
General recommendations
Observe the legislation in force in your
country.
Ensure that the weight of the towing vehicle
is higher than that of the towed vehicle.
The driver must remain at the wheel of the
towed vehicle and must have a valid driving
licence.
When towing a vehicle with all four wheels
on the ground, always use an approved
towing bar; rope and straps are prohibited.
The towing vehicle must move off gently.
When towing a vehicle with the engine off,
there is no longer any power assistance for
braking or steering.
In the following cases, you must always call
on a professional recovery service:
- vehicle broken down on a motorway or fast road,
- four-wheel drive vehicle,
- when it is not possible to put the gearbox into neutral, unlock the
steering, or release the parking brake,
- towing with only two wheels on the ground,
- where there is no approved towing bar available...
Page 153 of 240
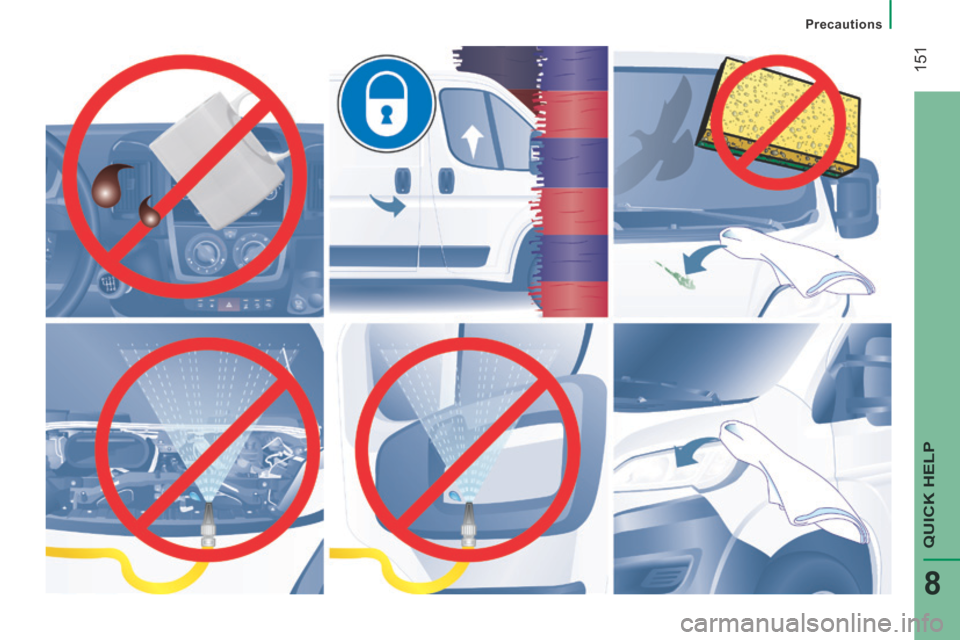
Precautions
151
QUICK HELP
8
JUMPER-PAPIER_EN_CHAP08_AIDE RAPIDE_ED01-2014
Page 154 of 240
152
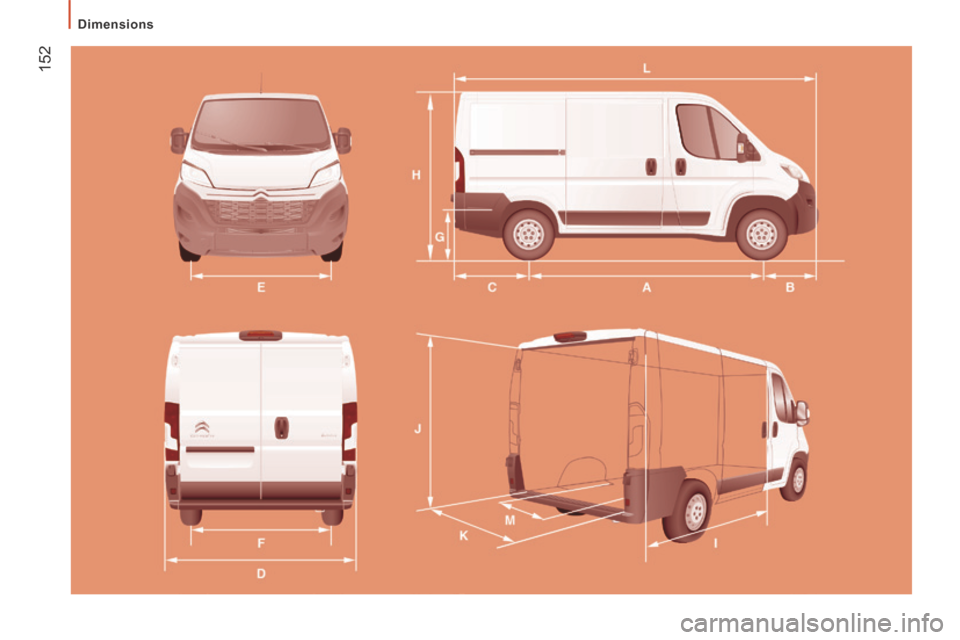
Dimensions
JUMPER-PAPIER_EN_CHAP09_CARACTERISTIQUES TECHNIQUES_ED01-2014
Page 155 of 240
153
9
TECHNICAL DATA
Dimensions
JUMPER-PAPIER_EN_CHAP09_CARACTERISTIQUES TECHNIQUES_ED01-2014
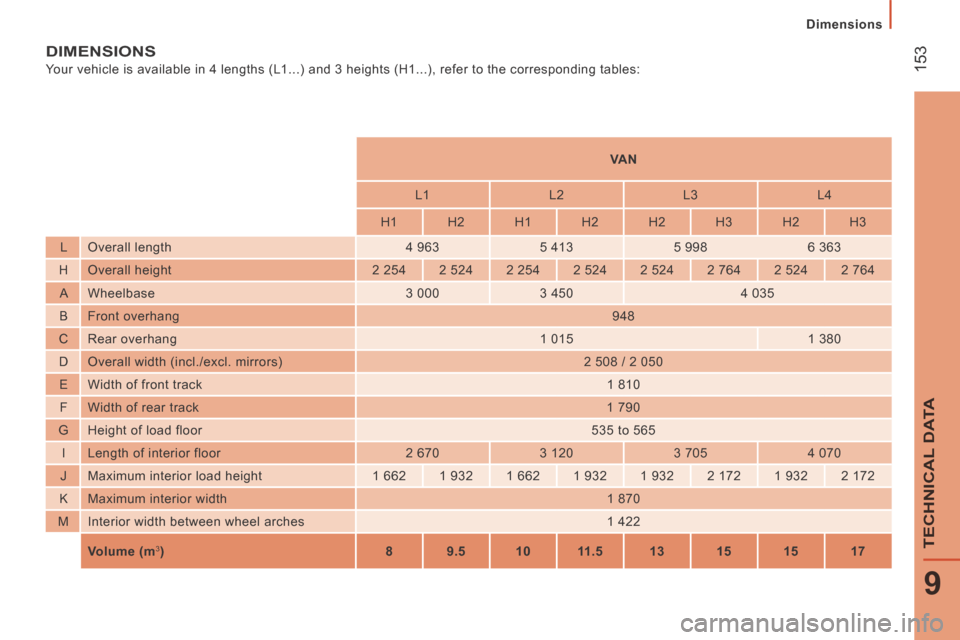
DIMENSIONS
Your vehicle is available in 4 lengths (L1...) and 3 heights (H1...),\
refer to the corresponding tables: VA N
L1 L2 L3 L4
H1 H2 H1 H2 H2 H3 H2 H3
L Overall length 4 963 5 413 5 998 6 363
H Overall height 2 254 2 524 2 254 2 524 2 524 2 764 2 524 2 764
A Wheelbase 3 000 3 450 4 035
B Front overhang 948
C Rear overhang 1 015 1 380
D Overall width (incl./excl. mirrors) 2 508 / 2 050
E Width of front track 1 810
F Width of rear track 1 790
G Height of load floor 535 to 565
I Length of interior floor 2 670 3 120 3 705 4 070
J Maximum interior load height 1 662 1 932 1 662 1 932 1 932 2 172 1 932 2 172
K Maximum interior width 1 870
M Interior width between wheel arches 1 422
Volume (m
3 ) 8 9.5 10 11.5 13 15 15 17
Page 156 of 240
154
Dimensions
JUMPER-PAPIER_EN_CHAP09_CARACTERISTIQUES TECHNIQUES_ED01-2014
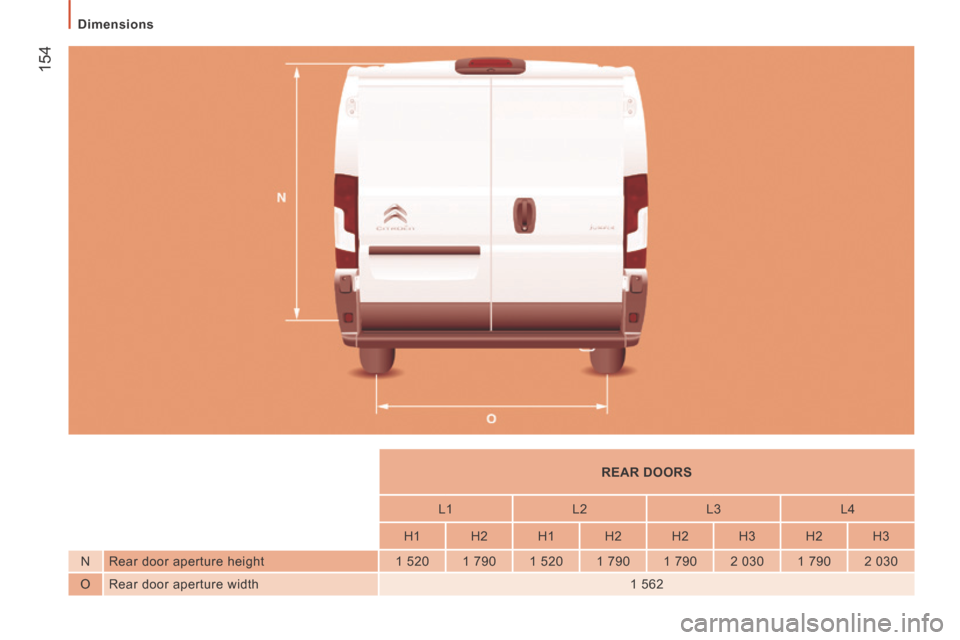
REAR DOORS
L1 L2 L3 L4
H1 H2 H1 H2 H2 H3 H2 H3
N Rear door aperture height 1 520 1 790 1 520 1 790 1 790 2 030 1 790 2 030
O Rear door aperture width 1 562
Page 157 of 240
155
9
TECHNICAL DATA
Dimensions
JUMPER-PAPIER_EN_CHAP09_CARACTERISTIQUES TECHNIQUES_ED01-2014
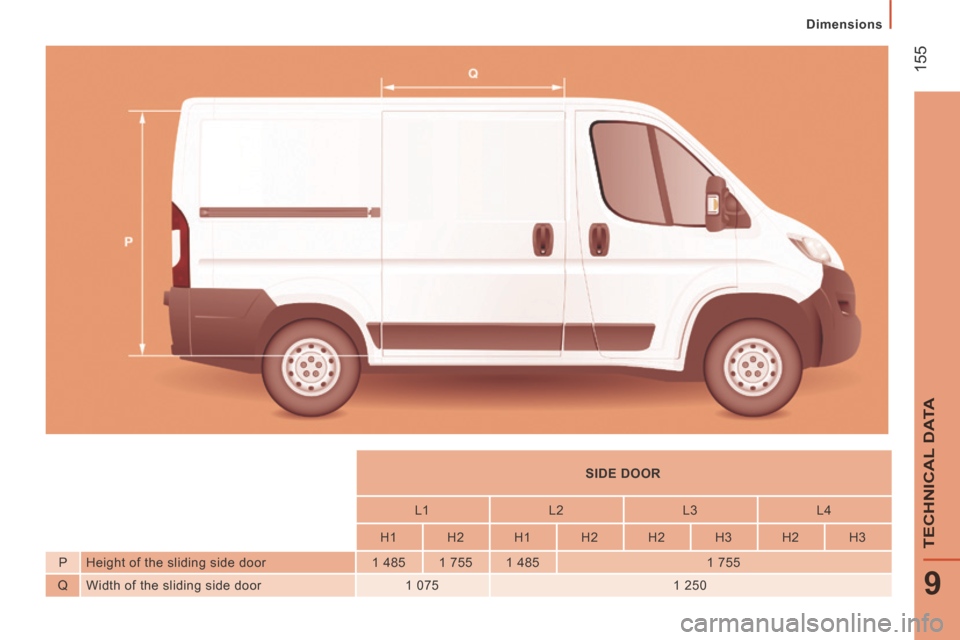
SIDE DOOR
L1 L2 L3 L4
H1 H2 H1 H2 H2 H3 H2 H3
P Height of the sliding side door 1 485 1 755 1 485 1 755
Q Width of the sliding side door 1 075 1 250
Page 158 of 240
156
Dimensions
JUMPER-PAPIER_EN_CHAP09_CARACTERISTIQUES TECHNIQUES_ED01-2014
Page 159 of 240
157
9
TECHNICAL DATA
Dimensions
JUMPER-PAPIER_EN_CHAP09_CARACTERISTIQUES TECHNIQUES_ED01-2014
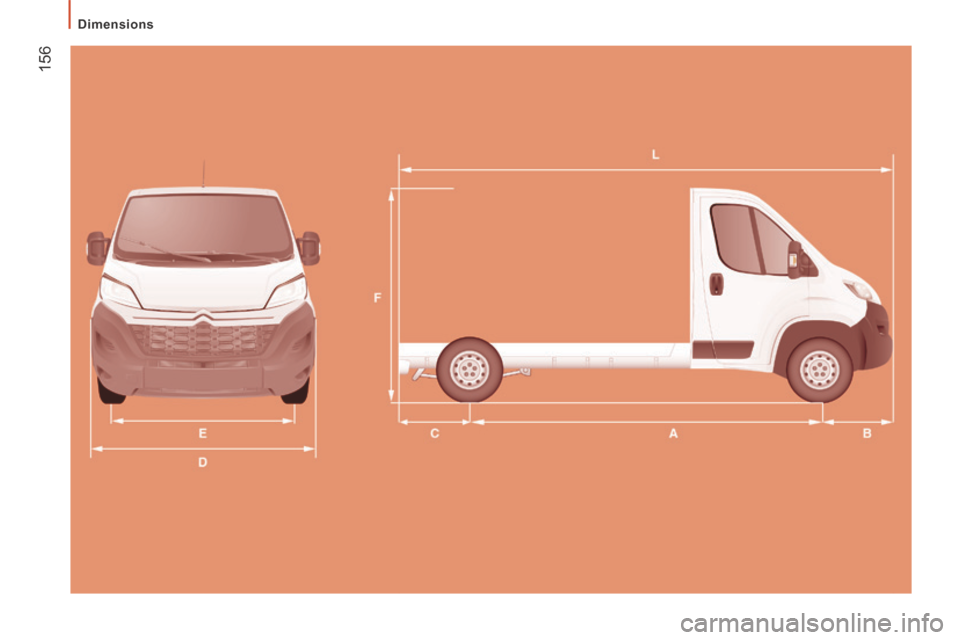
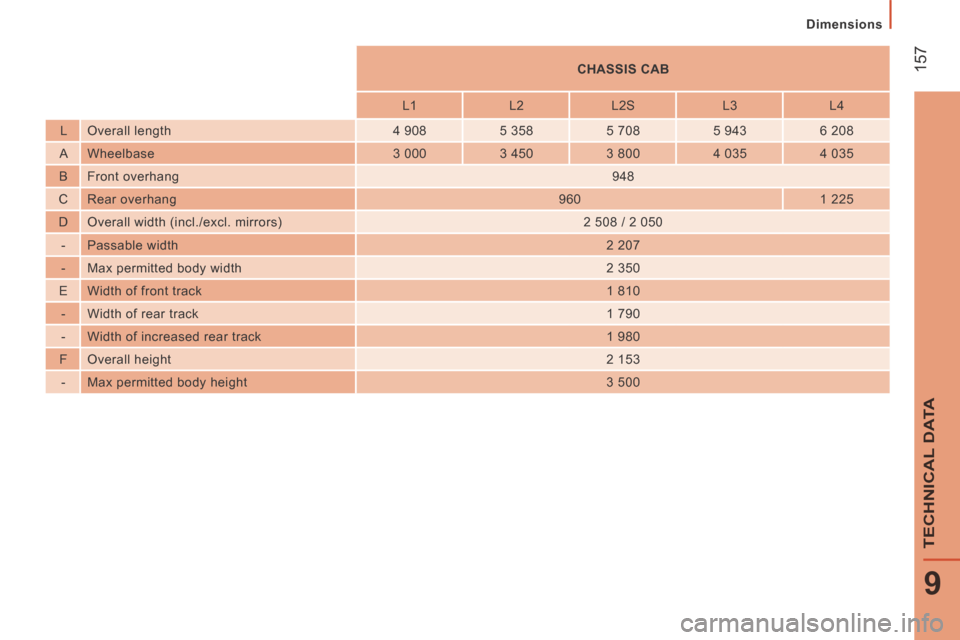
CHASSIS CAB
L1 L2 L2S L3 L4
L Overall length 4 908 5 358 5 708 5 943 6 208
A Wheelbase 3 000 3 450 3 800 4 035 4 035
B Front overhang 948
C Rear overhang 960 1 225
D Overall width (incl./excl. mirrors) 2 508 / 2 050
- Passable width 2 207
- Max permitted body width 2 350
E Width of front track 1 810
- Width of rear track 1 790
- Width of increased rear track 1 980
F Overall height 2 153
- Max permitted body height 3 500
Page 160 of 240
158
Dimensions
JUMPER-PAPIER_EN_CHAP09_CARACTERISTIQUES TECHNIQUES_ED01-2014
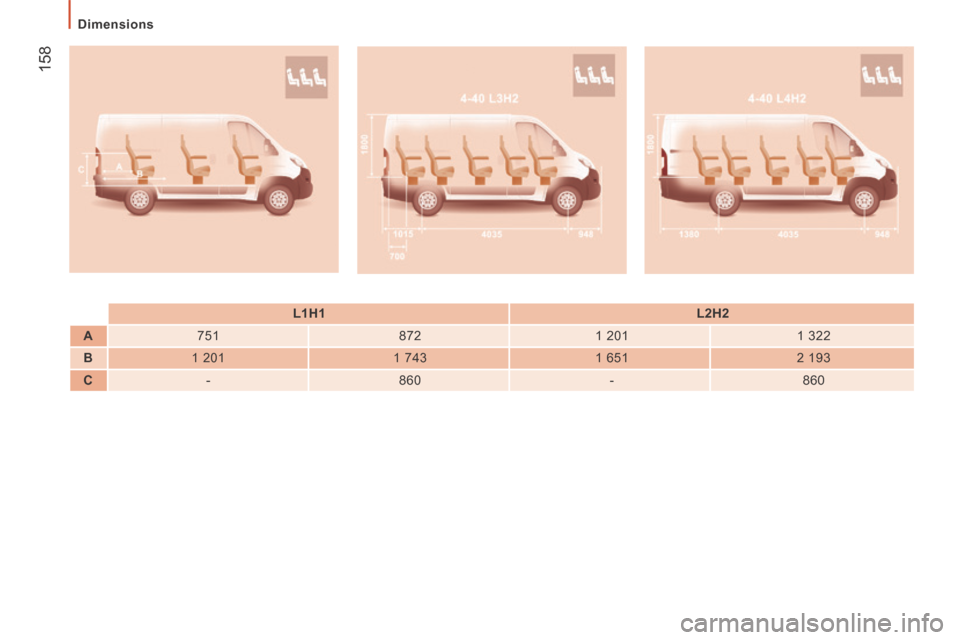
L1H1 L2H2
A 751 872 1 201 1 322
B 1 201 1 743 1 651 2 193
C - 860 - 860
Trending: coolant, air condition, MPG, steering wheel adjustment, change time, turn signal, load capacity


