mirror Citroen JUMPER DAG 2008.5 2.G Owner's Manual
[x] Cancel search | Manufacturer: CITROEN, Model Year: 2008.5, Model line: JUMPER DAG, Model: Citroen JUMPER DAG 2008.5 2.GPages: 163, PDF Size: 2.56 MB
Page 2 of 163
4
3
4
2
1
FAMILIARISATION
5
Familiarisation
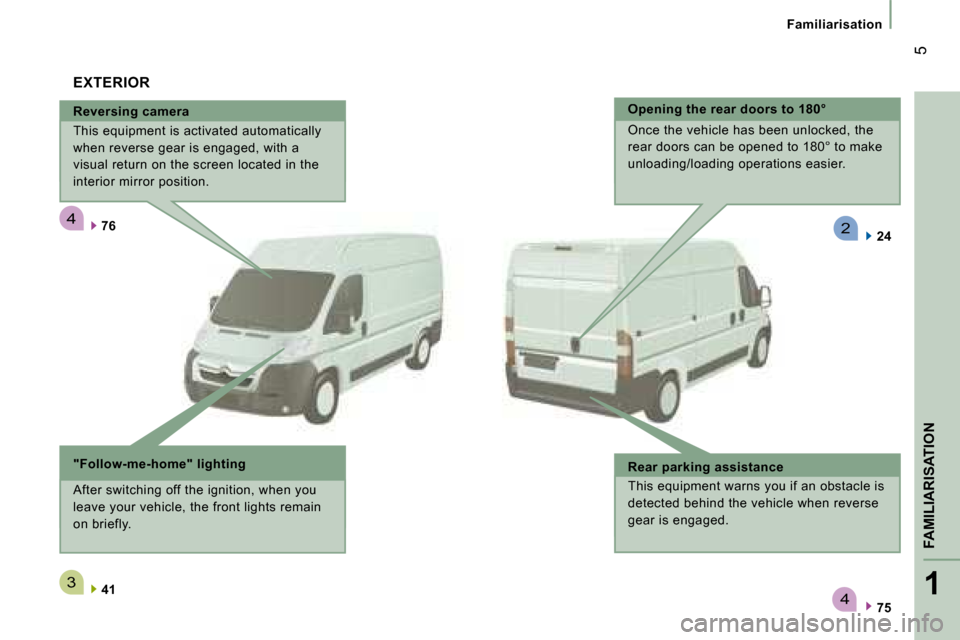
Reversing camera
This equipment is activated automatically
when reverse gear is engaged, with a
visual return on the screen located in the
interior mirror position.
76
75
41
EXTERIOR
"Follow-me-home" lighting
After switching off the ignition, when you
leave your vehicle, the front lights remain
on briefly.
Opening the rear doors to 180°
Once the vehicle has been unlocked, the
rear doors can be opened to 180° to make
unloading/loading operations easier.
Rear parking assistance
This equipment warns you if an obstacle is
detected behind the vehicle when reverse
gear is engaged.
24
Page 8 of 163
523
5
1
FAMILIARISATION
11
Familiarisation
SIT COMFORTABLY
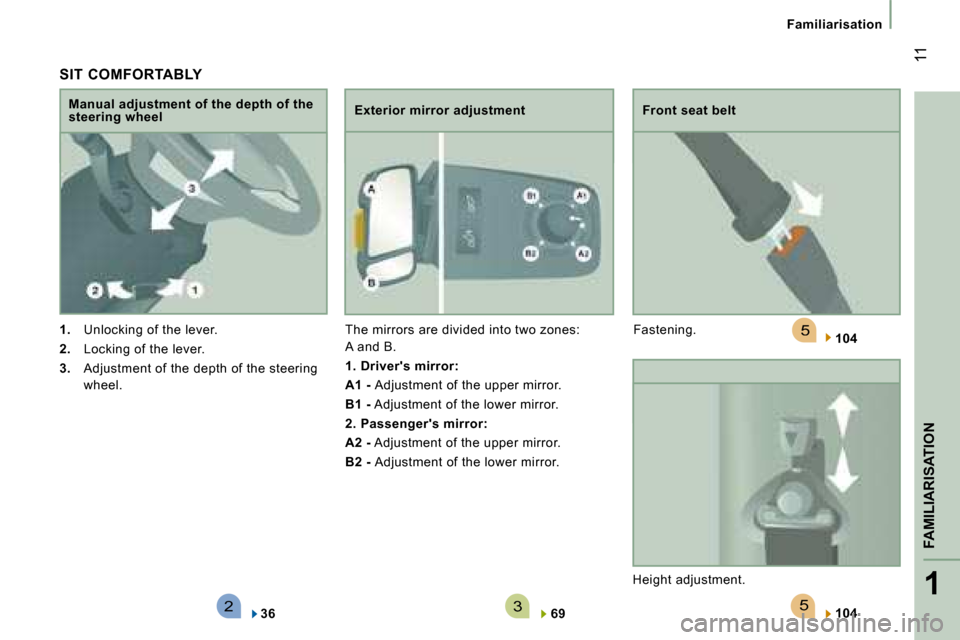
1. Unlocking of the lever.
2. Locking of the lever.
3. Adjustment of the depth of the steering
wheel.
Manual adjustment of the depth of the steering wheel Exterior mirror adjustment
The mirrors are divided into two zones:
A and B.
1. Driver's mirror:
A1 - Adjustment of the upper mirror.
B1 - Adjustment of the lower mirror.
2. Passenger's mirror:
A2 - Adjustment of the upper mirror.
B2 - Adjustment of the lower mirror.
36 69
Front seat belt
Fastening.
Height adjustment.
104
104
Page 43 of 163
46
Ventilation
VENTILATION
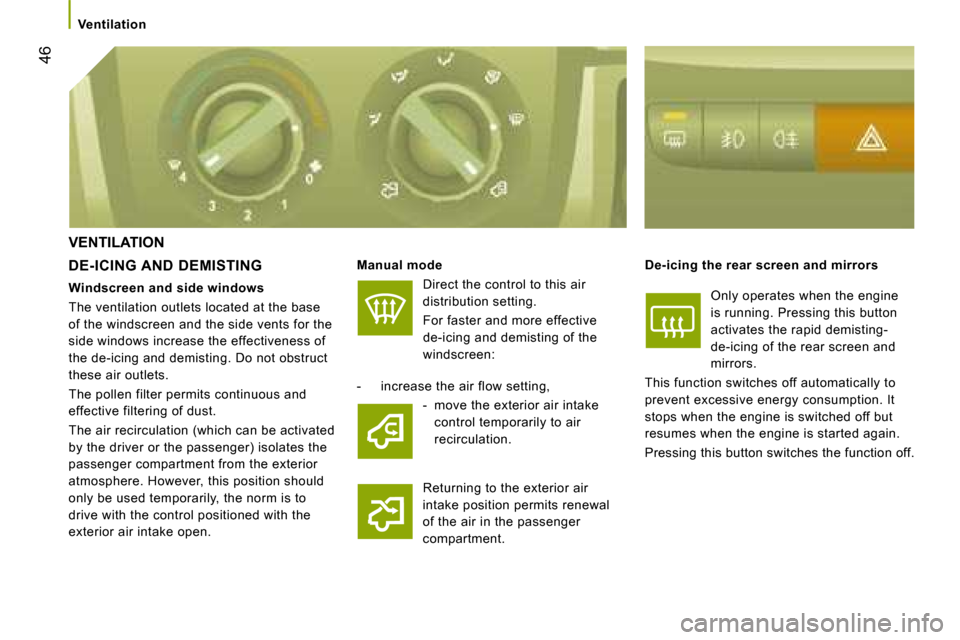
DE-ICING AND DEMISTING Manual mode
Direct the control to this air
distribution setting.
For faster and more effective
de-icing and demisting of the
windscreen:
De-icing the rear screen and mirrors
Only operates when the engine
is running. Pressing this button
activates the rapid demisting-
de-icing of the rear screen and
mirrors.
This function switches off automatically to
prevent excessive energy consumption. It
stops when the engine is switched off but
resumes when the engine is started again.
Pressing this button switches the function off.
- increase the air flow setting,
- move the exterior air intake control temporarily to air
recirculation.
Returning to the exterior air
intake position permits renewal
of the air in the passenger
compartment.
Windscreen and side windows
The ventilation outlets located at the base
of the windscreen and the side vents for the
side windows increase the effectiveness of
the de-icing and demisting. Do not obstruct
these air outlets.
The pollen filter permits continuous and
effective filtering of dust.
The air recirculation (which can be activated
by the driver or the passenger) isolates the
passenger compartment from the exterior
atmosphere. However, this position should
only be used temporarily, the norm is to
drive with the control positioned with the
exterior air intake open.
Page 66 of 163
69
3
ERGONOMICS AND COMFORT
Mirrors and windows
MIRRORS AND WINDOWS
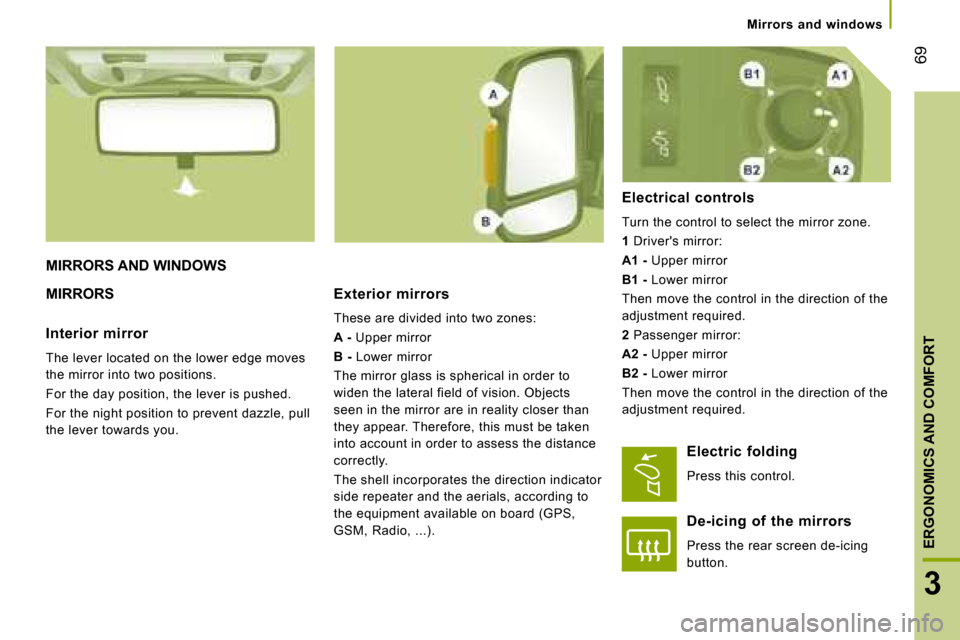
MIRRORS Exterior mirrors These are divided into two zones:
A - Upper mirror
B - Lower mirror
The mirror glass is spherical in order to
widen the lateral field of vision. Objects
seen in the mirror are in reality closer than
they appear. Therefore, this must be taken
into account in order to assess the distance
correctly.
The shell incorporates the direction indicator
side repeater and the aerials, according to
the equipment available on board (GPS,
�G�S�M�,� �R�a�d�i�o�,� �.�.�.�)�.� � Electrical controls
Turn the control to select the mirror zone.
1 Driver's mirror:
A1 - Upper mirror
B1 - Lower mirror
Then move the control in the direction of the
adjustment required.
2 Passenger mirror:
A2 - Upper mirror
B2 - Lower mirror
Then move the control in the direction of the
adjustment required.
Interior mirror
The lever located on the lower edge moves
the mirror into two positions.
For the day position, the lever is pushed.
For the night position to prevent dazzle, pull
the lever towards you.
Electric folding
Press this control.
De-icing of the mirrors
Press the rear screen de-icing
button.
Page 67 of 163
70
Mirrors and windows
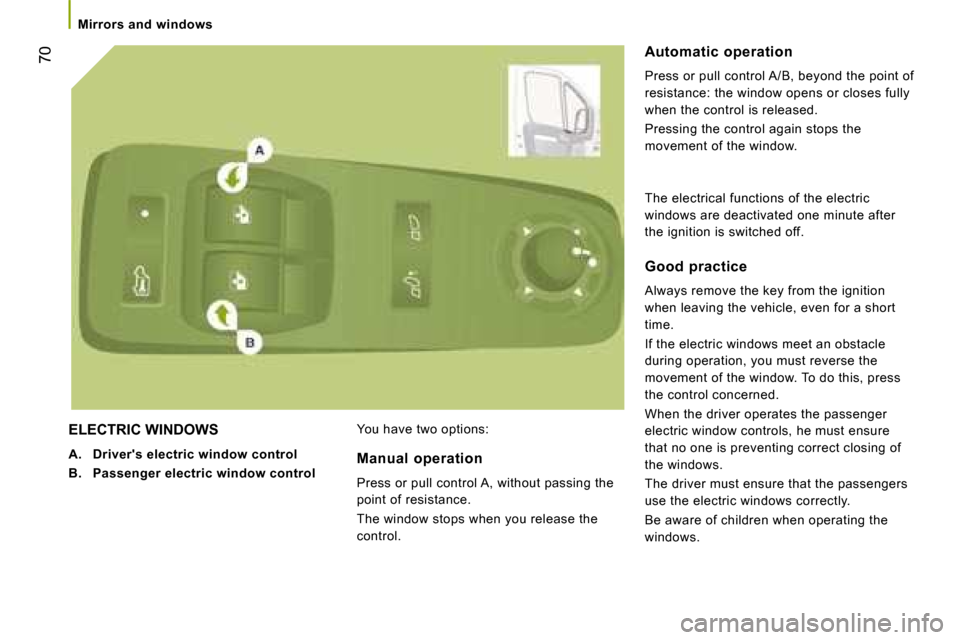
ELECTRIC WINDOWS
A. Driver's electric window control
B. Passenger electric window control You have two options: Automatic operation
Press or pull control A/B, beyond the point of
resistance: the window opens or closes fully
when the control is released.
Pressing the control again stops the
movement of the window.
Manual operation
Press or pull control A, without passing the
point of resistance.
The window stops when you release the
control. Good practice
Always remove the key from the ignition
when leaving the vehicle, even for a short
time.
If the electric windows meet an obstacle
during operation, you must reverse the
movement of the window. To do this, press
the control concerned.
When the driver operates the passenger
electric window controls, he must ensure
that no one is preventing correct closing of
the windows.
The driver must ensure that the passengers
use the electric windows correctly.
Be aware of children when operating the
windows.
The electrical functions of the electric
windows are deactivated one minute after
the ignition is switched off.
Page 73 of 163
76
Reversing camera
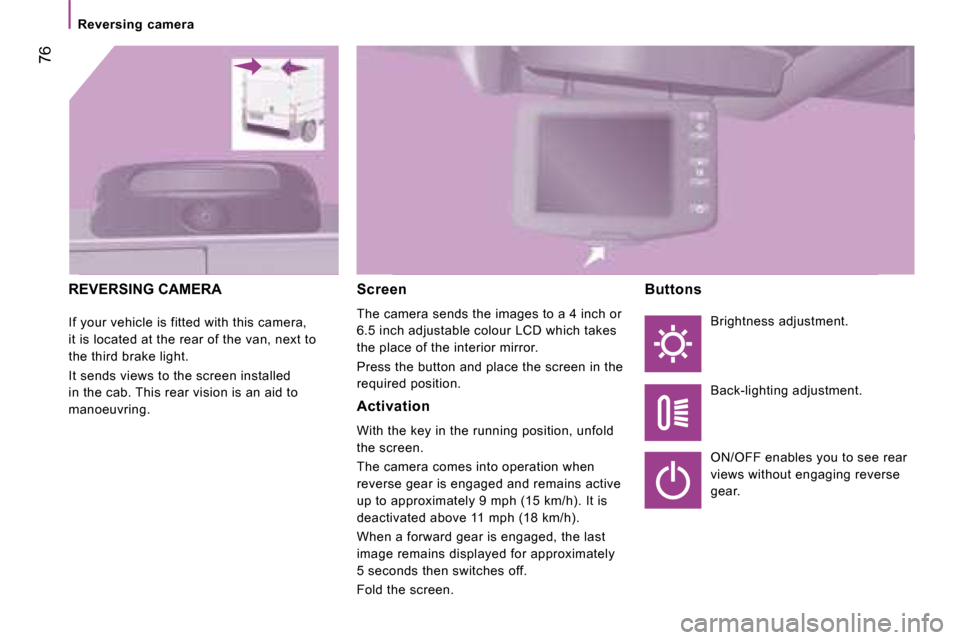
REVERSING CAMERA
If your vehicle is fitted with this camera,
it is located at the rear of the van, next to
the third brake light.
It sends views to the screen installed
in the cab. This rear vision is an aid to
manoeuvring. Screen
The camera sends the images to a 4 inch or
6.5 inch adjustable colour LCD which takes
the place of the interior mirror.
Press the button and place the screen in the
required position.
Activation
With the key in the running position, unfold
the screen.
The camera comes into operation when
reverse gear is engaged and remains active
up to approximately 9 mph (15 km/h). It is
deactivated above 11 mph (18 km/h).
When a forward gear is engaged, the last
image remains displayed for approximately
5 seconds then switches off.
Fold the screen. Buttons
Brightness adjustment.
Back-lighting adjustment.
ON/OFF enables you to see rear
views without engaging reverse
gear.
Page 138 of 163
136
Changing a bulb
- Remove the bulb by pressing it lightly while turning it anticlockwise.
- Change the bulb.
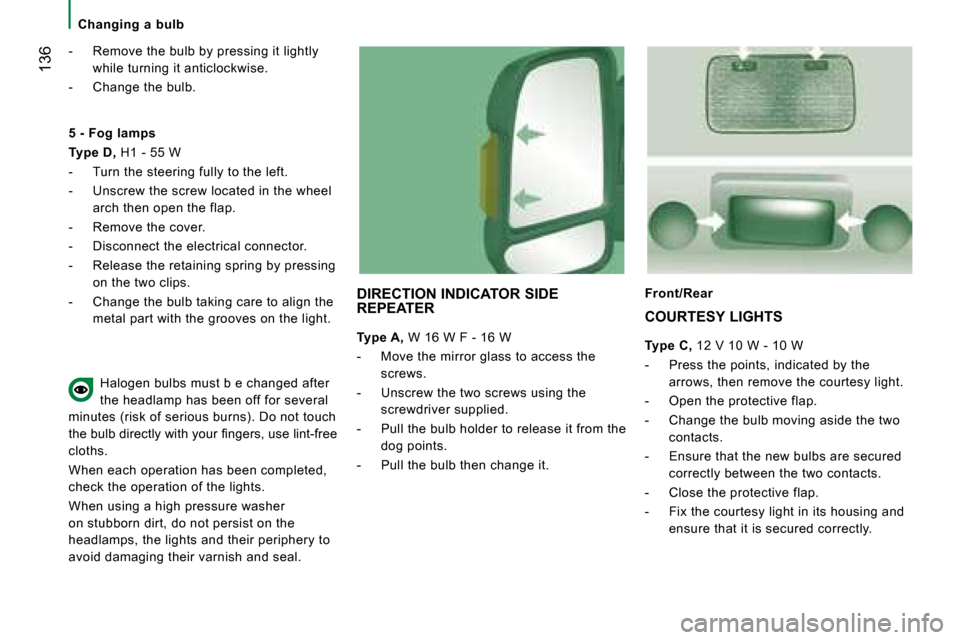
DIRECTION INDICATOR SIDE
REPEATER
Type A, W 16 W F - 16 W
- Move the mirror glass to access the screws.
- Unscrew the two screws using the screwdriver supplied.
- Pull the bulb holder to release it from the dog points.
- Pull the bulb then change it.
Front/Rear
5 - Fog lamps
Type D, H1 - 55 W
- Turn the steering fully to the left.
- Unscrew the screw located in the wheel arch then open the flap.
- Remove the cover.
- Disconnect the electrical connector.
- Release the retaining spring by pressing on the two clips.
- Change the bulb taking care to align the metal part with the grooves on the light.
Halogen bulbs must b e changed after
the headlamp has been off for several
minutes (risk of serious burns). Do not touch
�t�h�e� �b�u�l�b� �d�i�r�e�c�t�l�y� �w�i�t�h� �y�o�u�r� �fi� �n�g�e�r�s�,� �u�s�e� �l�i�n�t�-�f�r�e�e
cloths.
When each operation has been completed,
check the operation of the lights.
When using a high pressure washer
on stubborn dirt, do not persist on the
headlamps, the lights and their periphery to
avoid damaging their varnish and seal. COURTESY LIGHTS
Type C, 12 V 10 W - 10 W
- Press the points, indicated by the arrows, then remove the courtesy light.
- Open the protective flap.
- Change the bulb moving aside the two contacts.
- Ensure that the new bulbs are secured correctly between the two contacts.
- Close the protective flap.
- Fix the courtesy light in its housing and ensure that it is secured correctly.
Page 141 of 163
139
TROUBLESHOOTING
8
Changing a fuse
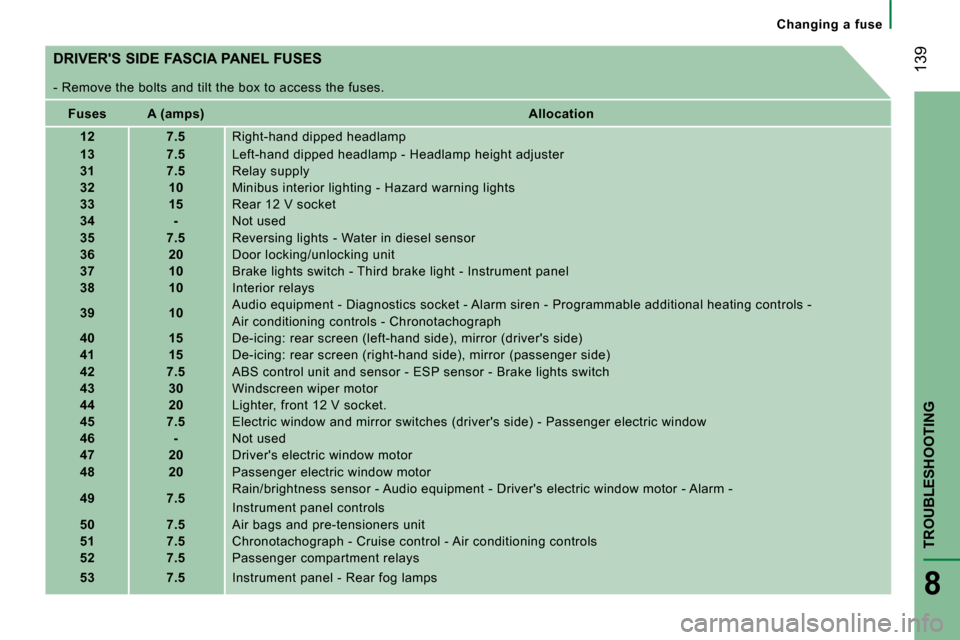
DRIVER'S SIDE FASCIA PANEL FUSES
- Remove the bolts and tilt the box to access the fuses.
Fuses A (amps)
Allocation
12 7.5 Right-hand dipped headlamp
13 7.5 Left-hand dipped headlamp - Headlamp height adj uster
31 7.5 Relay supply
32 10 Minibus interior lighting - Hazard warning ligh ts
33 15 Rear 12 V socket
34 - Not used
35 7.5 Reversing lights - Water in diesel sensor
36 20 Door locking/unlocking unit
37 10 Brake lights switch - Third brake light - Instr ument panel
38 10 Interior relays
39 10 Audio equipment - Diagnostics socket - Alarm siren
- Programmable additional heating controls -
Air conditioning controls - Chronotachograph
40 15 De-icing: rear screen (left-hand side), mirror (driver's side)
41 15 De-icing: rear screen (right-hand side), mirror (passenger side)
42 7.5 ABS control unit and sensor - ESP sensor - Brak e lights switch
43 30 Windscreen wiper motor
44 20 Lighter, front 12 V socket.
45 7.5 Electric window and mirror switches (driver's s ide) - Passenger electric window
46 - Not used
47 20 Driver's electric window motor
48 20 Passenger electric window motor
49 7.5 Rain/brightness sensor - Audio equipment - Driver'
s electric window motor - Alarm -
Instrument panel controls
50 7.5 Air bags and pre-tensioners unit
51 7.5 Chronotachograph - Cruise control - Air conditi oning controls
52 7.5 Passenger compartment relays
53 7.5 Instrument panel - Rear fog lamps
Page 147 of 163
147
9
TECHNICAL DATA
Dimensions
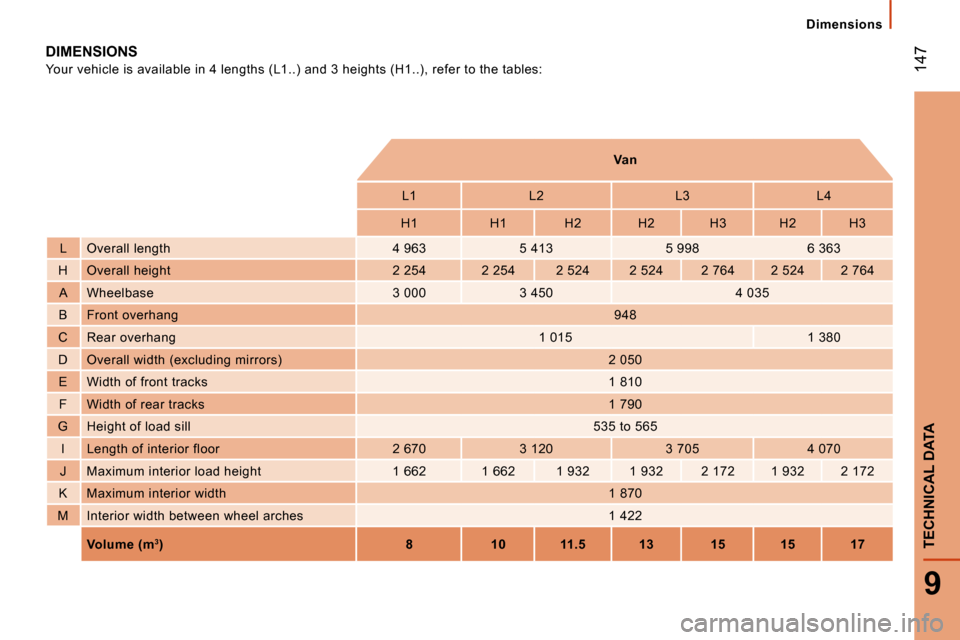
DIMENSIONS
Your vehicle is available in 4 lengths (L1..) and 3 heights (H1..), refer to the tables:
Van
L1 L2 L3 L4
H1 H1 H2 H2 H3 H2 H3
L Overall length 4 963 5 413 5 998 6 363
H Overall height 2 254 2 254 2 524 2 524 2 764 2 524 2 764
A Wheelbase 3 000 3 450 4 035
B Front overhang 948
C Rear overhang 1 015 1 380
D Overall width (excluding mirrors) 2 050
E Width of front tracks 1 810
F Width of rear tracks 1 790
G Height of load sill 535 to 565
I Length of interior floor 2 670 3 120 3 705 4 070
J Maximum interior load height 1 662 1 662 1 932 1 932 2 172 1 932 2 172
K Maximum interior width 1 870
M Interior width between wheel arches 1 422
Volume (m3) 8 10 11.5 13 15 15 17
Page 151 of 163
9
TECHNICAL DATA
Dimensions
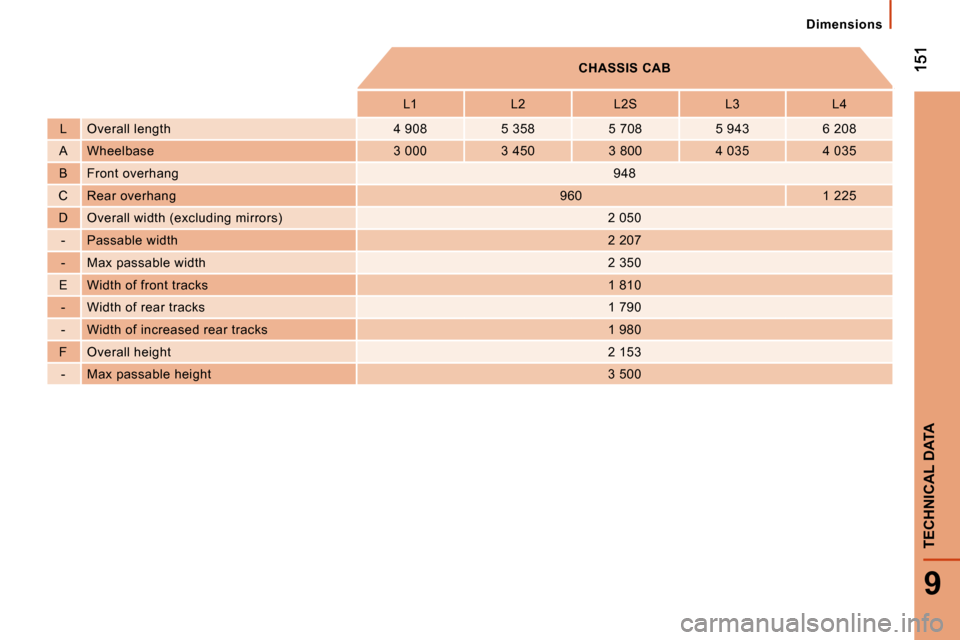
CHASSIS CAB
L1 L2 L2S L3 L4
L Overall length 4 908 5 358 5 708 5 943 6 208
A Wheelbase 3 000 3 450 3 800 4 035 4 035
B Front overhang 948
C Rear overhang 960 1 225
D Overall width (excluding mirrors) 2 050
- Passable width 2 207
- Max passable width 2 350
E Width of front tracks 1 810
- Width of rear tracks 1 790
- Width of increased rear tracks 1 980
F Overall height 2 153
- Max passable height 3 500