ECU Citroen JUMPY 2008.5 2.G Owner's Manual
[x] Cancel search | Manufacturer: CITROEN, Model Year: 2008.5, Model line: JUMPY, Model: Citroen JUMPY 2008.5 2.GPages: 185, PDF Size: 6.66 MB
Page 4 of 185

7
8
7
7
7
Exterior
FAMILIARISATION
1
144
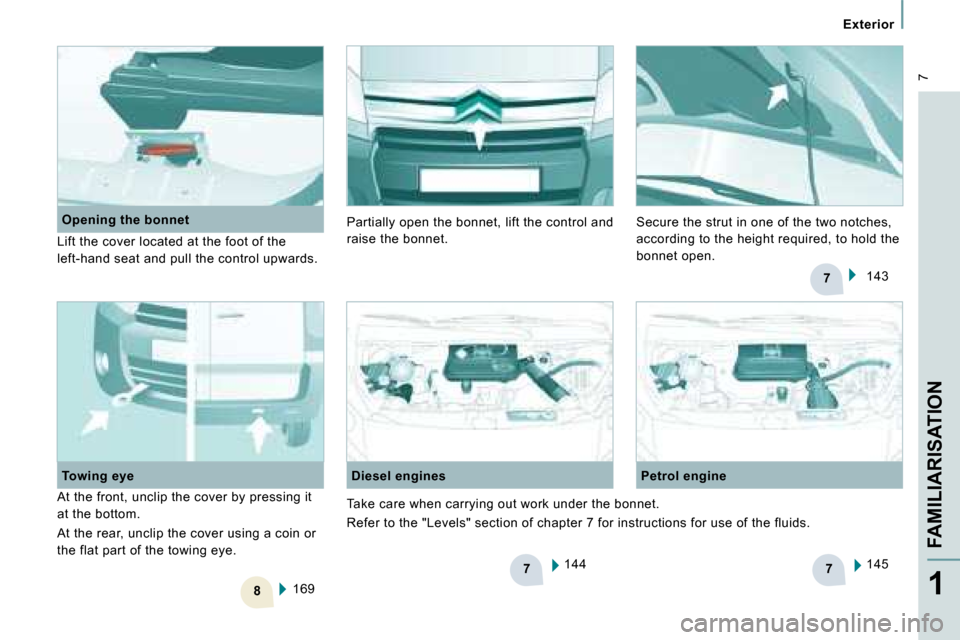
Diesel engines Petrol engine
145
169
Towing eye
Opening the bonnet
Lift the cover located at the foot of the
left-hand seat and pull the control upwards.
At the front, unclip the cover by pressing it
at the bottom.
At the rear, unclip the cover using a coin or
the flat part of the towing eye. 143
Partially open the bonnet, lift the control and
raise the bonnet.
Secure the strut in one of the two notches,
according to the height required, to hold the
bonnet open.
Take care when carrying out work under the bonnet.
Refer to the "Levels" section of chapter 7 for ins tructions for use of the fluids.
Page 12 of 185

3
333
15
Interior
FAMILIARISATION
1
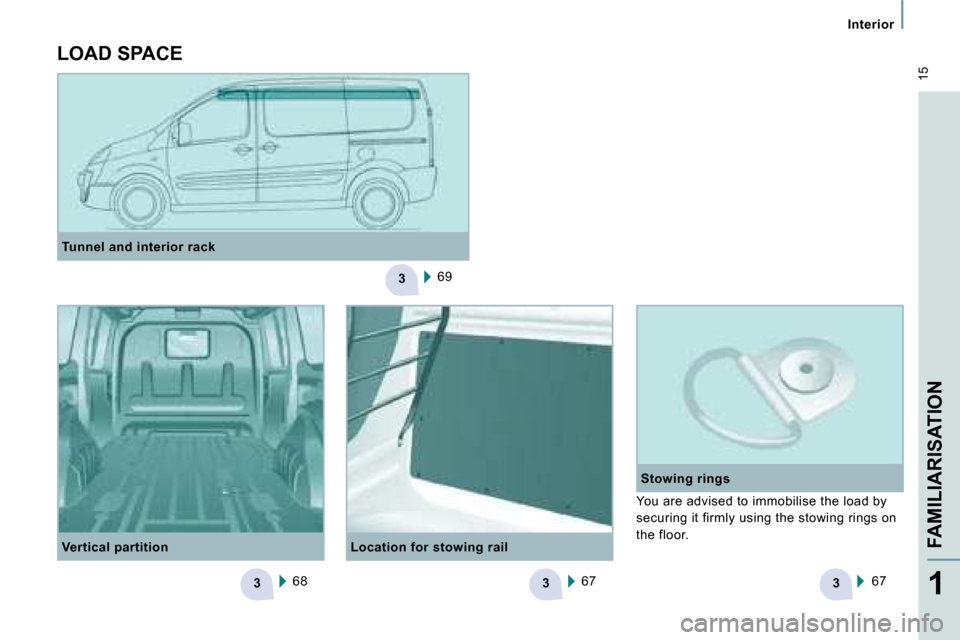
Location for stowing rail Stowing rings
Tunnel and interior rack
69
Vertical partition 68 67
67 You are advised to immobilise the load by
securing it firmly using the stowing rings on
the floor.
LOAD SPACE
Page 14 of 185

17
Accesses
READY TO SET OFF
2
At your request, the network can deactivate
this selectivity of opening between the cab
and the load space, contact a CITROËN
dealer.
REMOTE CONTROL This is confirmed by fixed lighting of the
direction indicators for approximately
two seconds.
ACCESSES
Unlocking the cab
Press this button once to unlock
your vehicle’s cab.
The direction indicators flash
twice.
Press this button a second time to unlock
the side door(s) and the rear doors.
This selective function of the accesses is
active when the vehicle is delivered. Unlocking the load
space
Press this button to unlock all of
the rear doors.
This separation of the locking
of the cab and load space is an
operating security feature. It enables you
to prevent access to the part of the vehicle
from which you are absent.
Central locking
Press this button to lock your
vehicle, cab and rear doors.
The direction indicators flash
once.
If one of the front doors is open or is not
closed correctly, the central locking will not
work.
Deadlocking
If your vehicle is fitted with deadlocking, a
second press on the closed padlock on
the remote control within five seconds after
locking changes the locking to deadlocking. Deadlocking renders the exterior and interior
door opening handles inoperative: do not
leave anyone inside the vehicle when it is
deadlocked.
If deadlocking is activated from inside the
vehicle, it will change to normal locking
when the vehicle is started.
Folding/unfolding the key
Press this button to release the
key from its housing.
To fold the key, press the
chromed button then fold the key
into the housing. If you do not press the
button, the mechanism may be damaged.
Good practice
Take care not to allow the remote control to
come into contact with grease, dust, rain or
a damp environment.
A heavy object attached to the key
(keyring, ...) weighing on the shaft of the key
in the switch, may cause a malfunction.
Page 23 of 185

23
Accesses
READY TO SET OFF
2
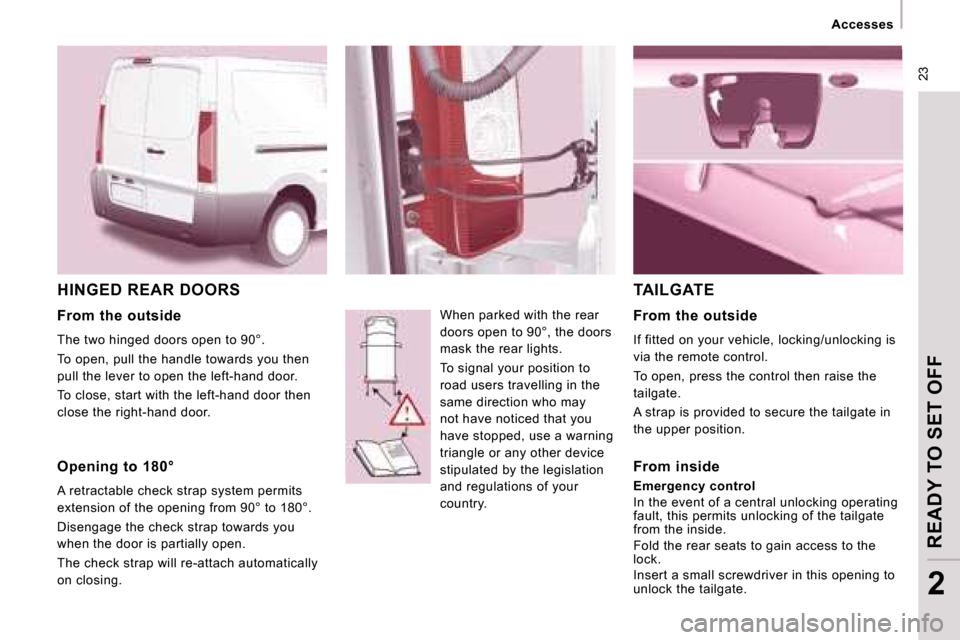
HINGED REAR DOORS
When parked with the rear
doors open to 90°, the doors
mask the rear lights.
To signal your position to
road users travelling in the
same direction who may
not have noticed that you
have stopped, use a warning
triangle or any other device
stipulated by the legislation
and regulations of your
country.
TAILGATE
From the outside
The two hinged doors open to 90°.
To open, pull the handle towards you then
pull the lever to open the left-hand door.
To close, start with the left-hand door then
close the right-hand door.
Opening to 180°
A retractable check strap system permits
extension of the opening from 90° to 180°.
Disengage the check strap towards you
when the door is partially open.
The check strap will re-attach automatically
on closing. From the outside
If fitted on your vehicle, locking/unlocking is
via the remote control.
To open, press the control then raise the
tailgate.
A strap is provided to secure the tailgate in
the upper position.
From inside
Emergency control
In the event of a central unlocking operating
fault, this permits unlocking of the tailgate
from the inside.
Fold the rear seats to gain access to the
lock.
Insert a small screwdriver in this opening to
unlock the tailgate.
Page 66 of 185

65
Practical information
ERGONOMICS and COMFORT
3
Ticket storage
According to the configuration of the vehicle. Overhead storage unit
This is located above the sun visors and
has two compartments for storing a jumper,
a file, ...
Be aware that storing a hard object in direct
contact with the compartment may result in
noise. Tip: the central cavity of the overhead
storage unit, located in the extension of the
vehicle’s roof between the rear space and
the cab, permits the transportation of long
objects. Take care to support and wedge
them securely.
The tunnel may be added to by an internal
rack, offered as an accessory.
For raised vehicles, a shelf located above
the overhead storage unit permits the
storing of small objects and materials
(straps, cloths, gloves, helmets, etc...).
Page 68 of 185

67
Practical information
ERGONOMICS and COMFORT
3
LOAD SPACE LAYOUT
Depending on the vehicle’s equipment, the
various fittings below enhance your load
space. Locations for stowing rail
Locations for securing a stowing rail are
available on each side of the vehicle.
Stowing rings
Use the stowing rings on the rear floor to
secure your loads.
As a safety precaution in case of sharp
braking, you are advised to place heavy
objects as far forwards towards the cab as
possible.
You are advised to immobilise the load by
securing it firmly using the stowing rings on
the floor. Trims
The lower parts of the sides are fitted with
load protection trims.
Roof box on raised version
This is a storage compartment located in the
load space, above the cab roof.
Page 128 of 185

128
Seat belts
Height adjustment
Squeeze the control with the return and slide
the assembly on the driver ’s seat side and
on the individual passenger seat side.
If your vehicle is fitted with a front bench,
the height of the seat belt associated with
the centre seat cannot be adjusted. Unfastening
Press the red button.
SEAT BELTS
CORRECT USE OF THE SEAT BELTS
The driver must ensure that passengers use
the seat belts correctly and that they are all
strapped in securely before moving off.
Wherever you are seated in the vehicle,
always fasten your seat belt, even for short
journeys.
The seat belts are fitted with an inertia reel
which automatically adjusts the length of the
strap to your size. The seat belt is rolled up
automatically when not in use.
Ensure that the seat belt is rolled up
correctly after use.
After folding or moving a seat or a rear
bench seat, ensure that the seat belt is
rolled up correctly and that the buckle is
ready to accommodate the tongue.
Depending on the nature and seriousness
of any impact, the pretensioning device may
be triggered before and independently of
inflation of the air bags. It instantly tightens
the seat belts against the body of the
occupants.
Triggering of the pretensioners is
accompanied by a slight discharge of
harmless smoke and a noise, due to the
activation of the pyrotechnic cartridge
incorporated in the system.
Fastening
Pull the strap, then insert the tongue into the
buckle.
Check that the seat belt is fastened correctly
by pulling the strap. Driver ’s seat belt not fastened warning
light
Passenger seat belt not fastened warning
light
When the vehicle is started, this
warning light comes on if the
driver has not fastened his seat
belt.
If your vehicle is fitted with a front
passenger seat, when the vehicle
is started, this warning light
comes on if the passenger has not
fastened his seat belt.
Page 137 of 185

136
Child safety Chapter 5, "Air bags" section. CHILD SEATS RECOMMENDED BY CITROËN
CITROËN offers a complete range of recommended c
hild seats which are secured using a
three point seat belt :
The child seats function and the
passenger air bag disarming function
are shared by the entire CITROËN range.
The front bench is fixed and has no
longitudinal adjustment.
The passenger must not travel with a child
on his lap.
In the absence of the disarming of the
passenger air bag, the installation of a "rear-
facing" child seat on the front seats is strictly
prohibited.
Group 0: from birth to 10 kg
Group 0+: from birth to 13 kg
L1
"ROMER Baby-Safe Plus"
Installed in the rear-facing position
Groups 1, 2 and 3: from 9 to 36 kg
L2
"KIDDY Life"
For the safety of young children (from 9 to 18 kg),
CITROËN recommends use of the restraining cushion.
Groups 2 and 3: from 15 to 36 kg
L3
"RECARO Start’’
L4
"KLIPPAN Optima"
From the age of 6 years (approximately 22 kg),
the booster is used on its own.
Page 138 of 185

136
Child safety Chapter 5, "Air bags" section. CHILD SEATS RECOMMENDED BY CITROËN
CITROËN offers a complete range of recommended c
hild seats which are secured using a
three point seat belt :
The child seats function and the
passenger air bag disarming function
are shared by the entire CITROËN range.
The front bench is fixed and has no
longitudinal adjustment.
The passenger must not travel with a child
on his lap.
In the absence of the disarming of the
passenger air bag, the installation of a "rear-
facing" child seat on the front seats is strictly
prohibited.
Group 0: from birth to 10 kg
Group 0+: from birth to 13 kg
L1
"ROMER Baby-Safe Plus"
Installed in the rear-facing position
Groups 1, 2 and 3: from 9 to 36 kg
L2
"KIDDY Life"
For the safety of young children (from 9 to 18 kg),
CITROËN recommends use of the restraining cushion.
Groups 2 and 3: from 15 to 36 kg
L3
"RECARO Start’’
L4
"KLIPPAN Optima"
From the age of 6 years (approximately 22 kg),
the booster is used on its own.
Page 139 of 185

137
Child safety
SAFETY
5
a: Group 0: from birth to 10 kg.
b: consult the legislation in force in your country b efore installing your child on this seat.
U: seat suitable for the installation of a child seat secured using a seat belt and universally approved , "rear facing" and/or "forward facing".
INSTALLING CHILD SEATS ATTACHED USING THE SEAT BEL T
This table indicates the options for installing child seats secured using a seat belt and universally approved in accordance with the weight of
the child and the seat in the vehicle.
Seat
Weight of the child and indicative age
Under 13 kg
(groups 0 (a) and 0+)
Up to approx
1 year
From 9 to 18 kg
(group 1)
1 to 3 years approx
From 15 to 25 kg
(group 2)
3 to 6 years approx
From 22 to 36 kg
(group 3)
6 to 10 years approx
Row 1 (b) Individual seat
U U U U
Bench, side seat U U U U
Bench, centre seat
L1 L2 L2, L3, L4 L2, L3, L4