dashboard CITROEN JUMPY 2008 Owners Manual
[x] Cancel search | Manufacturer: CITROEN, Model Year: 2008, Model line: JUMPY, Model: CITROEN JUMPY 2008Pages: 252, PDF Size: 12.15 MB
Page 34 of 252
ABS
ESP OFF
32
Instruments and controls
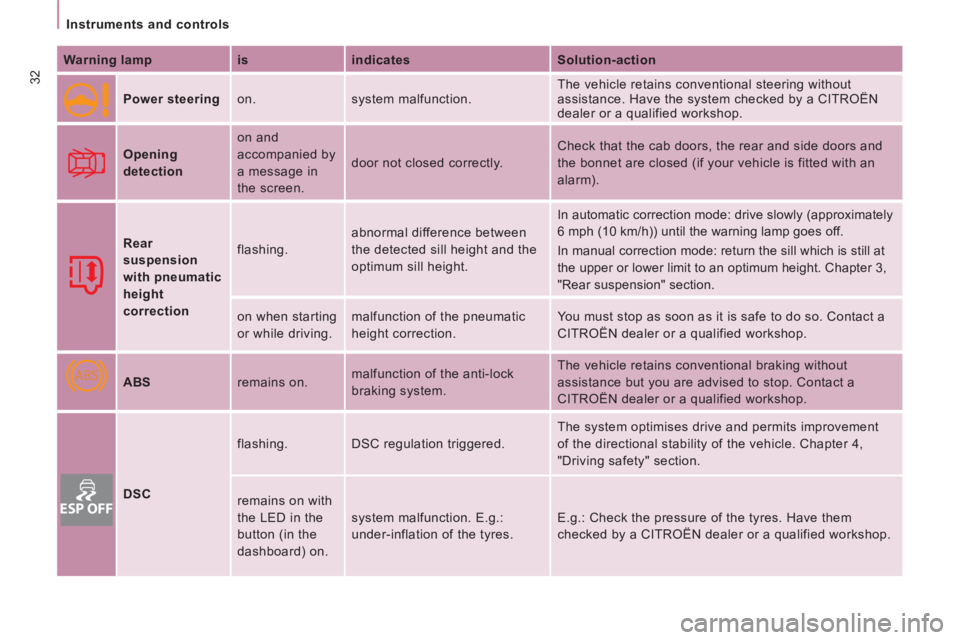
Warning lamp is indicates Solution-action
Power steering on. system malfunction. The vehicle retains conventional steering without
assistance. Have the system checked by a CITROËN
dealer or a qualified workshop.
Opening
detection
on and
accompanied by
a message in
the screen.
door not closed correctly.
Check that the cab doors, the rear and side doors and
the bonnet are closed (if your vehicle is fitted with an
alarm).
Rear
suspension
with pneumatic
height
correction
flashing.
abnormal difference between
the detected sill height and the
optimum sill height. In automatic correction mode: drive slowly (approximately
6 mph (10 km/h)) until the warning lamp goes off.
In manual correction mode: return the sill which is still at
the upper or lower limit to an optimum height. Chapter 3,
"Rear suspension" section.
on when starting
or while driving. malfunction of the pneumatic
height correction. You must stop as soon as it is safe to do so. Contact a
CITROËN dealer or a qualified workshop.
ABS remains on. malfunction of the anti-lock
braking system. The vehicle retains conventional braking without
assistance but you are advised to stop. Contact a
CITROËN dealer or a qualified workshop.
DSC flashing.
DSC regulation triggered. The system optimises drive and permits improvement
of the directional stability of the vehicle. Chapter 4,
"Driving safety" section.
remains on with
the LED in the
button (in the
dashboard) on. system malfunction. E.g.:
under-inflation of the tyres.
E.g.: Check the pressure of the tyres. Have them
checked by a CITROËN dealer or a qualified workshop.
Page 59 of 252
57
Ventilation
EASE OF USE
and
COMFORT
3
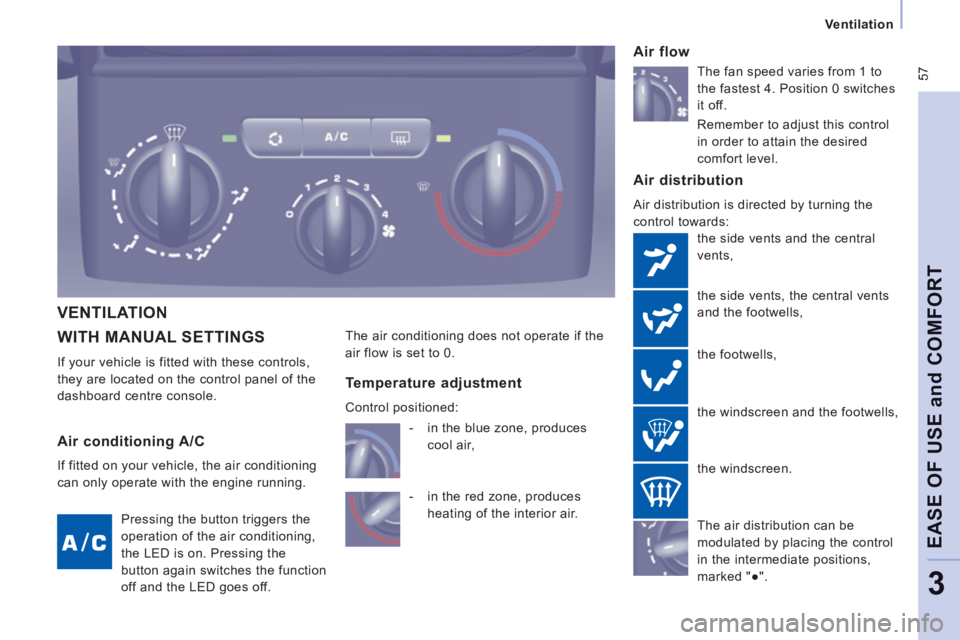
WITH MANUAL SETTINGS
If your vehicle is fitted with these controls,
they are located on the control panel of the
dashboard centre console.
Air distribution
Air distribution is directed by turning the
control towards: the side vents and the central
vents,
the side vents, the central vents
and the footwells,
the footwells,
the windscreen and the footwells,
Air flow
The air conditioning does not operate if the
air flow is set to 0.
the windscreen.
Air conditioning A/C
If fitted on your vehicle, the air conditioning
can only operate with the engine running. Pressing the button triggers the
operation of the air conditioning,
the LED is on. Pressing the
button again switches the function
off and the LED goes off.
Temperature adjustment
Control positioned:
- in the red zone, produces heating of the interior air.
- in the blue zone, produces
cool air,
The air distribution can be
modulated by placing the control
in the intermediate positions,
marked "●". The fan speed varies from 1 to
the fastest 4. Position 0 switches
it off.
Remember to adjust this control
in order to attain the desired
comfort level.
VENTILATION
Page 97 of 252
95
Airbags
SAFETY
4
Good practice
Sit in a normal upright position.
Wear a correctly adjusted seat belt.
Do not leave anything between the
occupants and the airbags (a child, pet,
object...). This could hinder the operation of
the airbags or injure the occupants.
After an accident or if the vehicle has been
stolen or broken into, have the airbag
systems checked.
All work on the airbag system is strictly
forbidden unless it is carried out by qualified
personnel at a CITROËN dealer or a
qualified workshop.
Even if all of the precautions mentioned are
observed, a risk of injury or of minor burns
to the head, chest or arms when an airbag
is deployed cannot be ruled out. In fact, the
bag inflates almost instantly (within a few
milliseconds) then deflates within the same
time discharging the hot gas via openings
provided for this purpose. Lateral airbags
Only put recommended covers on the seats.
These will not hinder inflation of the lateral
airbags. Contact a CITROËN dealer or a
qualified workshop.
Do not fix or attach anything to the seat
backs. This could cause injury to the chest
or arms when the lateral airbag inflates.
Do not sit with the upper part of the body
any nearer to the door than necessary.
Front airbags
Do not drive holding the steering wheel
by its spokes or resting your hands on the
centre part of the wheel.
Do not allow passengers to place their feet
on the dashboard, they risk serious injury if
the airbag is deployed.
Smoke as little as possible as deployment
of the airbags can cause burns or the risk of
injury from a cigarette or pipe.
Never remove or pierce the steering wheel
or hit it violently.
Page 99 of 252

97
Airbags
SAFETY
4
Deactivation
The passenger's front airbag alone can be
deactivated:
- with the ignition switched off , insert the key into the passenger's airbag
deactivation switch,
- turn it to the "OFF" position,
- then remove the key keeping the switch in the new position. Front airbags
The front airbags are fitted in the centre of
the steering wheel for the driver and in the
dashboard for the front passenger. Reactivation
In the
"OFF" position, the passenger's
airbag will not be deployed in the event of
an impact.
As soon as the child seat is removed, turn
the airbag switch to the "ON" position to
reactivate the airbag and thus ensure the
safety of your passenger in the event of
an impact. To ensure the safety of your child, it is
essential to deactivate the passengers
airbag when you install a rear-facing child
seat on the front passenger seat. Otherwise,
the child would risk being killed or seriously
injured if the airbag were to inflate.
The airbag warning lamp in the
instrument panel is on while the
airbag is deactivated.
Deployment
They are deployed, except the passenger's
front airbag if it has been deactivated, in
the event of a serious front impact applied
to all or part of the front impact zone
A in
the longitudinal centreline of the vehicle on
a horizontal plane directed from the front
towards the rear of the vehicle.
The front airbag inflates between the front
occupant of the vehicle and the dashboard
to cushion their forward movement. If this warning lamp comes on,
accompanied by an audible signal
and a message in the screen,
contact a CITROËN dealer or
a qualified workshop to have the system
checked. Front airbag fault
If the two airbag warning lamps are on
continuously, do not install a "rearward
facing" child seat. Contact a CITROËN or a
qualified workshop.
Page 115 of 252
11 3
Levels
CHECKS
6
Cooling system
Only use the fluid recommended by the
manufacturer.
Otherwise, you risk seriously damaging your
engine.
When the engine is warm, the temperature
of the coolant is controlled by the engine
fan. As this fan can operate with the ignition
key removed and because the cooling
system is pressurised, wait for at least one
hour after the engine has stopped before
carrying out any work.
Slacken the cap by 1/4 of a turn to release
the pressure to prevent any risk of scalding.
When the pressure has dropped, remove the
cap and top up the level with coolant.
If fluid has to be added frequently, this
indicates a fault which must be checked by a
CITROËN dealer or a qualified workshop as
soon as possible.
Power steering fluid level
The vehicle must be parked on level ground
with the engine cold. Unscrew the cap
integrated with the gauge and check the
level which must be between the MIN and
MAX marks. When this occurs with the engine running it
is due to the start of saturation of the particle
emission filter (exceptionally prolonged
urban type driving conditions: low speed,
long traffic jams, ...).
In order to regenerate the filter, you are
advised to drive at a speed higher than
40 mph (60 km/h) for at least five minutes
as soon as possible, when traffic conditions
permit (until the message disappears and
the service warning lamp goes off).
During regeneration of the particle emission
filter, relay noise may be heard under the
dashboard.
If the message is still displayed and if the
service warning lamp remains on, contact a
CITROËN dealer or a qualified workshop.
Topping up
The level must be between the MIN and
MAX marks on the expansion bottle. If
more than 1 litre of fluid is required to top
up the level, have the system checked by a
CITROËN dealer or a qualified workshop.
Screenwash and headlamp wash
level
For best quality cleaning and for your safety,
we would advise that you use products of
the CITROËN range.
Capacity of the screenwash reservoir:
approximately 4.5 litres.
If your vehicle is fitted with headlamp
washers, the capacity of the reservoir
is 7.5 litres.
To ensure optimum cleaning and prevent
freezing, this fluid must not be topped up or
replaced with plain water.
Diesel additive level
(Diesel with particle
emission filter)
The minimum level of this additive
is indicated by lighting of the service warning
light, accompanied by an audible signal and
a message in the screen. Topping up
This additive must be topped up by a
CITROËN dealer or a qualified workshop
without delay.
Page 137 of 252
135
Changing a fuse
QUICK HELP
7
CHANGING A FUSE
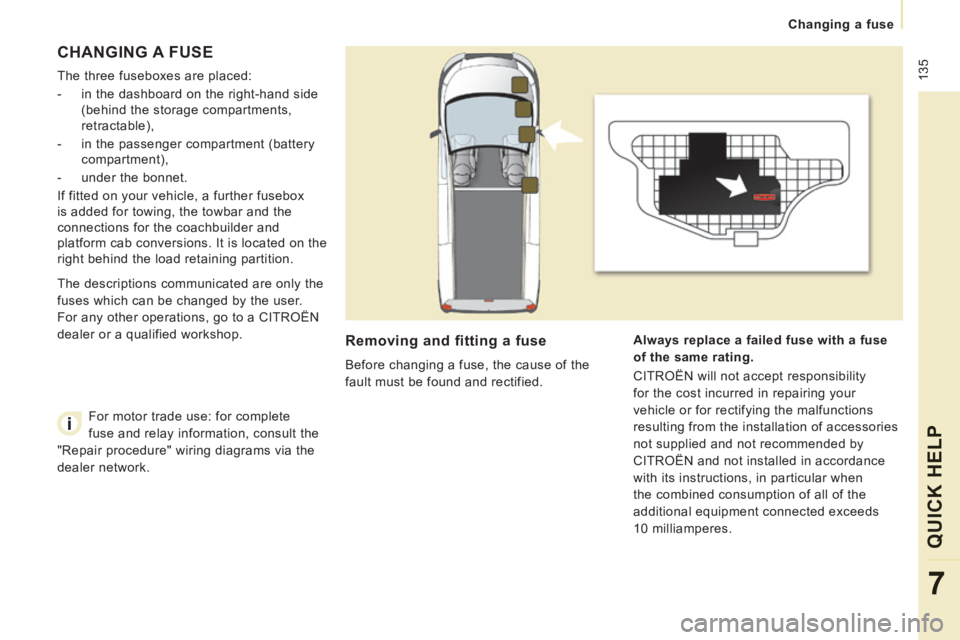
The three fuseboxes are placed:
- in the dashboard on the right-hand side (behind the storage compartments,
retractable),
- in the passenger compartment (battery compartment),
- under the bonnet.
If fitted on your vehicle, a further fusebox
is added for towing, the towbar and the
connections for the coachbuilder and
platform cab conversions. It is located on the
right behind the load retaining partition.
Removing and fitting a fuse
Before changing a fuse, the cause of the
fault must be found and rectified. Always replace a failed fuse with a fuse
of the same rating.
CITROËN will not accept responsibility
for the cost incurred in repairing your
vehicle or for rectifying the malfunctions
resulting from the installation of accessories
not supplied and not recommended by
CITROËN and not installed in accordance
with its instructions, in particular when
the combined consumption of all of the
additional equipment connected exceeds
10 milliamperes.
The descriptions communicated are only the
fuses which can be changed by the user.
For any other operations, go to a CITROËN
dealer or a qualified workshop.
For motor trade use: for complete
fuse and relay information, consult the
"Repair procedure" wiring diagrams via the
dealer network.
Page 138 of 252
136
Changing a fuse
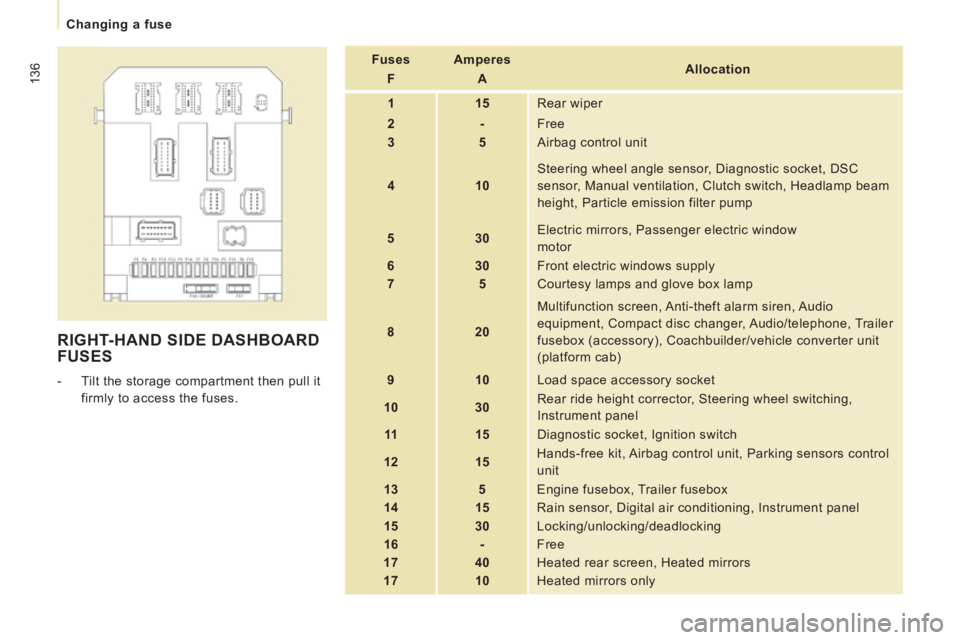
RIGHT-HAND SIDE DASHBOARD FUSES
- Tilt the storage compartment then pull it firmly to access the fuses. Fuses
F Amperes
A Allocation
1 15 Rear wiper
2 - Free
3 5 Airbag control unit
4 10 Steering wheel angle sensor, Diagnostic socket, DSC
sensor, Manual ventilation, Clutch switch, Headlamp beam
height, Particle emission filter pump
5 30 Electric mirrors, Passenger electric window
motor
6 30 Front electric windows supply
7 5 Courtesy lamps and glove box lamp
8 20 Multifunction screen, Anti-theft alarm siren, Audio
equipment, Compact disc changer, Audio/telephone, Trailer
fusebox (accessory), Coachbuilder/vehicle converter unit
(platform cab)
9 10 Load space accessory socket
10 30 Rear ride height corrector, Steering wheel switching,
Instrument panel
11 15 Diagnostic socket, Ignition switch
12 15 Hands-free kit, Airbag control unit, Parking sensors control
unit
13 5 Engine fusebox, Trailer fusebox
14 15 Rain sensor, Digital air conditioning, Instrument panel
15 30 Locking/unlocking/deadlocking
16 - Free
17 40 Heated rear screen, Heated mirrors
17 10 Heated mirrors only
Page 240 of 252
154
Poste de conduite
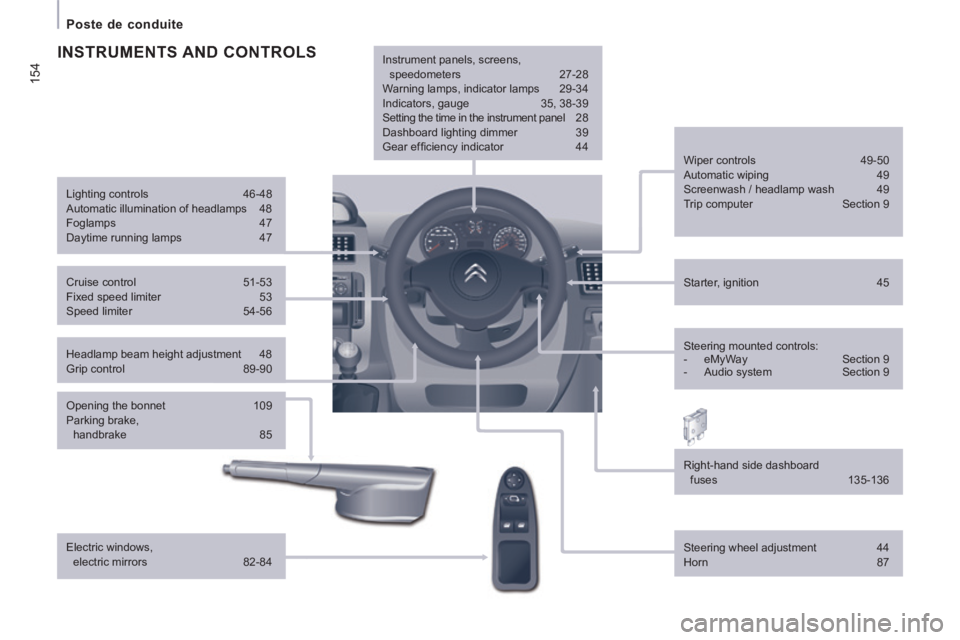
Headlamp beam height adjustment 48
Grip control 89-90 Starter, ignition
45
Wiper controls
49-50
Automatic wiping 49
Screenwash / headlamp wash 49
Trip computer Section 9
Cruise control 51-53
Fixed speed limiter 53
Speed limiter 54-56
Steering mounted controls:
- eMyWay Section 9
- Audio system Section 9
Lighting controls
46-48
Automatic illumination of headlamps 48
Foglamps 47
Daytime running lamps 47
INSTRUMENTS AND CONTROLS
Opening the bonnet 109
Parking brake, handbrake 85
Electric windows, electric mirrors 82-84 Instrument panels, screens,
speedometers 27-28
Warning lamps, indicator lamps 29-34
Indicators, gauge 35, 38-39
Setting the time in the instrument panel 28
Dashboard lighting dimmer 39
Gear effi ciency indicator 44
Steering wheel adjustment 44
Horn 87
Right-hand side dashboard
fuses 135-136