CITROEN JUMPY 2009 Owners Manual
Manufacturer: CITROEN, Model Year: 2009, Model line: JUMPY, Model: CITROEN JUMPY 2009Pages: 252, PDF Size: 12.15 MB
Page 131 of 252
129
Snow chains
QUICK HELP
7
SNOW CHAINS
In wintry conditions, snow chains improve
traction as well as the behaviour of the
vehicle when braking. The snow chains must be fitted only to
the driving wheels. They must never be
fitted to "space-saver" type spare wheels.
Take account of the legislation in force
in your country on the use of snow
chains and the maximum running speed
authorised. Advice on installation
If you have to fit the chains during
a journey, stop the vehicle on a flat
surface on the side of the road.
Apply the parking brake and position any
wheel chocks to prevent movement of
your vehicle.
Fit the chains following the instructions
provided by the manufacturer.
Move off gently and drive for a few
moments, without exceeding 30 mph
(50 km/h).
Stop your vehicle and check that the
snow chains are correctly tightened.
Avoid driving on roads that have been
cleared of snow, to avoid damaging
your vehicle's tyres and the road surface. It
is recommended that before you leave, you
practise fitting the snow chains on a level
and dry surface. If your vehicle is fitted with
alloy wheels, check that no part of the chain
or its fixings is in contact with the wheel rim.
Use only the chains designed to be fitted to
the type of wheel fitted to your vehicle:
Original
tyre size Maximum link
size.
215/65 R15
12 mm
215/60 R16
MICHELIN
215/60 R16
BRIDGESTONE
For more information on snow chains,
contact a CITROËN dealer or a qualified
workshop.
Page 132 of 252

130
Changing a bulb
CHANGING A BULB
Type A
All glass bulb: pull
gently as it is fitted by
pressure.
Type B
Bayonet bulb: press
on the bulb then turn it
anticlockwise.
Type C
Halogen bulb: release
the retaining spring from
its housing.
TYPES OF BULB
Various types of bulb are installed on your vehicle. To remove them: Halogen bulbs must be changed after
the headlamp has been off for several
minutes (risk of serious burns). Do not touch
the bulb directly with your fingers, use lint-
free cloths.
When each operation has been completed,
check the operation of the lighting.
Page 133 of 252

131
Changing a bulb
QUICK HELP
7
3. Direction indicators
Type B , PY21W - 21W (amber)
- Turn the bulb holder a quarter turn anticlockwise.
- Remove the bulb by pressing it lightly while turning it anticlockwise.
- Change the bulb.
- Ensure that the cover is refitted
correctly all the way round to ensure
sealing. FRONT LAMPS
Open the bonnet. To access the bulbs, reach
behind the headlamp unit.
Carry out the operations in reverse order to
refit each bulb.
1. Dipped / Main beam headlamps
Type C , H4 - 55W
- Remove the centre cover by pulling the flexible rubber tab.
- Disconnect the electrical connector.
- Release the retaining spring.
- Change the bulb taking care to align the metal part with the slots in the
lamp. 2. Sidelamps
Type A , W5W - 5W
- Remove the cover by pulling the flexible rubber tab.
- Remove the bulb holder fitted by pressure by pulling the connector.
- Change the bulb.
- Ensure that the cover is refitted correctly all the way round to ensure
sealing. 4. Foglamps
Type C , H1 - 55W
Contact a CITROËN dealer or a qualified
workshop.
Page 134 of 252

132
Changing a bulb
DIRECTION INDICATOR SIDE
REPEATER
Type A , WY5W - 5W (amber)
- Push the repeater towards the rear and disengage it.
- Support the connector and turn the bulb holder a quarter turn to the left.
- Turn the bulb a quarter turn to the left, remove it and change it.
- When refitting, engage the repeater towards the rear and bring it towards
the front. Front / Rear
Amber coloured bulbs (direction indicators
and side repeaters) must be replaced with
bulbs of identical specification and colour. COURTESY LAMPS
Type A , 12V 5W - 5W
- Unclip the lens by sliding a screwdriver in the slots on each side of the courtesy
lamp.
- Pull the bulb and change it.
- Clip the lens in its housing and ensure that it is secured correctly.
High pressure jet washing
When using this type of jet washer
on stubborn dirt, do not persist on the
headlamps, the lamps and their surrounds to
avoid damaging their coating and seals.
Page 135 of 252
133
Changing a bulb
QUICK HELP
7
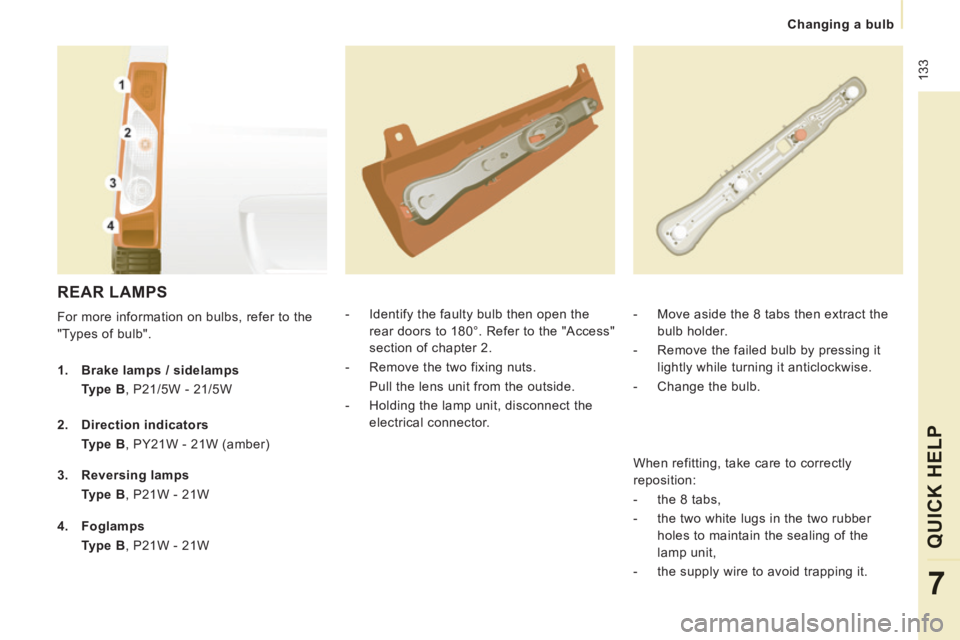
REAR LAMPS
For more information on bulbs, refer to the
"Types of bulb". - Identify the faulty bulb then open the
rear doors to 180°. Refer to the "Access"
section of chapter 2.
- Remove the two fixing nuts.
Pull the lens unit from the outside.
- Holding the lamp unit, disconnect the electrical connector. - Move aside the 8 tabs then extract the
bulb holder.
- Remove the failed bulb by pressing it lightly while turning it anticlockwise.
- Change the bulb.
1. Brake lamps / sidelamps
Type B , P21/5W - 21/5W
2. Direction indicators
Type B , PY21W - 21W (amber)
3. Reversing lamps
Type B , P21W - 21W
4. Foglamps
Type B , P21W - 21W When refitting, take care to correctly
reposition:
- the 8 tabs,
- the two white lugs in the two rubber
holes to maintain the sealing of the
lamp unit,
- the supply wire to avoid trapping it.
Page 136 of 252
134
Changing a bulb
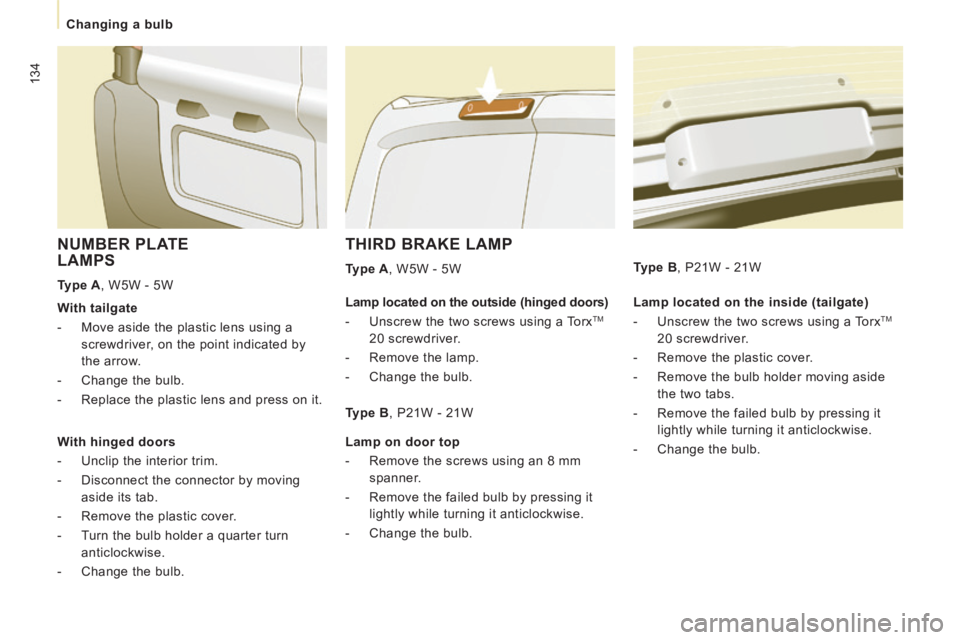
THIRD BRAKE LAMP
Type A , W5W - 5W
NUMBER PLATE LAMPS
Type A , W5W - 5W Lamp located on the inside (tailgate)
- Unscrew the two screws using a Torx
TM
20 screwdriver.
- Remove the plastic cover.
- Remove the bulb holder moving aside the two tabs.
- Remove the failed bulb by pressing it lightly while turning it anticlockwise.
- Change the bulb.
Type B , P21W - 21W
With tailgate
- Move aside the plastic lens using a
screwdriver, on the point indicated by
the arrow.
- Change the bulb.
- Replace the plastic lens and press on it.
With hinged doors
- Unclip the interior trim.
- Disconnect the connector by moving aside its tab.
- Remove the plastic cover.
- Turn the bulb holder a quarter turn anticlockwise.
- Change the bulb. Lamp located on the outside (hinged doors)
- Unscrew the two screws using a Torx TM
20 screwdriver.
- Remove the lamp.
- Change the bulb. Type B , P21W - 21W
Lamp on door top
- Remove the screws using an 8 mm spanner.
- Remove the failed bulb by pressing it lightly while turning it anticlockwise.
- Change the bulb.
Page 137 of 252

135
Changing a fuse
QUICK HELP
7
CHANGING A FUSE
The three fuseboxes are placed:
- in the dashboard on the right-hand side (behind the storage compartments,
retractable),
- in the passenger compartment (battery compartment),
- under the bonnet.
If fitted on your vehicle, a further fusebox
is added for towing, the towbar and the
connections for the coachbuilder and
platform cab conversions. It is located on the
right behind the load retaining partition.
Removing and fitting a fuse
Before changing a fuse, the cause of the
fault must be found and rectified. Always replace a failed fuse with a fuse
of the same rating.
CITROËN will not accept responsibility
for the cost incurred in repairing your
vehicle or for rectifying the malfunctions
resulting from the installation of accessories
not supplied and not recommended by
CITROËN and not installed in accordance
with its instructions, in particular when
the combined consumption of all of the
additional equipment connected exceeds
10 milliamperes.
The descriptions communicated are only the
fuses which can be changed by the user.
For any other operations, go to a CITROËN
dealer or a qualified workshop.
For motor trade use: for complete
fuse and relay information, consult the
"Repair procedure" wiring diagrams via the
dealer network.
Page 138 of 252
136
Changing a fuse
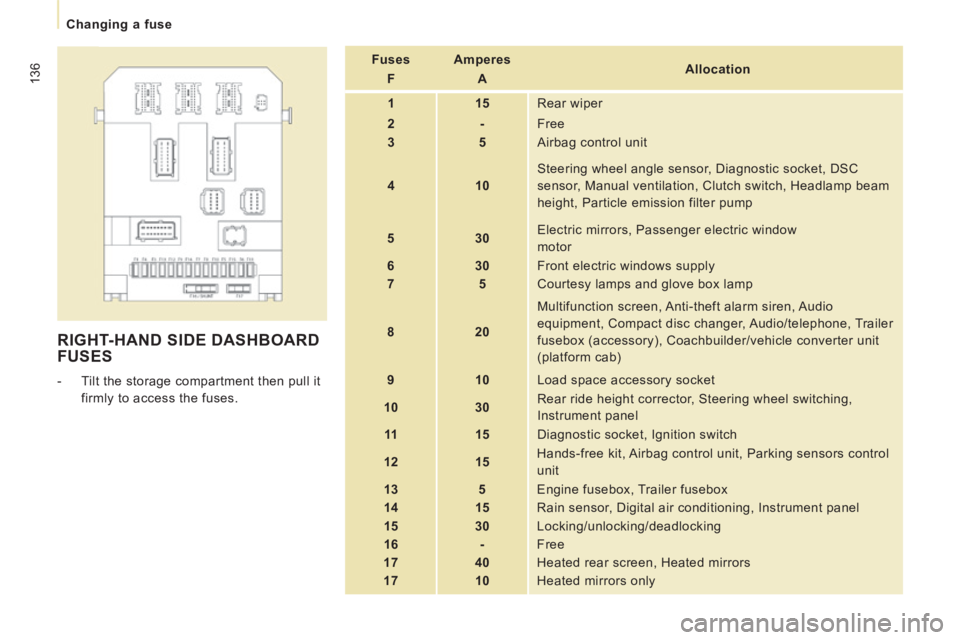
RIGHT-HAND SIDE DASHBOARD FUSES
- Tilt the storage compartment then pull it firmly to access the fuses. Fuses
F Amperes
A Allocation
1 15 Rear wiper
2 - Free
3 5 Airbag control unit
4 10 Steering wheel angle sensor, Diagnostic socket, DSC
sensor, Manual ventilation, Clutch switch, Headlamp beam
height, Particle emission filter pump
5 30 Electric mirrors, Passenger electric window
motor
6 30 Front electric windows supply
7 5 Courtesy lamps and glove box lamp
8 20 Multifunction screen, Anti-theft alarm siren, Audio
equipment, Compact disc changer, Audio/telephone, Trailer
fusebox (accessory), Coachbuilder/vehicle converter unit
(platform cab)
9 10 Load space accessory socket
10 30 Rear ride height corrector, Steering wheel switching,
Instrument panel
11 15 Diagnostic socket, Ignition switch
12 15 Hands-free kit, Airbag control unit, Parking sensors control
unit
13 5 Engine fusebox, Trailer fusebox
14 15 Rain sensor, Digital air conditioning, Instrument panel
15 30 Locking/unlocking/deadlocking
16 - Free
17 40 Heated rear screen, Heated mirrors
17 10 Heated mirrors only
Page 139 of 252
137
Changing a fuse
QUICK HELP
7
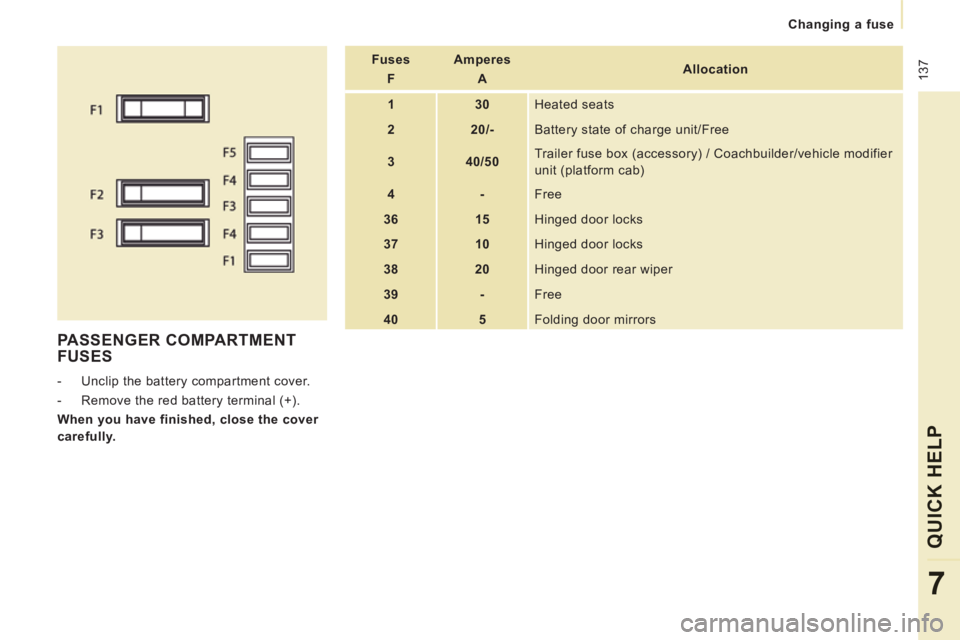
PASSENGER COMPARTMENT FUSES
- Unclip the battery compartment cover.
- Remove the red battery terminal (+).
When you have finished, close the cover
carefully. Fuses
F Amperes
A Allocation
1 30 Heated seats
2 20/- Battery state of charge unit/Free
3 40/50 Trailer fuse box (accessory) / Coachbuilder/vehicle modifier
unit (platform cab)
4 - Free
36 15 Hinged door locks
37 10 Hinged door locks
38 20 Hinged door rear wiper
39 - Free
40 5 Folding door mirrors
Page 140 of 252

138
Changing a fuse
FUSES UNDER THE BONNET
- After opening the bonnet, slide the screenwash support to make access
easier.
- Unclip and tilt the box to access the fuses. Fuses
F Amperes
A Allocation
1 20 Engine control unit, Fuel supply and air supply systems,
Fan assembly
2 15 Horn
3 10 Front and rear screenwash pump
4 20 Headlamp wash pump
5 15 Fuel supply system
6 10 Power steering, Secondary brake pedal switch
7 10 Braking system (ABS/DSC)
8 20 Starter motor control
9 10 Main brake pedal switch
10 30 Fuel supply and air supply systems, Emissions control
systems
11 40 Front ventilation
12 30 Windscreen wipers
13 40 Built-in systems interface
14 30 Free