Citroen JUMPY 2012 2.G Owner's Manual
Manufacturer: CITROEN, Model Year: 2012, Model line: JUMPY, Model: Citroen JUMPY 2012 2.GPages: 268, PDF Size: 9.71 MB
Page 181 of 268
9.31
06
5
6
7
8
AUDIO/VIDEO
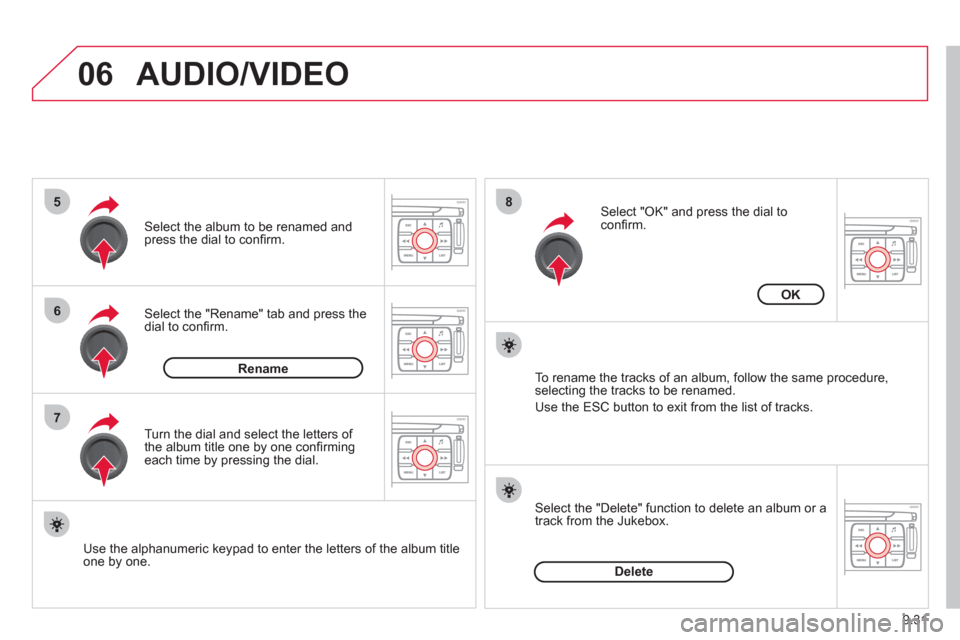
Select the "Rename" tab and press the dial to confi rm.
Select the album to be renamed andpress the dial to confi rm.
Use the alphanumeric keypad to enter the letters o
f the album title one by one.T
urn the dial and select the letters of
the album title one by one confi rming each time by pressing the dial.
Rename
To rename the tracks of an album, follow the same procedure,selecting the tracks to be renamed.
Use the ESC button to exit from the list of tracks.
Select "OK" and press the dial toconfi rm.
OK
Select the "Delete" function to delete an album or a
track from the Jukebox.
Delete
Page 182 of 268
9.32
06
1
2
AUDIO/VIDEO
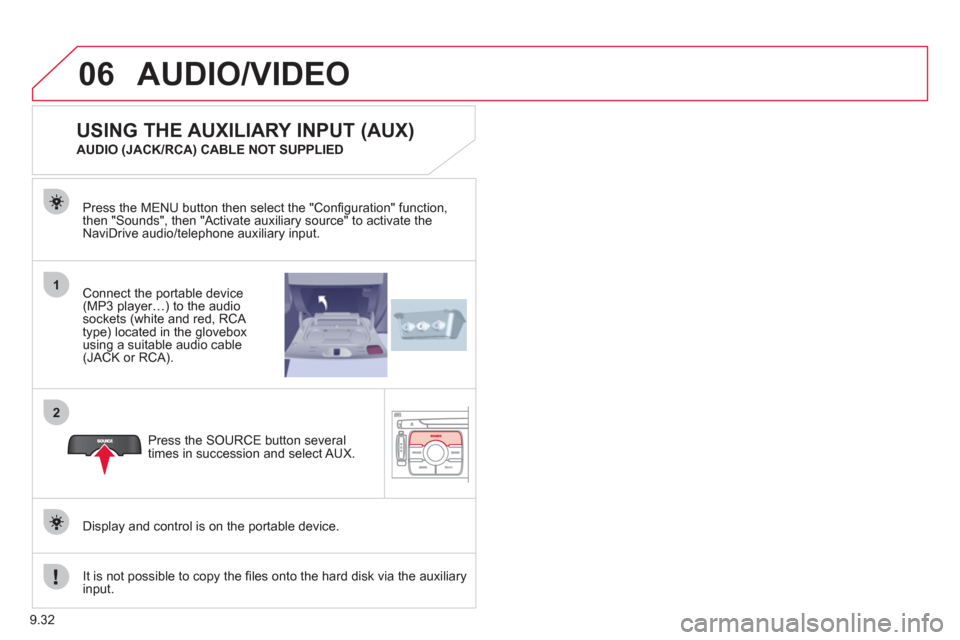
Connect the portable device (MP3 player…) to the audio
sockets (white and red, RCA
type) located in the glovebox using a suitable audio cable (JACK or RCA). Press the MENU button then select the "
Confi guration" function,
then "Sounds", then "Activate auxiliary source" to activate the
NaviDrive audio/telephone auxiliary input.
It is not possible to cop
y the fi les onto the hard disk via the auxiliary input.Pr
ess the SOURCE button several
times in succession and select AUX.
USING THE AUXILIARY INPUT (AUX)
AUDIO (JACK/RCA) CABLE NOT SUPPLIED
Displa
y and control is on the portable device.
Page 183 of 268
9.33
06
1
2
4
3
7
5
6
AUDIO/VIDEO
VIDEO MENU
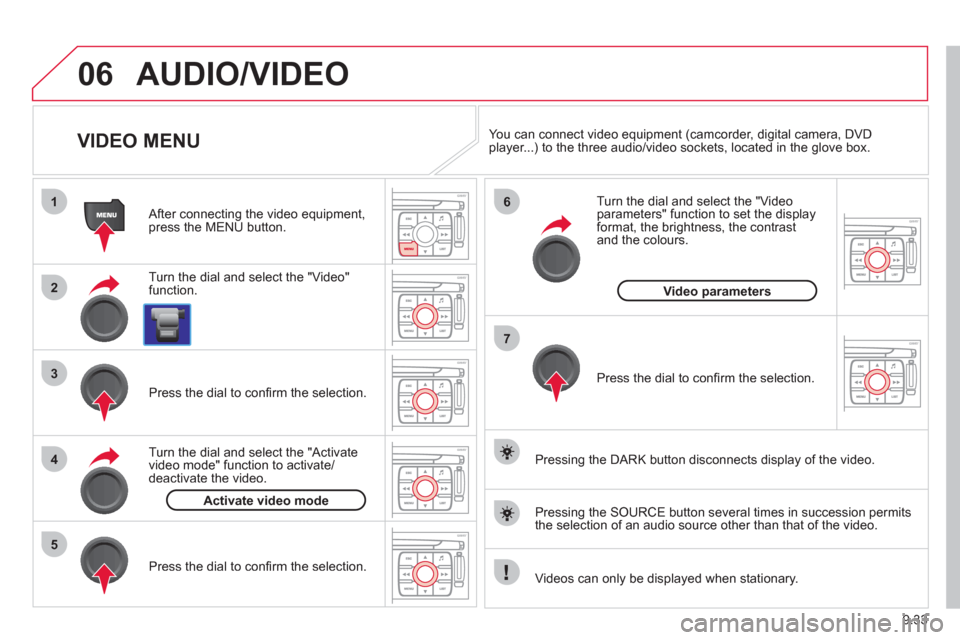
Turn the dial and select the "Video"
function.
After connecting the video equipment,press the MENU button.
Pr
ess the dial to confi rm the selection.
T
urn the dial and select the "Activatevideo mode" function to activate/deactivate the video.
Pr
ess the dial to confi rm the selection.
T
urn the dial and select the "Video parameters" function to set the displayformat, the brightness, the contrast and the colours.
Videos can only be displayed when stationary.
Pressin
g the DARK button disconnects display of the video.
You can connect video equipment
(camcorder, digital camera, DVDplayer...) to the three audio/video sockets, located in the glove box.
Pressin
g the SOURCE button several times in succession permits
the selection of an audio source other than that of the video.
Pr
ess the dial to confi rm the selection.
Activate video mode
Video parameters
Page 184 of 268
9.34
07
1
2
1
2
3
INTERNAL TELEPHONE
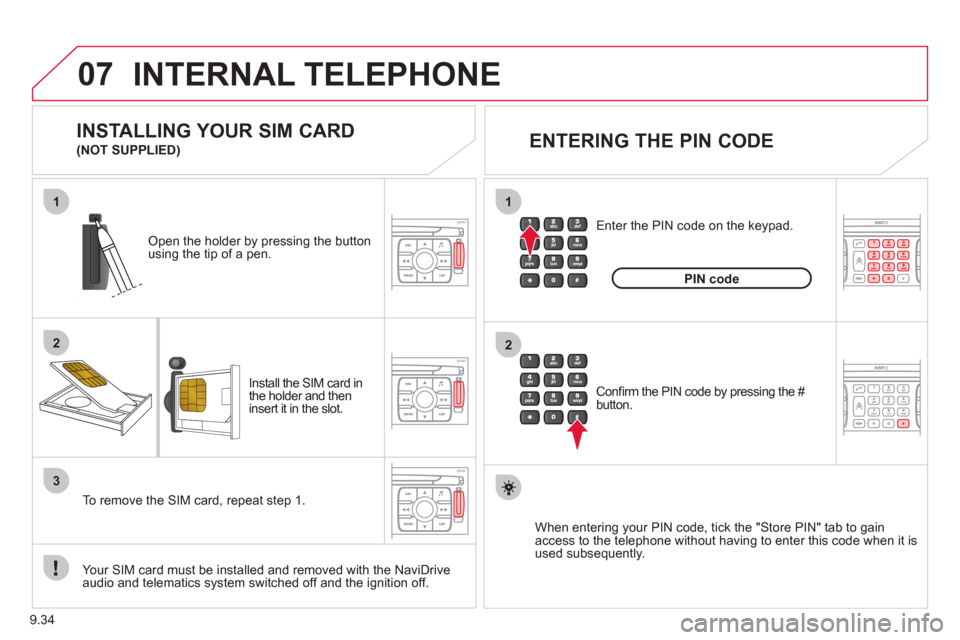
Install the SIM card in
the holder and then
insert it in the slot.
Open the holder by pressing the buttonusing the tip of a pen.
Your
SIM card must be installed and removed with the NaviDrive
audio and telematics system switched off and the ignition off.
To remove the
SIM card, repeat step 1.
Confi rm the PIN code by pressing the # button.
Enter the PIN code on the ke
ypad.
When enterin
g your PIN code, tick the "Store PIN" tab to gain
access to the telephone without having to enter this code when it is
used subsequently.
INSTALLING YOUR SIM CARD
(NOT SUPPLIED)
ENTERING THE PIN CODE
PINcode
Page 185 of 268
9.35
07
1
2
3
4
BLUETOOTH® TELEPHONE®
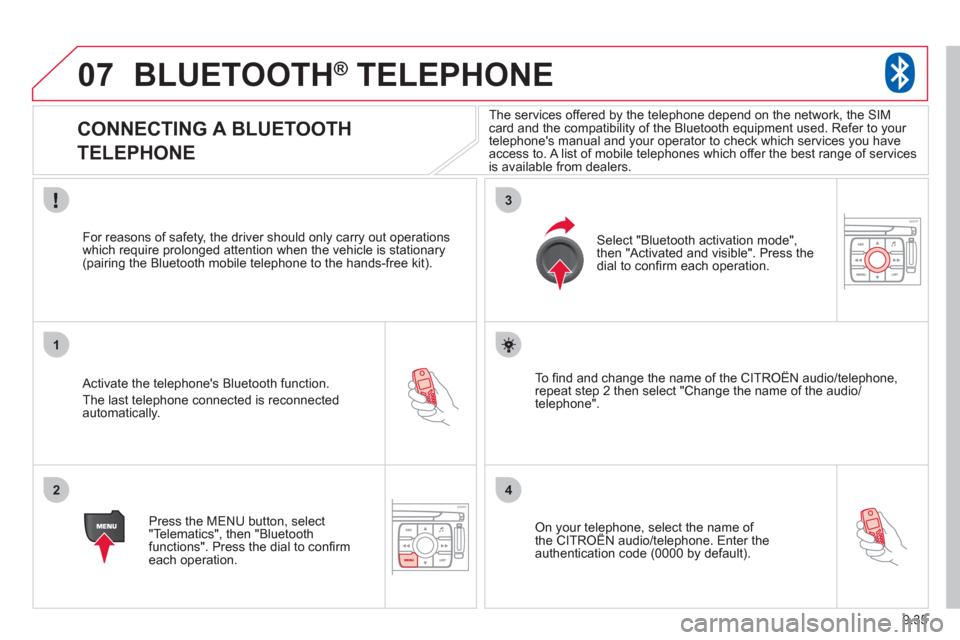
CONNECTING A BLUETOOTH
TELEPHONE
Activate the telephone's Bluetooth function.
The last telephone connected is reconnectedautomatically.
For reasons o
f safety, the driver should only carry out operations
which require prolonged attention when the vehicle is stationary (pairing the Bluetooth mobile telephone to the hands-free kit).
Press the MENU button, select
"Telematics", then "Bluetoothfunctions". Press the dial to confi rmeach operation.
To fi nd and chan
ge the name of the CITROËN audio/telephone,
repeat step 2 then select "Change the name of the audio/
telephone".
Select "Bluetooth activation mode"
,
then "Activated and visible". Press thedial to confi rm each operation.
On your telephone, select the name of the CITROÀN audio/telephone. Enter the yp,
authentication code (0000 by default).
The services offered b
y the telephone depend on the network, the SIM card and the compatibility of the Bluetooth equipment used. Refer to your
telephone's manual and your operator to check which services you have
access to. A list of mobile telephones which offer the best range of services
is available from dealers.
Page 186 of 268
9.36
07BLUETOOTH® TELEPHONE®
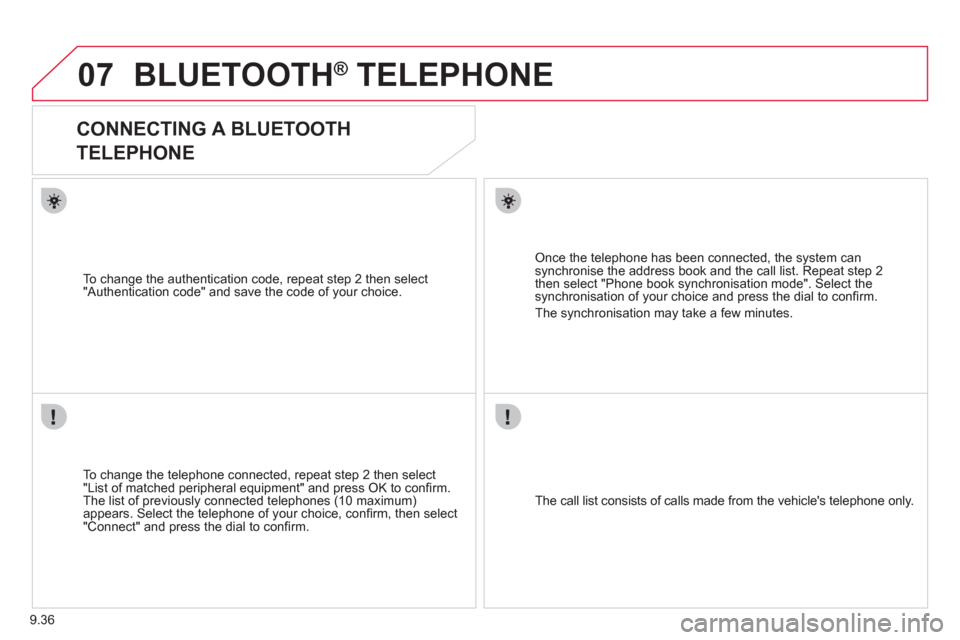
CONNECTING A BLUETOOTH
TELEPHONE
To change the telephone connected, repeat step 2 then select
"List of matched peripheral equipment" and press OK to confi rm.
The list of previously connected telephones (10 maximum)appears. Select the telephone of your choice, confi rm, then select
"Connect" and press the dial to confi rm.
To chan
ge the authentication code, repeat step 2 then select
"Authentication code" and save the code of your choice.
The call list consists of calls made from the vehicle's telephone onl
y.
Once the telephone has been connected, the system can synchronise the address book and the call list. Repeat step 2then select "Phone book synchronisation mode". Select thesynchronisation of your choice and press the dial to confi rm.
The s
ynchronisation may take a few minutes.
Page 187 of 268
9.37
07
1
2
4
3
6
5
USING THE TELEPHONE
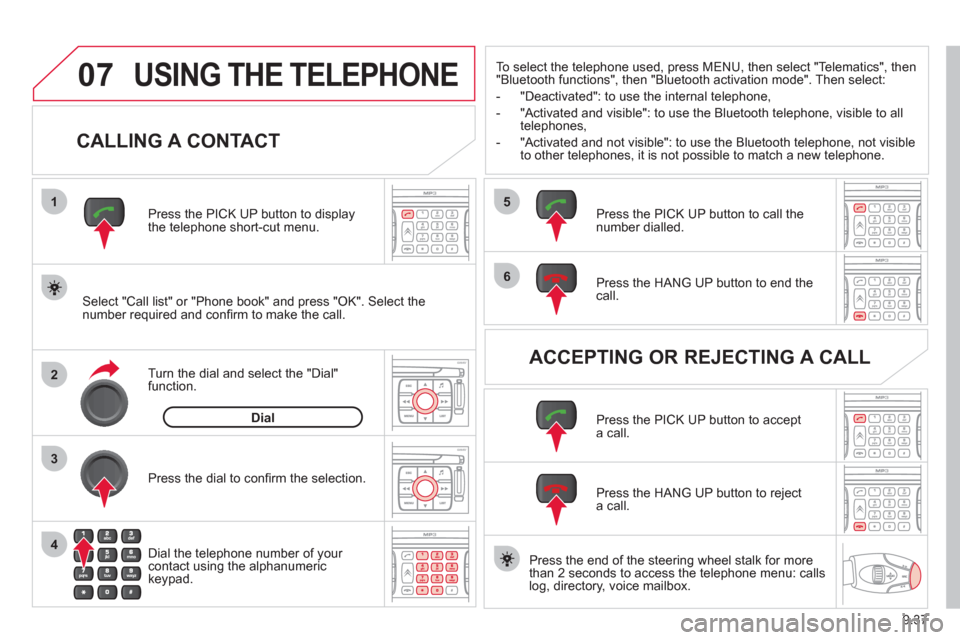
CALLING A CONTACT
Select "Call list" or "Phone book" and press "OK". Select thenumber required and confi rm to make the call. Press the PICK UP button to displa
ythe telephone short-cut menu.
Dial the telephone number of
your contact using the alphanumeric keypad. Pr
ess the dial to confi rm the selection.
Press the HAN
G UP button to end the call.
Press the PI
CK UP button to call thenumber dialled.
Press the HANG UP button to re
ject a call.
Press the PI
CK UP button to accept a call.
ACCEPTING OR REJECTING A CALL Turn the dial and select the "Dial" function.
Dial
To select the telephone used, press MENU, then select "Telematics", then
"Bluetooth functions", then "Bluetooth activation mode". Then select:
-
"Deactivated": to use the internal telephone,
- "Activated and visible": to use the Bluetooth telephone, visible to all
telephones,
- "Activated and not visible": to use the Bluetooth tele
phone, not visible
to other telephones, it is not possible to match a new telephone.
Press the end of the steerin
g wheel stalk for more
than 2 seconds to access the telephone menu: calls
log, directory, voice mailbox.
Page 188 of 268
9.38
08
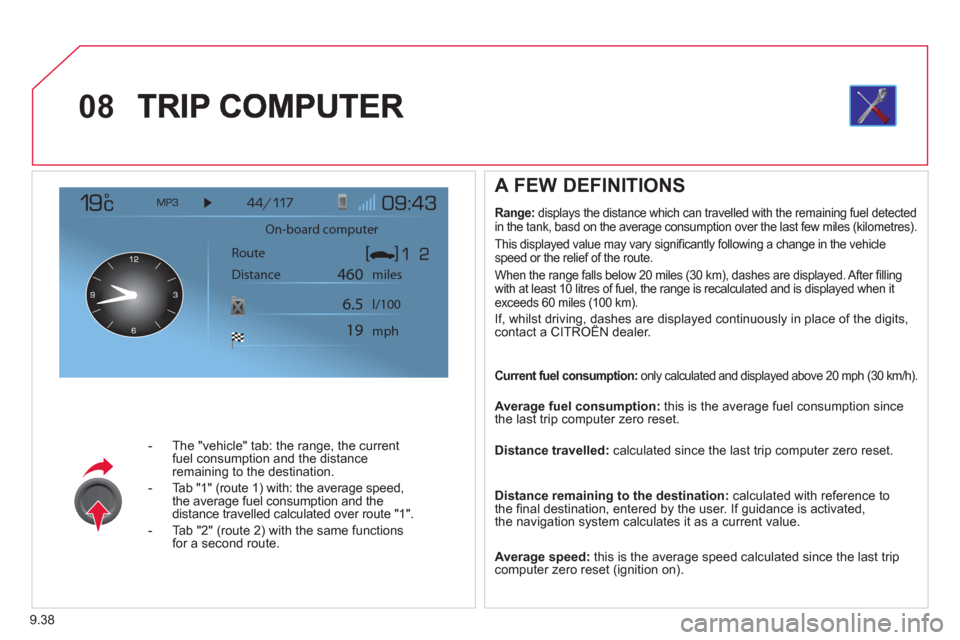
- The "vehicle" tab: the range, the current
fuel consumption and the distance
remaining to the destination.
- Tab "1"
(route 1) with: the average speed,
the average fuel consumption and the distance travelled calculated over route "1".
- Tab "2"
(route 2) with the same functions for a second route.
A FEW DEFINITIONS
Range:displays the distance which can travelled with the remaining fuel detected
in the tank, basd on the average consumption over the last few miles (kilometres).
This displa
yed value may vary signifi cantly following a change in the vehicle
speed or the relief of the route.
When the ran
ge falls below 20 miles (30 km), dashes are displayed. After fi lling
with at least 10 litres of fuel, the range is recalculated and is displayed when itexceeds 60 miles (100 km).
If, whilst driving, dashes are displayed continuously in place of the digits,contact a CITROÀN dealer. ,g,
Current fuel consumption: only calculated and displayed above 20 mph (30 km/h).
Average fuel consumption:
this is the average fuel consumption since
the last trip computer zero reset.
Distance travelled: calculated since the last trip computer zero reset.
Distance remaining to the destination:calculated with reference to
the fi nal destination, entered by the user. If guidance is activated,
the navigation system calculates it as a current value.
Average speed: this is the average speed calculated since the last trip computer zero reset (ignition on).
On-board computer
Route
Distance miles
mph l/100
460
6.5
19
Page 189 of 268
9.39
08TRIP COMPUTER
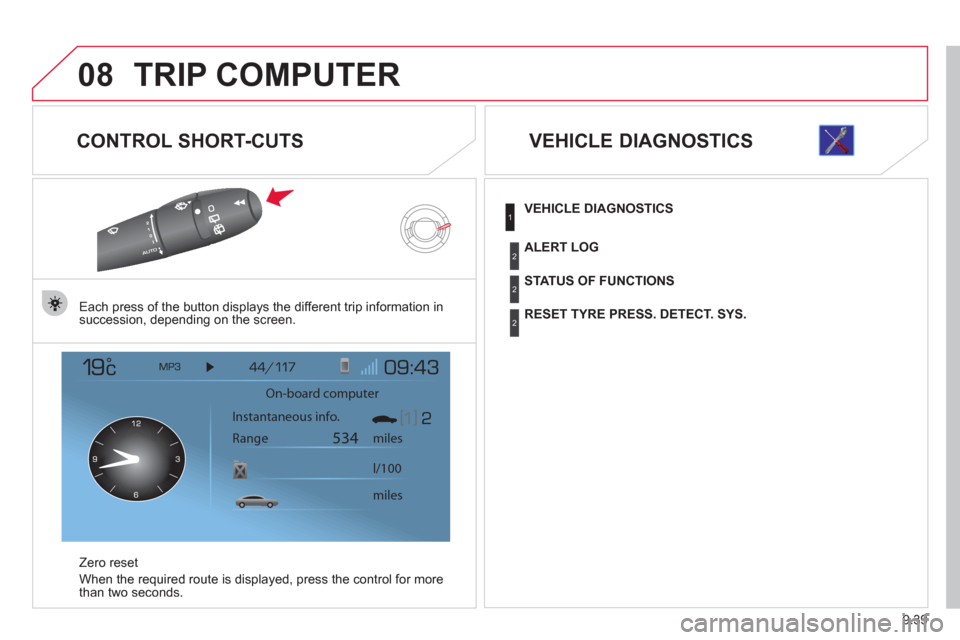
CONTROL SHORT-CUTS
Each press of the button displays the different trip information in
succession, depending on the screen.
Z
ero reset
When the required route is displa
yed, press the control for more
than two seconds.
VEHICLE DIAGNOSTICS
On-board computer
Instantaneous info.
Range miles
534
miles l/100
VEHICLE DIAGNOSTICS
STATUS OF FUNCTIONS
RESET TYRE PRESS. DETECT. SYS.
ALERT LOG
1
2
2
2
Page 190 of 268
9.40
09
1
2
3
4
5
6
7
8
CONFIGURATION
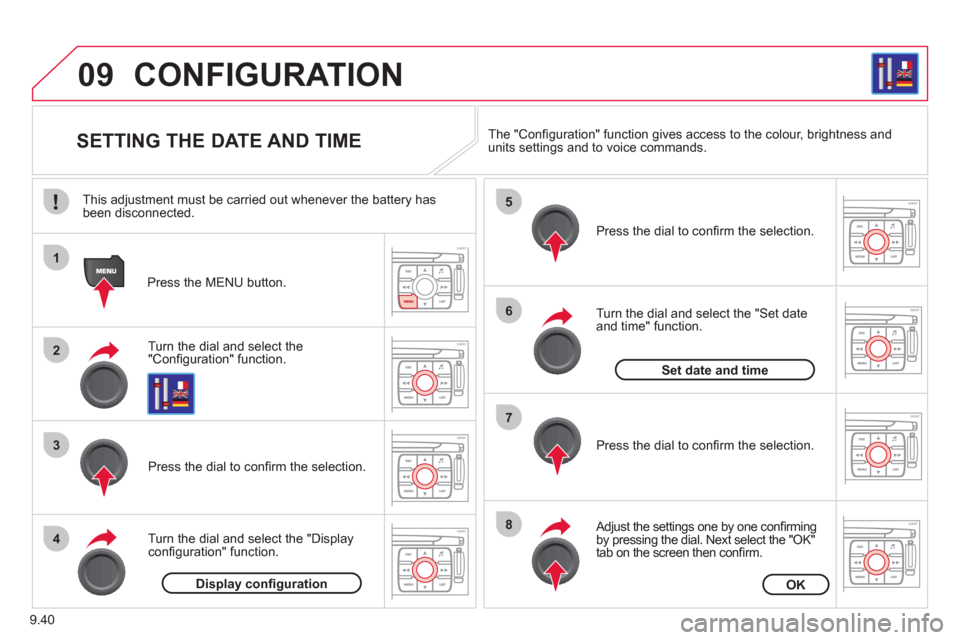
SETTING THE DATE AND TIME
Turn the dial and select the"Confi guration" function.
Press the MENU button.
Pr
ess the dial to confi rm the selection.
Turn the dial and select the "Displa
yconfi guration" function.
Pr
ess the dial to confi rm the selection.
Turn the dial and select the "
Set dateand time" function.
Adjust the settings one by one confi rmingby pressing the dial. Next select the "OK"
tab on the screen then confi rm.
Pr
ess the dial to confi rm the selection. The "
Confi guration" function gives access to the colour, brightness and units settings and to voice commands.
Display confi gurationOK
Set date and time
This adjustment must be carried out whenever the battery has been disconnected.