SCR Citroen JUMPY 2014 2.G Owner's Guide
[x] Cancel search | Manufacturer: CITROEN, Model Year: 2014, Model line: JUMPY, Model: Citroen JUMPY 2014 2.GPages: 252, PDF Size: 12.23 MB
Page 84 of 252

82
Mirrors and windows
JUMPY-VU_EN_CHAP03_ERGONOMIE ET CONFORT_ED01-2014
MIRRORS
MIRRORS AND WINDOWS Electric folding / unfolding
If your vehicle is fitted with this function, the
mirrors can be folded or unfolded electrically
from the inside, with the vehicle parked and
the ignition on:
- Place switch A in the centre position.
- Pull switch A rearwards. Manual door mirrors
Move the lever in all four directions to
adjust.
When the vehicle is parked, the door mirrors
can be folded back manually.
The mirror is convex to broaden the field of
side vision. Objects observed are, in reality,
closer than they appear. Therefore, take this
into account in order to judge the distance
correctly.
Heated mirrors
If your vehicle is fitted with this function,
press the rear screen demisting button. If the mirror casing has come out of its
initial location, with the vehicle stationary,
reposition the mirror casing manually or use
the electric folding switch.
There is no risk of breakage even in the
presence of ice.
Electric door mirrors
- Move switch A
to the right or to the left
to select the corresponding mirror.
- Move knob B in all four directions to
adjust.
- Return switch A to the centre position.
Page 88 of 252
86
Parking sensors
JUMPY-VU_EN_CHAP04_SECURITE_ED01-2014
Engage reverse gear
An audible signal confirms the activation of
the system by engaging reverse gear.
The proximity information is indicated by an
audible signal which becomes more rapid as
the vehicle approaches the obstacle. When
the distance between the rear of the vehicle
and the obstacle is less than approximately
thirty centimetres, the audible signal
becomes continuous.
Stop the assistance
Change to neutral.
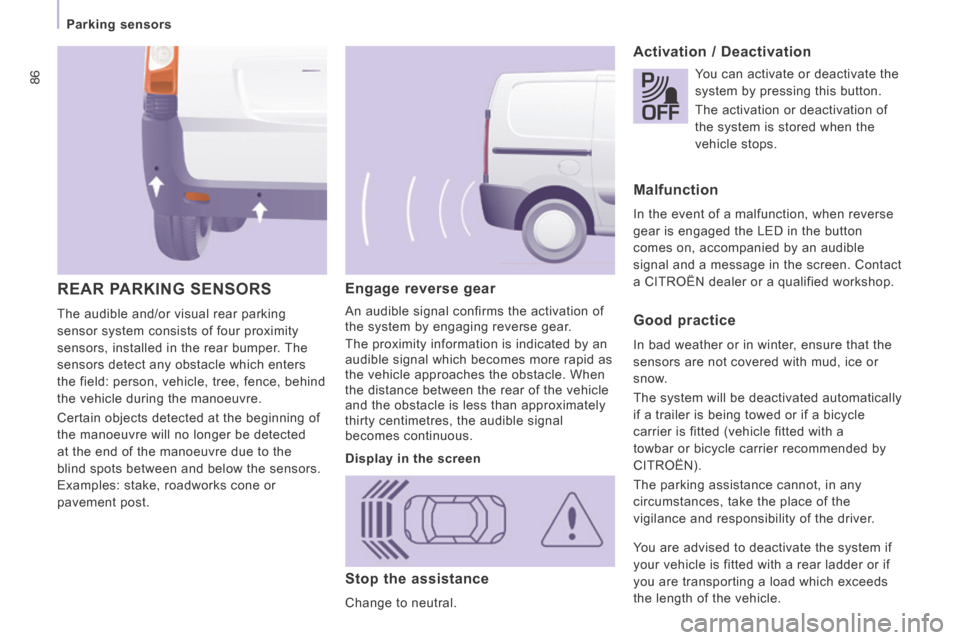
REAR PARKING SENSORS
The audible and/or visual rear parking
sensor system consists of four proximity
sensors, installed in the rear bumper. The
sensors detect any obstacle which enters
the field: person, vehicle, tree, fence, behind
the vehicle during the manoeuvre.
Certain objects detected at the beginning of
the manoeuvre will no longer be detected
at the end of the manoeuvre due to the
blind spots between and below the sensors.
Examples: stake, roadworks cone or
pavement post.
Activation / Deactivation
You can activate or deactivate the
system by pressing this button.
The activation or deactivation of
the system is stored when the
vehicle stops.
Malfunction
In the event of a malfunction, when reverse
gear is engaged the LED in the button
comes on, accompanied by an audible
signal and a message in the screen. Contact
a CITROËN dealer or a qualified workshop.
Good practice
In bad weather or in winter, ensure that the
sensors are not covered with mud, ice or
snow.
The system will be deactivated automatically
if a trailer is being towed or if a bicycle
carrier is fitted (vehicle fitted with a
towbar or bicycle carrier recommended by
CITROËN).
The parking assistance cannot, in any
circumstances, take the place of the
vigilance and responsibility of the driver.
Display in the screen
You are advised to deactivate the system if
your vehicle is fitted with a rear ladder or if
you are transporting a load which exceeds
the length of the vehicle.
Page 89 of 252
ABS
ABS 87
Driving safely
SAFETY
4
JUMPY-VU_EN_CHAP04_SECURITE_ED01-2014
HORN
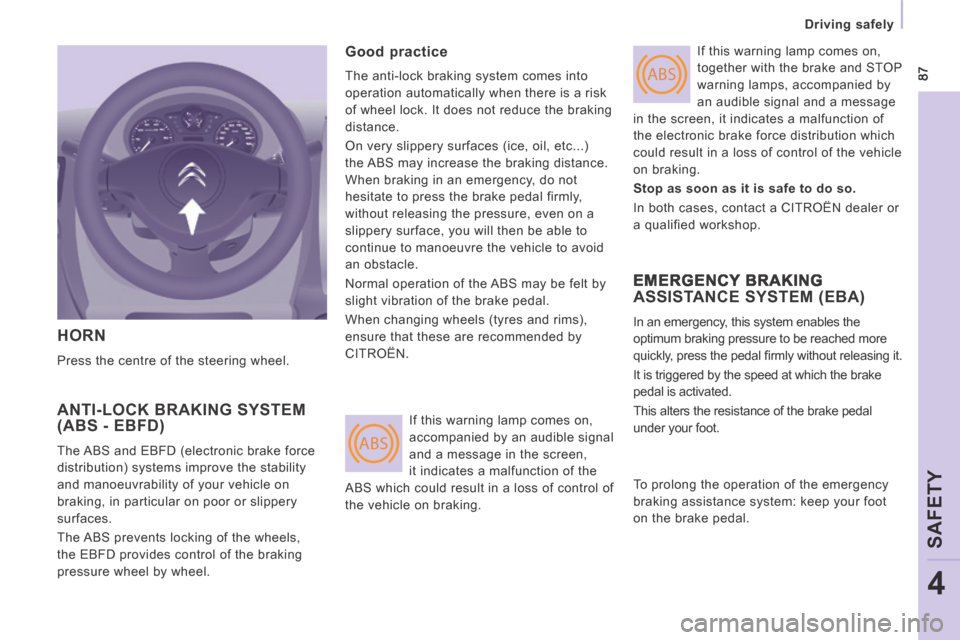
Press the centre of the steering wheel.
ANTI-LOCK BRAKING SYSTEM (ABS - EBFD)
The ABS and EBFD (electronic brake force
distribution) systems improve the stability
and manoeuvrability of your vehicle on
braking, in particular on poor or slippery
surfaces.
The ABS prevents locking of the wheels,
the EBFD provides control of the braking
pressure wheel by wheel.
Good practice
The anti-lock braking system comes into
operation automatically when there is a risk
of wheel lock. It does not reduce the braking
distance.
On very slippery surfaces (ice, oil, etc...)
the ABS may increase the braking distance.
When braking in an emergency, do not
hesitate to press the brake pedal firmly,
without releasing the pressure, even on a
slippery surface, you will then be able to
continue to manoeuvre the vehicle to avoid
an obstacle.
Normal operation of the ABS may be felt by
slight vibration of the brake pedal.
When changing wheels (tyres and rims),
ensure that these are recommended by
CITROËN. If this warning lamp comes on,
together with the brake and STOP
warning lamps, accompanied by
an audible signal and a message
in the screen, it indicates a malfunction of
the electronic brake force distribution which
could result in a loss of control of the vehicle
on braking.
Stop as soon as it is safe to do so.
In both cases, contact a CITROËN dealer or
a qualified workshop.
EMERGENCY BRAKING ASSISTANCE SYSTEM (EBA)
In an emergency, this system enables the
optimum braking pressure to be reached more
quickly, press the pedal fi rmly without releasing it.
It is triggered by the speed at which the brake
pedal is activated.
This alters the resistance of the brake pedal
under your foot.
If this warning lamp comes on,
accompanied by an audible signal
and a message in the screen,
it indicates a malfunction of the
ABS which could result in a loss of control of
the vehicle on braking. To prolong the operation of the emergency
braking assistance system: keep your foot
on the brake pedal.
Page 90 of 252

OFF
88
Driving safely
JUMPY-VU_EN_CHAP04_SECURITE_ED01-2014
ANTI-SLIP REGULATION (ASR) AND DYNAMIC STABILITY CONTROL (DSC)
These systems are linked and complement
the ABS.
The ASR system is very useful for
maintaining optimum drive and avoiding
losses of control of the vehicle on
acceleration.
The system optimises drive to prevent the
wheels skidding, by acting on the brakes of
the drive wheels and on the engine. It also
allows the directional stability of the vehicle
to be improved on acceleration. If there is a variation between the trajectory
followed by the vehicle and that required by
the driver, the DSC system automatically
acts on the engine and the brake of one
or more wheels, in order to put the vehicle
back on course.
Deactivation
In certain exceptional conditions (starting
the vehicle when stuck in mud or snow, or
on loose ground...), it could prove useful
to deactivate the ASR and DSC systems to
make the wheels spin and regain grip.
Operating fault
Good practice
The ASR/DSC systems offer increased
safety during normal driving, but should not
encourage the driver to take risks or to drive
at high speed.
The operation of these systems is assured
only if the recommendations of the
manufacturer regarding the wheels (tyres
and rims), the braking components, the
electronic components and fitting and repair
procedures are observed.
After an impact, have these systems
checked by a CITROËN dealer or a qualified
workshop.
Use the DSC to hold your course without
attempting to countersteer.
Operation
The warning lamp flashes when
operation of the ASR or DSC is
triggered.
They engage again:
- automatically above 30 mph (50 km/h),
- manually by pressing the button again. When a malfunction of the
systems occurs, the warning
lamp and the LED come on,
accompanied by an audible signal
and a message in the screen.
Contact a CITROËN dealer or a qualified
workshop to have the system checked.
The warning lamp may also come on if the
tyres are under-inflated. Check the pressure
of each tyre.
- Press the button, located on the centre console.
- The LED comes on: the ASR and DSC systems no longer
operate.
Page 98 of 252
96
Airbags
JUMPY-VU_EN_CHAP04_SECURITE_ED01-2014
If this warning lamp comes
on in the instrument panel,
accompanied by an audible signal
and a message in the screen,
contact a CITROËN dealer or
a qualified workshop to have the system
checked. The airbags may no longer be
deployed in the event of a serious impact.
Lateral airbags
If fitted on your vehicle, this is a system
which protects the driver and front
passenger in the event of a serious side
impact in order to limit the risk of injury to
the chest.
Each lateral airbag is fitted in the front seat
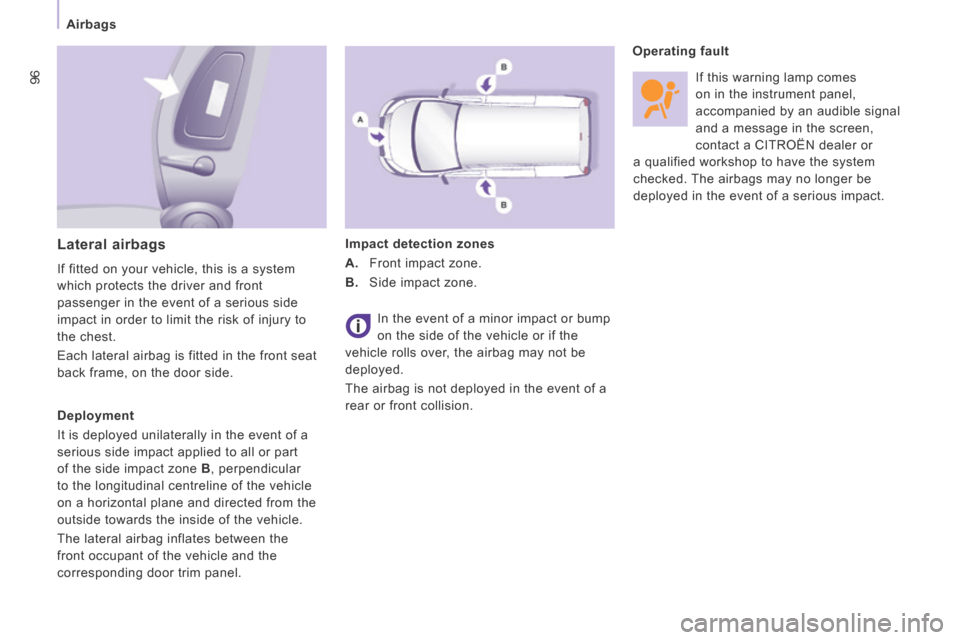
back frame, on the door side. Impact detection zones
A. Front impact zone.
B. Side impact zone.
In the event of a minor impact or bump
on the side of the vehicle or if the
vehicle rolls over, the airbag may not be
deployed.
The airbag is not deployed in the event of a
rear or front collision. Operating fault
Deployment
It is deployed unilaterally in the event of a
serious side impact applied to all or part
of the side impact zone B , perpendicular
to the longitudinal centreline of the vehicle
on a horizontal plane and directed from the
outside towards the inside of the vehicle.
The lateral airbag inflates between the
front occupant of the vehicle and the
corresponding door trim panel.
Page 99 of 252

97
Airbags
SAFETY
4
JUMPY-VU_EN_CHAP04_SECURITE_ED01-2014
Deactivation
The passenger's front airbag alone can be
deactivated:
- with the ignition switched off , insert the key into the passenger's airbag
deactivation switch,
- turn it to the "OFF" position,
- then remove the key keeping the switch in the new position. Front airbags
The front airbags are fitted in the centre of
the steering wheel for the driver and in the
dashboard for the front passenger. Reactivation
In the
"OFF" position, the passenger's
airbag will not be deployed in the event of
an impact.
As soon as the child seat is removed, turn
the airbag switch to the "ON" position to
reactivate the airbag and thus ensure the
safety of your passenger in the event of an
impact. To ensure the safety of your child, it is
essential to deactivate the passengers
airbag when you install a rear-facing child
seat on the front passenger seat. Otherwise,
the child would risk being killed or seriously
injured if the airbag were to inflate.
The airbag warning lamp in the
instrument panel is on while the
airbag is deactivated.
Deployment
They are deployed, except the passenger's
front airbag if it has been deactivated, in
the event of a serious front impact applied
to all or part of the front impact zone
A in
the longitudinal centreline of the vehicle on
a horizontal plane directed from the front
towards the rear of the vehicle.
The front airbag inflates between the front
occupant of the vehicle and the dashboard
to cushion their forward movement. If this warning lamp comes on,
accompanied by an audible signal
and a message in the screen,
contact a CITROËN dealer or
a qualified workshop to have the system
checked. Front airbag fault
If the two airbag warning lamps are on
continuously, do not install a "rearward
facing" child seat. Contact a CITROËN or a
qualified workshop.
Page 110 of 252
108
Equipment
JUMPY-VU_EN_CHAP05_ACCESSOIRES_ED01-2014
The fitting of electrical equipment
or accessories which are not
recommended by CITROËN may result
in the failure of your vehicle's electronic
system. Please note this specific warning.
You are advised to contact a representative
of the Marque to be shown the range of
recommended equipment and accessories.
Depending on the country in which the
vehicle is sold or operated, it is compulsory
to have a high visibility safety vest, warning
triangle and replacement bulbs available in
the vehicle.
Installation of radiocommunication
transmitters
Before installing accessory
radiocommunication transmitters with an
external aerial on your vehicle, you are
advised to contact a representative of the
CITROËN marque.
The CITROËN dealer network can inform
you of the specifications (frequency
band, maximum output power, aerial
position, specific installation conditions)
of the transmitters which can be fitted,
in accordance with the Motor Vehicle
Electromagnetic Compatibility Directive
(2004/104/CE). Front mud flaps, rear mud flaps, ...
Range of trade
equipment
Parts and Services technical information
publishes an accessory catalogue offering
various equipment and fittings, such as:
Screenwash, replacement fuses, wiper
blades, interior and exterior cleaning
and maintenance products, replacement
bulbs, ...
Roof bars for short, medium and long
wheelbase (load retainers for all models).
Towbar, towbar harness: trailer towbar which must be fi tted by the network.
Sill plate, loading roller, sill. Sill plate,
loading roller, sill.
Roof bars for the various heights, roof bars,
ladder.
Separation partitions and grilles, smooth,
non-slip wooden protective floor.
Protective grilles, multimedia.
Another range is also available, structured
around comfort, leisure and maintenance:
Anti-theft alarm, window engraving, first aid
kit, high visibility safety vest, rear parking
sensors, warning triangle,
Front seat covers compatible with airbags,
bench, rubber mats, carpet mats, snow
chains. To prevent the mat from becoming caught
under the pedals:
- ensure that the mat and its fi xings are
positioned correctly,
- never fi t one mat on top of another.
Audio equipment, hands-free kit, speakers,
CD changer, navigation, ...
Regardless of the audio and telematic
equipment offered on the market, the
technical constraints linked with the fi tting of
equipment of these families of products mean
that the special features of the equipment and
its compatibility with the capacities of the your
vehicle's standard equipment must be taken
into account. Please contact a dealer for
information before fi tting such equipment.
Page 111 of 252

109
Opening the bonnet
CHECKS
6
JUMPY-VU_EN_CHAP06_VERIFICATIONS_ED01-2014
OPENING THE BONNET
From inside:
- lift the cover located at the foot of the front left seat.
- pull the release lever upwards. To close
Lower the bonnet and release it at the end of its
travel. Check that the bonnet is properly latched.
From outside: partially open the bonnet, lift
the safety catch and raise the bonnet.
Bonnet stay
Secure the stay in one of the two notches,
according to the height required, to hold the
bonnet open.
Before closing the bonnet, replace the stay
in its housing. "Bonnet open" warning
This warning is linked to the
alarm option
only.
With the engine running or the
vehicle moving, a warning lamp
and a diagram in the screen,
accompanied by an audible
signal, warn you that the bonnet
is not properly closed.
Page 112 of 252
11 0
Under the bonnet
JUMPY-VU_EN_CHAP06_VERIFICATIONS_ED01-2014
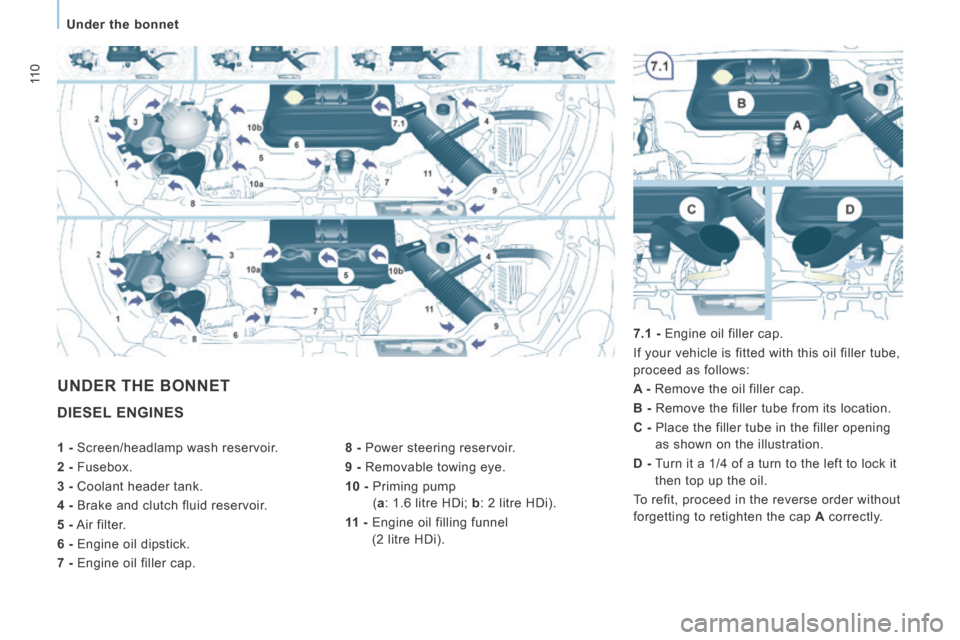
DIESEL ENGINES
8 - Power steering reservoir.
9 - Removable towing eye.
10 - Priming pump( a : 1.6 litre HDi; b : 2 litre HDi).
11 - Engine oil filling funnel
(2 litre HDi). 7.1 - Engine oil filler cap.
If your vehicle is fitted with this oil filler tube,
proceed as follows:
A -
Remove the oil filler cap.
B - Remove the filler tube from its location.
C - Place the filler tube in the filler opening as shown on the illustration.
D - Turn it a 1/4 of a turn to the left to lock it then top up the oil.
To refit, proceed in the reverse order without
forgetting to retighten the cap A correctly.
UNDER THE BONNET
1 - Screen/headlamp wash reservoir.
2 - Fusebox.
3 - Coolant header tank.
4 - Brake and clutch fluid reservoir.
5 - Air filter.
6 - Engine oil dipstick.
7 - Engine oil filler cap.
Page 113 of 252
111
Under the bonnet
CHECKS
6
JUMPY-VU_EN_CHAP06_VERIFICATIONS_ED01-2014
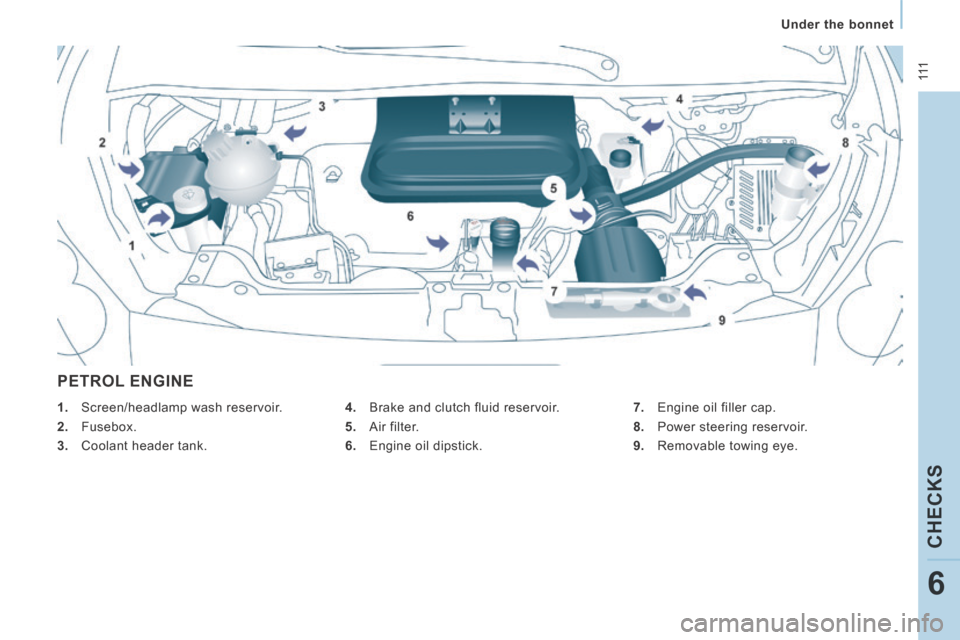
PETROL ENGINE
4. Brake and clutch fluid reservoir.
5. Air filter.
6. Engine oil dipstick. 7. Engine oil filler cap.
8. Power steering reservoir.
9. Removable towing eye.
1. Screen/headlamp wash reservoir.
2. Fusebox.
3. Coolant header tank.