clock Citroen JUMPY 2016 2.G User Guide
[x] Cancel search | Manufacturer: CITROEN, Model Year: 2016, Model line: JUMPY, Model: Citroen JUMPY 2016 2.GPages: 595, PDF Size: 12.47 MB
Page 313 of 595

311
Jumpy _en_Chap08_En-cas-de-panne_ed01-2016
Number plate lamps
(side-hinged doors)
Ty p e A, W5W-5W
F
R
emove the plastic cover using a small
screwdriver.
F
U
sing a screwdriver through the aperture,
push the lamp towards the outside.
F
D
isconnect the electrical connector.
F
R
emove the lamp.
F
T
urn the bulb holder a quarter turn anti-
clockwise.
F
C
hange the failed bulb.
To refit, press on the lamp to clip it in place.
Third brake lamp
(side-hinged doors)
Ty p e A , W5W-5W
To refit, press on the lens to clip it in place.
F
O
pen the left hand rear door. F
I
nsert a thin screwdriver into one of the cut-
outs in the lens.
F
P
ush it outwards to unclip it.
F
R
emove the lens.
F
C
hange the failed bulb.
8
In the event of a breakdown
Page 315 of 595

313
Jumpy _en_Chap08_En-cas-de-panne_ed01-2016
Rear lamps
(tailgate)
For more information on Changing a bulb and
in particular, the types of bulbs, refer to the
corresponding section.
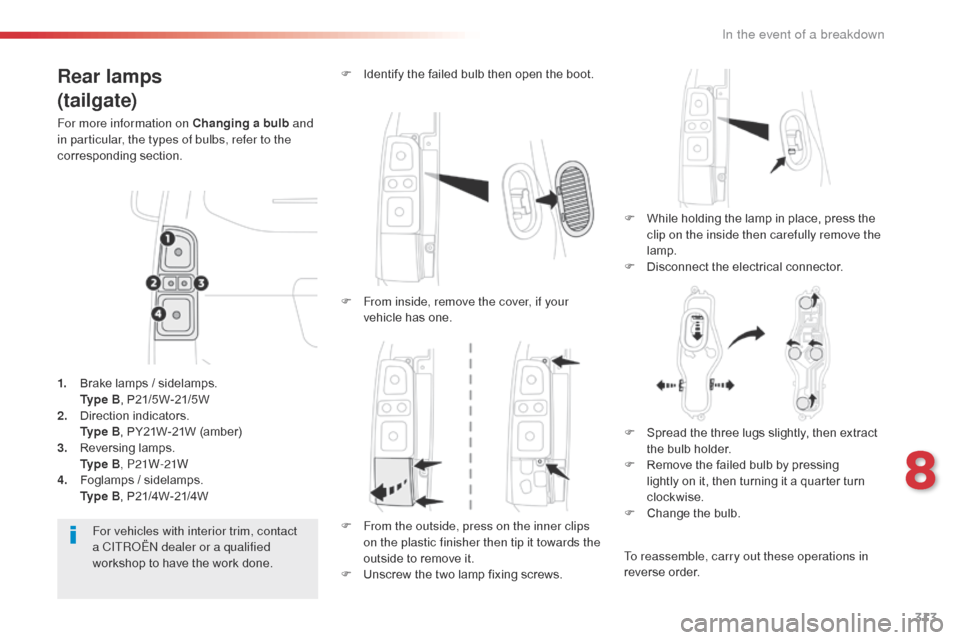
F
W
hile holding the lamp in place, press the
clip on the inside then carefully remove the
lamp.
F
D
isconnect the electrical connector.
F
I
dentify the failed bulb then open the boot.
For vehicles with interior trim, contact
a CITROËN dealer or a qualified
workshop to have the work done.
1.
B
rake lamps / sidelamps.
Ty
p e B, P21/5W-21/5W
2.
D
irection indicators.
Ty
p e B, PY21W-21W (amber)
3.
R
eversing lamps.
Ty
p e B, P21W-21W
4.
F
oglamps / sidelamps.
Ty
p e B, P21/4W-21/4W F
F
rom inside, remove the cover, if your
vehicle has one.
F
F
rom the outside, press on the inner clips
on the plastic finisher then tip it towards the
outside to remove it.
F
U
nscrew the two lamp fixing screws.F
S
pread the three lugs slightly, then extract
the bulb holder.
F
R
emove the failed bulb by pressing
lightly on it, then turning it a quarter turn
clockwise.
F
C
hange the bulb.
To reassemble, carry out these operations in
reverse order.
8
In the event of a breakdown
Page 316 of 595

314
Jumpy _en_Chap08_En-cas-de-panne_ed01-2016
To refit, press on the lens to clip it in place.
F
U
nclip the trim at each end by turning it
upwards.
F
P
ull on the trim to disengage the central
clips, then remove it.
F
U
sing a screwdriver through the aperture,
push the lamp towards the outside.
F
D
isconnect the electrical connector.
F
R
emove the lamp.
F
T
urn the bulb holder a quarter turn anti-
clockwise.
F
C
hange the failed bulb.
To refit, carry out these operations in reverse
o r d e r.
To refit the lamp and trim, press on them to clip
them in place.
Third brake lamp
(tailgate)
Ty p e A , W5W-5W
Number plate lamps
(tailgate)
Ty p e A, W5W-5W
F
O
pen the tailgate. F
I
nsert a thin screwdriver into one of the cut-
outs in the lens.
F
P
ush it outwards to unclip it.
F
R
emove the lens.
F
C
hange the failed bulb.
In the event of a breakdown
Page 317 of 595

315
Jumpy _en_Chap08_En-cas-de-panne_ed01-2016
Courtesy lamps
(front and rear)
For the replacement of this type of LED lamp
and light guide, contact a CITROËN dealer or a
qualified workshop.
A replacement kit for the LEDs is available from
CITROËN dealers.Rear lamps
For more information on Changing a bulb and
in particular, the types of bulbs, refer to the
corresponding section.
Platform cab
F Identify the failed bulb.
F R emove the four screws securing the lens.
F
P
ull the lens towards you.
F
R
emove the failed bulb by pressing lightly
on it and then turning it a quarter turn
clockwise.
F
C
hange the bulb.
1.
D
irection indicators.
Ty
p e B , P21W-21W
2.
B
rake lamps.
Ty
p e B , P21W-21W
3.
S
idelamps.
Ty
p e B , R10W-10W
4.
R
eversing lamps.
Ty
p e B , P21W-21W
5.
F
oglamps.
Ty
p e B , P21W-21W To reassemble, carry out these operations in
reverse order.
8
In the event of a breakdown
Page 378 of 595

376
22
23
1
Jumpy_en_Chap10b_NAC-1_ed01-2016
Settings specific to
connected navigation
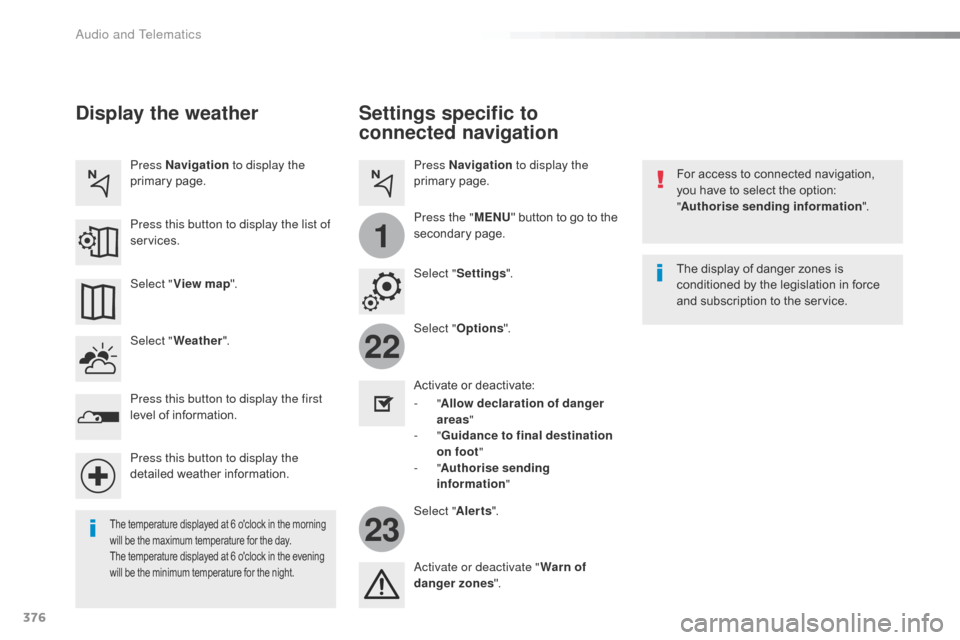
For access to connected navigation,
you have to select the option:
"Authorise sending information ".
Select " Options ".
Select " Alerts".
-
" Allow declaration of danger
areas "
-
" Guidance to final destination
on foot "
-
" Authorise sending
information "
Activate or deactivate:
Activate or deactivate "
Warn of
danger zones ". The display of danger zones is
conditioned by the legislation in force
and subscription to the service.
The temperature displayed at 6 o'clock in the morning
will be the maximum temperature for the day.
The temperature displayed at 6 o'clock in the evening
will be the minimum temperature for the night.
Select "
Settings ".
Press
Navigation to display the
primary page.
Press the " MENU" button to go to the
secondary page.
Display the weather
Select " Weather ".
Press this button to display the first
level of information.
Press this button to display the
detailed weather information. Select " View map ".
Press Navigation
to display the
primary page.
Press this button to display the list of
services.
Audio and Telematics