ECU Citroen JUMPY 2016 2.G Owner's Manual
[x] Cancel search | Manufacturer: CITROEN, Model Year: 2016, Model line: JUMPY, Model: Citroen JUMPY 2016 2.GPages: 595, PDF Size: 12.47 MB
Page 49 of 595
47
Jumpy _en_Chap02_ouvertures_ed01-2016
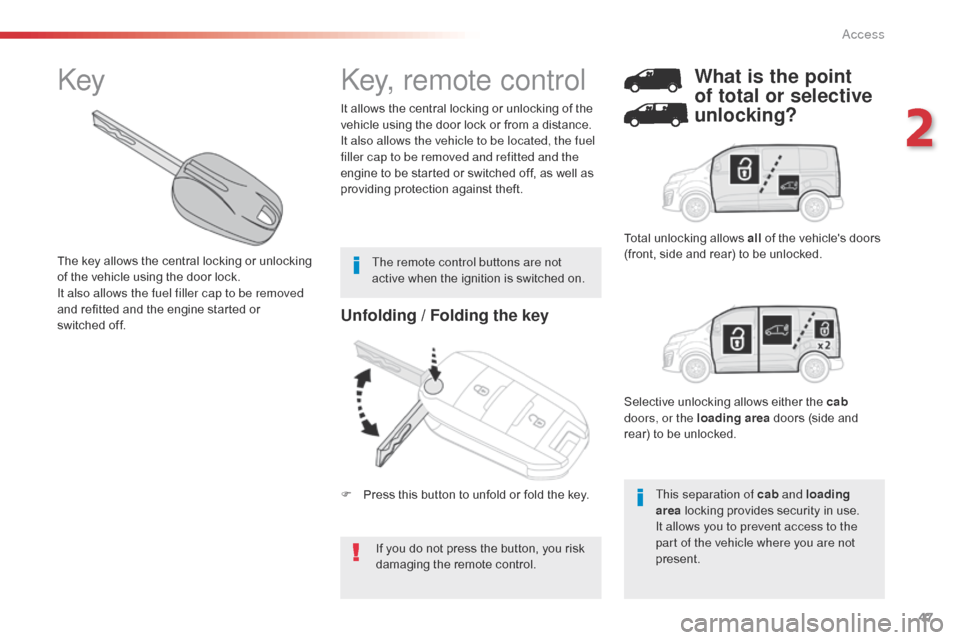
Unfolding / Folding the key
If you do not press the button, you risk
damaging the remote control.
It allows the central locking or unlocking of the
vehicle using the door lock or from a distance.
It also allows the vehicle to be located, the fuel
filler cap to be removed and refitted and the
engine to be started or switched off, as well as
providing protection against theft.
Key, remote control
This separation of cab
and loading
area locking provides security in use.
It allows you to prevent access to the
part of the vehicle where you are not
present.
What is the point
of total or selective
unlocking?
Total unlocking allows all of the vehicle's doors
(front, side and rear) to be unlocked.
The remote control buttons are not
active when the ignition is switched on.
Selective unlocking allows either the cab
doors, or the loading area doors (side and
rear) to be unlocked.
Key
The key allows the central locking or unlocking
of the vehicle using the door lock.
It also allows the fuel filler cap to be removed
and refitted and the engine started or
switched
off.
F
P
ress this button to unfold or fold the key.
2
Access
Page 57 of 595
55
Jumpy _en_Chap02_ouvertures_ed01-2016
"Keyless Entry and
Starting"
It allows the central locking or unlocking of the
vehicle from a distance.
It is also used to locate and start the vehicle, as
well as providing protection against theft.
Remote control
This separation of cab and loading
area locking provide security in use.
It allows you to prevent access to the
part of the vehicle where you are not
present.
What is the point
of total or selective
unlocking?
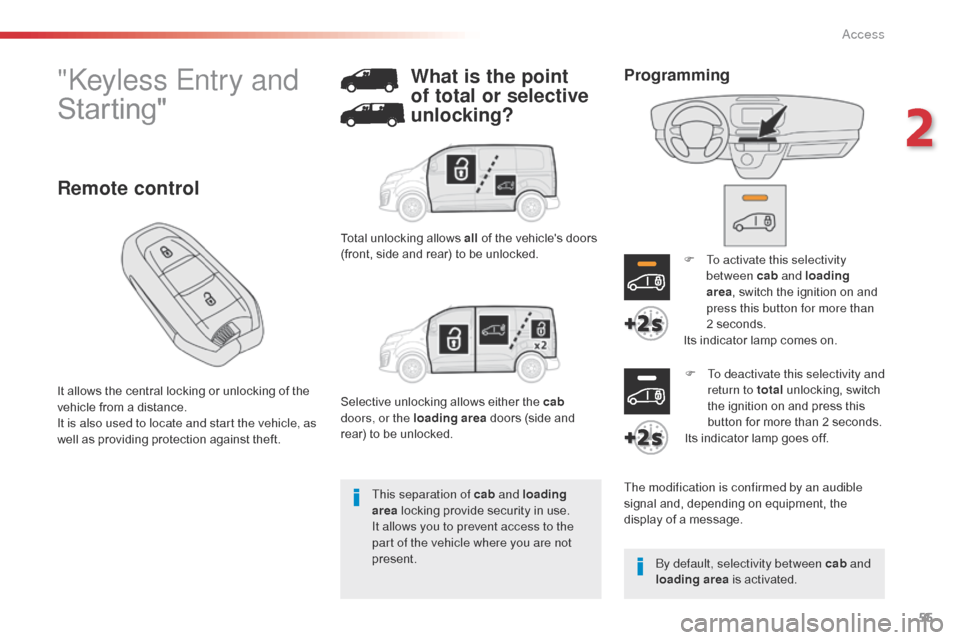
Total unlocking allows all of the vehicle's doors
(front, side and rear) to be unlocked.
Selective unlocking allows either the cab
doors, or the loading area doors (side and
rear) to be unlocked. F
T
o activate this selectivity
between cab and loading
area , switch the ignition on and
press this button for more than
2
seconds.
Its indicator lamp comes on.
The modification is confirmed by an audible
signal and, depending on equipment, the
display of a message. F
T
o deactivate this selectivity and
return to total unlocking, switch
the ignition on and press this
button for more than 2
seconds.
Its indicator lamp goes off.
By default, selectivity between cab and
loading area is activated.
Programming
2
Access
Page 108 of 595

106
Jumpy _en_Chap03_ergonomie-et-confort_ed01-2016
Moduwork
Removing the flap
Removable flap
F Holding the flap with one hand, with your other hand turn the control at the top of the
flap to release it.
F
L
ower the flap to remove it from its
housing.
The cushion of the outer seat of the bench
seat can be raised up to the backrest to create
additional loading space in the cab.
A flap in the partition can be removed to allow
long objects to be carried.
Once the removable flap has been
removed, you can load long objects
under the outer seat. F
S
tow it behind the driver's seat, clipping it
to the fixing lugs.
F
T
urn the control at the top of the flap to
secure it.
Ease of use and comfort
Page 109 of 595

107
Jumpy _en_Chap03_ergonomie-et-confort_ed01-2016
When the outer seat is raised and
the flap removed, you must fit the
non-slip net.
Refer to the Non-slip net section.
Never
place your hand under the
seat cushion to guide the seat
upward; risk of trapping your fingers.
Only the strap should be used.
Refitting the flap
F Offer up the flap at an angle, with the yellow hinges pointing downward.
F
P
lace the hinges in their housings then
push fully down (to avoid vibrations).
F
W
ith one hand, raise the flap to close it,
then with the other hand turn the control at
the top of the flap to secure it.
Folding the seat cushion
Raising the seat cushion
F With one hand, pull the strap firmly for ward to release the seat cushion. F
A s
trut raises the cushion onto the
backrest.
3
Ease of use and comfort
Page 110 of 595
108
Jumpy _en_Chap03_ergonomie-et-confort_ed01-2016
Lowering the seat cushion
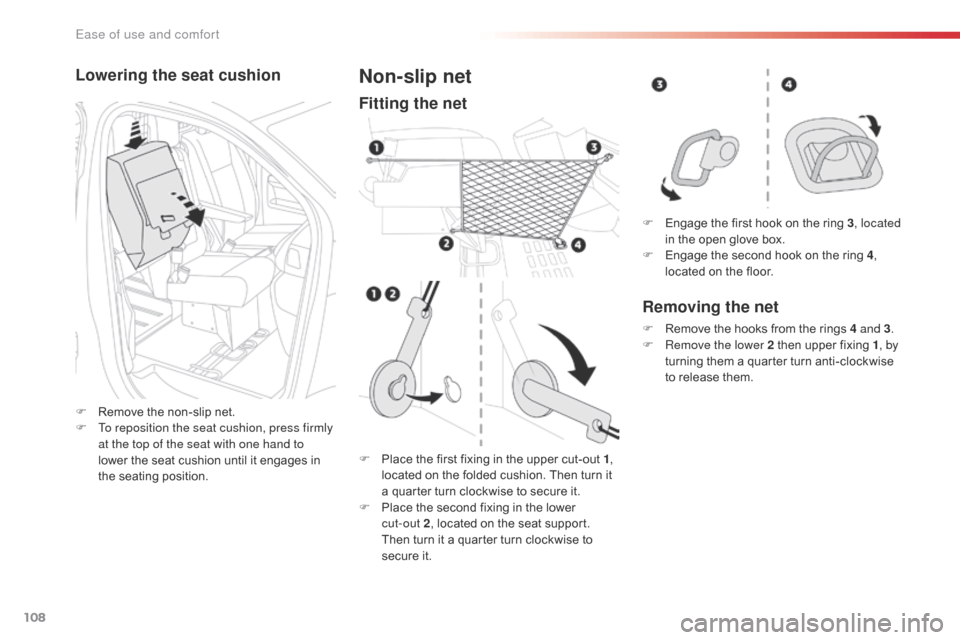
F Remove the non-slip net.
F T o reposition the seat cushion, press firmly
at the top of the seat with one hand to
lower the seat cushion until it engages in
the seating position.
Non-slip net
Fitting the net
F Place the first fixing in the upper cut-out 1 ,
located on the folded cushion. Then turn it
a quarter turn clockwise to secure it.
F
P
lace the second fixing in the lower
cut-out
2, located on the seat support.
Then turn it a quarter turn clockwise to
secure it. F
E
ngage the first hook on the ring 3
, located
in the open glove box.
F
E
ngage the second hook on the ring 4
,
located on the floor.
Removing the net
F Remove the hooks from the rings 4 and 3 .
F R emove the lower 2 then upper fixing 1 , by
turning them a quarter turn anti-clockwise
to release them.
Ease of use and comfort
Page 120 of 595
118
Jumpy _en_Chap03_ergonomie-et-confort_ed01-2016
No not attach anything to the cab fixing
structure.
Do not exceed the number of
passengers indicated on the registration
certificate.
In the rear, the loading area is intended
for carrying goods only.
You are advised to place heavy goods
or objects as far for ward as possible in
the loading area (towards the cab) and
secure them by means of straps using
the stowing rings on the floor.
The rear seat belt frames are not
intended for securing transported
articles.
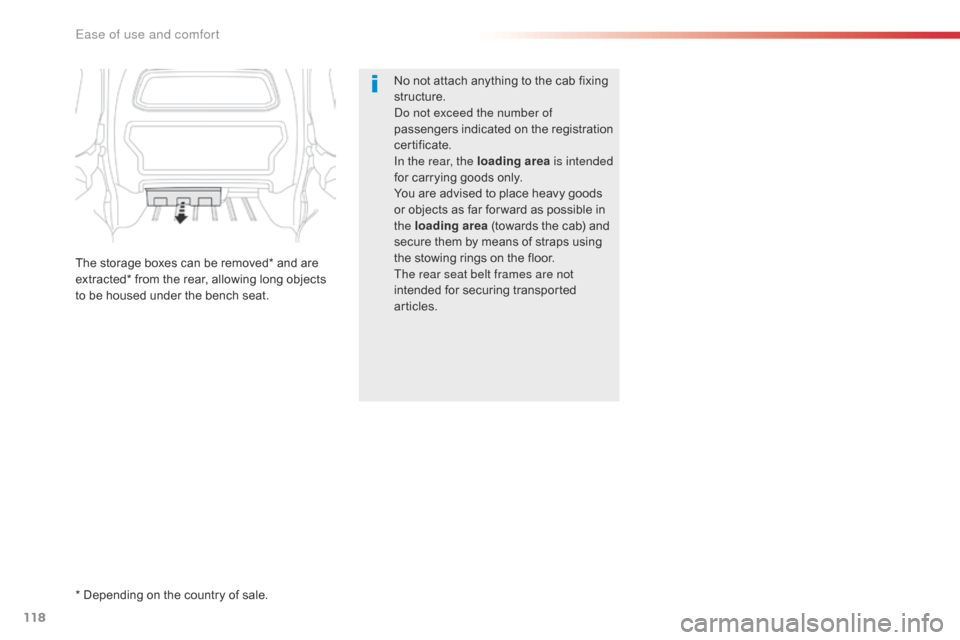
The storage boxes can be removed* and are
extracted* from the rear, allowing long objects
to be housed under the bench seat.
* Depending on the country of sale.
Ease of use and comfort
Page 121 of 595
119
Jumpy _en_Chap03_ergonomie-et-confort_ed01-2016
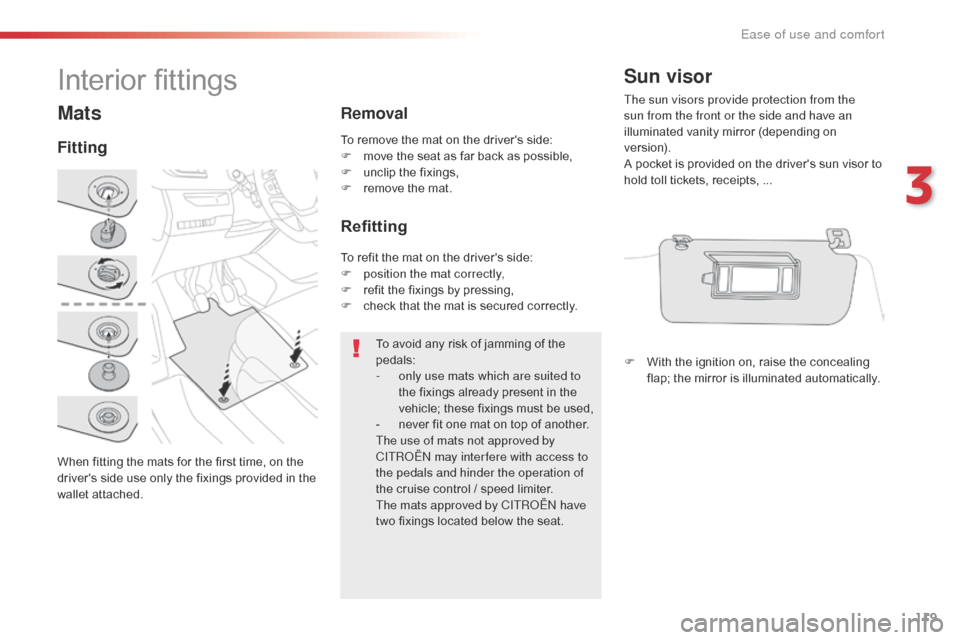
Mats
FittingRemoval
Refitting
To avoid any risk of jamming of the
pedals:
-
o
nly use mats which are suited to
the fixings already present in the
vehicle; these fixings must be used,
-
n
ever fit one mat on top of another.
The use of mats not approved by
CITROËN may inter fere with access to
the pedals and hinder the operation of
the cruise control / speed limiter.
The mats approved by CITROËN have
two fixings located below the seat.
To remove the mat on the driver's side:
F
m
ove the seat as far back as possible,
F
u
nclip the fixings,
F
r
emove the mat.
To refit the mat on the driver's side:
F
p
osition the mat correctly,
F
r
efit the fixings by pressing,
F
c
heck that the mat is secured correctly.
Sun visor
The sun visors provide protection from the
sun from the front or the side and have an
illuminated vanity mirror (depending on
ve r s i o n).
A pocket is provided on the driver's sun visor to
hold toll tickets, receipts, ...
F
W
ith the ignition on, raise the concealing
flap; the mirror is illuminated automatically.Interior fittings
When fitting the mats for the first time, on the
driver's side use only the fixings provided in the
wallet attached.
3
Ease of use and comfort
Page 124 of 595
122
Jumpy _en_Chap03_ergonomie-et-confort_ed01-2016
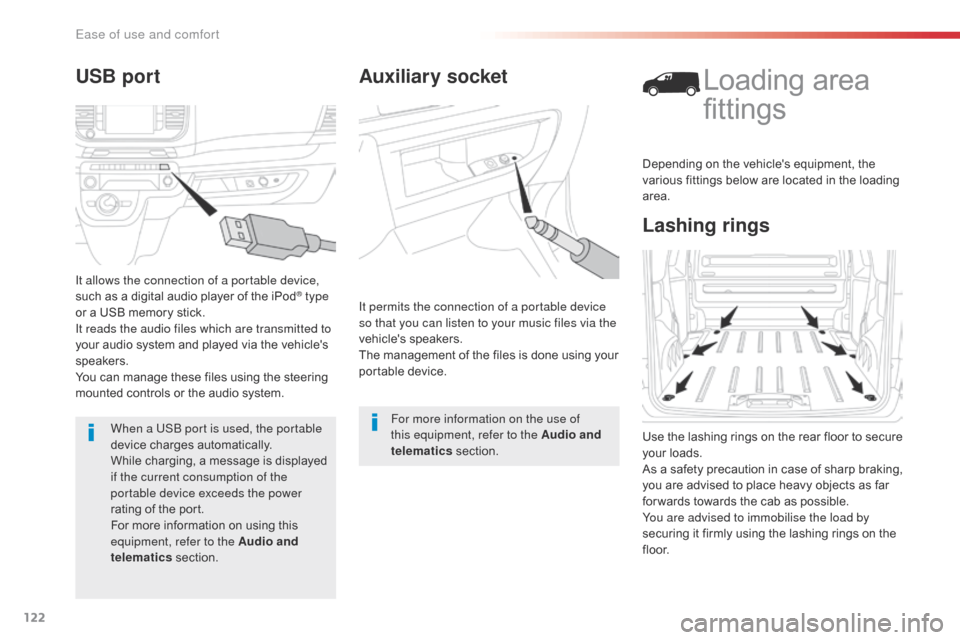
Auxiliary socket
It permits the connection of a portable device
so that you can listen to your music files via the
vehicle's speakers.
The management of the files is done using your
portable device.For more information on the use of
this equipment, refer to the Audio and
telematics section.
Lashing rings
Loading area
fittings
Use the lashing rings on the rear floor to secure
your loads.
As a safety precaution in case of sharp braking,
you are advised to place heavy objects as far
for wards towards the cab as possible.
You are advised to immobilise the load by
securing it firmly using the lashing rings on the
f l o o r.Depending on the vehicle's equipment, the
various fittings below are located in the loading
area.
USB port
It allows the connection of a portable device,
such as a digital audio player of the iPod® type
or a USB memory stick.
It reads the audio files which are transmitted to
your audio system and played via the vehicle's
speakers.
You can manage these files using the steering
mounted controls or the audio system.
When a USB port is used, the portable
device charges automatically.
While charging, a message is displayed
if the current consumption of the
portable device exceeds the power
rating of the port.
For more information on using this
equipment, refer to the Audio and
telematics section.
Ease of use and comfort
Page 126 of 595
124
Jumpy _en_Chap03_ergonomie-et-confort_ed01-2016
Fit the net
Unclip the upper fixing covers and secure the
lower fixings (as previously described).
F
F
old (table position) the seats and bench
seats in rows 2 and 3 (according to
equipment).
F
U
nroll the high load retaining net.
F
P
osition the upper net fixings in the
corresponding anchorages in the roof
(first one side, then the other).
F
F
ully extend the straps.
F
O
n each side, attach the bottom fixings of
the net to the lower anchorages (behind
row 1) or in the stowing rings (behind
row
2).
F
P
ull on the straps to stretch the net.
F
C
heck that the net is attached securely and
properly extended.
Never use the ISOFIX ring intended
for fixing the upper strap of a child seat
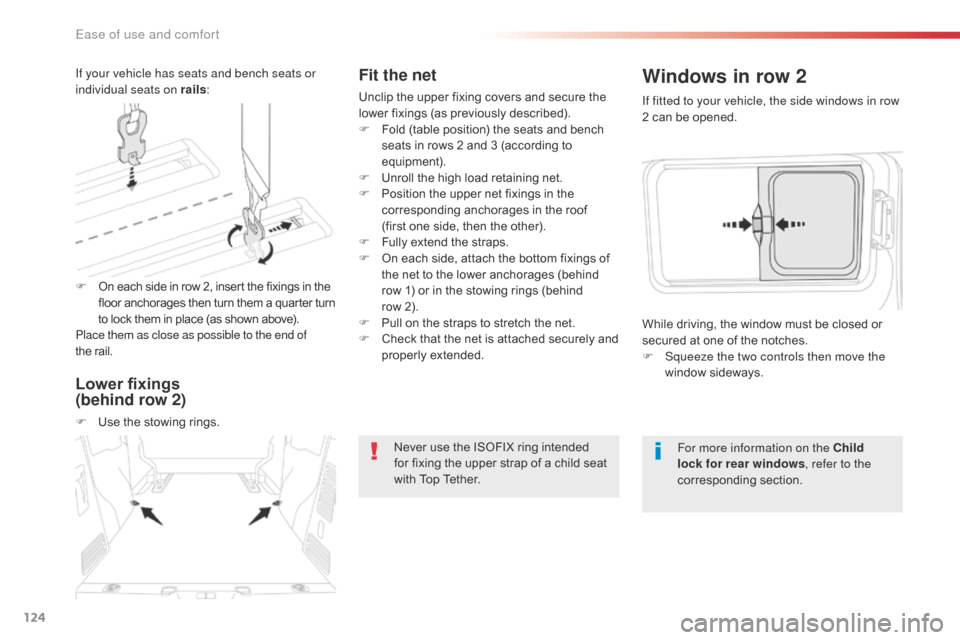
with Top Tether. If fitted to your vehicle, the side windows in row
2 can be opened.
Windows in row 2
For more information on the Child
lock for rear windows
, refer to the
corresponding section.
While driving, the window must be closed or
secured at one of the notches.
F
S
queeze the two controls then move the
window sideways.
F
O
n each side in row 2, insert the fixings in the
floor anchorages then turn them a quar ter turn
to lock them in place (as shown above).
Place them as close as possible to the end of
the
rail.
If your vehicle has seats and bench seats or
individual seats on rails
:
Lower fixings
(behind row 2)
F Use the stowing rings.
Ease of use and comfort
Page 162 of 595
160
Jumpy _en_Chap05_securite_ed01-2016
Automatic operation of
hazard warning lamps
Hazard warning lamps
When braking in an emergency, depending on
the rate of deceleration, as well as when the
ABS regulation is invoked or in the event of an
impact, the hazard warning lamps come on
automatically.
They switch off automatically the first time you
accelerate.
F
Y
ou can also switch them off by pressing
the button.
Visual warning with all of the direction
indicators flashing to alert other road users to a
vehicle breakdown, towing or accident.
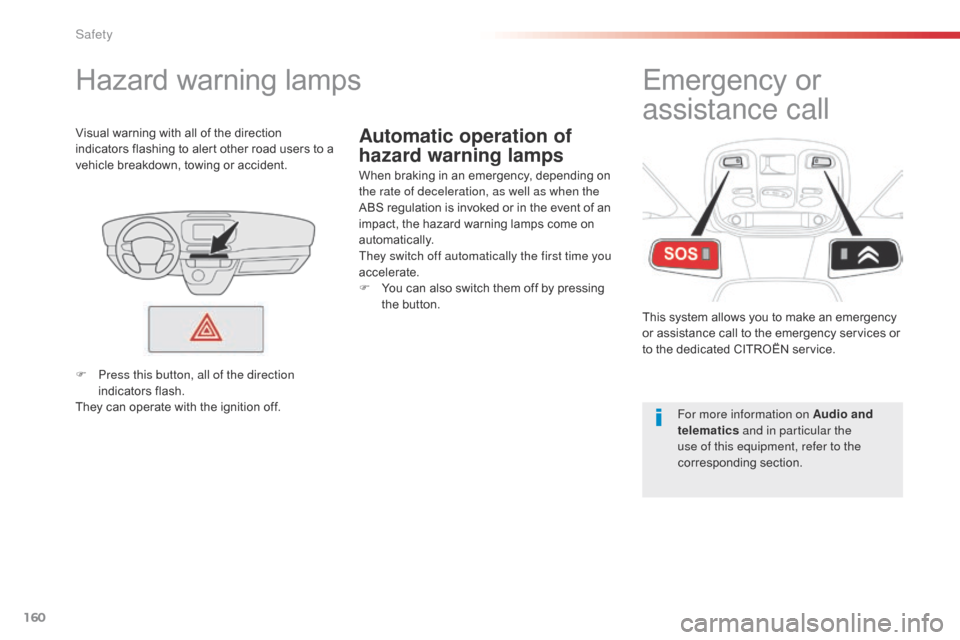
Emergency or
assistance call
This system allows you to make an emergency
or assistance call to the emergency services or
to the dedicated CITROËN service.
For more information on Audio and
telematics and in particular the
use of this equipment, refer to the
corresponding section.
F
P
ress this button, all of the direction
indicators flash.
They can operate with the ignition off.
Safety