central CITROEN JUMPY 2021 User Guide
[x] Cancel search | Manufacturer: CITROEN, Model Year: 2021, Model line: JUMPY, Model: CITROEN JUMPY 2021Pages: 324, PDF Size: 10.05 MB
Page 59 of 324

57
Ease of use and comfort
3Central seat cushion
storage
Precautions for the seats
and bench seats
Do not remove a head restraint without storing it
and securing it to a support.
Ensure that the passengers can always access
the seat belts and fasten them easily.
A passenger must not take their seat without
adjusting the seat's head restraint correctly and
adjusting and fastening their seat belt.
Ensure that no object or passenger feet
could obstruct the anchorage points or
prevent the correct latching of the assembly.
If removing and storing seats and bench
seats out of the vehicle, ensure that they
are placed in a clean area, so as to avoid
introducing any foreign bodies into the
mechanisms.
The seats and bench seats are not designed for any other use than in the
vehicle. They are equipped with mechanisms
and features that may be damaged if used
improperly or if dropped.
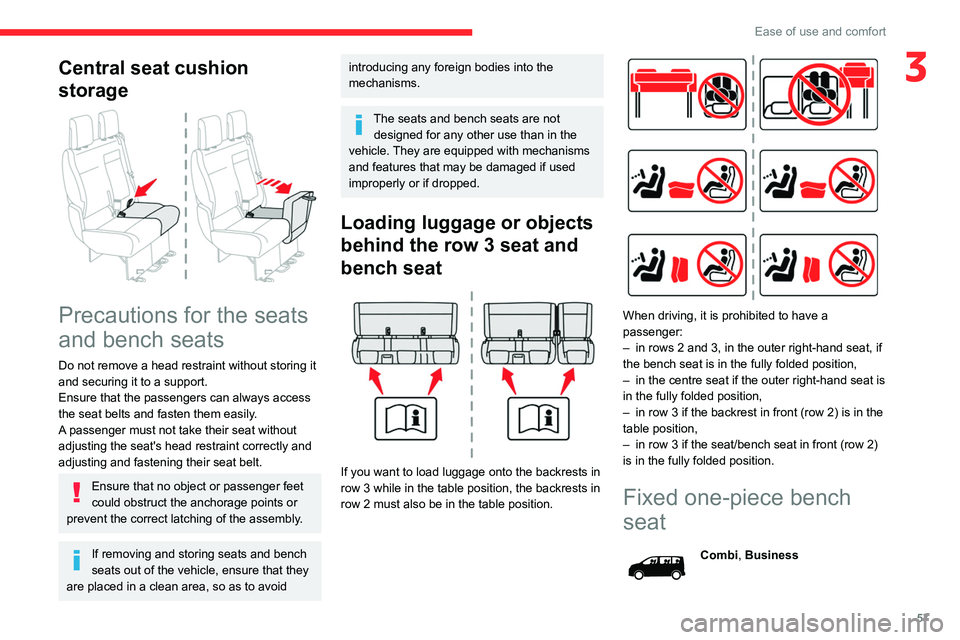
Loading luggage or objects
behind the row 3 seat and
bench seat
If you want to load luggage onto the backrests in
row
3 while in the table position, the backrests in
row
2 must also be in the table position.
When driving, it is prohibited to have a
passenger:
–
in rows 2 and 3, in the outer right-hand seat, if
the bench seat is in the fully folded position,
–
in the centre seat if the outer right-hand seat is
in the fully folded position,
–
in row 3 if the backrest in front (row 2) is in the
table position,
–
in row 3 if the seat/bench seat in front (row 2)
is in the fully folded position.
Fixed one-piece bench
seat
Combi, Business
Page 76 of 324

74
Ease of use and comfort
► Pull the tab A and attach the blind to the hook
B.
Always guide the blind slowly, using the tab, when raising or lowering it.
Panoramic sunroof
This is fitted with two manual and independent
blinds, which improve thermal and acoustic
comfort.
Blinds
Opening/Closing
► Take one of the blinds by its grip and push it
back or pull it forwards to the desired position.
Retractable sliding table
Shine, Business Lounge
The table has a central storage space covered
by a lid. When deployed, this device becomes
a table with two table tops on which you can
place objects. The central part has two cup/
can holders and can also be used to hold small
objects (e.g. credit card, pen).
The assembly is mounted on a runner allowing it
to be positioned either in row 2 or row 3.
Storage
► Slide back the cover for access to 1 1 litres of
storage space.
Page 81 of 324

79
Ease of use and comfort
3Temperature
► Turn the thumbwheel 1 from "LO" (cold)
to "HI" (hot) to adjust the temperature to your
requirements.
Air distribution
► Pressing button 3 successively directs the air
flow towards:
–
windscreen, side windows and footwells,
–
footwells,
–
central vents, side vents and footwells,
–
windscreen, side windows, central vents, side
vents and footwells,
–
central and side vents,
–
windscreen and side windows (demisting or
defrosting).
Air conditioning
With the engine running, the air conditioning is
designed to operate effectively in all seasons,
with the windows closed.
It enables you to:
–
lower the temperature in summer
,
–
enhance the effectiveness of the demisting
function in winter
, above 3°C.
On/Off
► Press button 5 to activate/deactivate the air
conditioning system.
When the air conditioning is in operation, to
cool the air more quickly, you can use interior
air recirculation for a few moments by pressing
button 4. Then restore the intake of exterior air.
The air conditioning does not operate when the air flow adjustment is set to off.
Switching the system off could result in
discomfort (humidity, misting).
Dual-zone automatic air
conditioning
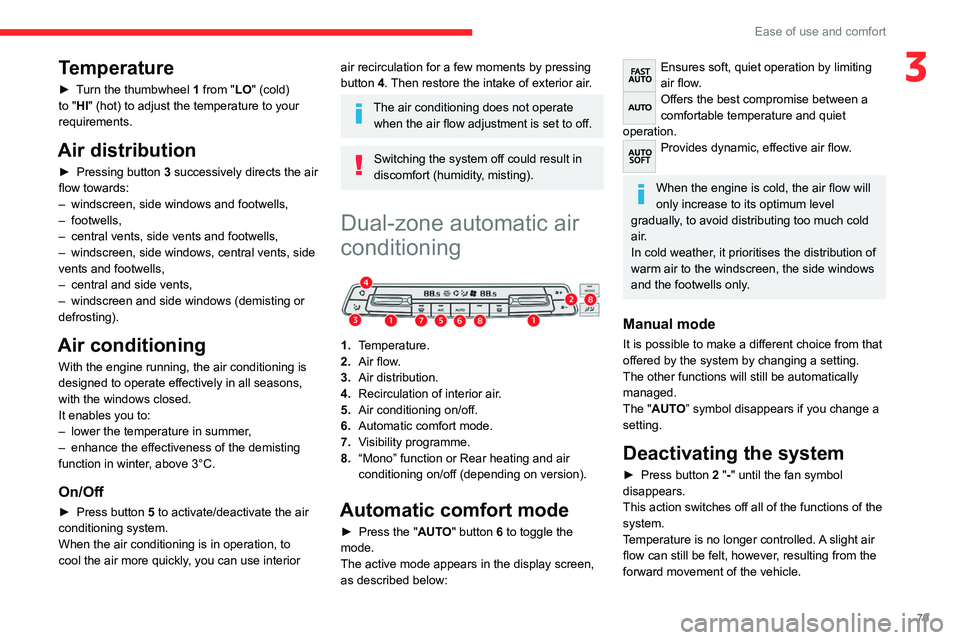
1. Temperature.
2. Air flow.
3. Air distribution.
4. Recirculation of interior air.
5. Air conditioning on/off.
6. Automatic comfort mode.
7. Visibility programme.
8. “Mono” function or Rear heating and air
conditioning on/off (depending on version).
Automatic comfort mode
► Press the " AUTO" button 6 to toggle the
mode.
The active mode appears in the display screen,
as described below:
Ensures soft, quiet operation by limiting
air flow.
Offers the best compromise between a
comfortable temperature and quiet
operation.
Provides dynamic, effective air flow.
When the engine is cold, the air flow will
only increase to its optimum level
gradually, to avoid distributing too much cold
air.
In cold weather, it prioritises the distribution of
warm air to the windscreen, the side windows
and the footwells only.
Manual mode
It is possible to make a different choice from that
offered by the system by changing a setting.
The other functions will still be automatically
managed.
The "AUTO” symbol disappears if you change a
setting.
Deactivating the system
► Press button 2 "-" until the fan symbol
disappears.
This action switches off all of the functions of the
system.
Temperature is no longer controlled. A slight air
flow can still be felt, however, resulting from the
forward movement of the vehicle.
Page 83 of 324

81
Ease of use and comfort
3Switching the system off could result in
discomfort (humidity, misting).
Air distribution
► Pressing button 3 successively directs the air
flow towards:
–
windscreen, side windows and footwells,
–
footwells,
–
central vents, side vents and footwells,
–
windscreen, side windows, central vents, side
vents and footwells,
–
central and side vents,
–
windscreen and side windows (demisting or
defrosting).
Air flow
► Press the buttons 2 to increase/decrease the
air flow.
The air flow symbol (a fan) appears. It is filled in
or emptied gradually, according to the value set.
Interior air recirculation
The intake of exterior air prevents the formation
of mist on the windscreen and side windows.
Recirculating the interior air isolates the
passenger compartment from outside odours
and fumes and allows the desired passenger
compartment temperature to be achieved more
rapidly.
► Press this button to activate/deactivate
the function (confirmed by the
illumination/extinction of the indicator lamp).
Front demisting
- defrosting
These markings on the control panel indicate the positioning of the controls for
rapid demisting or defrosting of the windscreen
and side windows.
Heating or manual air
conditioning
► Set the air flow , temperature and air
distribution controls to the appropriately marked
positions.
► For air condition ing, press this button;
its indicator lamp comes on.
Dual-zone automatic air
conditioning
► Press this button to demist or defrost
the windscreen and side windows more
quickly
.
The system automatically manages the air
conditioning, air flow and air intake, and provides
optimum distribution towards the windscreen and
side windows.
► To turn it off, press this button
again or press " AUTO".
The system restarts with the values in use before
it was deactivated.
Page 101 of 324

99
Safety
5Horn
► Press the central part of the steering wheel.
Pedestrian horn (Electric)
This system alerts pedestrians that the vehicle is approaching.
The pedestrian horn operates once the vehicle
is moving and at speeds of up to 19 mph
(30
km/h), in forward or reverse gear.
This function cannot be deactivated.
Malfunction
In the event of a malfunction, this warning
lamp lights up on the instrument panel.
Have it checked by a CITROËN dealer or a
qualified workshop.
Electronic stability control
(ESC)
The electronic stability control programme includes the following systems:
–
Anti-lock braking system (ABS) and Electronic
brake force distribution (EBFD).
–
Emergency braking assistance (EBA).
–
Anti-slip regulation (ASR).
–
Dynamic stability control (DSC).
–
Intelligent traction control.
–
T
railer stability assist (TSA).
Anti-lock braking system (ABS)/Electronic brake force
distribution (EBFD)
These systems enhance the vehicle’s stability
and handling during braking, and enable greater
control while cornering, particularly on poor or
slippery road surfaces.
ABS prevents wheel locking in the event of
emergency braking.
Electronic brake force distribution (EBFD)
manages overall braking pressure on each
individual wheel.
►
When braking in an emergency
, depress
the pedal very firmly and maintain this
pressure.
Normal operation of the ABS may make
itself felt by slight vibrations of the brake
pedal.
The fixed illumination of this warning lamp signals that there is a fault with the ABS.
The vehicle retains conventional braking. Drive
carefully at a moderate speed.
Have it checked by a CITROËN dealer or a
qualified workshop.
This warning lamp, when lit together with the STOP and ABS warning lamps,
accompanied by a message and an audible
signal, indicates an EBFD malfunction.
You must stop the vehicle.
Stop as soon as it is safe to do so and switch off
the ignition.
Contact a CITROËN dealer or a qualified
workshop.
When changing wheels (tyres and rims),
ensure that these are approved for your
vehicle.
After an impact
Have it checked by a CITROËN dealer or
a qualified workshop.
Emergency braking
assistance (EBA)
In an emergency, this system enables you
to reach the optimum braking pressure more
quickly and therefore reduce the stopping
distance.
It is triggered in relation to the speed at which
the brake pedal is pressed. This is felt by a
Page 120 of 324

11 8
Safety
U:Seat position suitable for the installation of
a child seat secured using the seat belt and
universally approved for "rearward facing"
and/or "forward facing" use.
UF: Seat position suitable for the installation a
child seat secured using the seat belt and
universally approved for "forward facing"
use.
X: Seat position not suitable for the installation
of a child seat for the specified weight group.
(a) Universal child seat: child seat that can be
installed in all vehicles using the seat belt.
(b) Group 0: from birth to 10 kg. Carrycots and
"car" infant carriers cannot be installed on
the front passenger seat(s) or the seats in
row 3.
(c) Refer to the current legislation in the country
in which you are driving before placing a
child in this seat position.
(d) To install a "rearward facing" or "forward
facing" child seat on a rear seat, move the
seats in front of it forward, then straighten
their backrests to allow sufficient room for
the child seat and the child's legs.
(e) The seat can be installed centrally in the
vehicle; it then prevents the use of the outer
seats. (f)
When a "rearward facing" child seat is
installed on the front passenger seat, the
front passenger airbag must be deactivated.
Otherwise, the child risks being severely
injured or killed if the airbag is deployed.
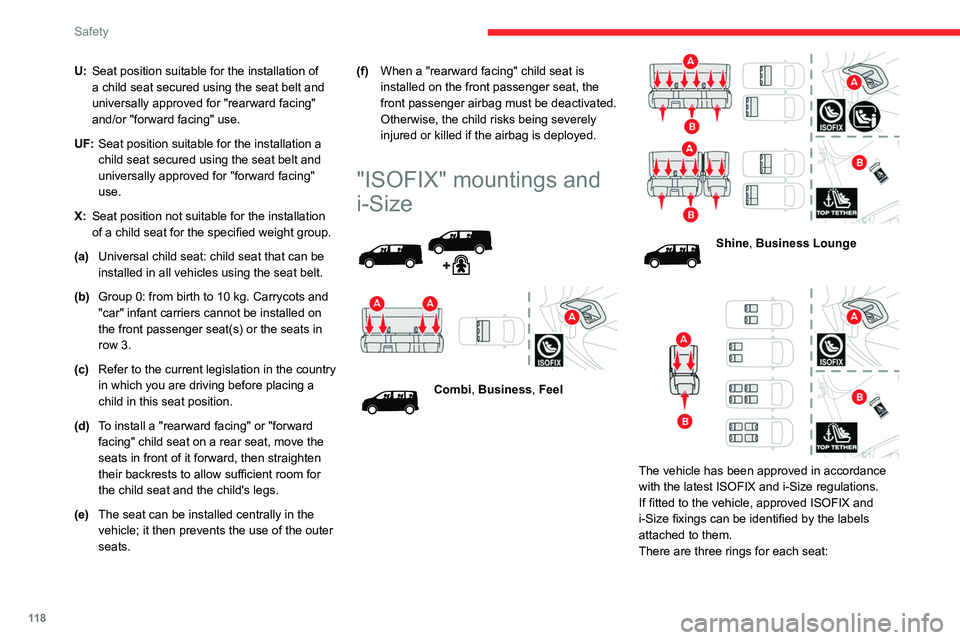
"ISOFIX" mountings and
i-Size
Combi, Business, Feel
Shine, Business Lounge
The vehicle has been approved in accordance
with the latest ISOFIX and i-Size regulations.
If fitted to the vehicle, approved ISOFIX and
i-Size fixings can be identified by the labels
attached to them.
There are three rings for each seat:
Page 132 of 324

130
Safety
IL:Seat position suitable for the installation
of an
Isofix Semi-Universa L seat which is
either:
–
"rearward facing" fitted with an upper
strap or a support leg,
–
"forward facing" fitted with a support leg,
–
a carrycot fitted with an upper strap or a
support leg.
X: Seat position not suitable for the installation
of
an ISOFIX child seat or carrycot for the
specified weight group.
(a) Refer to the current legislation in the country
in which you are driving before placing a
child in this seat position.(b)The seat can be installed centrally in the
vehicle; it then prevents the use of the outer
seats.
For information on securing the upper
strap using the ISOFIX mountings , refer
to the corresponding section.
(1) Installing a carrycot on this seat may
prevent the use of one or more of the other
seats in this row.
(2) Installation possible only behind the driver's
seat. (3)
Installation possible only behind the driver's
seat with individual passenger seat.
(4) The seat in row 2 must be adjusted so that
there is no contact between the child in row
3 and the seat immediately in front.
(5) The front seat must be adjusted so that
there is no contact between the child in row
2 and the seat immediately in front.
(6) The front seat must be adjusted so that
there is no contact between the child in row
2 and the seat immediately in front (with the
front seat adjusted to 2 notches ahead of
the centre of the slide).
i-Size child seats
i-Size child seats have two latches that are anchored to the two rings A.
These i-Size child seats also have:
–
either an upper strap that is attached to ring B
.
–
or a support leg that rests on the vehicle floor
, compatible with the approved i-Size seat position.
Their role is to prevent the child seat from tipping forward in the even\
t of a collision.
For more information on the ISOFIX mountings, refer to the corresponding section.
Locations for i-Size child seats
In accordance with the new European regulations, this table indicates the options for installing i-Size child seats on seats in the vehicle fitted with i-Size
approved ISOFIX mountings.
Page 134 of 324

132
Safety
Seati-Size restraint system
Combi, Business, Feel
Row 3
Fixed one-piece bench seat, outer seats and centre seat (b) i-U (c)
Seat and bench seat, outer seats
and centre seat (b) i-U (c)
Shine, Business Lounge
Row 2 and 3
Rear seats with seat and bench seat i-U (c)
Rear seats with 2 individual seats
i-UF (c, d)
(Excluding group 0)
Rear seats with 1 individual seat i-UF (c, d)
(Excluding group 0)
i-U: Suitable for forward facing and rearward facing "Universal" i-Size restr\
aint systems.
i-UF: Only suitable for forward facing "Universal" i-Size restraint systems.
(a) Refer to the current legislation in the country in which you are driving\
before placing a child in this seat position.
(b) The seat can be installed centrally in the vehicle; it then prevents the use of the outer seats.
(c) The seat in row 2 cannot be used when an i-Size child seat is installed \
immediately behind.
(d) Install an i-Size child restraint system only if seats are installed in \
forward direction.
Manual child lock
Mechanical system to prevent opening of the
sliding side door using its interior lever.
Page 135 of 324

133
Safety
5
Locking/Unlocking
► Rotate the control located on the edge of the
side door up
to lock it, or down to unlock it.
Electric child lock
Remote control system to
prevent opening of the rear
doors (sliding side door(s), side-
hinged rear doors or tailgate
(depending on version)) using
their interior controls.
This control prevents the opening of the rear
doors using their interior handles and the use of
the rear electric windows.
Activation/Deactivation
► With the ignition on, press this button to
activate/deactivate the child lock.
A
message is displayed, confirming activation/
deactivation of the child lock.
When the indicator lamp is on, the child lock is
activated.
In the event of a serious impact, the
electric child lock is deactivated
automatically.
Any other status of the indicator lamp indicates a malfunction of the electric
child lock.
With the child lock activated, it is still
possible to open the doors from outside.
This system is independent and in no circumstances does it take the place of
the central locking control.
Check the status of the child lock each time
you switch on the ignition.
Always keep the electronic key with you when
leaving the vehicle, even for a short time.
In the event of a serious impact, the electric
child lock is switched off automatically to
permit the exit of the rear passengers.
Child lock on rear
windows
This mechanical system
prevents opening of the left-
hand and/or right-hand rear side
windows.
► The system is locked/unlocked using the
remote control key or the back-up key for the
Keyless Entry and Start system.
Page 214 of 324

212
In the event of a breakdown
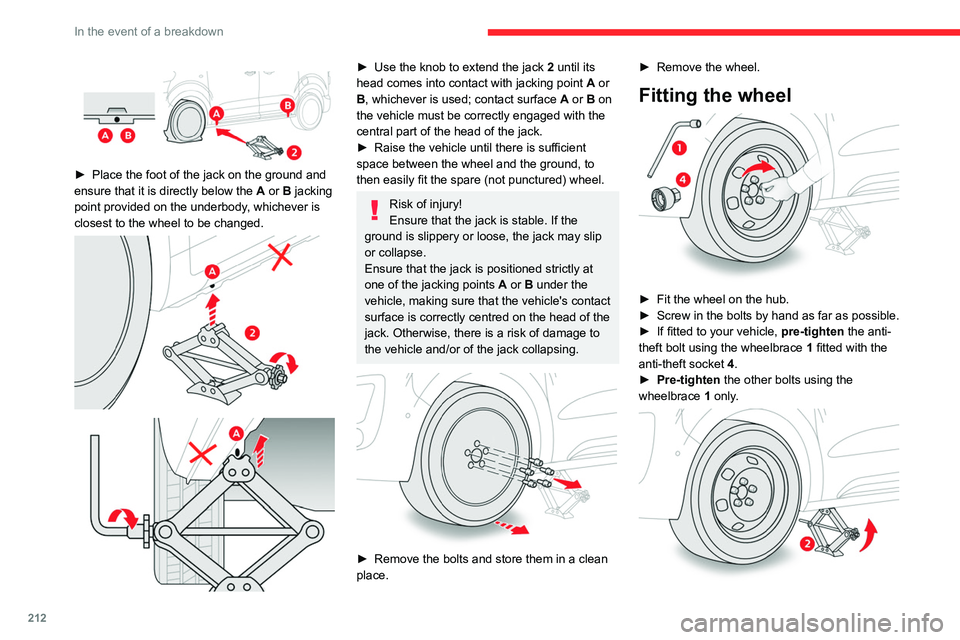
► Place the foot of the jack on the ground and
ensure that it is directly below the A
or B jacking
point provided on the underbody, whichever is
closest to the wheel to be changed.
► Use the knob to extend the jack 2 until its
head comes into contact with jacking point A or
B, whichever is used; contact surface A or B on
the vehicle must be correctly engaged with the
central part of the head of the jack.
►
Raise the vehicle until there is sufficient
space between the wheel and the ground, to
then easily fit the spare (not punctured) wheel.
Risk of injury!
Ensure that the jack is stable. If the
ground is slippery or loose, the jack may slip
or collapse.
Ensure that the jack is positioned strictly at
one of the jacking points A or B under the
vehicle, making sure that the vehicle's contact
surface is correctly centred on the head of the
jack. Otherwise, there is a risk of damage to
the vehicle and/or of the jack collapsing.
► Remove the bolts and store them in a clean
place. ►
Remove the wheel.
Fitting the wheel
► Fit the wheel on the hub.
► Screw in the bolts by hand as far as possible.
►
If fitted to your vehicle,
pre-tighten the anti-
theft bolt using the wheelbrace 1 fitted with the
anti-theft socket 4.
►
Pre-tighten
the other bolts using the
wheelbrace
1
only.