tailgate CITROEN JUMPY 2022 User Guide
[x] Cancel search | Manufacturer: CITROEN, Model Year: 2022, Model line: JUMPY, Model: CITROEN JUMPY 2022Pages: 324, PDF Size: 10.05 MB
Page 46 of 324

44
Access
(the right-hand door is not detected). For more
information on the List of warning lamps and,
in particular, the door open warning, refer to the
corresponding section.
Opening to approximately
180°
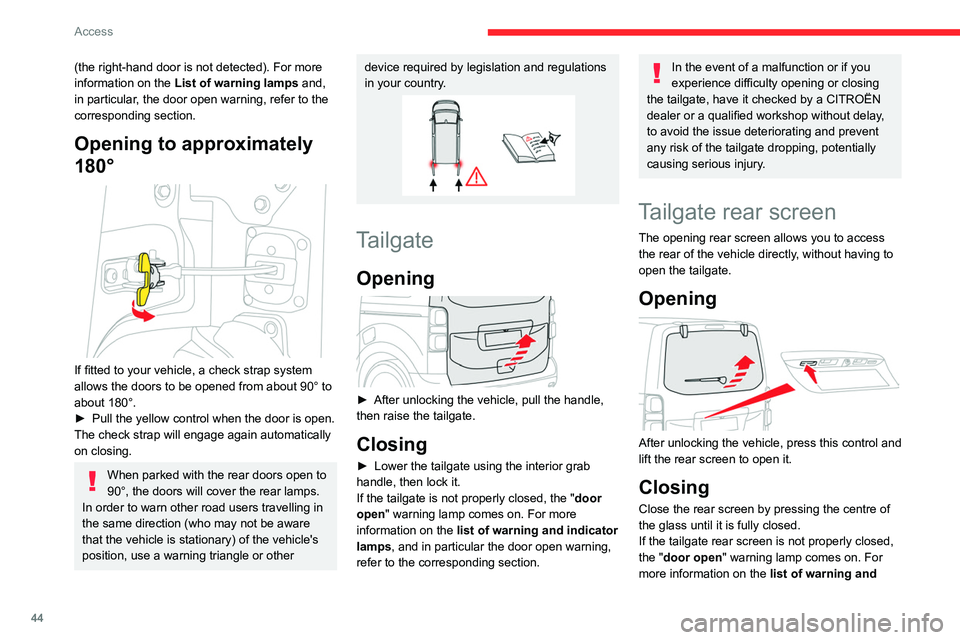
If fitted to your vehicle, a check strap system
allows the doors to be opened from about 90° to
about 180°.
►
Pull the yellow control when the door is open.
The check strap will engage again automatically
on closing.
When parked with the rear doors open to
90°, the doors will cover the rear lamps.
In order to warn other road users travelling in
the same direction (who may not be aware
that the vehicle is stationary) of the vehicle's
position, use a warning triangle or other
device required by legislation and regulations
in your country.
Tailgate
Opening
► After unlocking the vehicle, pull the handle,
then raise the tailgate.
Closing
► Lower the tailgate using the interior grab
handle, then lock it.
If the tailgate is not properly closed, the " door
open
" warning lamp comes on. For more
information on the list of warning and indicator
lamps, and in particular the door open warning,
refer to the corresponding section.
In the event of a malfunction or if you
experience difficulty opening or closing
the tailgate, have it checked by a CITROËN
dealer or a qualified workshop without delay,
to avoid the issue deteriorating and prevent
any risk of the tailgate dropping, potentially
causing serious injury.
Tailgate rear screen
The opening rear screen allows you to access
the rear of the vehicle directly, without having to
open the tailgate.
Opening
After unlocking the vehicle, press this control and
lift the rear screen to open it.
Closing
Close the rear screen by pressing the centre of
the glass until it is fully closed.
If the tailgate rear screen is not properly closed,
the "door open " warning lamp comes on. For
more information on the list of warning and
Page 47 of 324

45
Access
2indicator lamps and in particular the door open
warning, refer to the corresponding section.
The tailgate and rear screen cannot both be open at the same time, to avoid
damaging them.
Alarm
(Depending on version)
System which protects and provides a deterrent
against theft and break-ins.
Exterior perimeter monitoring
The system checks for opening of the vehicle.
The alarm is triggered if anyone tries to open a
door, the boot or the bonnet, for example.
Interior volumetric monitoring
The system only checks for any
variation in volume in the cab.
The alarm is triggered if anyone
breaks a window or enters the
vehicle’s cab; however it is not
triggered if someone enters the
loading area.
The system checks for any
variation in volume in the
passenger compartment.
The alarm is triggered if anyone
breaks a window, enters the
passenger compartment or
moves inside the vehicle.
Self-protection function
The system checks whether any of its
components are out of service.
The alarm is triggered if the battery, the central
control or the siren wiring is put out of service or
damaged.
Work on the alarm system
Contact a CITROËN dealer or a qualified
workshop.
If your vehicle is fitted with Additional
Heating / Ventilation, volumetric
monitoring is not compatible with this system.
For more information on Additional Heating
/ Ventilation , refer to the corresponding
section.
Locking the vehicle with full
alarm system
Activation
► Switch off the ignition and exit the vehicle.
► Lock or deadlock the vehicle using the
remote control or with the Keyless Entry and
Start system.
When the monitoring system is active, the red
indicator lamp in the button flashes once per
second and the direction indicators come on for
about 2 seconds.
The exterior perimeter monitoring is activated
after 5 seconds and the interior volumetric
monitoring after 45 seconds.
If an opening (door, tailgate/side-hinged
doors or bonnet) is not properly closed,
the vehicle is not locked, but the exterior
perimeter monitoring will be activated after 45
seconds, at the same time as the interior
volumetric monitoring.
Page 88 of 324

86
Ease of use and comfort
► Select the time of entry into the vehicle and
the desired days. Press OK.
►
Press
ON to activate this programme.
The temperature pre-conditioning sequence
begins approximately 45 minutes before the
programmed time when the vehicle is connected
(20 minutes when it is not connected) and is
maintained for 10 minutes after.
You can set multiple programmes. Each one is saved in the system.
To optimise the driving range, we recommend
starting a programme while the vehicle is
connected.
The fan noise that occurs during temperature pre-conditioning is perfectly
normal.
Operating conditions
– The function is only activated when the
ignition is switched off and the
vehicle
locked.
–
When the vehicle is not connected, the
function is only activated if the battery charge
level is greater than 50%.
–
When the vehicle is not connected and a
recurring programme is active (e.g. from Monday
to Friday), if two temperature pre-conditioning
sequences are run without the vehicle being
used, the programme will be deactivated.
Courtesy lamp(s)
Front: comes on when one of the front or
rear doors is opened (sliding side door
and depending on equipment, left-hand
side-hinged door or tailgate).
Rear or row 2 and row 3: comes on when one of
the rear doors is opened (sliding side door and
depending on equipment, left-hand side-hinged
door or tailgate).
Always lit, ignition on.
Always off.
Front
Rear
Page 96 of 324

94
Lighting and visibility
► Give a short downwards push to the control
stalk.
A
wiping cycle confirms that the instruction has
been accepted.
This indicator lamp lights up on the instrument panel, accompanied by a
message.
Switching off
► Give the control stalk another brief push
downwards or set the control stalk to another
position ( Int
, 1 or 2).
This indicator lamp goes off on the instrument panel, accompanied by a
message.
If the ignition has been off for more than
one minute, the automatic wipers must
be reactivated by pushing the control stalk
downwards.
Malfunction
If a fault occurs with the automatic wipers, the
wipers operate in intermittent mode.
Have it checked by a CITROËN dealer or a
qualified workshop.
Do not cover the rain/sunshine sensor.
When using an automatic car wash,
switch off the automatic wipers and the
ignition.
In winter, wait until the windscreen is
completely clear of ice before activating the
automatic wipers.
Rear wiper
Off.
Intermittent wipe.
Wash-wipe (set duration).
Reverse gear
When reverse gear is engaged, if the windscreen
wipers are operating, the rear wiper will come
into operation automatically (activated by
default).
Activation/Deactivation
With audio system or touch screen
The system's settings are adjusted via the vehicle configuration menu.
This function is activated by default.
In the event of accumulation of snow or
hard frost or if a bicycle carrier is fitted to
the tailgate, deactivate the automatic rear
wiper via the vehicle configuration menu.
Rear screenwash
► Turn the ring as far as it will go and hold it in
position.
The screenwash and the wiper operate for as
long as the ring remains turned.
A final wiping cycle is performed when screen
washing ends.
Special position of the
windscreen wipers
This maintenance position is used while cleaning
or replacing the wiper blades. It can also be
useful, in wintry weather (ice, snow), to release
the wiper blades from the windscreen.
To maintain the effectiveness of the flat wiper blades, it is advisable to:
–
handle them with care.
–
clean them regularly using soapy water
.
–
avoid using them to hold cardboard on the
windscreen.
–
replace them at the first signs of wear
.
Page 135 of 324

133
Safety
5
Locking/Unlocking
► Rotate the control located on the edge of the
side door up
to lock it, or down to unlock it.
Electric child lock
Remote control system to
prevent opening of the rear
doors (sliding side door(s), side-
hinged rear doors or tailgate
(depending on version)) using
their interior controls.
This control prevents the opening of the rear
doors using their interior handles and the use of
the rear electric windows.
Activation/Deactivation
► With the ignition on, press this button to
activate/deactivate the child lock.
A
message is displayed, confirming activation/
deactivation of the child lock.
When the indicator lamp is on, the child lock is
activated.
In the event of a serious impact, the
electric child lock is deactivated
automatically.
Any other status of the indicator lamp indicates a malfunction of the electric
child lock.
With the child lock activated, it is still
possible to open the doors from outside.
This system is independent and in no circumstances does it take the place of
the central locking control.
Check the status of the child lock each time
you switch on the ignition.
Always keep the electronic key with you when
leaving the vehicle, even for a short time.
In the event of a serious impact, the electric
child lock is switched off automatically to
permit the exit of the rear passengers.
Child lock on rear
windows
This mechanical system
prevents opening of the left-
hand and/or right-hand rear side
windows.
► The system is locked/unlocked using the
remote control key or the back-up key for the
Keyless Entry and Start system.
Page 204 of 324

202
Practical information
Keyless Entry and Start
You must not depress the brake pedal
while switching the ignition on again, then
switching it off. If you do, the engine will start,
requiring you to restart the procedure.
Advice on care and maintenance
General recommendations
Observe the following recommendations to avoid
damaging the vehicle.
Exterior
Never use a high-pressure jet wash in
the engine compartment - risk of
damaging the electrical components!
Do not wash the vehicle in bright sunshine or
extremely cold conditions.
When washing the vehicle in an
automatic roller-brush car wash, be sure
to lock the doors and, depending on version,
move the electronic key away and deactivate
the "hands-free" function (Hands-Free
Tailgate Access).
When using a pressure washer, keep the jet
nozzle at a minimum distance of 30 cm from
the vehicle (particularly when cleaning areas
containing chipped paint, sensors or seals).
Promptly clean up any stains containing
chemicals liable to damage the vehicle's
paintwork (including tree resin, bird
droppings, insect secretions, pollen and tar).
Depending on the environment, clean the
vehicle frequently to remove salty deposits
(in coastal areas), soot (in industrial areas)
and mud/salts (in wet or cold areas). These
substances can be highly corrosive.
Contact a CITROËN dealer or a qualified
workshop for advice on removing stubborn
stains requiring special products (such as tar
or insect removers).
Preferably, have paint touch-ups performed
by a CITROËN dealer or a qualified
workshop.
Interior
When washing the vehicle, never use a
water hose or high-pressure jet to clean
the interior.
Liquids carried in cups or other open
containers can spill, presenting a risk of
damage to the instruments and controls and
the controls located on the centre console. Be
vigilant!
To clean instrument panels, touch screens
or other displays, wipe gently with a soft,
dry cloth. Do not use products (e.g. alcohol,
disinfectant) or soapy water directly on these
surfaces - risk of damage!
Bodywork
High-gloss paint
Do not use abrasive products, solvents,
petrol or oil to clean the bodywork.
Never use an abrasive sponge to clean
stubborn stains - risk of scratching the
paintwork!
Do not apply polish in strong sunshine, or to
plastic or rubber parts.
Use a soft cloth and soapy water or a pH
neutral product.
Gently wipe the bodywork with a clean
microfibre cloth.
Apply polish with the vehicle clean and dry.
Comply with the instructions for use stated on
the product.
Textured paint
This type of paint reacts under the effect of
light, through variations in appearance and
finish that highlight the lines and contours of the
vehicle. Its varnish is enriched with particles that
remain visible and create a unique satin effect
with relief. Its slightly granular texture gives it a
surprising touch.
Never attempt to clean without water.
Never clean your vehicle in an automatic
roller-brush car wash.
Page 212 of 324

210
In the event of a breakdown
2.Jack.
Used to raise the vehicle.
3. Wheel bolt cover/wheel trim removal tool.
Depending on the vehicle's equipment, this is
used to remove the wheel bolt covers on alloy
wheels or the wheel trim on steel wheels.
4. Socket for "anti-theft" wheel bolts.
Used to adapt the wheelbrace to the special
"anti-theft" bolts.
5. Towing eye.
For more information on Towing, please
refer to the corresponding section.
These tools are specific to the vehicle and may vary according to the level of
equipment.
Do not use them for any other purpose.
The jack must only be used to change a wheel with a damaged or punctured tyre.
Do not use any jack other than the one
supplied with the vehicle.
If the vehicle does not have its original jack,
contact a CITROËN dealer or a qualified
workshop to obtain the one that was intended
by the manufacturer.
The jack meets European standards, as
defined in the Machinery Directive 2006/42/
CE.
The jack does not require any maintenance.
Accessing the spare wheel
► Access to the spare wheel is from the rear .
► Depending on version, open the side-hinged
doors or the tailgate.
To avoid any unwanted opening of the electric side door(s), deactivate the
Hands-Free Tailgate Access function in the
vehicle configuration menu.
For more information on the Hands-free
sliding side door , refer to the corresponding
section.
► If the vehicle is fitted with a towbar , raise
the rear of the vehicle using the jack (must be
at jacking point B) to allow sufficient space to
remove the spare wheel.
Remove the spare wheel from the
carrier
► Access the carrier bolt, located on the rear
door sill.
►
Slacken the bolt using the wheelbrace (about
14 turns) until the carrier is low enough to allow
the carrier hook to be disengaged.
► Release the carrier from the hook, take the
spare wheel and place it next to the wheel to be
changed.
Page 218 of 324

216
In the event of a breakdown
Direction indicator side
repeater
– Push the repeater towards the rear and
release it.
–
When refitting, engage the repeater towards
the front and then slide it backwards.
Amber coloured bulbs (direction indicators and
side repeaters) must be replaced with bulbs of
identical specification and colour
.
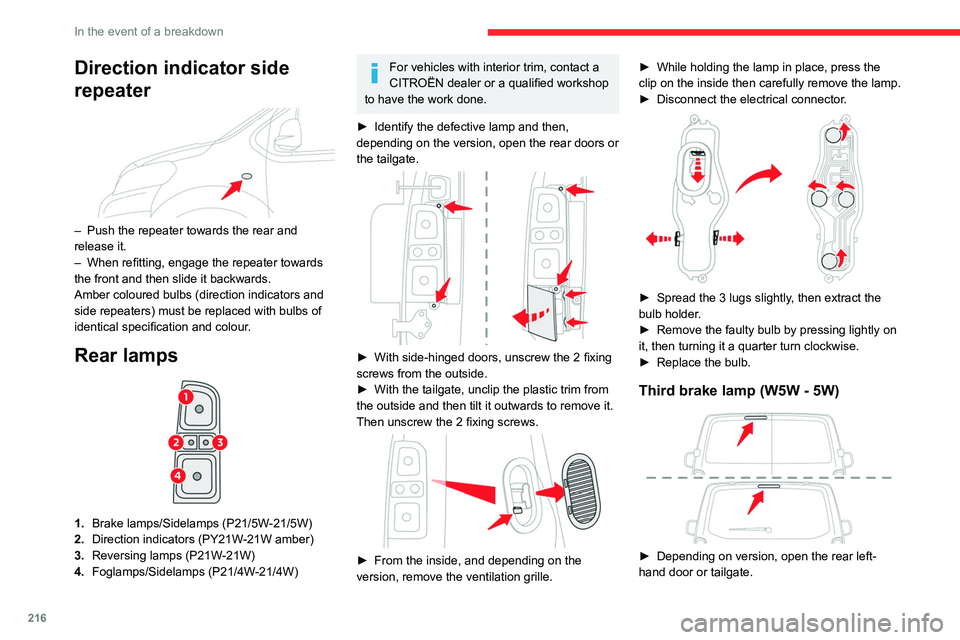
Rear lamps
1.Brake lamps/Sidelamps (P21/5W-21/5W)
2. Direction indicators (PY21W-21W amber)
3. Reversing lamps (P21W-21W)
4. Foglamps/Sidelamps (P21/4W-21/4W)
For vehicles with interior trim, contact a
CITROËN dealer or a qualified workshop
to have the work done.
►
Identify the defective lamp and then,
depending on the version, open the rear doors or
the tailgate.
► With side-hinged doors, unscrew the 2 fixing
screws from the outside.
►
With the tailgate, unclip the plastic trim from
the outside and then tilt it outwards to remove it.
Then unscrew the 2 fixing screws.
► From the inside, and depending on the
version, remove the ventilation grille. ►
While holding the lamp in place, press the
clip on the inside then carefully remove the lamp.
►
Disconnect the electrical connector
.
► Spread the 3 lugs slightly
, then extract the
bulb holder.
►
Remove the faulty bulb by pressing lightly on
it, then turning it a quarter turn clockwise.
►
Replace the bulb.
Third brake lamp (W5W - 5W)
► Depending on version, open the rear left-
hand door or tailgate.
Page 219 of 324

217
In the event of a breakdown
8
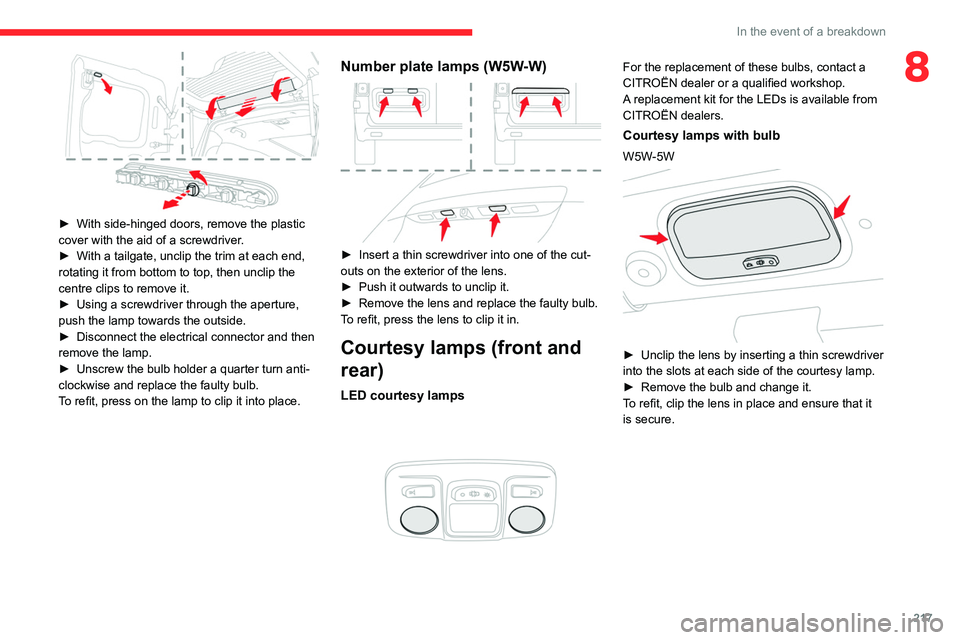
► With side-hinged doors, remove the plastic
cover with the aid of a screwdriver .
►
With a tailgate, unclip the trim at each end,
rotating it from bottom to top, then unclip the
centre clips to remove it.
►
Using a screwdriver through the aperture,
push the lamp towards the outside.
►
Disconnect the electrical connector and then
remove the lamp.
►
Unscrew the bulb holder a quarter turn anti-
clockwise and replace the faulty bulb.
T
o refit, press on the lamp to clip it into place.
Number plate lamps (W5W-W)
► Insert a thin screwdriver into one of the cut-
outs on the exterior of the lens.
►
Push it outwards to unclip it.
►
Remove the lens and replace the faulty bulb.
T
o refit, press the lens to clip it in.
Courtesy lamps (front and
rear)
LED courtesy lamps
For the replacement of these bulbs, contact a
CITROËN dealer or a qualified workshop.
A replacement kit for the LEDs is available from
CITROËN dealers.
Courtesy lamps with bulb
W5W-5W
► Unclip the lens by inserting a thin screwdriver
into the slots at each side of the courtesy lamp.
►
Remove the bulb and change it.
T
o refit, clip the lens in place and ensure that it
is secure.
Page 223 of 324

221
In the event of a breakdown
8If this label is present, use only a 12 V
charger to avoid causing irreversible
damage to the electrical components.
24V
12V
Frozen battery
Never try to charge a frozen battery - risk
of explosion!
If the battery has frozen, have it checked by a
CITROËN dealer or by a qualified workshop,
who will verify that the internal components
have not been damaged and that the case
has not cracked, which could lead to a risk of
leakage of toxic and corrosive acid.
Disconnecting/reconnecting
the battery
In order to maintain an adequate state of
charge for starting the engine, we recommend
disconnecting the battery if the vehicle is to be
unused for an extended period.
Before disconnecting the battery:
►
Close all openings (doors, tailgate, windows).
►
Switch off all electricity-consuming devices
(audio system, wipers, lamps, etc.).
►
Switch off the ignition and wait for 4
minutes.After accessing the battery, it is only necessary
to disconnect the (+) terminal.
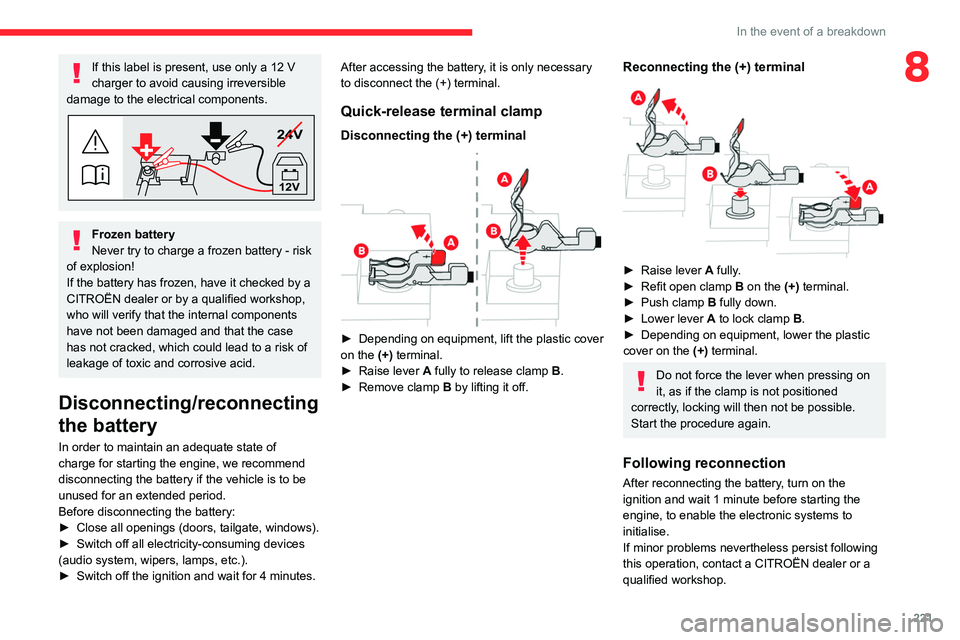
Quick-release terminal clamp
Disconnecting the (+) terminal
► Depending on equipment, lift the plastic cover
on the (+) terminal.
►
Raise lever
A
fully to release clamp
B
.
►
Remove clamp
B
by lifting it off.
Reconnecting the (+) terminal
► Raise lever A fully.
► Refit open clamp B on the (+) terminal.
►
Push clamp
B fully down.
►
Lower lever
A
to lock clamp B.
►
Depending on equipment, lower the plastic
cover on the
(+) terminal.
Do not force the lever when pressing on
it, as if the clamp is not positioned
correctly, locking will then not be possible.
Start the procedure again.
Following reconnection
After reconnecting the battery, turn on the
ignition and wait 1 minute before starting the
engine, to enable the electronic systems to
initialise.
If minor problems nevertheless persist following
this operation, contact a CITROËN dealer or a
qualified workshop.