ECU CITROEN JUMPY 2022 Owners Manual
[x] Cancel search | Manufacturer: CITROEN, Model Year: 2022, Model line: JUMPY, Model: CITROEN JUMPY 2022Pages: 324, PDF Size: 10.05 MB
Page 16 of 324

14
Dashboard instruments
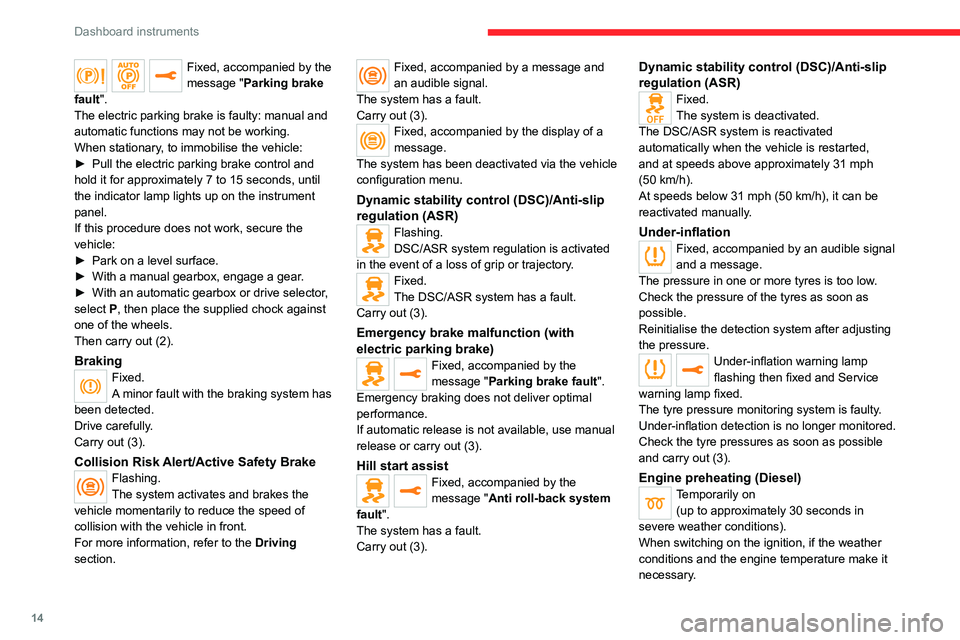
Fixed, accompanied by the
message "Parking brake
fault".
The electric parking brake is faulty: manual and
automatic functions may not be working.
When stationary, to immobilise the vehicle:
►
Pull the electric parking brake control and
hold it for approximately 7 to 15 seconds, until
the indicator lamp lights up on the instrument
panel.
If this procedure does not work, secure the
vehicle:
►
Park on a level surface.
►
With a manual gearbox, engage a gear
.
►
With an automatic gearbox or drive selector
,
select
P, then place the supplied chock against
one of the wheels.
Then carry out (2).
BrakingFixed.
A minor fault with the braking system has
been detected.
Drive carefully.
Carry out (3).
Collision Risk Alert/Active Safety BrakeFlashing.
The system activates and brakes the
vehicle momentarily to reduce the speed of
collision with the vehicle in front.
For more information, refer to the Driving
section.
Fixed, accompanied by a message and
an audible signal.
The system has a fault.
Carry out (3).
Fixed, accompanied by the display of a
message.
The system has been deactivated via the vehicle
configuration menu.
Dynamic stability control (DSC)/Anti-slip
regulation (ASR)
Flashing.
DSC/ASR system regulation is activated
in the event of a loss of grip or trajectory.
Fixed.
The DSC/ASR system has a fault.
Carry out (3).
Emergency brake malfunction (with
electric parking brake)
Fixed, accompanied by the
message "Parking brake fault".
Emergency braking does not deliver optimal
performance.
If automatic release is not available, use manual
release or carry out (3).
Hill start assistFixed, accompanied by the
message "Anti roll-back system
fault".
The system has a fault.
Carry out (3).
Dynamic stability control (DSC)/Anti-slip
regulation (ASR)
Fixed.
The system is deactivated.
The DSC/ASR system is reactivated
automatically when the vehicle is restarted,
and at speeds above approximately 31 mph
(50
km/h).
At speeds below 31
mph (50 km/h), it can be
reactivated manually.
Under-inflationFixed, accompanied by an audible signal
and a message.
The pressure in one or more tyres is too low.
Check the pressure of the tyres as soon as
possible.
Reinitialise the detection system after adjusting
the pressure.
Under-inflation warning lamp
flashing then fixed and Service
warning lamp fixed.
The tyre pressure monitoring system is faulty.
Under-inflation detection is no longer monitored.
Check the tyre pressures as soon as possible
and carry out (3).
Engine preheating (Diesel)Temporarily on (up to approximately 30 seconds in
severe weather conditions).
When switching on the ignition, if the weather
conditions and the engine temperature make it
necessary.
Page 32 of 324

30
Access
Purchasing a second-hand vehicle
Have the key codes memorised by a
CITROËN dealer, to ensure that the keys in
your possession are the only ones able to
start the vehicle.
To preserve the battery charge in the electronic key and the vehicle's battery,
the "hands-free" functions are set to
hibernation mode after 21 days without use.
To restore these functions, press one of the
remote control buttons or start the engine with
the electronic key in the reader.
For more information on starting with the
Keyless Entry and Start system, refer to the
corresponding section.
Electrical interference
The electronic key may not work if it is
close to an electronic device (e.g.
mobile
telephone (switched on or on standby), laptop
computer, strong magnetic fields). If this
occurs, move the electronic key away from
the electronic device.
Accumulations (water, dust, grime, salt, etc.) on the inner surface of the door
handle may affect detection.
If cleaning the inner surface of the door
handle using a cloth does not restore
detection, contact a CITROËN dealer or a
qualified workshop.
A sudden splash of water (stream of water,
high pressure jet washer, etc.) may be
identified by the system as the desire to open
the vehicle.
Unlocking/Complete or
selective unlocking
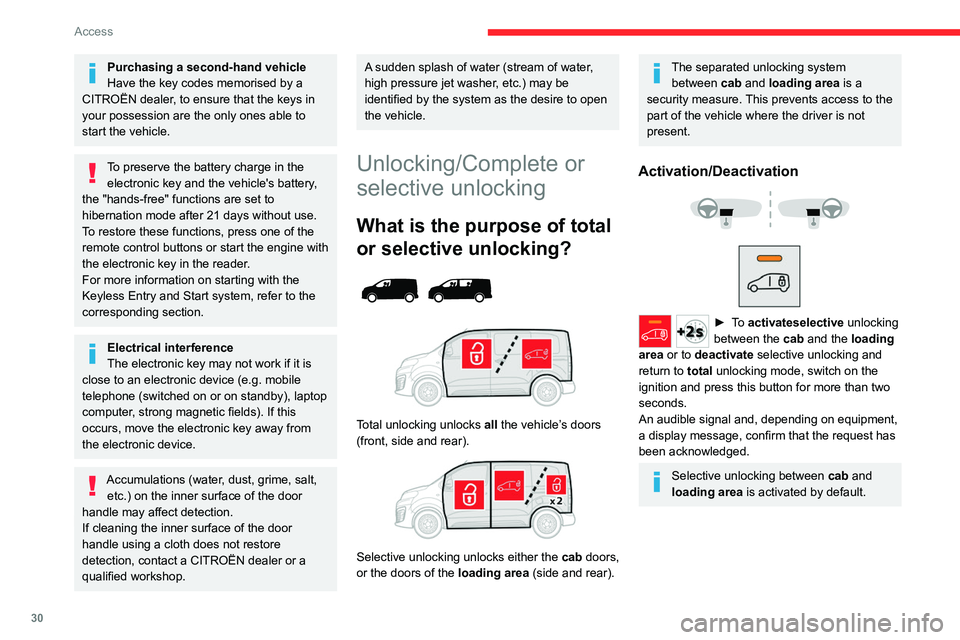
What is the purpose of total
or selective unlocking?
Total unlocking unlocks all the vehicle’s doors
(front, side and rear).
Selective unlocking unlocks either the cab doors,
or the doors of the loading area (side and rear).
The separated unlocking system between cab and loading area is a
security measure. This prevents access to the
part of the vehicle where the driver is not
present.
Activation/Deactivation
► To activateselective unlocking
between the cab and the loading
area or to deactivate selective unlocking and
return to total unlocking mode, switch on the
ignition and press this button for more than two
seconds.
An audible signal and, depending on equipment,
a display message, confirm that the request has
been acknowledged.
Selective unlocking between cab and
loading area is activated by default.
Page 39 of 324

37
Access
2Central locking
Manual
► Press this button to lock/unlock the vehicle
(doors, tailgate or side-hinged doors) from inside
the passenger compartment.
The indicator lamp comes on to confirm the
central locking of the vehicle.
Central locking does not take place if any
of the doors are open.
When locking/deadlocking from the
outside
When the vehicle is locked or deadlocked
from the outside, the indicator lamp flashes
and the button is deactivated.
►
After normal locking, pull one of the
interior door controls to unlock the vehicle.
►
After deadlocking, you must use the
remote control, the "Keyless Entry and
Start" system or the built-in key to unlock the
vehicle.
Driving with the doors locked makes
access for the emergency services more
difficult
in an emergency.
When transporting an oversized load
(tailgate or side-hinged doors open),
press the button to lock only the cab doors.
When transporting an oversized load
(tailgate or side-hinged doors open),
press the button to lock only the front and rear
doors (sliding side door).
When locking from inside, the door
mirrors do not fold.
Central locking from the inside does not
operate if one of the doors is open (indicated
by a mechanical noise coming from the
locks).
When the tailgate or side-hinged doors are
open, only the other doors are locked (the
button does not light up).
Automatic (anti-intrusion security)
The doors and the tailgate or the side-hinged
doors can lock automatically while driving (speed
above 6 mph (10
km/h)).
To deactivate/reactivate this function (activated
by default):
►
Press the button until an audible signal is
heard and/or a message appears on the screen.
Locking/unlocking the
loading area
This button is unavailable if the vehicle has been locked or deadlocked from
outside (using the key, remote control or
Keyless Entry and Start, depending on
equipment) or if any of the doors are still
open.
Page 56 of 324

54
Ease of use and comfort
Once the removable flap has been
removed, you can load long objects
under the outer seat.
Removable flap (type 1)
Removing the flap
► While holding the flap with one hand, turn the
control at the top of the flap with the other hand
to release it.
►
Lower the flap to remove it from its housing.
►
Stow
it behind the driver’s seat, clipping it into
the attachment lugs.
►
T
urn the control at the top of the flap to
secure it.
Refitting the flap
► Tilt the flap, with the yellow hinges pointing
downwards.
►
Insert the hinges into their housing then press
down fully (to avoid vibrations).
►
With one hand lift the flap to close it, then
with the other hand turn the control at the top of
the flap to secure it.
Removable flap (type 2)
► To open or close the flap, slide it to the left
or right.
The flap is kept in the closed or open position
with magnets located at each end position.
Folding seat cushion
Raising the seat cushion
► With one hand, firmly pull the strap forwards
to unlock the seat cushion.
►
A
strut lifts the seat cushoin against the
backrest.
Page 58 of 324

56
Ease of use and comfort
turn it a quarter turn (in a clockwise direction) to
lock it.
►
Put the second fastener into the lower cut-out
2
, located on the seat base. Keep the fastener
pressed against the structure, then turn it a
quarter turn (in a clockwise direction) to lock it.
► Secure the first hook to the ring 3 located in
the glove box.
►
Secure the second hook to the ring 4
located
on the floor.
Removing the net
► Release the hooks from the rings 4 and 3.
► Remove the lower fastener 2
then the upper
fastener 1, turning them by a quarter turn
backwards to unlock them.
Make sure that the size, shape and
volume of the loads carried are
compatible with the highway code and safety
regulations and do not impair the driver’s field
of vision.
All loads must be appropriately secured
to prevent or minimise displacement and
prevent injury.
Install the anti-slip net (supplied with the
vehicle) every time that the seat is raised and
the partition flap removed.
Never use the net for any other purposes.
Regularly check the condition of the anti-
slip net. As soon as signs of wear or tear
appear, contact a CITROËN dealer to have
it replaced by an anti-slip net that meets the
specifications required by CITROËN for the
vehicle.
Always fit the removable flap back into place
when you are not carrying any long loads.
"Rotating writing table"
If fitted to your vehicle, the central seat cushion
of the bench seat can be tilted to form a pivoting
writing table, thus creating a mobile desk (with
the vehicle stationary).
►
Pull the handle located at the top of the
backrest cushion.
Never use the table while the vehicle is
being driven.
In the event of sudden braking or impact, any
objects on the table might become dangerous
projectiles that could cause injury.
Page 59 of 324

57
Ease of use and comfort
3Central seat cushion
storage
Precautions for the seats
and bench seats
Do not remove a head restraint without storing it
and securing it to a support.
Ensure that the passengers can always access
the seat belts and fasten them easily.
A passenger must not take their seat without
adjusting the seat's head restraint correctly and
adjusting and fastening their seat belt.
Ensure that no object or passenger feet
could obstruct the anchorage points or
prevent the correct latching of the assembly.
If removing and storing seats and bench
seats out of the vehicle, ensure that they
are placed in a clean area, so as to avoid
introducing any foreign bodies into the
mechanisms.
The seats and bench seats are not designed for any other use than in the
vehicle. They are equipped with mechanisms
and features that may be damaged if used
improperly or if dropped.
Loading luggage or objects
behind the row 3 seat and
bench seat
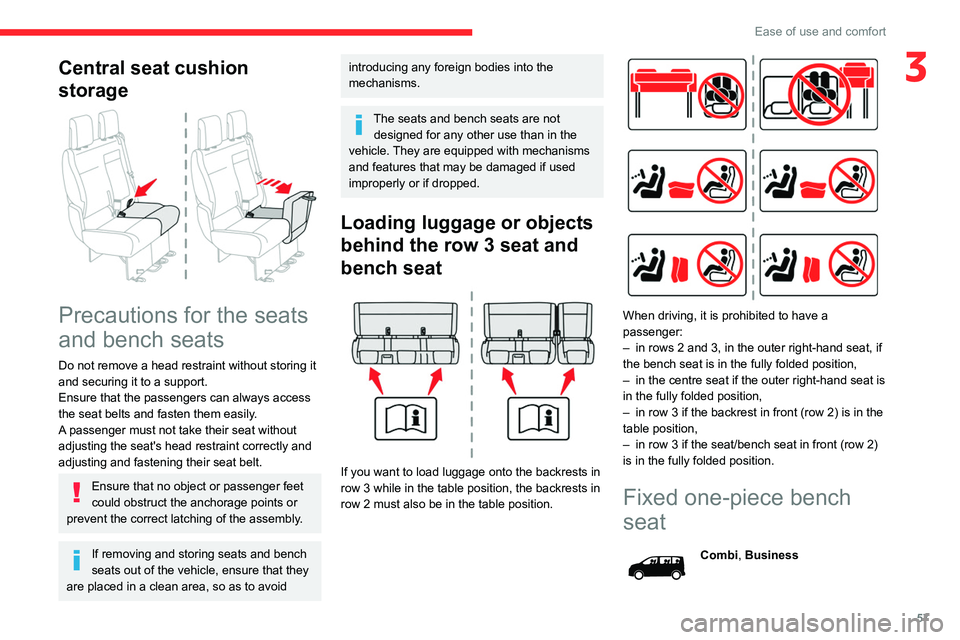
If you want to load luggage onto the backrests in
row
3 while in the table position, the backrests in
row
2 must also be in the table position.
When driving, it is prohibited to have a
passenger:
–
in rows 2 and 3, in the outer right-hand seat, if
the bench seat is in the fully folded position,
–
in the centre seat if the outer right-hand seat is
in the fully folded position,
–
in row 3 if the backrest in front (row 2) is in the
table position,
–
in row 3 if the seat/bench seat in front (row 2)
is in the fully folded position.
Fixed one-piece bench
seat
Combi, Business
Page 68 of 324

66
Ease of use and comfort
The two outer seats are fitted with ISOFIX
mountings.
For more information on the ISOFIX
mountings , refer to the corresponding
section.
Storage compartment
If applicable, a storage compartment is available
at the front, underneath the bench seat.
Under seat cushion storage
wells
If the vehicle is so equipped, they are located
underneath the centre and outer left-hand seats.
To gain access to it from the cab, tip the required
seat forwards.
Depending on the country of sale, the wells can
be dismantled and removed through the rear so
that bulky objects can be stowed underneath the
bench seat.
Do not attach anything to the cab fixing
structure.
Do not exceed the number of passengers
indicated on the registration certificate.
In the rear, the loading area is intended for
carrying goods only.
You are advised to place the goods or heavy
objects as far forwards as possible in the
loading area (towards the cab) and secure
them by means of straps using the stowing
rings on the floor.
The rear seat belt frames are not designed to
secure the load being carried.
Page 69 of 324

67
Ease of use and comfort
3Folding crew cab
The crew cab has a folding bench seat, seat
belts and side windows. It is separated from
the loading area by the bench seat by a high-
strength grille.
Folded position
► With just one hand, pull one of the straps A
upwards to fold the bench seat. ►
Using handle
B
, guide the movement of the
bench seat until it locks in the folded position.
Bench seat position
► To put the bench seat back in place, pull the
strap C to unlock the bench seat, then release
the strap.
►
Then, using only the handle
B
, guide the
descent of the backrest to tip the assembly until
it locks in the bench seat position.
Never put your hand underneath the
bench seat to guide it downwards, as you
could get your fingers trapped.
Ensure there are no objects or feet beneath
the bench seat or obstructing the anchorage
system, preventing the assembly from being
correctly locked.
Do not attach anything to the cab fixing
structure.
Do not exceed the number of passengers
indicated on the registration certificate.
In the rear, the load space is intended for
carrying goods only.
It is recommended to place goods or heavy
objects as far forwards as possible in the load
space (towards the cab) and secure them by
means of straps using the stowing rings on
the floor.
The rear seat belt frames are not designed to
secure the load being carried.
Page 70 of 324

68
Ease of use and comfort
Interior fittings
Mats
Fitting
When fitting it on the driver's side, only use the
mountings present on the carpet.
The other mats are simply laid over the carpet.
Removing/refitting
► To remove it on the driver's side, move
the seat as far back as possible and give the
fasteners a quarter turn.
► To refit it, position the mat and replace the
fasteners, giving them a quarter turn.
►
Check that the mat is secured correctly
.
To avoid any risk of jamming the pedals:– Only use mats which are suited to the
fixings already present in the vehicle; these
fixings must be used.
–
Never fit one mat on top of another
.
The use of mats not approved by CITROËN
may interfere with access to the pedals and
hinder the operation of the cruise control/
speed limiter.
The approved mats have two fasteners
located underneath the seat.
In row 2 and row 3
Use the Velcro straps to attach the transverse
mat in row 2 with the longitudinal mats in rows
2 and 3.
Glove box
It houses the front passenger airbag deactivation
switch and can hold a bottle of water, the
vehicle's handbook pack, etc.
Never drive with the glove box (if
equipped) open when a passenger is
sitting at the front. It may cause injury during
sharp deceleration.
Storage compartment
This can hold a bottle of water, the vehicle's
documentation, etc.
► To open the storage compartment, press the
left-hand end of the control and guide the lid to
its open position notch.
If your vehicle is so equipped, it is lit when the lid
is opened.
When driving , keep the storage
compartment closed. Otherwise, there is
Page 73 of 324

71
Ease of use and comfort
3If the power consumption becomes too
high and when required by the vehicle's
electrical system (particular weather
conditions, electrical overload, etc.), the
power supply to the socket will be cut off; the
green indicator lamp goes off
Load space cover
► To remove it, lift it up.
► T o install it, insert the guides into their
housings.
In the event of sudden deceleration,
objects placed on the load space cover
can turn into projectiles.
Loading area fittings
Stowing rings
Use the stowing rings on the rear floor to secure
loads.
As a safety precaution in case of sharp braking,
we recommend placing heavy objects as far
forwards as possible (i.e. near the cab).
We recommend immobilising the load by firmly
securing it using the stowing rings present on
the floor.
Load retaining partition
On the floor, behind the front seats, a vertical
partition protects the driver and front passengers
against the risk of load movement.