lights Citroen JUMPY MULTISPACE 2008.5 2.G Owner's Guide
[x] Cancel search | Manufacturer: CITROEN, Model Year: 2008.5, Model line: JUMPY MULTISPACE, Model: Citroen JUMPY MULTISPACE 2008.5 2.GPages: 194, PDF Size: 6.88 MB
Page 165 of 194

164
Battery
BATTERY
This is housed in a compartment located
underneath the floor, in front of the driver ’s
seat. Before disconnecting the battery, you must
wait for 2 minutes after switching off the
ignition.
Never disconnect a terminal when the
engine is running.
Never charge a battery without first
disconnecting the terminals.
After every reconnection of the battery,
switch on the ignition and wait 1 minute
before starting to allow the electronic
systems to be initialised. If slight difficulties
are experienced after this, please contact a
CITROËN dealer. It is advisable to disconnect the battery
if the vehicle is not to be used for a
period of more than one month. After the engine has stopped, with the key
in the ignition position, certain functions
(windscreen wiper, electric windows, courtesy
lights, audio equipment, etc.) can only be used
for a cumulative duration of thirty minutes, to
prevent discharging of the battery.
To charge the battery using a battery charger
- Disconnect the battery,
- Follow the instructions for use given by
the battery charger manufacturer,
- Reconnect starting with the negative (-) terminal,
- Check that the terminals and connectors are clean. If they are covered with
sulphate (white or greenish deposit),
disconnect them and clean them
To start the vehicle from another battery
- Connect the red cable to the positive (+) terminals of the two batteries,
- Connect one end of the green or black cable to the negative (-) terminal of the
slave battery,
- Connect the other end of the green or black cable to an earth point on the
broken down vehicle as far as possible
from the battery,
- Operate the starter, let the engine run,
- Wait for the engine to return to idle, then disconnect the cables. Once the thirty minutes are over, the active
functions are put on standby and the battery
warning light flashes accompanied by a
message on the display.
To resume the use of these functions
immediately, start the engine and let it run
for a few minutes.
The time available will then be double the
time for which the engine was left running.
However, this time will always be between
five and thirty minutes.
A flat battery will prevent the engine from
starting.
Page 172 of 194

Changing a bulb
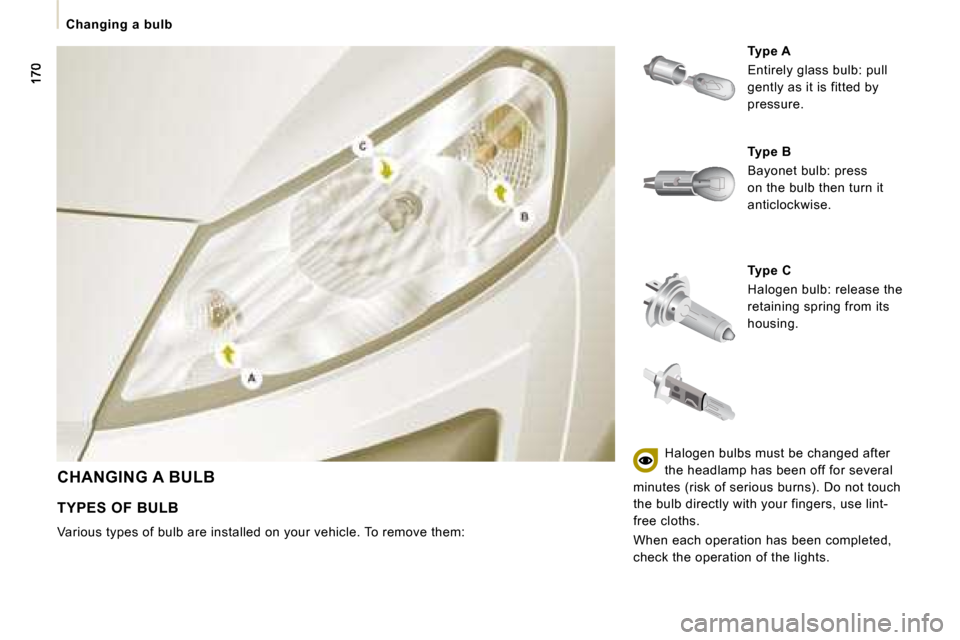
CHANGING A BULB
Type C
Halogen bulb: release the
retaining spring from its
housing.
Type A
Entirely glass bulb: pull
gently as it is fitted by
pressure.
TYPES OF BULB
Various types of bulb are installed on your vehicl e. To remove them:
Type B
Bayonet bulb: press
on the bulb then turn it
anticlockwise.
Halogen bulbs must be changed after
the headlamp has been off for several
minutes (risk of serious burns). Do not touch
the bulb directly with your fingers, use lint-
free cloths.
When each operation has been completed,
check the operation of the lights.
Page 173 of 194

Changing a bulb
TROUBLESHOOTING
8
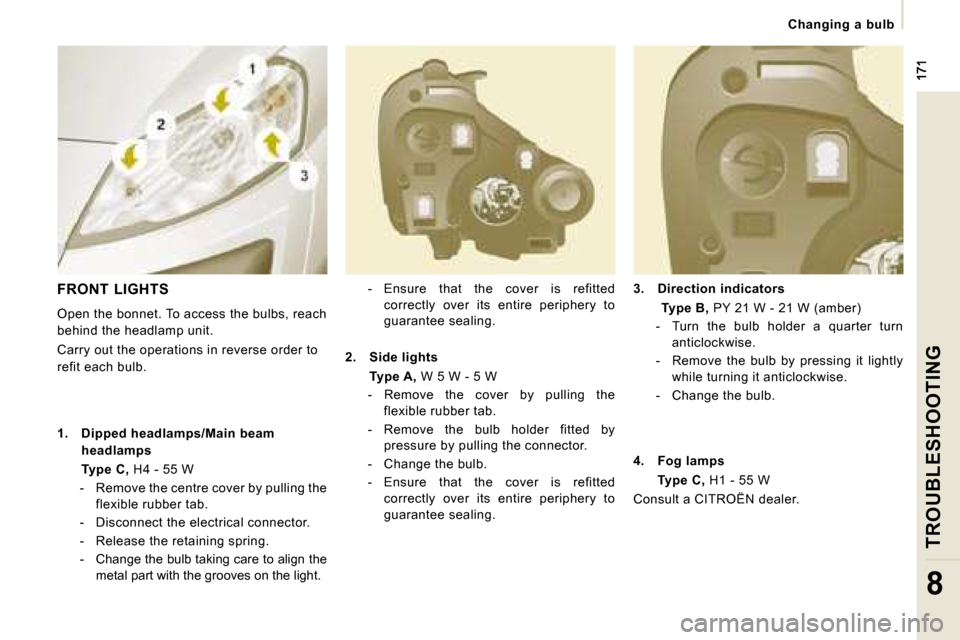
3. Direction indicators
Type B, PY 21 W - 21 W (amber)
- Turn the bulb holder a quarter turn anticlockwise.
- Remove the bulb by pressing it lightly while turning it anticlockwise.
- Change the bulb.
- Ensure that the cover is refitted
correctly over its entire periphery to
guarantee sealing. FRONT LIGHTS
Open the bonnet. To access the bulbs, reach
behind the headlamp unit.
Carry out the operations in reverse order to
refit each bulb.
1. Dipped headlamps/Main beam
headlamps
Type C, H4 - 55 W
- Remove the centre cover by pulling the flexible rubber tab.
- Disconnect the electrical connector.
- Release the retaining spring.
- Change the bulb taking care to align the metal part with the grooves on the light.
2. Side lights
Type A, W 5 W - 5 W
- Remove the cover by pulling the flexible rubber tab.
- Remove the bulb holder fitted by pressure by pulling the connector.
- Change the bulb.
- Ensure that the cover is refitted correctly over its entire periphery to
guarantee sealing.
4. Fog lamps
Type C, H1 - 55 W
Consult a CITROËN dealer.
Page 174 of 194

172
Changing a bulb
DIRECTION INDICATOR SIDE REPEATER
Type A, WY 5 W (amber)
- Push the repeater towards the rear and disengage it.
- Support the connector and turn the bulb holder a quarter turn to the left.
- Turn the bulb a quarter turn to the left, remove it and change it.
- When refitting, engage the repeater towards the rear and bring it towards the
front.
Front/Rear
Amber coloured bulbs (direction indicators
and side repeaters) must be replaced with
bulbs of identical specification and colour.
Type A, 12 V 5 W - 5 W
- Unclip the lens by sliding a screwdriver in the slots on each side of the courtesy
light.
- Pull the bulb and change it.
- Clip the lens in its housing and ensure that it is secured correctly.
High pressure washing
When using this type of washing on
stubborn dirt, do not persist on the
headlamps, the lights and their surrounds to
avoid damaging their coating and their seal.
Page 175 of 194

Changing a bulb
TROUBLESHOOTING
8
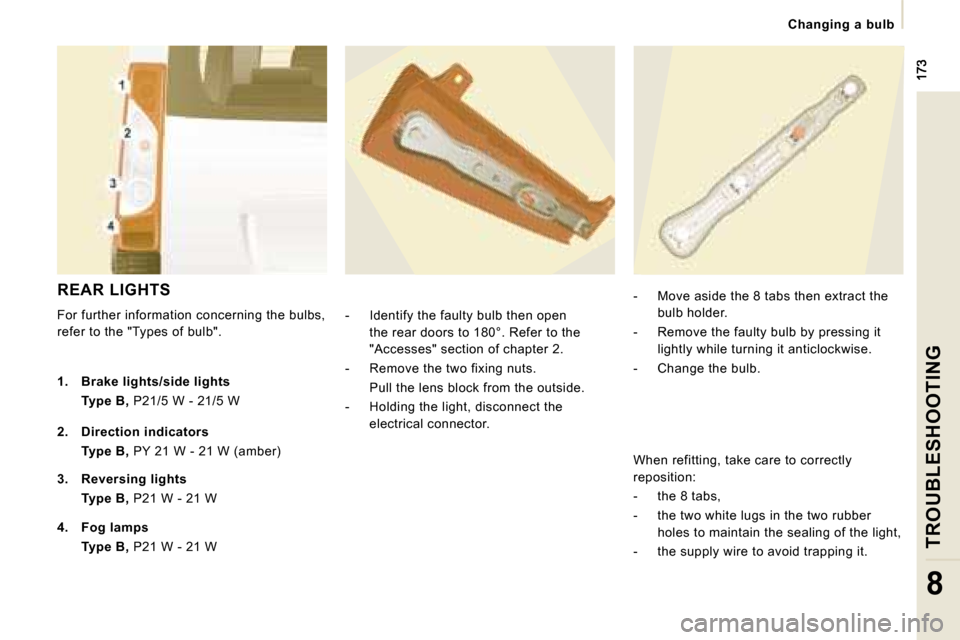
REAR LIGHTS
For further information concerning the bulbs,
refer to the "Types of bulb". - Identify the faulty bulb then open
the rear doors to 180°. Refer to the
"Accesses" section of chapter 2.
- Remove the two fixing nuts.
Pull the lens block from the outside.
- Holding the light, disconnect the electrical connector. - Move aside the 8 tabs then extract the
bulb holder.
- Remove the faulty bulb by pressing it lightly while turning it anticlockwise.
- Change the bulb.
1. Brake lights/side lights
Type B, P21/5 W - 21/5 W
2. Direction indicators
Type B, PY 21 W - 21 W (amber)
3. Reversing lights
Type B, P21 W - 21 W
4. Fog lamps
Type B, P21 W - 21 W When refitting, take care to correctly
reposition:
- the 8 tabs,
- the two white lugs in the two rubber
holes to maintain the sealing of the light,
- the supply wire to avoid trapping it.
Page 176 of 194

174
Changing a bulb
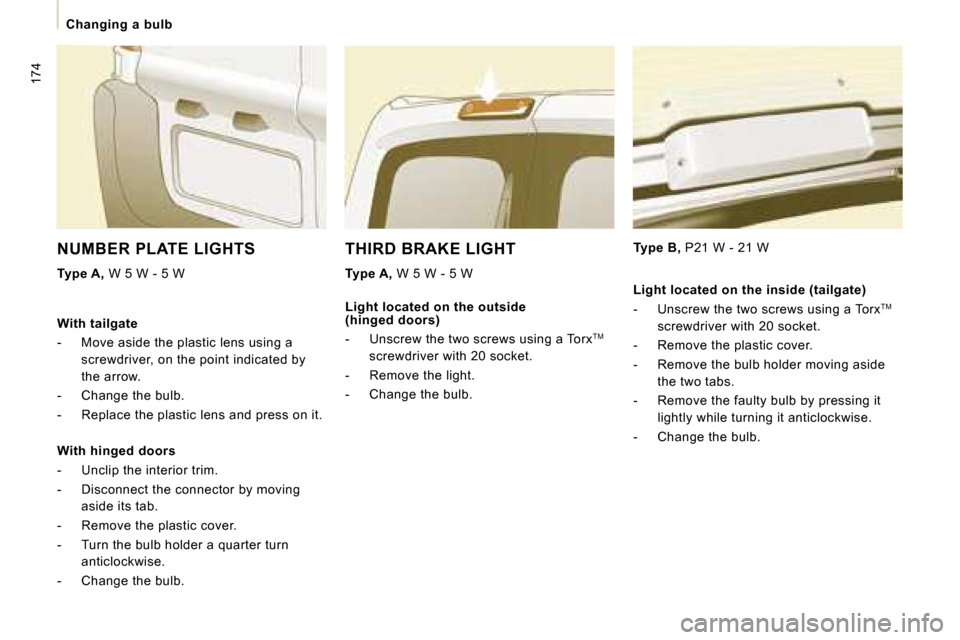
THIRD BRAKE LIGHT
Type A, W 5 W - 5 W
Type B, P21 W - 21 W
NUMBER PLATE LIGHTS
Type A, W 5 W - 5 W
With tailgate
- Move aside the plastic lens using a screwdriver, on the point indicated by
the arrow.
- Change the bulb.
- Replace the plastic lens and press on it.
With hinged doors
- Unclip the interior trim.
- Disconnect the connector by moving aside its tab.
- Remove the plastic cover.
- Turn the bulb holder a quarter turn anticlockwise.
- Change the bulb. Light located on the outside
(hinged doors)
- Unscrew the two screws using a Torx
TM
screwdriver with 20 socket.
- Remove the light.
- Change the bulb. Light located on the inside (tailgate)
- Unscrew the two screws using a Torx
TM
screwdriver with 20 socket.
- Remove the plastic cover.
- Remove the bulb holder moving aside the two tabs.
- Remove the faulty bulb by pressing it lightly while turning it anticlockwise.
- Change the bulb.
Page 178 of 194

176
Changing a fuse
RIGHT-HAND SIDE FASCIA PANEL FUSES
- Tilt the storage compartment then pull it firmly to access the fuses.
Fuses A (amps) Allocation
1 15 Rear wiper
2 - Free
3 5 Air bag control unit
4 10 Steering wheel angle sensor, Diagnostic socket, ESP sensor,
Manual ventilation, Clutch switch, Headlamp beam he ight,
Particle emission filter pump
5 30 Electric mirrors, Passenger electric window mot or
6 30 Front electric windows supply
7 5 Courtesy lights and glove box light
8 20 Multifunction display, Anti-theft alarm siren, Audio equipment,
Compact disc changer, Audio/telephone, Trailer fuse box
(accessory)
9 10 Row 2 accessories socket
10 30 Rear ride height corrector, Steering wheel swit ching,
Instrument panel
11 15 Diagnostic socket, Ignition switch
12 15 Hands-free kit, Air bag control unit, Parking a ssistance control unit
13 5 Engine fuse box, Trailer fuse box
14 15 Rain sensor, Rear ventilation, Automatic air co nditioning,
Instrument panel
15 30 Locking/unlocking/deadlocking of the accesses
16 - Free
17 40 Heated rear screen, Heated mirrors