Citroen JUMPY MULTISPACE 2009.5 2.G User Guide
Manufacturer: CITROEN, Model Year: 2009.5, Model line: JUMPY MULTISPACE, Model: Citroen JUMPY MULTISPACE 2009.5 2.GPages: 231, PDF Size: 11.45 MB
Page 11 of 231
22
Accesses
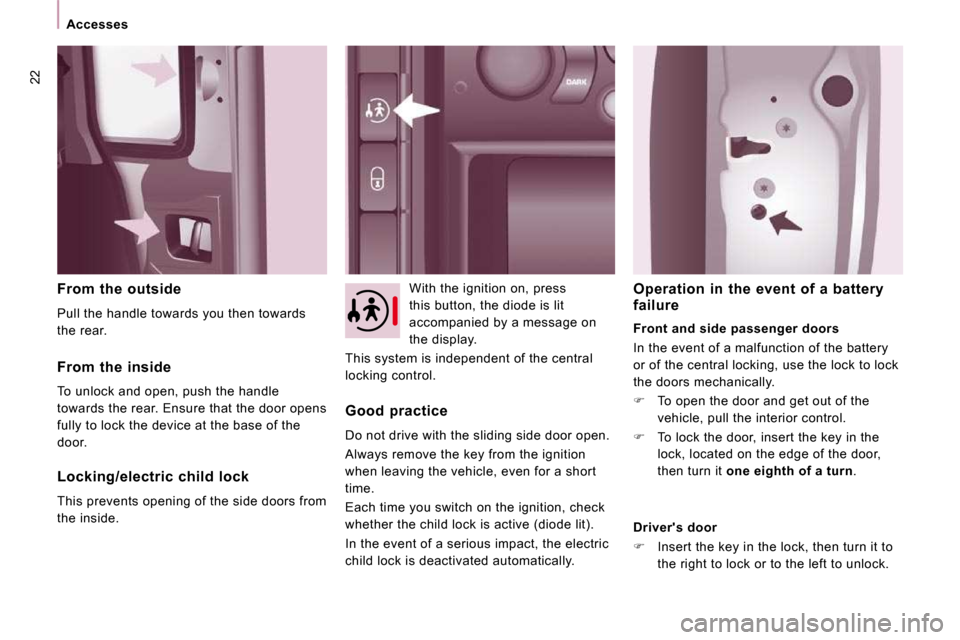
From the outside
Pull the handle towards you then towards
the rear. With the ignition on, press
this button, the diode is lit
accompanied by a message on
the display.
This system is independent of the central
locking control.
From the inside
To unlock and open, push the handle
towards the rear. Ensure that the door opens
fully to lock the device at the base of the
door.
Locking/electric child lock
This prevents opening of the side doors from
the inside. Good practice
Do not drive with the sliding side door open.
Always remove the key from the ignition
when leaving the vehicle, even for a short
time.
Each time you switch on the ignition, check
whether the child lock is active (diode lit).
In the event of a serious impact, the electric
child lock is deactivated automatically. Operation in the event of a battery
failure
Front and side passenger doors
In the event of a malfunction of the battery
or of the central locking, use the lock to lock
the doors mechanically.
� To open the door and get out of the
vehicle, pull the interior control.
� To lock the door, insert the key in the
lock, located on the edge of the door,
then turn it one eighth of a turn .
Driver's door
� Insert the key in the lock, then turn it to
the right to lock or to the left to unlock.
Page 12 of 231
23
Accesses
READY TO SET OFF
2
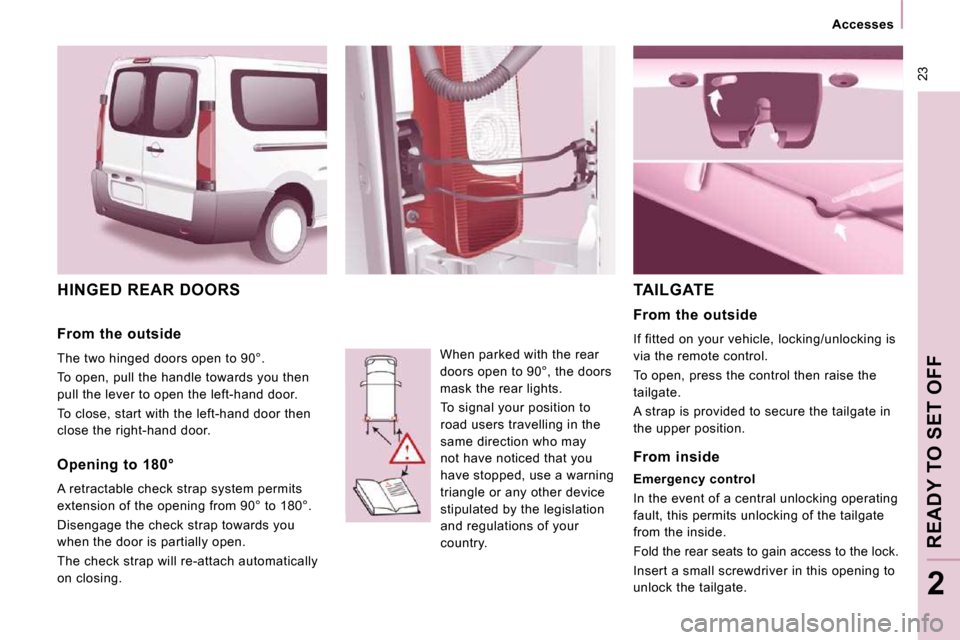
HINGED REAR DOORS
When parked with the rear
doors open to 90°, the doors
mask the rear lights. To signal your position to
road users travelling in the
same direction who may
not have noticed that you
have stopped, use a warning
triangle or any other device
stipulated by the legislation
and regulations of your
country.
TAILGATE
From the outside
The two hinged doors open to 90°.
To open, pull the handle towards you then
pull the lever to open the left-hand door.
To close, start with the left-hand door then
close the right-hand door.
Opening to 180°
A retractable check strap system permits
extension of the opening from 90° to 180°.
Disengage the check strap towards you
when the door is partially open.
The check strap will re-attach automatically
on closing. From the outside
If fitted on your vehicle, locking/unlocking is
via the remote control.
To open, press the control then raise the
tailgate.
A strap is provided to secure the tailgate in
the upper position.
From inside
Emergency control
In the event of a central unlocking operating
fault, this permits unlocking of the tailgate
from the inside.
Fold the rear seats to gain access to the lock.
Insert a small screwdriver in this opening to
unlock the tailgate.
Page 13 of 231
24
Instruments and controls
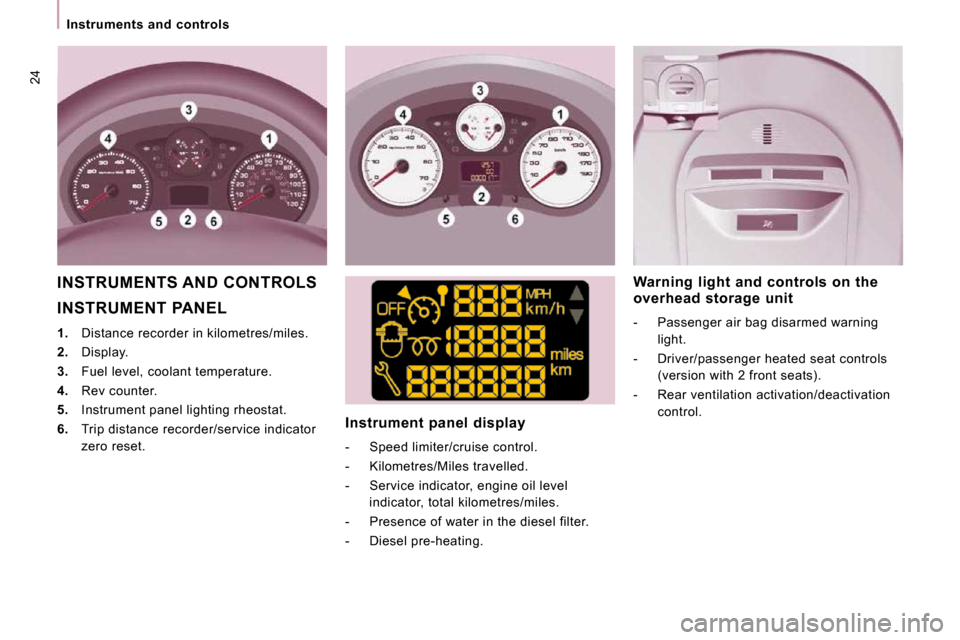
INSTRUMENT PANEL
1. Distance recorder in kilometres/miles.
2. Display.
3. Fuel level, coolant temperature.
4. Rev counter.
5. Instrument panel lighting rheostat.
6. Trip distance recorder/service indicator
zero reset. Instrument panel display
- Speed limiter/cruise control.
- Kilometres/Miles travelled.
- Service indicator, engine oil level
indicator, total kilometres/miles.
- Presence of water in the diesel filter.
- Diesel pre-heating. Warning light and controls on the
overhead storage unit
- Passenger air bag disarmed warning
light.
- Driver/passenger heated seat controls (version with 2 front seats).
- Rear ventilation activation/deactivation control.
INSTRUMENTS AND CONTROLS
Page 14 of 231
25
Instruments and controls
READY TO SET OFF
2
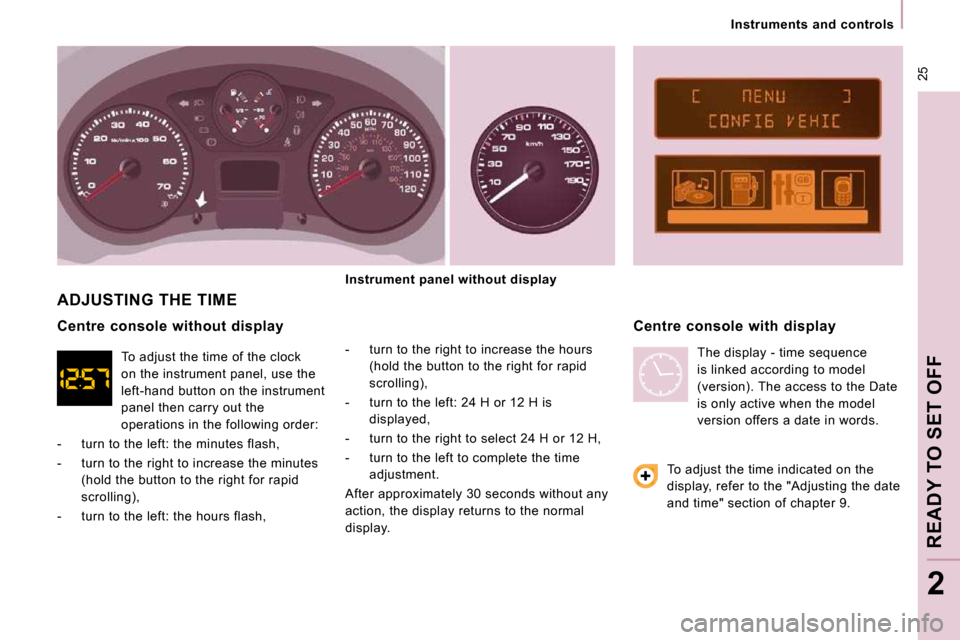
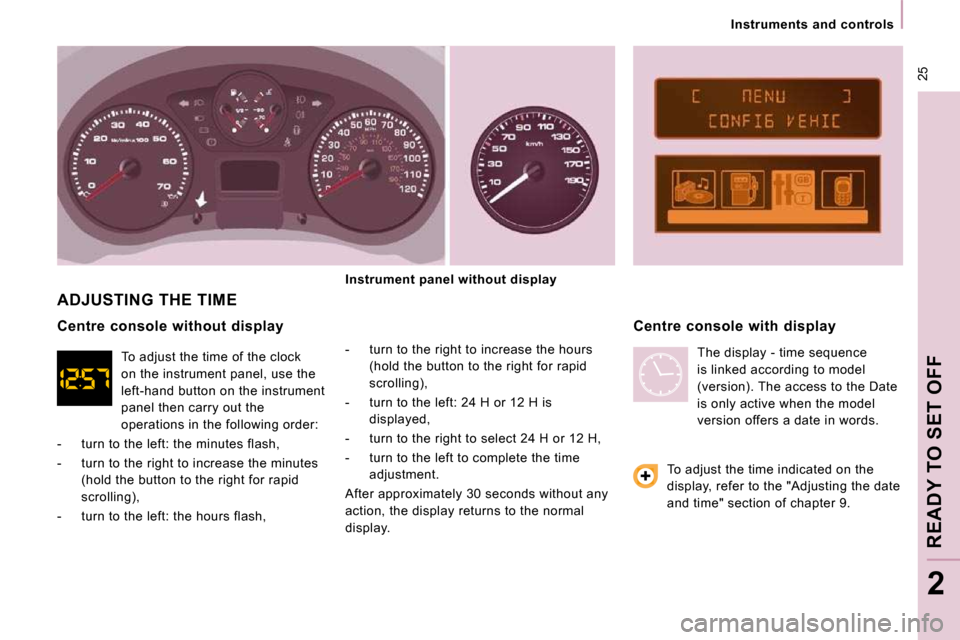
ADJUSTING THE TIME
- turn to the right to increase the hours (hold the button to the right for rapid
scrolling),
- turn to the left: 24 H or 12 H is displayed,
- turn to the right to select 24 H or 12 H,
- turn to the left to complete the time adjustment.
After approximately 30 seconds without any
action, the display returns to the normal
display. Centre console with display
Centre console without display
To adjust the time indicated on the
display, refer to the "Adjusting the date
and time" section of chapter 9.
Instrument panel without display
To adjust the time of the clock
on the instrument panel, use the
left-hand button on the instrument
panel then carry out the
operations in the following order:
- turn to the left: the minutes flash,
- turn to the right to increase the minutes (hold the button to the right for rapid
scrolling),
- turn to the left: the hours flash, The display - time sequence
is linked according to model
(version). The access to the Date
is only active when the model
version offers a date in words.
Page 15 of 231
25
Instruments and controls
READY TO SET OFF
2
ADJUSTING THE TIME
- turn to the right to increase the hours (hold the button to the right for rapid
scrolling),
- turn to the left: 24 H or 12 H is displayed,
- turn to the right to select 24 H or 12 H,
- turn to the left to complete the time adjustment.
After approximately 30 seconds without any
action, the display returns to the normal
display. Centre console with display
Centre console without display
To adjust the time indicated on the
display, refer to the "Adjusting the date
and time" section of chapter 9.
Instrument panel without display
To adjust the time of the clock
on the instrument panel, use the
left-hand button on the instrument
panel then carry out the
operations in the following order:
- turn to the left: the minutes flash,
- turn to the right to increase the minutes (hold the button to the right for rapid
scrolling),
- turn to the left: the hours flash, The display - time sequence
is linked according to model
(version). The access to the Date
is only active when the model
version offers a date in words.
Page 16 of 231
Instruments and controls
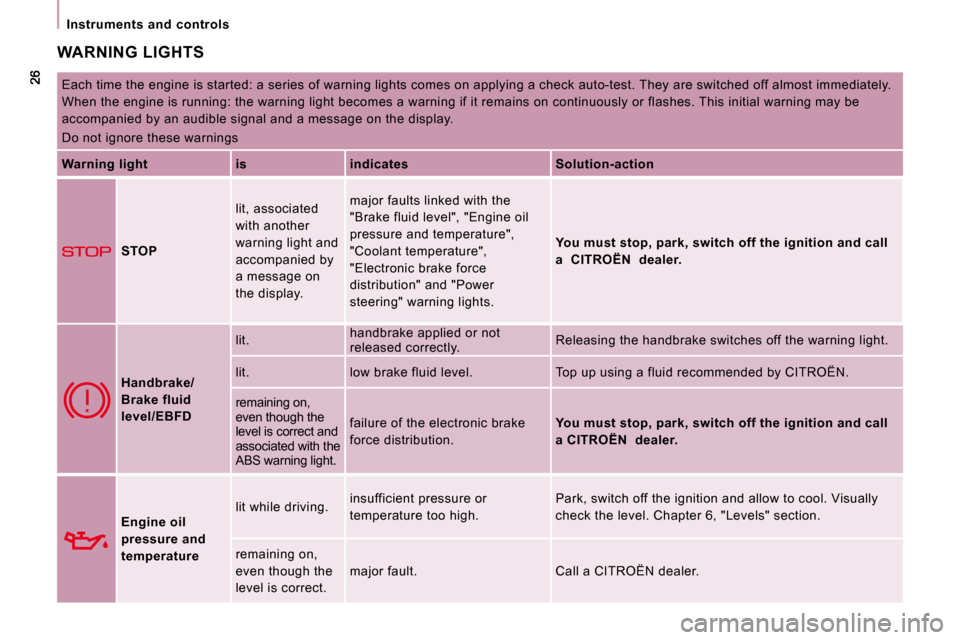
WARNING LIGHTS
Each time the engine is started: a series of warning lights comes on applying a check auto-test. They are switched off almost immediately.
When the engine is running: the warning light becom es a warning if it remains on continuously or flashes. This initial warning may be
accompanied by an audible signal and a message on t he display.
Do not ignore these warnings
Warning light is indicates Solution-action
STOP lit, associated
with another
warning light and
accompanied by
a message on
the display. major faults linked with the
"Brake fluid level", "Engine oil
pressure and temperature",
"Coolant temperature",
"Electronic brake force
distribution" and "Power
steering" warning lights.
You must stop, park, switch off the ignition and ca ll
a CITROËN dealer.
Handbrake/
Brake fluid
level/EBFD lit.
handbrake applied or not
released correctly. Releasing the handbrake switches off the warning l
ight.
lit. low brake fluid level. Top up using a fluid recommended by CITROËN.
remaining on,
even though the
level is correct and
associated with the
ABS warning light. failure of the electronic brake
force distribution.
You must stop, park, switch off the ignition and ca ll
a CITROËN dealer.
Engine oil
pressure and
temperature lit while driving.
insufficient pressure or
temperature too high. Park, switch off the ignition and allow to cool. V
isually
check the level. Chapter 6, "Levels" section.
remaining on,
even though the
level is correct. major fault. Call a CITROËN dealer.
Page 17 of 231
27
Instruments and controls
READY TO SET OFF
2
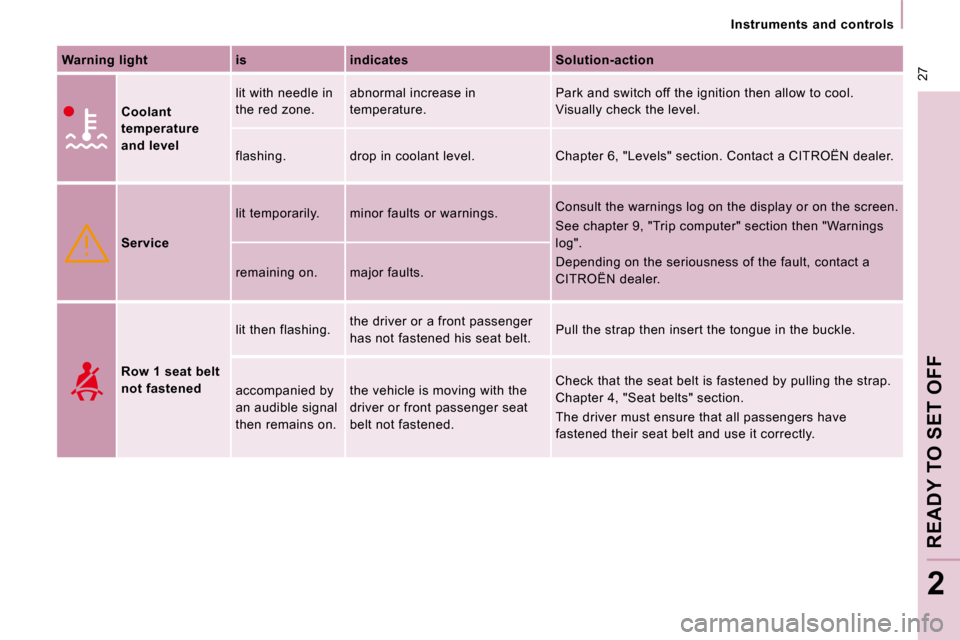
Warning light is indicates Solution-action
Coolant
temperature
and level lit with needle in
the red zone.
abnormal increase in
temperature. Park and switch off the ignition then allow to coo
l.
Visually check the level.
flashing. drop in coolant level. Chapter 6, "Lev els" section. Contact a CITROËN dealer.
Service lit temporarily. minor faults or warnings.
Consult the warnings log on the display or on the
screen.
See chapter 9, "Trip computer" section then "Warnin gs
log".
Depending on the seriousness of the fault, contact a
CITROËN dealer.
remaining on. major faults.
Row 1 seat belt
not fastened lit then flashing.
the driver or a front passenger
has not fastened his seat belt. Pull the strap then insert the tongue in the buckl
e.
accompanied by
an audible signal
then remains on. the vehicle is moving with the
driver or front passenger seat
belt not fastened. Check that the seat belt is fastened by pulling th
e strap.
Chapter 4, "Seat belts" section.
The driver must ensure that all passengers have
fastened their seat belt and use it correctly.
Page 18 of 231
28
Instruments and controls
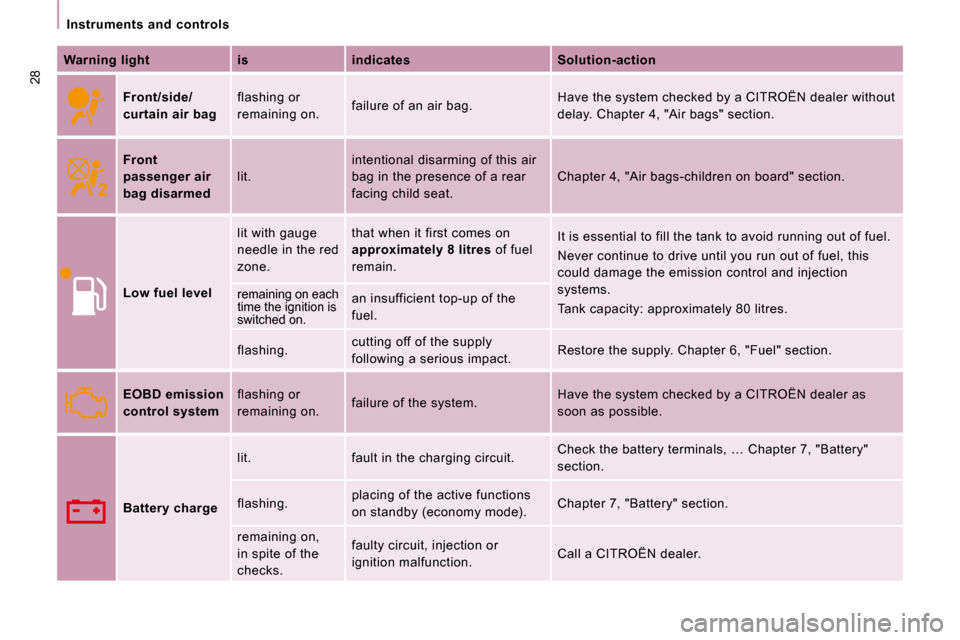
Warning light is indicates Solution-action
Front/side/
curtain air bag flashing or
remaining on.
failure of an air bag. Have the system checked by a CITROËN dealer withou
t
delay. Chapter 4, "Air bags" section.
Front
passenger air
bag disarmed lit. intentional disarming of this air
bag in the presence of a rear
facing child seat. Chapter 4, "Air bags-children on board" section.
Low fuel level lit with gauge
needle in the red
zone.
that when it first comes on
approximately 8 litres of fuel
remain. It is essential to fill the tank to avoid running
out of fuel.
Never continue to drive until you run out of fuel, this
could damage the emission control and injection
systems.
Tank capacity: approximately 80 litres.
remaining on each
time the ignition is
switched on. an insufficient top-up of the
fuel.
flashing. cutting off of the supply
following a serious impact. Restore the supply. Chapter 6, "Fuel" section.
EOBD emission
control system flashing or
remaining on.
failure of the system. Have the system checked by a CITROËN dealer as
soon as possible.
Battery charge lit. fault in the charging circuit.
Check the battery terminals, … Chapter 7, "Battery
"
section.
flashing. placing of the active functions
on standby (economy mode). Chapter 7, "Battery" section.
remaining on,
in spite of the
checks. faulty circuit, injection or
ignition malfunction.
Call a CITROËN dealer.
Page 19 of 231
ABS
ESP
29
Instruments and controls
READY TO SET OFF
2
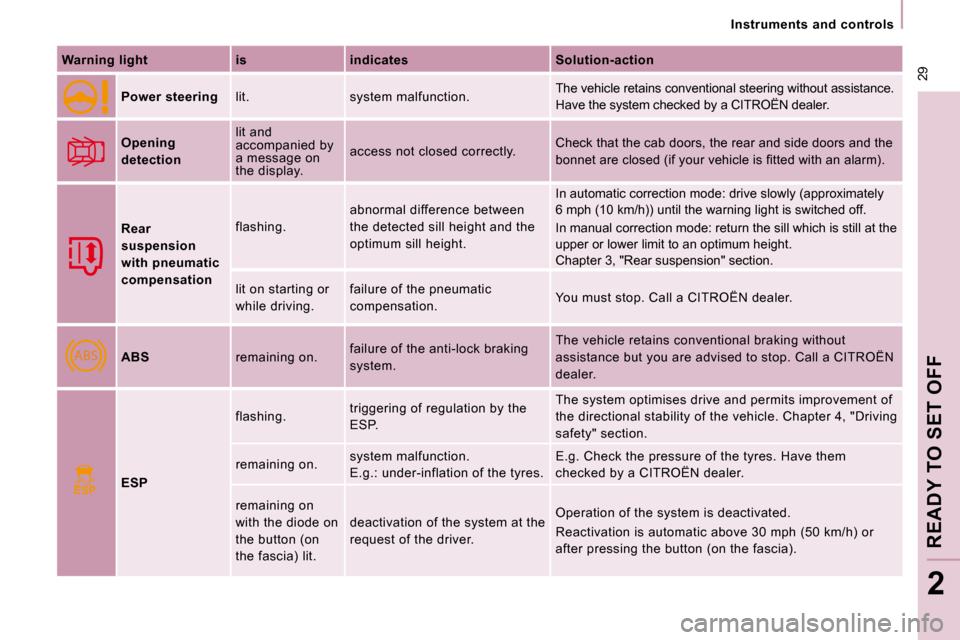
Warning light is indicates Solution-action
Power steering lit. system malfunction. The vehicle retains conventional steering without
assistance.
Have the system checked by a CITROËN dealer.
Opening
detection lit and
accompanied by
a message on
the display.
access not closed correctly.
Check that the cab doors, the rear and side doors
and the
�b�o�n�n�e�t� �a�r�e� �c�l�o�s�e�d� �(�i�f� �y�o�u�r� �v�e�h�i�c�l�e� �i�s� �fi� �t�t�e�d� �w�i�t�h� �a �n� �a�l�a�r�m�)�.�
Rear
suspension
with pneumatic
compensation flashing.
abnormal difference between
the detected sill height and the
optimum sill height. In automatic correction mode: drive slowly (approximately
6 mph (10 km/h)) until the warning light is switched off.
In manual correction mode: return the sill which is still at th
e
upper or lower limit to an optimum height.
Chapter 3, "Rear suspension" section.
lit on starting or
while driving. failure of the pneumatic
compensation.
You must stop. Call a CITROËN dealer.
ABS remaining on. failure of the anti-lock braking
system. The vehicle retains conventional braking without
assistance but you are advised to stop. Call a CITR
OËN
dealer.
ESP flashing.
triggering of regulation by the
ESP. The system optimises drive and permits improvement
of
the directional stability of the vehicle. Chapter 4 , "Driving
safety" section.
remaining on. system malfunction.
E.g.: under-inflation of the tyres. E.g. Check the pressure of the tyres. Have them
checked by a CITROËN dealer.
remaining on
with the diode on
the button (on
the fascia) lit. deactivation of the system at the
request of the driver.
Operation of the system is deactivated.
Reactivation is automatic above 30 mph (50 km/h) o
r
after pressing the button (on the fascia).
Page 20 of 231
30
Instruments and controls
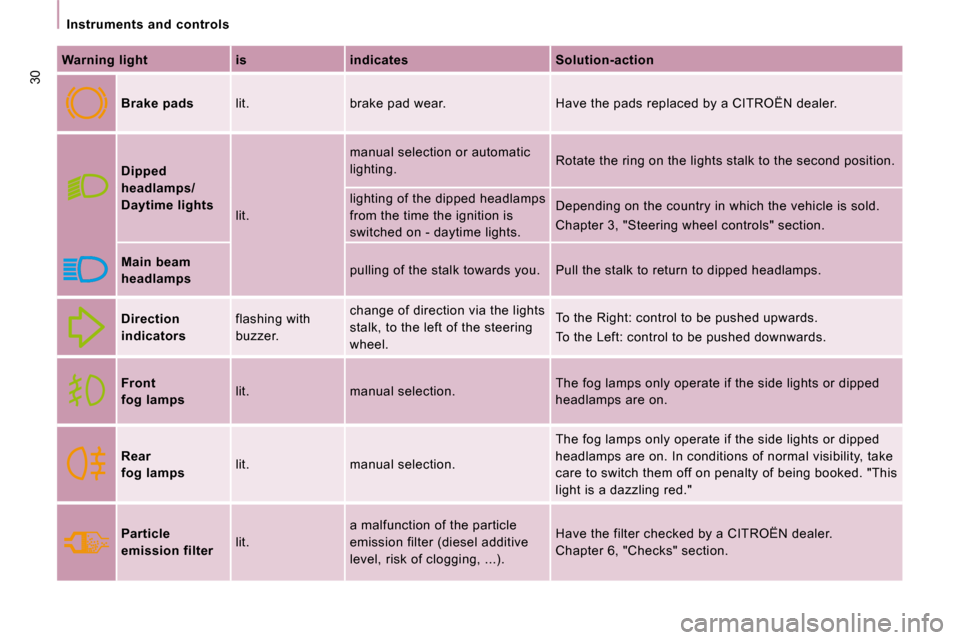
Warning light is indicates Solution-action
Brake pads lit. brake pad wear. Have the pads replaced by a CITROËN dealer.
Dipped
headlamps/
Daytime lights
lit. manual selection or automatic
lighting.
Rotate the ring on the lights stalk to the second
position.
lighting of the dipped headlamps
from the time the ignition is
switched on - daytime lights. Depending on the country in which the vehicle is s
old.
Chapter 3, "Steering wheel controls" section.
Main beam
headlamps pulling of the stalk towards you. Pull the stalk
to return to dipped headlamps.
Direction
indicators flashing with
buzzer. change of direction via the lights
stalk, to the left of the steering
wheel. To the Right: control to be pushed upwards.
To the Left: control to be pushed downwards.
Front
fog lamps lit. manual selection. The fog lamps only operate if the side lights or d
ipped
headlamps are on.
Rear
fog lamps lit. manual selection. The fog lamps only operate if the side lights or d
ipped
headlamps are on. In conditions of normal visibilit y, take
care to switch them off on penalty of being booked. "This
light is a dazzling red."
Particle
emission filter lit. a malfunction of the particle
emission filter (diesel additive
level, risk of clogging, ...). Have the filter checked by a CITROËN dealer.
Chapter 6, "Checks" section.