key Citroen JUMPY MULTISPACE 2011 2.G Owner's Guide
[x] Cancel search | Manufacturer: CITROEN, Model Year: 2011, Model line: JUMPY MULTISPACE, Model: Citroen JUMPY MULTISPACE 2011 2.GPages: 268, PDF Size: 10.1 MB
Page 156 of 268
9.4
01
2
8
16
18 17
71114 3
59
4 1512 13
61
10
FIRST STEPS
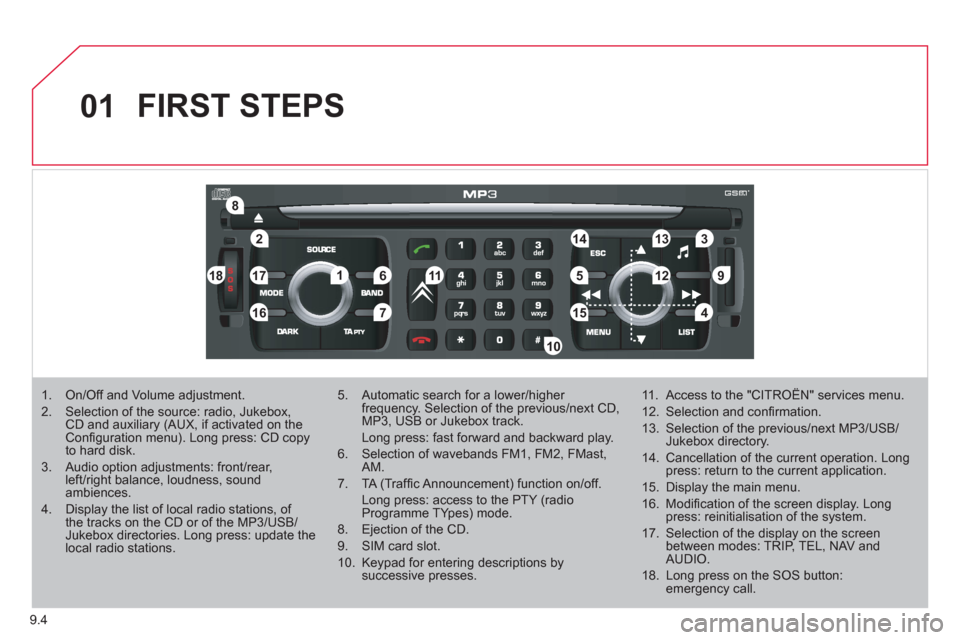
1. On/Off and Volume adjustment.
2. Selection of the source: radio, Jukebox, CD and auxiliary (AUX, if activated on the Confi guration menu). Long press: CD copyto hard disk.
3. Audio option adjustments: front/rear,left/right balance, loudness, sound ambiences.
4. Display the list of local radio stations, of the tracks on the CD or of the MP3/USB/Jukebox directories. Long press: update the local radio stations.
5. Automatic search for a lower/higher frequency. Selection of the previous/next CD, MP3, USB or Jukebox track.
Long press: fast forward and backward play.
6. Selection of wavebands FM1, FM2, FMast,AM.
7. TA (Traffi c Announcement) function on/off.
Long press: access to the PTY (radioProgramme TYpes) mode.
8. Ejection of the CD.
9. SIM card slot.
10. Keypad for entering descriptions by successive presses.
11. Access to the "CITROËN" services menu.
12. Selection and confi rmation.
13. Selection of the previous/next MP3/USB/Jukebox directory.
14. Cancellation of the current operation. Longpress: return to the current application.
15. Display the main menu.
16. Modifi cation of the screen display. Longpress: reinitialisation of the system.
17. Selection of the display on the screen between modes: TRIP, TEL, NAV and AUDIO.
18. Long press on the SOS button: emergency call.
Page 181 of 268
9.29
06
5
6
7
8
AUDIO/VIDEO
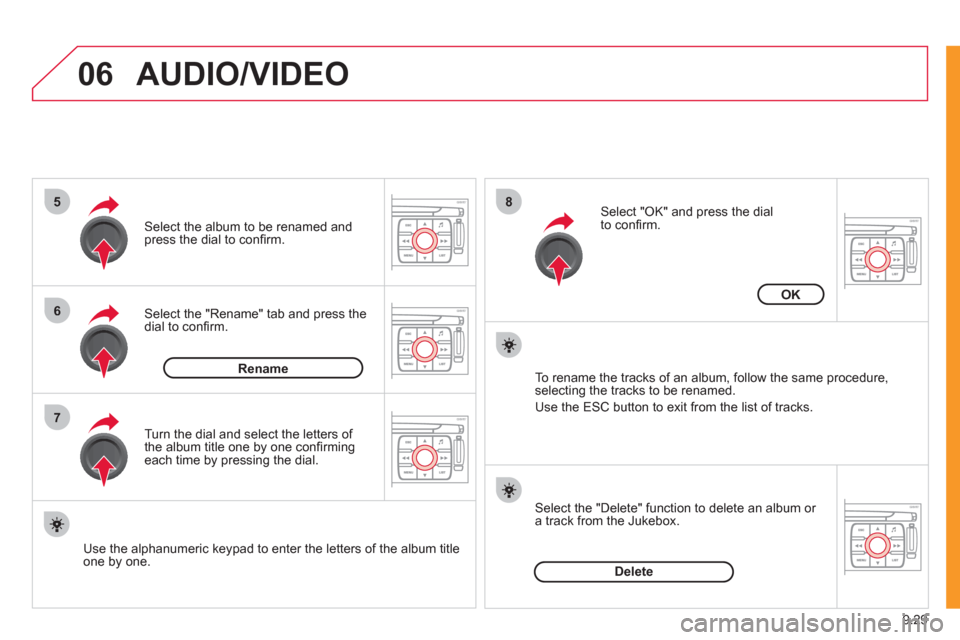
Select the "Rename" tab and press the dial to confi rm.
Select the album to be renamed andpress the dial to confi rm.
Use the alphanumeric keypad to enter the letters o
f the album title one by one.T
urn the dial and select the letters of
the album title one by one confi rming each time by pressing the dial.
Rename
To rename the tracks of an album, follow the same procedure,selecting the tracks to be renamed.
Use the ESC button to exit from the list of tracks.
Select "OK" and press the dial
to confi rm.
OK
Select the "Delete" function to delete an album or a track from the Jukebox.
Delete
Page 187 of 268
9.35
07
1
2
4
3
6
5
USING THE TELEPHONE
CALLING A CONTACT
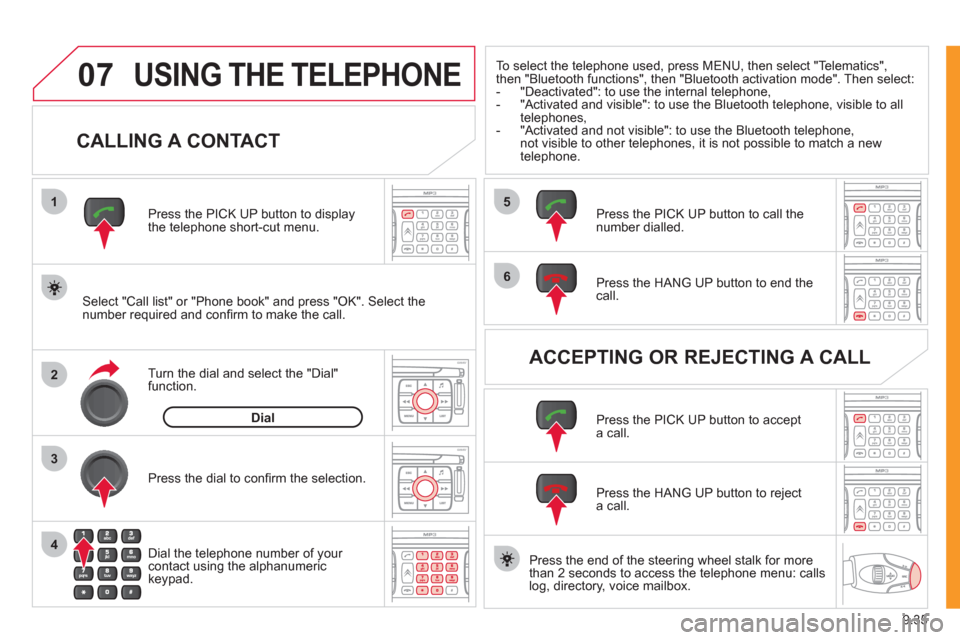
Select "Call list" or "Phone book" and press "OK". Select thenumber required and confi rm to make the call. Press the PICK UP button to displa
ythe telephone short-cut menu.
Dial the telephone number of
your contact using the alphanumeric keypad. Pr
ess the dial to confi rm the selection.
Press the HAN
G UP button to end the call.
Press the PI
CK UP button to call thenumber dialled.
Press the HANG UP button to re
ject a call.
Press the PI
CK UP button to accept a call.
ACCEPTING OR REJECTING A CALL Turn the dial and select the "Dial" function.
Dial
To select the telephone used, press MENU, then select "Telematics",
then "Bluetooth
functions", then "Bluetooth activation mode". Then select:
- "Deactivated": to use the internal telephone,
- "Activated and visible": to use the Bluetooth telephone, visible to all
telephones,
-
"Activated and not visible": to use the Bluetooth telephone, not visible to other telephones, it is not possible to match a new
telephone.
Press the end of the steerin
g wheel stalk for more
than 2 seconds to access the telephone menu: calls
log, directory, voice mailbox.
Page 207 of 268
9.55
04
1
2
3
5
6
4
NAVIGATION - GUIDANCE
SELECTING A DESTINATION
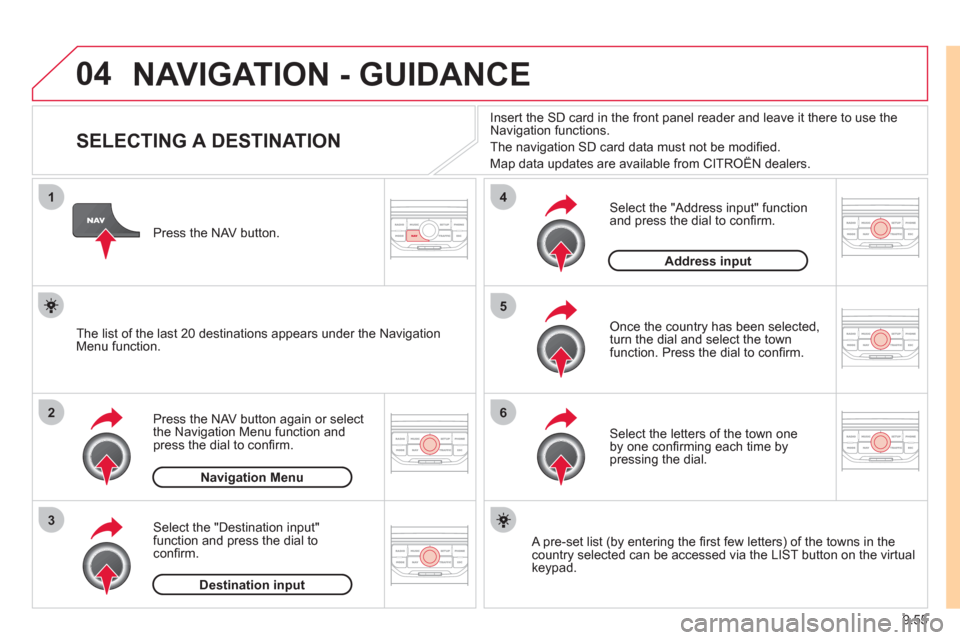
Press the NAV button again or select
the Navigation Menu function and
press the dial to confi rm.
Select the "Destination in
put"
function and press the dial to
confi rm. Pr
ess the NAV button.
Select the letters of the town one
by one confi rming each time by pressing the dial.
Once the country has been selected,
turn the dial and select the townfunction. Press the dial to confi rm. Insert the
SD card in the front panel reader and leave it there to use the
Navigation functions.
The navi
gation SD card data must not be modifi ed.
Map data updates are available from CITROÀN dealers.
A pre-set list (by entering the fi rst few letters) of the towns in thecountry selected can be accessed via the LIST button on the virtual
keypad.
Select the "Address input" function
and press the dial to confi rm.
The list o
f the last 20 destinations appears under the NavigationMenu function.
Navigation Menu
Destination input
Address input
Page 212 of 268
9.60
04
8
6
7
4
3
5
2
1
NAVIGATION - GUIDANCE
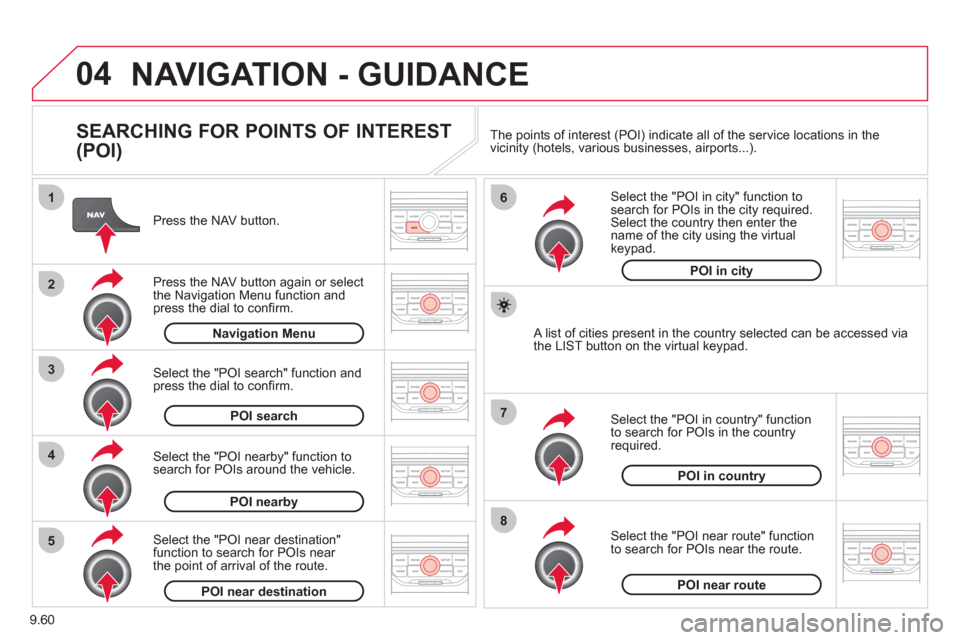
SEARCHING FOR POINTS OF INTEREST
(POI)
Press the NAV button.
Press the NAV button again or select
the Navigation Menu function and press the dial to confi rm.
Select the "POI nearby" function to search for POIs around the vehicle.
Select the "POI search" function and press the dial to confi rm. Navigation Menu
POI search
POI nearby
Select the "POI in city" function tosearch for POIs in the city required.Select the country then enter the name of the city using the virtual
keypad.
Select the "POI near route" function
to search for POIs near the route.
Select the "P
OI in country" function
to search for POIs in the country
required.
Select the "POI near destination"function to search for POIs near
the point of arrival of the route.
POI near destinationPOI near route
POI in country
POI in city
A list of cities present in the country selected can be accessed via
the LIST button on the virtual keypad. The points o
f interest (POI) indicate all of the service locations in the
vicinity (hotels, various businesses, airports...).
Page 217 of 268
9.65
06
3 2 1 1
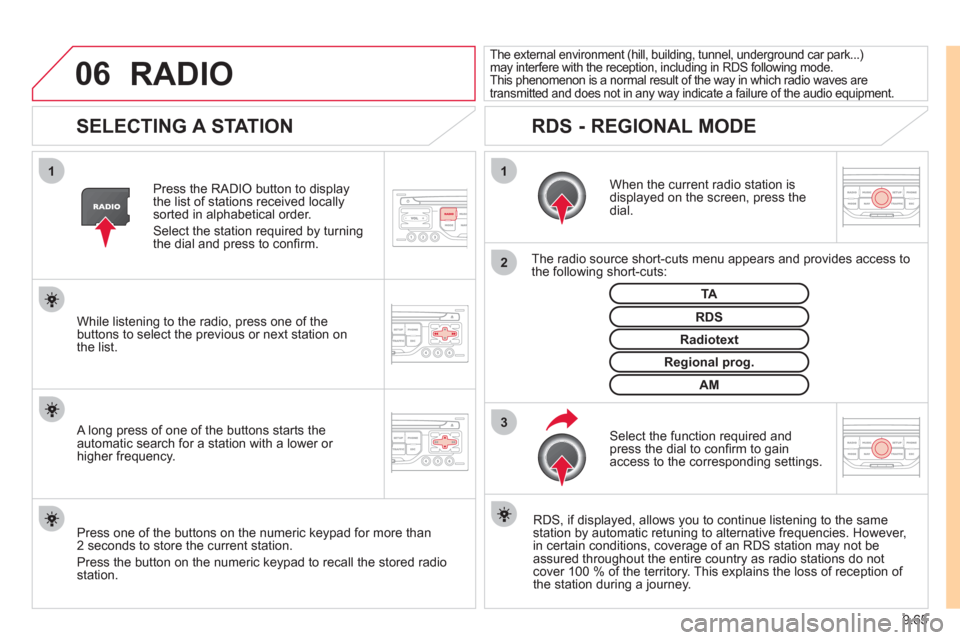
SELECTING A STATION
When the current radio station isdisplayed on the screen, press thedial.
The radio source short-cuts menu appears and provides access to
the following short-cuts:
Select the function re
quired and press the dial to confi rm to gain
access to the corresponding settings.
TA
RDS, if displayed, allows you to continue listening to the same station by automatic retuning to alternative frequencies. However,
in certain conditions, coverage of an RDS station may not be
assured throughout the entire country as radio stations do notcover 100 % of the territory. This explains the loss of reception of
the station during a journey.
The external environment (hill, building, tunnel, underground car park...)may interfere with the reception, including in RDS following mode.
This phenomenon is a normal result of the way in which radio waves are
transmitted and does not in any way indicate a failure of the audio equipment.
RDS - REGIONAL MODE
Press the RADIO button to display
the list of stations received locally sorted in alphabetical order.
Select the station required by turningthe dial and press to confi rm.
Re
gional prog.
Radiotext
RDSWhile listening to the radio, press one of the
buttons to select the previous or next station on
the list.
Press one o
f the buttons on the numeric keypad for more than
2 seconds to store the current station.
Press the button on the numeric keypad to recall the stored radio
station.
AM
A long press of one of the buttons starts theautomatic search for a station with a lower or
higher frequency.
RADIO
Page 223 of 268
9.71
08
1
3 2
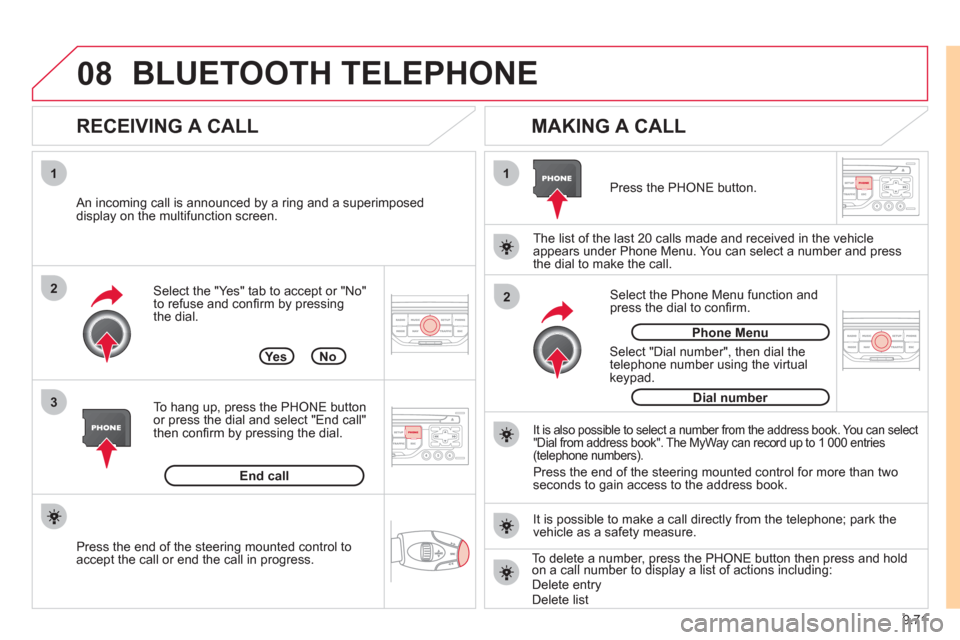
2 1Select the "Yes" tab to accept or "No"
to refuse and confi rm by pressing
the dial.
RECEIVING A CALL
MAKING A CALL
An incoming call is announced by a ring and a superimposed
display on the multifunction screen.
Yes
To han
g up, press the PHONE button
or press the dial and select "End call"then confi rm by pressing the dial.
End callPress the PH
ONE button.
Select "Dial number"
, then dial the
telephone number using the virtualkeypad.
Select the Phone Menu function and
press the dial to confi rm.
The list of the last 2
0 calls made and received in the vehicle
appears under Phone Menu. You can select a number and press
the dial to make the call.
No
It is also possible to select a number from the address book. You can select "Dial from address book". The MyWay can record up to 1 000 entries(telephone numbers).
Press the end of the steering mounted control for more than twoseconds to gain access to the address book.
Phone Menu
Dial number
It is possible to make a call directl
y from the telephone; park the
vehicle as a safety measure.
BLUETOOTH TELEPHONE
Press the end of the steering mounted control to
accept the call or end the call in progress.To delete a number, press the PHONE button then press and hold on a call number to display a list of actions including:pp,p
Delete entryDelete list
Page 245 of 268
9.93
06
1
2
3
4
5
6
7
8
9
10
BLUETOOTH FUNCTIONS
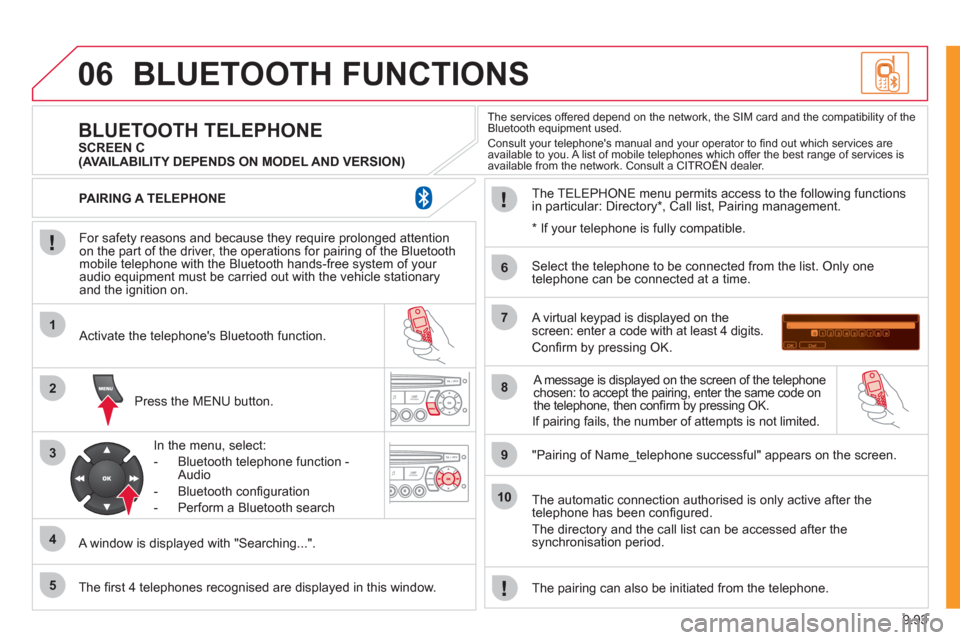
For safety reasons and because they require prolonged attentionon the part of the driver, the operations for pairing of the Bluetooth mobile telephone with the Bluetooth hands-free system of your
audio equipment must be carried out with the vehicle stationary
and the ignition on.
Press the MENU button.
A window is displa
yed with "Searching...".
Activate the telephone's Bluetooth
function.
In the menu, select:
- Bluetooth telephone
function -
Audio
- Bluetooth con
fi guration
- P
erform a Bluetooth search
The services offered depend on the network, the SIM card and the compatibility of theBluetooth equipment used.Consult your telephone's manual and your operator to fi nd out which services are available to you. A list of mobile telephones which offer the best range of services isavailable from the network. Consult a CITROÀN dealer. yp
BLUETOOTH TELEPHONE SCREEN C
The TELEPH
ONE menu permits access to the following functions
in particular: Directory * , Call list, Pairing management.
The fi rst 4 telephones reco
gnised are displayed in this window.
A virtual keypad is displayed on thescreen: enter a code with at least 4 digits.
Confi rm by pressing OK.
"Pairin
g of Name_telephone successful" appears on the screen.
Select the telephone to be connected from the list.
Only one
telephone can be connected at a time.
A messa
ge is displayed on the screen of the telephone chosen: to accept the pairing, enter the same code on
the telephone, then confi rm by pressing OK.
The automatic connection authorised is onl
y active after the
telephone has been confi gured.
The directory and the call list can be accessed a
fter thesynchronisation period.
PAIRING A TELEPHONE
The pairin
g can also be initiated from the telephone.
(AVAILABILITY DEPENDS ON MODEL AND VERSION)
*
If
your telephone is fully compatible.
If pairin
g fails, the number of attempts is not limited.
Page 246 of 268
9.94
06
2
1
2
2
3
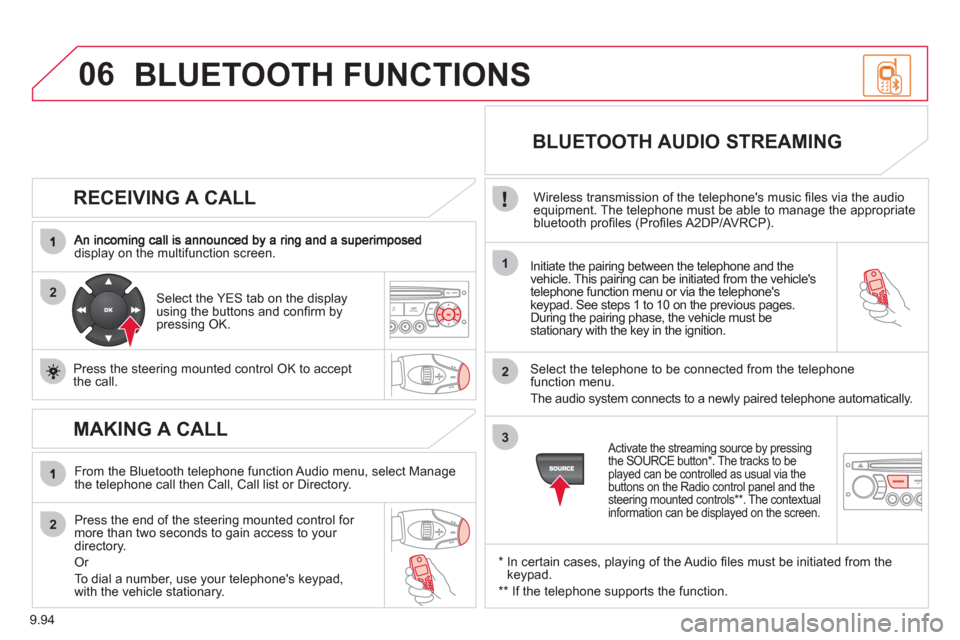
RECEIVING A CALL
display on the multifunction screen.Initiate the pairing between the telephone and the
vehicle. This pairing can be initiated from the vehicle's
telephone function menu or via the telephone'skeypad. See steps 1 to 10 on the previous pages.
During the pairing phase, the vehicle must be stationary with the key in the ignition.
Select the tele
phone to be connected from the telephone
function menu.
The audio s
ystem connects to a newly paired telephone automatically.
Select the YES tab on the display
using the buttons and confi rm bypressing OK.
Press the steerin
g mounted control OK to accept
the call.
BLUETOOTH AUDIO STREAMING
Wireless transmission of the telephone's music fi les via the audio equipment. The telephone must be able to manage the appropriate
bluetooth profi les (Profi les A2DP/AVRCP).
*
In certain cases, playing of the Audio fi les must be initiated from the keypad.
**
If the tele
phone supports the function.
Activate the streaming source by pressing
the SOURCE button * . The tracks to be
played can be controlled as usual via the
buttons on the Radio control panel and the
steering mounted controls ** . The contextual
information can be displayed on the screen.
MAKING A CALL
From the Bluetooth telephone function Audio menu, select Manage
the telephone call then Call, Call list or Directory.
Press the end o
f the steering mounted control for more than two seconds to gain access to your
directory.
Or
To dial a number, use
your telephone's keypad,with the vehicle stationary.
BLUETOOTH FUNCTIONS
Page 257 of 268
15
1
Exterior
VISUAL SEARC
H
10
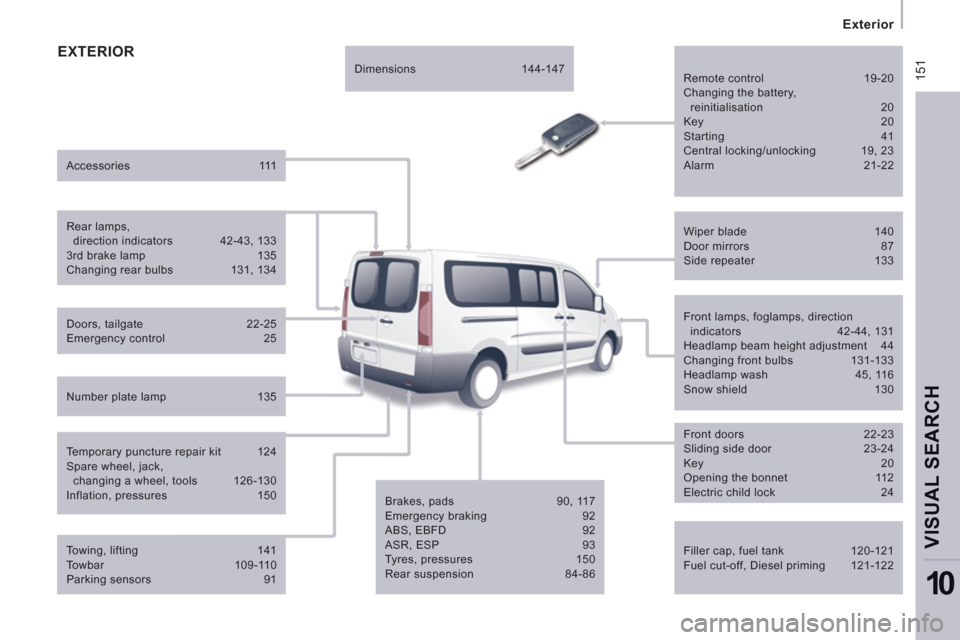
EXTERIOR
Filler cap, fuel tank 120-121
Fuel cut-off, Diesel priming 121-122
Wiper blade 140
Door mirrors 87
Side repeater 133
Front lamps, foglamps, direction
indicators 42-44, 131
Headlamp beam height adjustment 44
Changing front bulbs 131-133
Headlamp wash 45, 116
Snow shield 130
Front doors 22-23
Sliding side door 23-24
Key 20
Opening the bonnet 112
Electric child lock 24
Brakes, pads 90, 117
Emergency braking 92
ABS, EBFD 92
ASR, ESP 93
Tyres, pressures 150
Rear suspension 84-86
Doors, tailgate 22-25
Emergency control 25
Accessories 111
Number plate lamp 135
Dimensions 144-147
Temporary puncture repair kit 124
Spare wheel, jack,
changing a wheel, tools 126-130
Inflation, pressures 150
Remote control 19-20
Changing the battery,
reinitialisation 20
Key 20
Starting 41
Central locking/unlocking 19, 23
Alarm 21-22
Towing, lifting 141
Towbar 109-110
Parking sensors 91
Rear lamps,
direction indicators 42-43, 133
3rd brake lamp 135
Changing rear bulbs 131, 134