heating Citroen JUMPY MULTISPACE 2012 2.G Owner's Manual
[x] Cancel search | Manufacturer: CITROEN, Model Year: 2012, Model line: JUMPY MULTISPACE, Model: Citroen JUMPY MULTISPACE 2012 2.GPages: 276, PDF Size: 10.22 MB
Page 4 of 276

2
Contents
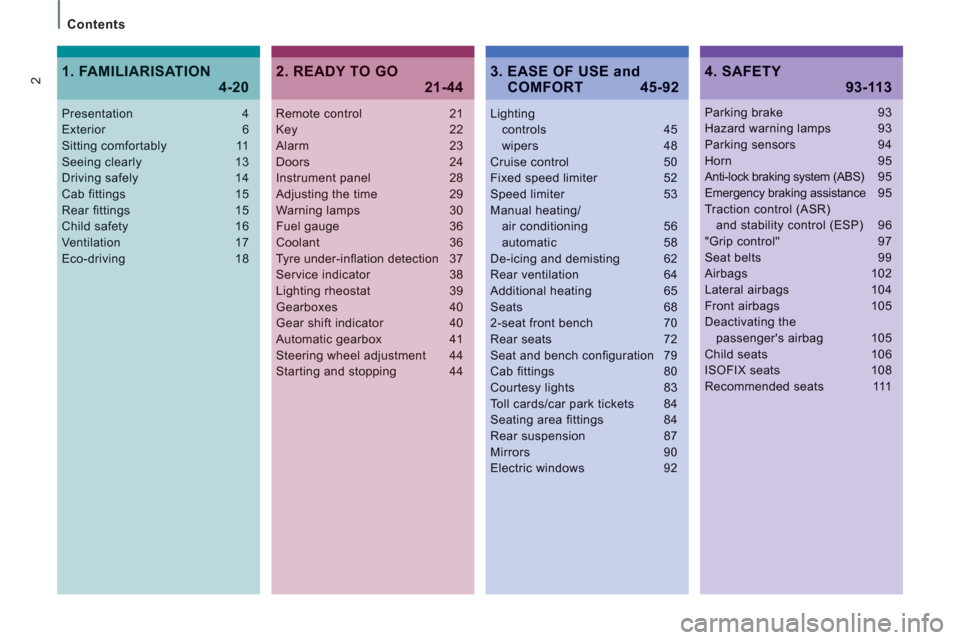
Remote control 21Key 22Alarm 23Doors 24Instrument panel 28Adjusting the time 29Warning lamps 30Fuel gauge 36Coolant 36Tyre under-infl ation detection 37Service indicator 38Lighting rheostat 39Gearboxes 40Gear shift indicator 40Automatic gearbox 41Steering wheel adjustment 44Starting and stopping 44
Lightingcontrols 45wipers 48Cruise control 50Fixed speed limiter 52Speed limiter 53Manual heating/air conditioning 56automatic 58De-icing and demisting 62Rear ventilation 64Additional heating 65Seats 682-seat front bench 70Rear seats 72Seat and bench confi guration 79Cab fittings 80Courtesy lights 83Toll cards/car park tickets 84Seating area fittings 84
Rear suspension 87Mirrors 90Electric windows 92
Presentation 4Exterior 6Sitting comfortably 11Seeing clearly 13Driving safely 14Cab fittings 15Rear fittings 15Child safety 16Ventilation 17Eco-driving 18
Parking brake 93Hazard warning lamps 93Parking sensors 94Horn 95Anti-lock braking system (ABS)95Emergency braking assistance 95Traction control (ASR) and stability control (ESP) 96"Grip control" 97Seat belts 99Airbags 102Lateral airbags 104Front airbags 105Deactivating the passenger's airbag 105Child seats 106ISOFIX seats 108Recommended seats 111
2. READY TO GO
21-44
4. SAFETY
93-113
1. FAMILIARISATION
4-203. EASE OF USE and COMFORT 45-92
Page 12 of 276

Interior
10
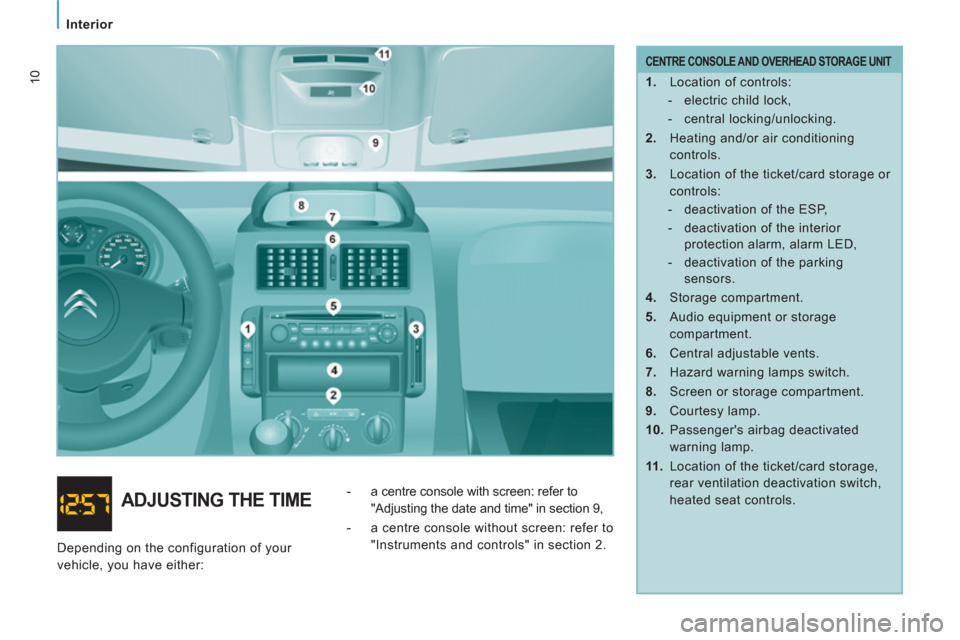
CENTRE CONSOLE AND OVERHEAD STORAGE UNIT
1.
Location of controls:
- electric child lock,
- central locking/unlocking.
2.
Heating and/or air conditioning
controls.
3.
Location of the ticket/card storage or
controls:
- deactivation of the ESP,
- deactivation of the interior
protection alarm, alarm LED,
- deactivation of the parking
sensors.
4.
Storage compartment.
5.
Audio equipment or storage
compartment.
6.
Central adjustable vents.
7.
Hazard warning lamps switch.
8.
Screen or storage compartment.
9.
Courtesy lamp.
10.
Passenger's airbag deactivated
warning lamp.
11 .
Location of the ticket/card storage,
rear ventilation deactivation switch,
heated seat controls.
ADJUSTING THE TIME
- a centre console with screen: refer to
"Adjusting the date and time" in section 9,
- a centre console without screen: refer to
"Instruments and controls" in section 2.
Depending on the configuration of your
vehicle, you have either:
Page 19 of 276

3
33
17
Interior
FAMILIARISATIO
N
1
Recommended settings
For optimum use of the system, we recommend:
If I require...
Air
distribution
Temperature
Air flow
Air
recirculation
AC
Heating
-
Cooling
Demisting
Defrosting
Manual controls
56
Digital controls, with separate driver
and passenger settings
58
At the rear
64
VENTILATION
Page 30 of 276

28
Instruments and controls
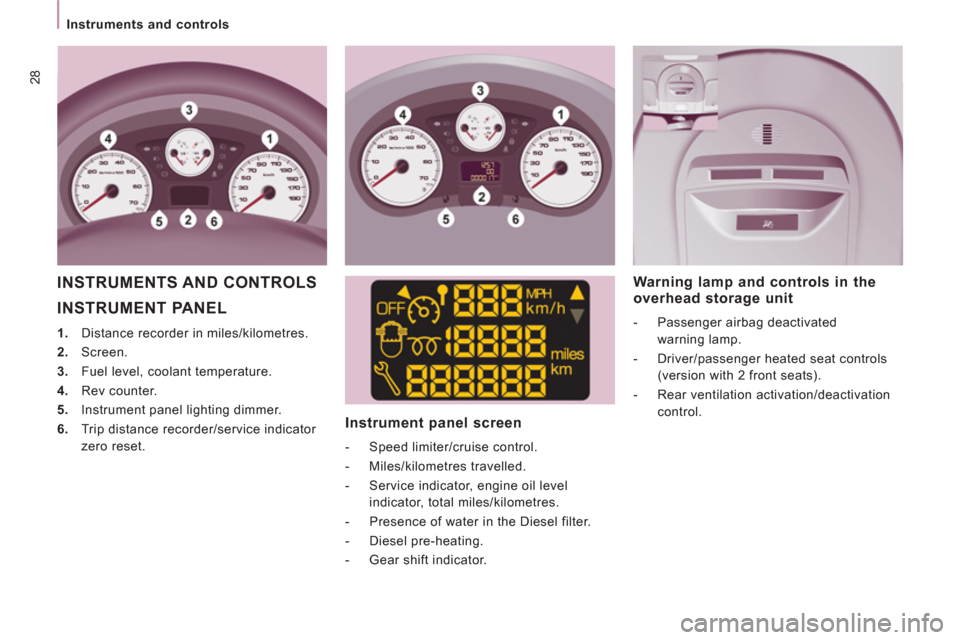
INSTRUMENT PANEL
1.
Distance recorder in miles/kilometres.
2.
Screen.
3.
Fuel level, coolant temperature.
4.
Rev counter.
5.
Instrument panel lighting dimmer.
6.
Trip distance recorder/service indicator
zero reset.
Instrument panel screen
- Speed limiter/cruise control.
- Miles/kilometres travelled.
- Service indicator, engine oil level
indicator, total miles/kilometres.
- Presence of water in the Diesel filter.
- Diesel pre-heating.
- Gear shift indicator.
Warning lamp and controls in the
overhead storage unit
- Passenger airbag deactivated
warning lamp.
- Driver/passenger heated seat controls
(version with 2 front seats).
- Rear ventilation activation/deactivation
control.
INSTRUMENTS AND CONTROLS
Page 37 of 276

35
Instruments and controls
REA
DY
TO GO
2
Screen
is
indicates
Solution-action
Cruise control on. cruise control selected. Manual selection. Chapter 3, "Steering mounted
controls" section.
Speed limiter on. speed limiter selected. Manual selection. Chapter 3, "Steering mounted
controls" section.
Gear shift
indicat
or on. a recommendation that is
independent of the traffic
configuration and density. to reduce fuel consumption, change up on a manual
gearbox.
The driver retains responsibility for following this
indication or not.
Diesel
pre-heating on. climatic conditions requiring
pre-heating. Wait until the warning lamp goes off before operating the
starter.
Particle
emissions filter on. a malfunction of the particle
emissions filter (Diesel additive
level, risk of clogging, ...). Have the filter checked by a CITROËN dealer or a
qualified workshop.
Chapter 6, "Checks" section.
Presence of
water in the
Diesel filter on and
accompanied by
a message in the
screen. water in the Diesel filter. Have the filter bled by a CITROËN dealer or a qualified
workshop without delay.
Chapter 6, "Checks" section.
Service spanner
on. service due shortly. Refer to the list of checks in the servicing booklet.
Have the service carried out by a CITROËN dealer or a
qualified workshop.
Time on. adjustment of the time. Use the left-hand button on the instrument panel.
Chapter 2, at the beginning of the "Instruments and
controls" section.
Page 46 of 276

44
Gearboxes and steering wheel
STARTING AND STOPPING
Key
Take care to prevent the key from coming
into contact with grease, dust, rain or a
damp environment.
A heavy object attached to the key
(key ring, ...) weighing the key down in the
ignition switch may cause a malfunction.
Starting position.
The starter is operated, the engine turns
over, release the key.
STOP position:
steering lock.
The ignition is off. Turn the steering wheel
until the steering locks. Remove the key.
Good practice when starting
If this comes on, a door or the
bonnet is not closed correctly,
check!
Diesel pre-heating warning lamp
If the temperature is high enough,
the warning lamp comes on for
less than one second, you can
start without waiting.
In cold weather, wait for this warning lamp
to go off then operate the starter (Starting
position) until the engine starts.
Good practice when stopping
Minimise engine and gearbox wear
When switching off the ignition, let the
engine run for a few seconds to allow the
turbocharger (Diesel engine) to return to idle.
Do not press the accelerator when switching
off the ignition.
There is no need to engage a gear after
parking the vehicle.
Running and accessories position.
To unlock the steering, turn the steering
wheel gently while turning the key, without
forcing. In this position, certain accessories
can be used.
Door or bonnet open warning lamp
STEERING WHEEL HEIGHT AND
REACH ADJUSTMENT
When the vehicle is stationary, release the
steering wheel adjustment mechanism by
lowering the lever.
Adjust the steering wheel for height and
reach, then lock the adjustment mechanism
by pushing the lever fully upwards. Starting and stopping
Page 58 of 276

56
Ventilation
WITH MANUAL SETTINGS
If your vehicle is fitted with these controls,
they are located on the control panel of the
dashboard centre console.
Air distribution
Air distribution is directed by turning the
control towards:
the side vents and the central
vents,
the side vents, the central vents
and the footwells,
the footwells,
the windscreen and the footwells,
Air flow
The air conditioning does not operate if the
air flow is set to 0.
The air distribution can be
modulated by placing the control
in the intermediate positions,
marked "●".
Air conditioning A/C
If fitted on your vehicle, the air conditioning
can only operate with the engine running.
Pressing the button triggers the
operation of the air conditioning,
the LED is on. Pressing the button
again switches the function off
and the LED goes off.
Temperature adjustment
Control positioned:
- in the blue zone, produces
cool air,
- in the red zone, produces
heating of the interior air.
The fan speed varies from 1 to
the fastest 4. Position 0 switches
it off.
Remember to adjust this control in
order to attain the desired comfort
level.
the windscreen.
VENTILATION
Page 59 of 276

57
Ventilation
EASE OF USE and COMFOR
T
3
Intake of exterior air
Recommended settings
For optimum operation of the manual system, the settings below are recommended: The LED in the button is off.
This is the preferred operating
position.
The LED in the button is on.
Recirculation temporarily prevents
exterior odours and smoke from
entering the passenger compartment.
Used with the air conditioning switched on
and setting of the force of blown air (from
1 to 4), recirculation enables you to obtain
the required ambient air comfort level more
quickly with both hot or cold settings.
This position should only be temporary.
When your ambient air comfort level has
been reached, return to the intake of exterior
air position to permit renewal of the air in the
passenger compartment and avoid misting.
This operating mode is preferable.
If I require...
Air
distribution
Temperature
Air flow
Air
recirculation
Air
conditioning
A/C
Heating
Cooling
Demisting
Defrosting
Recirculation of interior air
Page 60 of 276

58
Ventilation
DIGITAL AIR CONDITIONING WITH SEPARATE SETTINGS
Good practice
For maximum cooling or heating of the
passenger compartment, it is possible to exceed
the value 15 by turning until LO is displayed or
the value 27 by turning until HI is displayed.
For optimum comfort, the difference between
the value displayed for the driver and for the
passenger should not be greater than 3. If your vehicle is fitted with this control
panel, it is located on the centre console. On entering the vehicle, the inside
temperature may be much colder (or
warmer) than is comfortable. There is no
advantage in changing the value displayed
in order to quickly reach the level of comfort
required. The system will use its maximum
performance to reach the comfort value set.
Page 66 of 276

64
Ventilation
REAR VENTILATION
If your vehicle is fitted with an additional air
conditioning unit, located in the rear of the
vehicle. The distribution duct located in the
roof and the 6 individual vents provide a
perfect air distribution.
The warm air diffused at the floor, from the
front heating and air conditioning unit, is
distributed at the feet of the rear passengers
of the 2nd row.
A warm air diffusion vent, located on the
specifi c unit, completes the installation for the
feet of the rear passengers of the 3rd row.
Temperature adjustment
Control positioned:
- on the blue, produces cool air,
- on the red, produces heating.
Activation/Deactivation
Air flow
The fan speed for the air via the
vents, varies from 1 to the fastest 4.
To obtain the desired comfort
level, remember to adjust this
control.
To stop the fan, place the control in position 0. This button, located on the
overhead storage unit, enables
you to activate or deactivate the
operation of the rear controls from
the driver's seat or the front passenger seat.
The first press activates (green LED on).
A second press deactivates (LED off).