ELECTRIC Citroen JUMPY MULTISPACE 2013 2.G User Guide
[x] Cancel search | Manufacturer: CITROEN, Model Year: 2013, Model line: JUMPY MULTISPACE, Model: Citroen JUMPY MULTISPACE 2013 2.GPages: 260, PDF Size: 8.79 MB
Page 119 of 260

11 7
Towing a trailer
ACCE
SS
ORIE
S
5
For more information about weights,
refer to the administrative documents
(registration document, ...) or to the
"Weights" section of chapter 8.
TOWING A TRAILER, CARAVAN, BOAT, ETC...
Distribution of loads
Distribute the load in the trailer so that the
heaviest objects are as close as possible
to the axle and the nose weight is close to
the maximum authorised without, however,
exceeding it.
Cooling
Towing a trailer on a slope increases the
coolant temperature.
As the fan is electrically controlled, its
cooling capacity is not dependent on the
engine speed.
Driving advice
A towed vehicle must free wheel: gearbox in
neutral.
Page 120 of 260
11 8
Towing a trailer
You should therefore use a high gear to
lower the engine speed and reduce your
speed.
In all cases, pay attention to the coolant
temperature.
Ty r e s
Check the tyre pressures of the towing
vehicle (see the "Identification markings"
section of chapter 8) and of the trailer,
observing the recommended pressures.
Towbar
We recommend the use of genuine
CITROËN towbars and their harnesses,
which have been tested and approved from
the design stage of your vehicle, and that
you entrust the fitting of this equipment to a
CITROËN dealer.
If this equipment is not fitted by a CITROËN
dealer, it is imperative that it is fitted using
the electrical pre-equipment installed at the
rear of the vehicle and in accordance with
the manufacturer's instructions.
In accordance with the general instructions
a reminder of which has been given above,
we draw your attention to the risk associated
with fitting a towbar or electrical accessory
not recommended by CITROËN. Fitting such
equipment could result in the failure of your
vehicle's electronic system. Please obtain
information from the Manufacturer before
fitting this type of equipment. If the coolant temperature warning
lamp comes on, stop the vehicle
and switch off the engine as soon
as possible.
Good Practice
In certain cases of particularly arduous
use (towing the maximum load up a steep
slope in high temperatures), the engine
automatically limits its power. In this case,
the air conditioning is automatically cut off to
save engine power.
See the "Levels" section of chapter 6.
Brakes
Towing increases the braking distance. Drive
at a moderate speed, change down early
and brake gradually.
Side wind
Sensitivity to side wind is increased. Drive
smoothly and at a moderate speed.
ABS/DSC
The ABS or DSC systems only control the
vehicle, not the trailer or caravan.
Rear parking sensors
The parking sensors system does not
function while the vehicle is towing.
Page 121 of 260
Equipment
ACCE
SS
ORIE
S
5
OTHER ACCESSORIES
For any work on your vehicle, use
a qualified workshop that has the
technical information, competence and
equipment required, which a CITROËN
dealer is able to provide.
Installation of radiocommunication
transmitters
Before installing accessory
radiocommunication transmitters with an
external aerial on your vehicle, you are
advised to contact a representative of the
CITROËN marque.
The CITROËN Network will inform you of the
specifications (frequency band, maximum
output power, aerial position, specific
installation conditions) of the transmitters
which can be fitted, in accordance with the
Motor Vehicle Electromagnetic Compatibility
Directive (2004/104/CE).
This range is also available, structured
around comfort, leisure and maintenance: Trims (except for 163 hp engine), front mud
flaps, rear mud flaps, spoilers, sill, ...
Audio equipment, hands-free kit, speakers, CD changer,
navigation, ...
Regardless of the audio and telematic equipment
offered on the market, the technical constraints linked
with the fi tting of equipment of these families of products
mean that the special features of the equipment and its
compatibility with the capacities of your vehicle's standard
equipment must be taken into account. Please contact a
dealer for information before fi tting such equipment.
Front seat covers compatible with air bags,
benches, rubber mats, carpet mats, boot
tray, roof bars, side blinds, snow chains.
To prevent the mat from becoming caught
under the pedals:
- ensure that the mat and its fixings are
positioned correctly,
- never fit one mat on top of another. Screenwash, replacement fuses, wiper
blades, interior and exterior cleaning and
maintenance products, replacement
bulbs, ...
The fitting of electrical equipment
or accessories which are not
recommended by CITROËN may result in a
failure of your vehicle's electronic system.
Please note this specific warning. You
are advised to contact a representative
of the Marque to be shown the range of
recommended equipment and accessories.
Depending on the country in which the
vehicle is sold or operated, it is compulsory
to have a high visibility safety vest, warning
triangle and replacement bulbs available in
the vehicle. Anti-theft alarm, window engraving, first aid
kit, high visibility safety vest, rear parking
sensors, warning triangle, ...
Page 128 of 260
126
Checks
Manual gearbox
Have the level checked in accordance with
the manufacturer's servicing schedule.
To check the main levels and certain
components, in accordance with the
manufacturer's servicing schedule, refer
to the pages of the servicing and warranty
booklet which correspond to your vehicle's
engine.
Only use products recommended by
CITROËN or products of equivalent
quality and specification.
In order to optimise the operation of units as
important as the braking system, CITROËN
selects and offers specific products.
In order to avoid damaging the electrical
units, high pressure washing to clean the
engine compartment is strictly prohibited.
After washing the vehicle dampness, or in
winter, ice may form on the brake discs and
pads: braking efficiency may be reduced.
Make some light brake applications to dry
and de-ice the brakes.
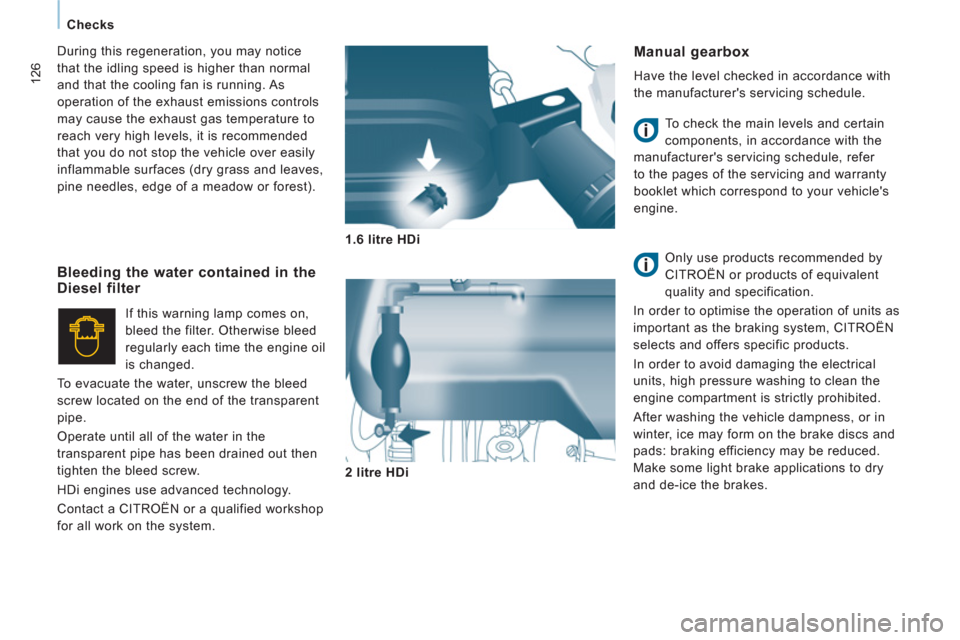
1.6 litre HDi
2 litre HDi
Bleeding the water contained in theDiesel filter
If this warning lamp comes on,
bleed the filter. Otherwise bleed
regularly each time the engine oil
is changed.
To evacuate the water, unscrew the bleed
screw located on the end of the transparent
pipe.
Operate until all of the water in the
transparent pipe has been drained out then
tighten the bleed screw.
HDi engines use advanced technology.
Contact a CITROËN or a qualified workshop
for all work on the system. During this regeneration, you may notice
that the idling speed is higher than normal
and that the cooling fan is running. As
operation of the exhaust emissions controls
may cause the exhaust gas temperature to
reach very high levels, it is recommended
that you do not stop the vehicle over easily
inflammable surfaces (dry grass and leaves,
pine needles, edge of a meadow or forest).
Page 130 of 260
128
Fuel
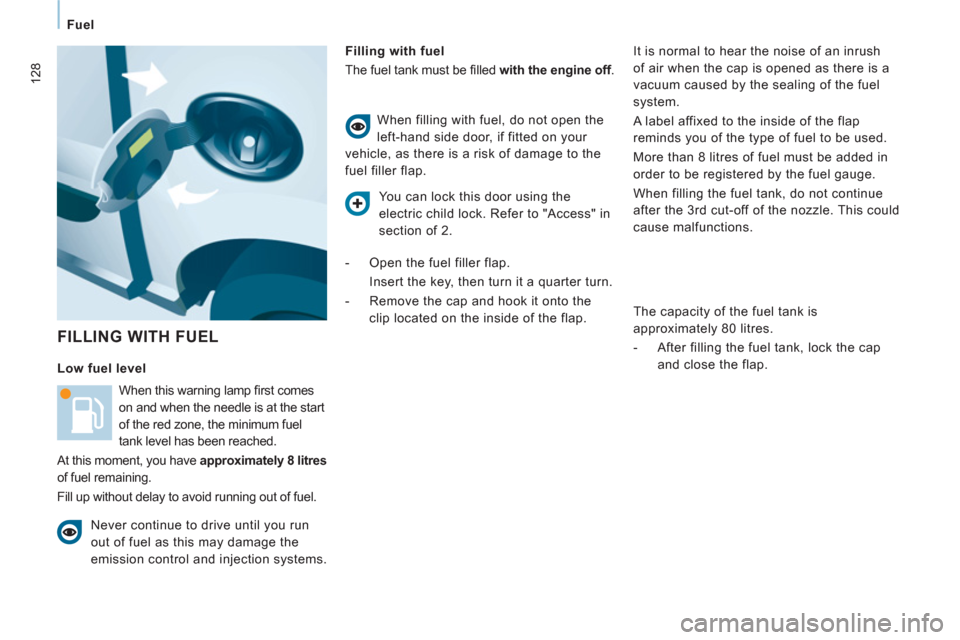
FILLING WITH FUEL
Filling with fuel
The fuel tank must be fi lled with the engine off
.
When this warning lamp fi rst comes
on and when the needle is at the start
of the red zone, the minimum fuel
tank level has been reached.
At this moment, you have approximately 8 litres
of fuel remaining.
Fill up without delay to avoid running out of fuel. When filling with fuel, do not open the
left-hand side door, if fitted on your
vehicle, as there is a risk of damage to the
fuel filler flap.
Never continue to drive until you run
out of fuel as this may damage the
emission control and injection systems.
Low fuel level
It is normal to hear the noise of an inrush
of air when the cap is opened as there is a
vacuum caused by the sealing of the fuel
system.
A label affixed to the inside of the flap
reminds you of the type of fuel to be used.
More than 8 litres of fuel must be added in
order to be registered by the fuel gauge.
When filling the fuel tank, do not continue
after the 3 rd cut-off of the nozzle. This could
cause malfunctions.
The capacity of the fuel tank is
approximately 80 litres.
- After filling the fuel tank, lock the cap
and close the flap.
You can lock this door using the
electric child lock. Refer to "Access" in
section of 2.
- Open the fuel filler flap.
Insert the key, then turn it a quarter turn.
- Remove the cap and hook it onto the
clip located on the inside of the flap.
Page 134 of 260
132
Battery
ECONOMY MODE
After the engine has stopped, with the key
in the ignition position, certain functions
(windscreen wiper, electric windows, courtesy
lamps, audio equipment, etc.) can only
be used for a cumulative duration of thirty
minutes, to prevent discharging of the battery.
Once the thirty minutes are over, the active
functions are put on standby and the battery
warning lamp flashes accompanied by a
message in the screen.
To resume the use of these functions
immediately, start the engine and let it run
for a few minutes.
The time available will then be double the
time for which the engine was left running.
However, this time will always be between
five and thirty minutes.
A flat battery will prevent the engine from
starting.
Page 135 of 260

Repairing a wheel
QUICK HEL
P
7
PUNCTURE REPAIR KIT
The kit is located at the left hand rear of the
vehicle.
The temporary puncture repair kit consists
of a compressor and a cartridge (containing
a sealant).
Using the kit
- switch off the ignition,
- affix the speed limitation sticker to the
vehicle's steering wheel to remind you
that a wheel is in temporary use,
- check that the switch A
is at position " 0
",
- connect the pipe of the bottle 1
to the
valve of the tyre to be repaired,
- connect the compressor's electrical plug
to the vehicle's 12V socket,
- start the vehicle and let the engine run,
- switch on the compressor by pressing
the switch A
to position " 1
" until the tyre
pressure reaches 2.0 bars,
Vehicles supplied with a temporary
puncture repair kit do not have a spare
wheel or tooling (jack, wheelbrace, ...).
- remove the compressor, unclip and
store the bottle in a sealed bag to avoid
staining your vehicle with traces of fluid,
- drive immediately, for approximately
two miles (three kilometres), at reduced
speed (between 12 and 37 mph (20 and
60 km/h)), to seal the puncture,
- stop to check the repair and the
pressure,
If, after approximately five to ten
minutes, you are not able to obtain
this pressure, the tyre cannot be
repaired; contact a CITROËN dealer
or a qualified workshop for roadside
assistance.
Page 136 of 260

134
Repairing a wheel
- connect the compressor pipe directly to
the valve of the repaired wheel.
- connect the compressor's electrical plug
to the vehicle's 12V socket again,
- start the vehicle again and let the
engine run, Warning, the sealant cartridge contains
ethylene-glycol, this product is harmful
if swallowed and causes irritation to
the eyes. Keep this product out of reach of
children.
The expiry date of the sealant is indicated
under the cartridge.
The cartridge is intended for a single use;
once opened, it must be replaced.
After use, do not discard the cartridge into the
environment, take it to a CITROËN dealer or
to a specialised waste disposal site.
Do not forget to obtain a new sealant
cartridge, available from a CITROËN dealer
or a qualified workshop.
- adjust the pressure using the
compressor (to inflate: switch A
in
position " 1
"; to deflate: switch A
in
position " 0
" and press button B
), in
accordance with the vehicle's tyre
pressure label (located on the door
aperture, on the driver's side), then
remember to check that the leak has
been sealed correctly (no further
loss of pressure after several miles
(kilometres)),
- remove the compressor, then stow the
complete kit,
- drive at reduced speed (50 mph
(80 km/h) max) limiting the distance
travelled to approximately 125 miles
(200 km),
- visit a CITROËN dealer or a qualified
workshop as soon as possible to have
the tyre repaired or replaced by a
technician.
Page 144 of 260
142
Changing a bulb
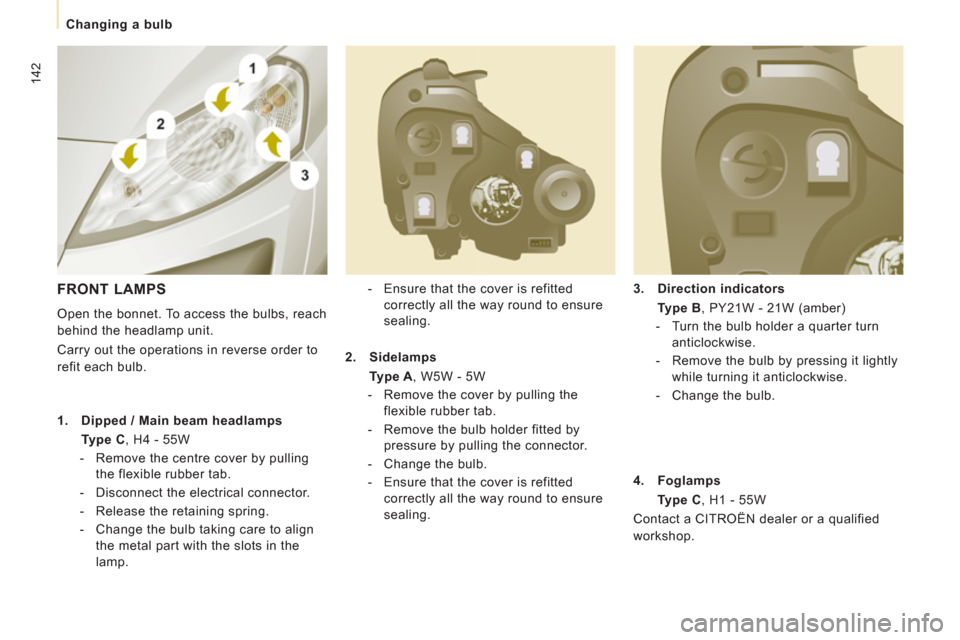
3.
Direction indicators
Type B
, PY21W - 21W (amber)
- Turn the bulb holder a quarter turn
anticlockwise.
- Remove the bulb by pressing it lightly
while turning it anticlockwise.
- Change the bulb.
- Ensure that the cover is refitted
correctly all the way round to ensure
sealing.
FRONT LAMPS
Open the bonnet. To access the bulbs, reach
behind the headlamp unit.
Carry out the operations in reverse order to
refit each bulb.
1.
Dipped / Main beam headlamps
Type C
, H4 - 55W
- Remove the centre cover by pulling
the flexible rubber tab.
- Disconnect the electrical connector.
- Release the retaining spring.
- Change the bulb taking care to align
the metal part with the slots in the
lamp.
2.
Sidelamps
Type A
, W5W - 5W
- Remove the cover by pulling the
flexible rubber tab.
- Remove the bulb holder fitted by
pressure by pulling the connector.
- Change the bulb.
- Ensure that the cover is refitted
correctly all the way round to ensure
sealing.
4.
Foglamps
Type C
, H1 - 55W
Contact a CITROËN dealer or a qualified
workshop.
Page 146 of 260
144
Changing a bulb
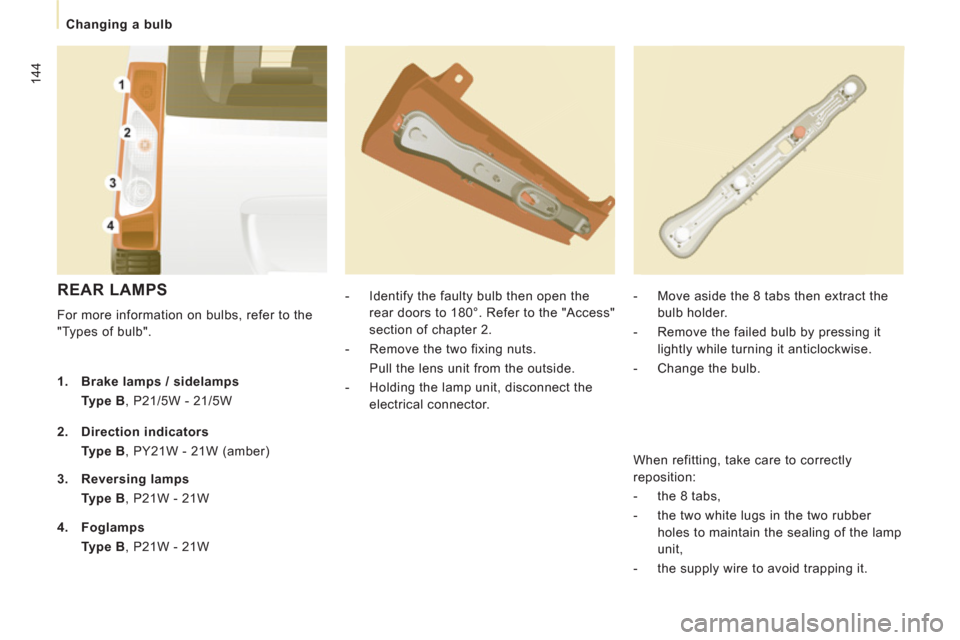
REAR LAMPS
For more information on bulbs, refer to the
"Types of bulb".
- Identify the faulty bulb then open the
rear doors to 180°. Refer to the "Access"
section of chapter 2.
- Remove the two fixing nuts.
Pull the lens unit from the outside.
- Holding the lamp unit, disconnect the
electrical connector.
- Move aside the 8 tabs then extract the
bulb holder.
- Remove the failed bulb by pressing it
lightly while turning it anticlockwise.
- Change the bulb.
1.
Brake lamps / sidelamps
Type B
, P21/5W - 21/5W
2.
Direction indicators
Type B
, PY21W - 21W (amber)
3.
Reversing lamps
Type B
, P21W - 21W
4.
Foglamps
Type B
, P21W - 21W When refitting, take care to correctly
reposition:
- the 8 tabs,
- the two white lugs in the two rubber
holes to maintain the sealing of the lamp
unit,
- the supply wire to avoid trapping it.