key Citroen JUMPY MULTISPACE 2013 2.G User Guide
[x] Cancel search | Manufacturer: CITROEN, Model Year: 2013, Model line: JUMPY MULTISPACE, Model: Citroen JUMPY MULTISPACE 2013 2.GPages: 260, PDF Size: 8.79 MB
Page 86 of 260

84
Practical information
Permanently on, ignition on. Front: comes on when one of the
front or rear doors is opened.
Row 2 and row 3: comes on when
one of the rear doors or the boot
is opened, if fitted on your vehicle.
Permanently off.
Individual reading lamp
Rear courtesy lamp
If fitted on the vehicle, these are
switched on and off by means of a
manual switch, with the ignition on.
SEATING AREA COURTESY LAMPS
Automatic switching on/off
The front courtesy lamp comes on when the
key is removed from the ignition.
All of the courtesy lamps come on when
the vehicle is unlocked, when one of the
corresponding doors is opened and for
location of the vehicle using the remote
control.
They switch off gradually after the ignition is
switched on and when the vehicle is locked.
Front courtesy lamp
Page 91 of 260

89
Rear suspension
EASE OF USE and COMFOR
T
3
2 - Manual correction of the height of the rear sill
If your vehicle is fitted with this adjustment,
the control is located on the right-hand side
at the rear of the vehicle.
This manual adjustment permits "lowering"
or "raising" of the height of the sill of the rear
platform to facilitate operations in a parking
area.
This adjustment of the height of the sill is
restricted by a lower limit and an upper limit.
First use
To initialise the function, press the control
for approximately 2 seconds.
Malfunctions
If the load sill is not adjusted when the
control is pressed, "3 beeps" indicate a
malfunction for the following reasons:
- foot on the brake pedal with the key in
the ignition,
- excessive use of the manual correction,
- low battery charge,
- other.
If the audible signal persists, contact a
CITROËN dealer or a qualified workshop. Carry out these operations with the vehicle
still stationary and:
- with the front and side doors closed,
- with the parking brake applied,
- do not leave your foot on the brake
pedal.
Lower: downwards adjustment
of the platform sill
Press the control downwards
continuously.
Release the button to stop the movement,
"3 beeps" indicate that you have reached
the maximum limit, the movement stops
automatically.
Raise: upwards adjustment of
the platform sill
Press the control upwards
continuously.
Release the button to stop the movement,
"3 beeps" indicate that you have reached
the maximum limit, the movement stops
automatically.
Return to the optimum sill height
Press the control up or down twice in
succession, the opposite of the position of
the load sill.
Page 92 of 260

90
Rear suspension
Deactivation of manual height correction
Good practice
When stationary and with the ignition key
removed, excessive use of the system
consumes battery power.
Long term parking
Avoid parking for a long duration on ground
which could present a potential obstacle as
your vehicle could lower.
Following a long period out of use, the
height of the platform may change due to the
automatic height correction on unlocking or
on opening one of your vehicle's doors. With the vehicle stationary:
- press and hold,
- release the control.
Deactivation is confirmed by
the LED which is on. It remains on for
approximately 30 seconds.
Return to manual height correction
You must deactivate the manual height
correction in the following situations:
- when working underneath the vehicle,
- when changing a wheel,
- when the vehicle is being transported by
lorry, train, ferry, boat, ...
Driving with the height of the rear platform:
- too low, risks damaging the technical
components underneath the vehicle,
- too high, risks unstable driving.
If you start and the warning lamp flashes, to
switch it off:
- correct the position of the manual
control which is still at the lower or
upper limit,
- or drive slowly at above 6 mph
(10 km/h), until height correction returns
to automatic mode.
Warning lamp
Refer to the "Instruments and controls"
section of chapter 2.
With the vehicle stationary:
- press and hold,
- release the control.
Return to manual correction is
confirmed by the LED which goes off.
According to the configuration, a beep may
be heard during these operations.
Page 93 of 260

91
Mirrors and windows
EASE OF USE and COMFOR
T
3
MIRRORS
If fitted on your vehicle, the mirror is
supplemented by a 2nd lower mirror. This
mirror is convex to broaden the field of side
vision. Objects observed are, in reality,
closer than they appear. Therefore, take this
into account in order to judge the distance
correctly.
MIRRORS AND WINDOWS
Electric folding
If your vehicle is fitted with this function,
the mirrors can be folded electrically from
the inside, with the vehicle parked and the
ignition on:
- Place switch A
in the centre position.
- Pull switch A
rearwards.
Heated mirrors
If your vehicle is fitted with this function,
press the rear screen demisting button. The folding / unfolding on locking / unlocking
can be deactivated.
Contact a CITROËN dealer or a qualified
workshop.
Electric door mirrors
- Move switch A
to the right or to the left
to select the corresponding mirror.
- Move knob B
in all four directions to
adjust.
- Return switch A
to the centre position. From the outside, lock the vehicle using the
remote control or the key.
Electric unfolding
The electric unfolding of the mirrors is
possible with the remote control or the key
on unlocking the vehicle, unless folding
was selected using switch A
. In this case,
pull the switch rearwards from the centre
position again.
Manual door mirrors
Move the lever in all four directions to
adjust.
When the vehicle is parked, the door mirrors
can be folded back manually.
If the mirror casing has come out of its
initial location, with the vehicle stationary,
reposition the mirror casing manually or use
the electric folding switch.
There is no risk of breakage even in the
presence of ice.
Page 108 of 260

106
Airbags
Deactivating
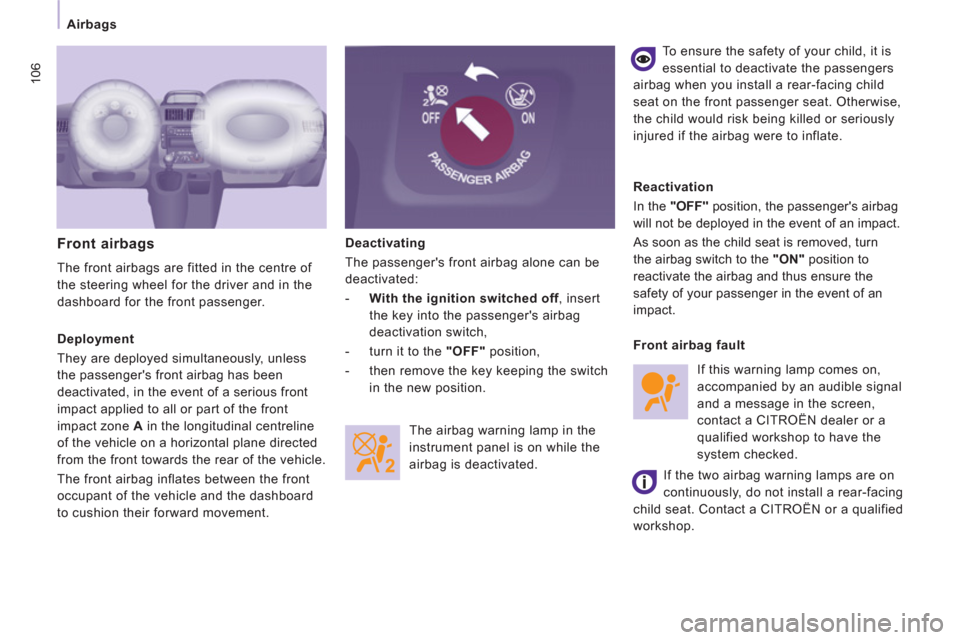
The passenger's front airbag alone can be
deactivated:
- With the ignition switched off
, insert
the key into the passenger's airbag
deactivation switch,
- turn it to the "OFF"
position,
- then remove the key keeping the switch
in the new position.
Front airbags
The front airbags are fitted in the centre of
the steering wheel for the driver and in the
dashboard for the front passenger.
Reactivation
In the "OFF"
position, the passenger's airbag
will not be deployed in the event of an impact.
As soon as the child seat is removed, turn
the airbag switch to the "ON"
position to
reactivate the airbag and thus ensure the
safety of your passenger in the event of an
impact. To ensure the safety of your child, it is
essential to deactivate the passengers
airbag when you install a rear-facing child
seat on the front passenger seat. Otherwise,
the child would risk being killed or seriously
injured if the airbag were to inflate.
The airbag warning lamp in the
instrument panel is on while the
airbag is deactivated.
Deployment
They are deployed simultaneously, unless
the passenger's front airbag has been
deactivated, in the event of a serious front
impact applied to all or part of the front
impact zone A
in the longitudinal centreline
of the vehicle on a horizontal plane directed
from the front towards the rear of the vehicle.
The front airbag inflates between the front
occupant of the vehicle and the dashboard
to cushion their forward movement.
Front airbag fault
If this warning lamp comes on,
accompanied by an audible signal
and a message in the screen,
contact a CITROËN dealer or a
qualified workshop to have the
system checked.
If the two airbag warning lamps are on
continuously, do not install a rear-facing
child seat. Contact a CITROËN or a qualified
workshop.
Page 118 of 260

11 6
Child safety
Deactivate the passenger's airbag when a
"rear facing" child seat is installed on the
front seat.
Otherwise, the child would risk being
seriously injured or killed if the airbag were
to inflate.
Installing a booster seat
The chest part of the seat belt must be
positioned on the child's shoulder without
touching the neck.
Ensure that the lap part of the seat belt
passes correctly over the child's thighs.
CITROËN recommends the use of a booster
seat which has a back, fitted with a seat belt
guide at shoulder level.
ADVICE ON CHILD SEATS
The incorrect installation of a child seat in a
vehicle compromises the child's protection in
the event of an accident.
Remember to fasten the seat belts or the
child seat harnesses keeping the slack
in
relation to the child's body to a minimum
,
even for short journeys.
For optimum installation of the "forward
facing" child seat, ensure that the back of
the child seat is in contact with the back of
the vehicle's seat and that the head restraint
does not cause any discomfort.
If the head restraint has to be removed,
ensure that it is stored or attached securely
to prevent it from being thrown around the
vehicle in the event of sharp braking.
Children under the age of 10 must not travel
in the "forward facing" position on the front
passenger seat, unless the rear seats are
already occupied by other children, cannot
be used or are absent.
As a safety precaution, do not leave:
- one or more children alone and
unsupervised in a vehicle,
- a child or an animal in a vehicle which
is exposed to the sun, with the windows
closed,
- the keys within reach of children inside
the vehicle.
To prevent accidental opening of the doors,
use the "Child Lock".
Take care not to open the rear windows by
more than one third.
To protect young children from the rays of
the sun, fit side blinds to the rear windows.
Page 126 of 260

124
Levels
Cooling system
Only use the fluid recommended by the
manufacturer.
Otherwise, you risk seriously damaging your
engine.
When the engine is warm, the temperature
of the coolant is controlled by the engine
fan. As this fan can operate with the ignition
key removed and because the cooling
system is pressurised, wait for at least one
hour after the engine has stopped before
carrying out any work.
Slacken the cap by 1/4 of a turn to release
the pressure to prevent any risk of scalding.
When the pressure has dropped, remove the
cap and top up the level with coolant.
If fluid has to be added frequently, this
indicates a fault which must be checked by a
CITROËN dealer or a qualified workshop as
soon as possible. The vehicle must be parked on level ground
with the engine cold. Unscrew the cap
integrated with the gauge and check the
level which must be between the MIN and
MAX marks.
Diesel additive level (Diesel
with particle emission filter)
The minimum level of this additive
is indicated by lighting of the
service warning light, accompanied by an
audible signal and a message in the screen.
When this occurs with the engine running it
is due to the start of saturation of the particle
emission filter (exceptionally prolonged
urban type driving conditions: low speed,
long traffic jams, ...).
In order to regenerate the filter, you are
advised to drive at a speed higher than
40 mph (60 km/h) for at least five minutes
as soon as possible, when traffic conditions
permit (until the message disappears and
the service warning lamp goes off).
During regeneration of the particle emission
filter, relay noise may be heard under the
dashboard.
If the message is still displayed and if the
service warning lamp remains on, contact a
CITROËN dealer or a qualified workshop.
Topping up
The level must be between the MIN and
MAX marks on the expansion bottle. If
more than 1 litre of fluid is required to top
up the level, have the system checked by a
CITROËN dealer or a qualified workshop.
Screenwash and headlamp wash level
For best quality cleaning and for your safety,
we would advise that you use products of
the CITROËN range.
Capacity of the screenwash reservoir:
approximately 4.5 litres.
If your vehicle is fitted with headlamp
washers, the capacity of the reservoir is
7.5 litres.
To ensure optimum cleaning and prevent
freezing, this fluid must not be topped up or
replaced with plain water.
Topping up
This additive must be topped up by a
CITROËN dealer or a qualified workshop
without delay.
Page 130 of 260

128
Fuel
FILLING WITH FUEL
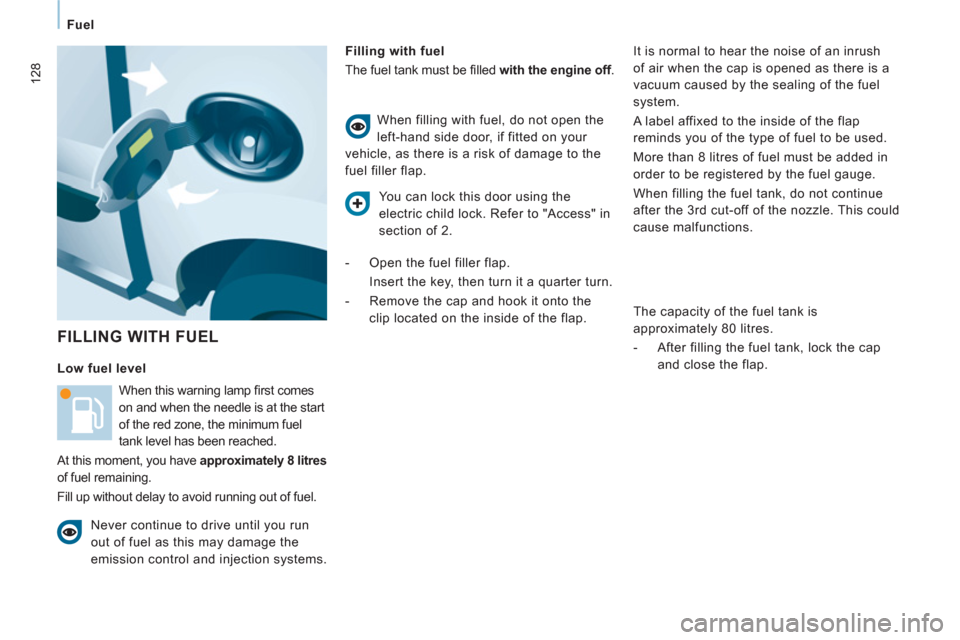
Filling with fuel
The fuel tank must be fi lled with the engine off
.
When this warning lamp fi rst comes
on and when the needle is at the start
of the red zone, the minimum fuel
tank level has been reached.
At this moment, you have approximately 8 litres
of fuel remaining.
Fill up without delay to avoid running out of fuel. When filling with fuel, do not open the
left-hand side door, if fitted on your
vehicle, as there is a risk of damage to the
fuel filler flap.
Never continue to drive until you run
out of fuel as this may damage the
emission control and injection systems.
Low fuel level
It is normal to hear the noise of an inrush
of air when the cap is opened as there is a
vacuum caused by the sealing of the fuel
system.
A label affixed to the inside of the flap
reminds you of the type of fuel to be used.
More than 8 litres of fuel must be added in
order to be registered by the fuel gauge.
When filling the fuel tank, do not continue
after the 3 rd cut-off of the nozzle. This could
cause malfunctions.
The capacity of the fuel tank is
approximately 80 litres.
- After filling the fuel tank, lock the cap
and close the flap.
You can lock this door using the
electric child lock. Refer to "Access" in
section of 2.
- Open the fuel filler flap.
Insert the key, then turn it a quarter turn.
- Remove the cap and hook it onto the
clip located on the inside of the flap.
Page 131 of 260

DIESEL
129
Fuel
CHECK
S
6
FUEL CUT-OFF
In a serious collision, a mechanism
automatically prevents fuel from reaching
the engine.
DIESEL PRIMINGPUMP
If you should run out of fuel, it is necessary
to prime the circuit:
- fill the fuel tank with at least five litres of
diesel,
- squeeze and release the manual priming
pump, under the bonnet under the
protective cover, until fuel appears in the
transparent pipe,
- operate the starter until the engine
starts. The flashing of this warning lamp
is accompanied by a message in
the screen.
Check that there is no odour or leakage of
fuel outside the vehicle and re-establish the
fuel supply:
- switch off the ignition (STOP position),
- remove the key,
- put the key back in the ignition,
- switch on the ignition and start.
Quality of the fuel used for Dieselengines Quality of the fuel used for petrolengines
The Diesel engines are perfectly compatible
with biofuels which conform to current
and future European standards (Diesel
fuel which complies with standard EN 590
mixed with a biofuel which complies with
standard EN 14214) available at the pumps
(containing up to 7 % Fatty Acid Methyl
Ester).
The B30 biofuel can be used in certain
Diesel engines; however, this use is subject
to strict application of the special servicing
conditions. Contact a CITROËN dealer or a
qualified workshop.
The use of any other type of (bio)fuel
(vegetable or animal oils, pure or diluted,
domestic fuel...) is strictly prohibited (risk of
damage to the engine and fuel system).
The petrol engines are perfectly compatible
with E10 or E24 type petrol biofuels
(containing 10 % or 24 % ethanol),
conforming to European standards EN 228
and EN 15376.
E85 type fuels (containing up to 85 %
ethanol) are reserved exclusively for
vehicles marketed for the use of this type
of fuel (BioFlex vehicles). The quality of
the ethanol must comply with European
standard EN 15293.
For Brazil only, special vehicles are
marketed to run on fuels containing up to
100 % ethanol (E100 type).
Page 134 of 260

132
Battery
ECONOMY MODE
After the engine has stopped, with the key
in the ignition position, certain functions
(windscreen wiper, electric windows, courtesy
lamps, audio equipment, etc.) can only
be used for a cumulative duration of thirty
minutes, to prevent discharging of the battery.
Once the thirty minutes are over, the active
functions are put on standby and the battery
warning lamp flashes accompanied by a
message in the screen.
To resume the use of these functions
immediately, start the engine and let it run
for a few minutes.
The time available will then be double the
time for which the engine was left running.
However, this time will always be between
five and thirty minutes.
A flat battery will prevent the engine from
starting.