bonnet Citroen JUMPY MULTISPACE DAG 2008.5 2.G User Guide
[x] Cancel search | Manufacturer: CITROEN, Model Year: 2008.5, Model line: JUMPY MULTISPACE DAG, Model: Citroen JUMPY MULTISPACE DAG 2008.5 2.GPages: 194, PDF Size: 6.92 MB
Page 162 of 194

160
Checks
CHECKS
Battery
At the start of winter, have your battery
checked by a CITROËN dealer.
Brake pads
Brake pad wear depends on the style of
driving, in particular for vehicles which are
used in town, over short distances. It may
be necessary to check the thickness of the
pads, even between services.
Unless there is a leak on the circuit, a drop
in the brake fluid level indicates that the
brake pads are worn.
Brake disc/drum wear status
For any information relating to checking
the brake disc/drum wear status, contact a
CITROËN dealer.
Handbrake
Where the handbrake travel is too great
or there is a reduction in the performance
of the system, the handbrake should be
adjusted, even between services.
Have the system checked by a
CITROËN dealer.
Oil filter
Change the filter regularly, in accordance
with the servicing schedule.
Carbon filter and passenger compartment filter
The carbon filter permits continuous and
effective filtering of dust.
If the passenger compartment filter becomes
clogged, this may reduce the performance
of the air conditioning system and generate
unpleasant odours.
We recommend the use of a combined
passenger compartment filter. By means of
its second special active filter, it contributes
to the purification of the air breathed by
the occupants and the cleanness of the
passenger compartment (reduction of
allergic symptoms, unpleasant odours and
greasy deposits).
Refer to the servicing booklet to find out the
replacement interval for these components.
Depending on the environment (dusty
atmosphere...) and the use of the vehicle
(urban driving...), change them twice as
often if necessary.
Refer to the "Under the bonnet" section of
chapter 7.
Particle emission filter (Diesel)
It is imperative that particle
emission filter maintenance
is carried out by a CITROËN
dealer.
On acceleration after the vehicle has been
running for a prolonged period at very low
speed or at idle, you may, in exceptional
circumstances, notice the emission of water
vapour at the exhaust. This water vapour
does not have any adverse effect on vehicle
handling or the environment.
Page 164 of 194

163
Fuel
CHECKS
7
FILLING WITH FUEL
FUEL CIRCUIT DISARMED
In a serious collision, a mechanism
automatically prevents fuel from reaching
the engine.
The fuel tank must be filled
with the
engine off .
DIESEL REPRIMING PUMP
If you should run out of fuel, it is necessary
to re-prime the circuit:
- fill the fuel tank with at least five
litres of diesel,
- squeeze and release the manual re- priming pump, under the bonnet under
the protective cover, until fuel appears in
the transparent pipe,
- operate the starter until the engine starts. Low fuel level
When the needle is at the start of
the red zone, the minimum fuel
tank level is reached when this
warning light comes on. At this moment,
you have approximately 8 litres of fuel
remaining. Fill up without delay to avoid
running out of fuel. When filling with fuel, do not open the
left-hand side door, if fitted on your
vehicle, as there is a risk of damage to the
fuel filler flap.
You can lock this door using the
electric child lock. Refer to the
"Accesses" section of chaper 2.
- Open the fuel filler flap.
- Insert the key, then turn it a quarter turn.
- Remove the cap and hook it onto the clip located on the inside of the flap.
A label affixed to the inside of the flap
reminds you of the type of fuel to be used.
When filling the fuel tank, do not continue
after the 3rd cut-off of the nozzle. This could
cause malfunctions.
The capacity of the fuel tank is
approximately 80 litres.
- After filling the fuel tank, lock the cap and close the flap. The flashing of this warning light
is accompanied by a message on
the display.
Check that there is no odour or leakage of
fuel outside the vehicle and re-establish the
fuel supply:
- switch off the ignition (STOP position).
- remove the key.
- put the key back in the ignition.
- switch on the ignition and start.
Page 180 of 194

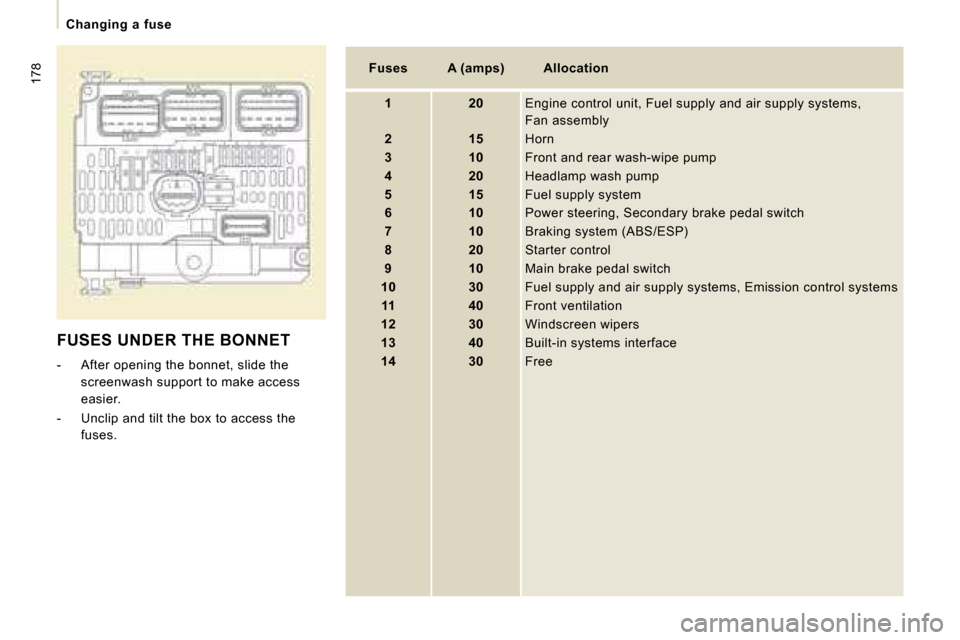
FUSES UNDER THE BONNET
� � � �-� � �A�f�t�e�r� �o�p�e�n�i�n�g� �t�h�e� �b�o�n�n�e�t�,� �s�l�i�d�e� �t�h�e� �s�c�r�e�e�n�w�a�s�h� �s�u�p�p�o�r�t� �t�o� �m�a�k�e� �a�c�c�e�s�s�
�e�a�s�i�e�r�.�
� � �-� � �U�n�c�l�i�p� �a�n�d� �t�i�l�t� �t�h�e� �b�o�x� �t�o� �a�c�c�e�s�s� �t�h�e� �f�u�s�e�s�.� �
Fuses A (amps) Allocation
1 20 � �E�n�g�i�n�e� �c�o�n�t�r�o�l� �u�n�i�t�,� �F�u�e�l� �s�u�p�p�l�y� �a�n�d� �a�i�r� �s�u�p�p�l�y� �s�y �s�t�e�m�s�,
�F�a�n� �a�s�s�e�m�b�l�y�
2 15 Horn
3 10 Front and rear wash-wipe pump
4 20 Headlamp wash pump
5 15 � �F�u�e�l� �s�u�p�p�l�y� �s�y�s�t�e�m�
6 10 � �P�o�w�e�r� �s�t�e�e�r�i�n�g�,� �S�e�c�o�n�d�a�r�y� �b�r�a�k�e� �p�e�d�a�l� �s�w�i�t�c�h�
7 10 � �B�r�a�k�i�n�g� �s�y�s�t�e�m� �(�A�B�S�/�E�S�P�)�
8 20 Starter control
9 10 � �M�a�i�n� �b�r�a�k�e� �p�e�d�a�l� �s�w�i�t�c�h�
10 30 � �F�u�e�l� �s�u�p�p�l�y� �a�n�d� �a�i�r� �s�u�p�p�l�y� �s�y�s�t�e�m�s�,� �E�m�i�s�s�i�o�n� �c�o�n�t�r �o�l� �s�y�s�t�e�m�s�
11 40 � �F�r�o�n�t� �v�e�n�t�i�l�a�t�i�o�n�
12 30 Windscreen wipers
13 40 � �B�u�i�l�t�-�i�n� �s�y�s�t�e�m�s� �i�n�t�e�r�f�a�c�e�
14 30 Free
178
Changing a fuse