tow Citroen JUMPY MULTISPACE DAG 2010 2.G Owner's Guide
[x] Cancel search | Manufacturer: CITROEN, Model Year: 2010, Model line: JUMPY MULTISPACE DAG, Model: Citroen JUMPY MULTISPACE DAG 2010 2.GPages: 235, PDF Size: 11.17 MB
Page 115 of 235

108
Under the bonnet
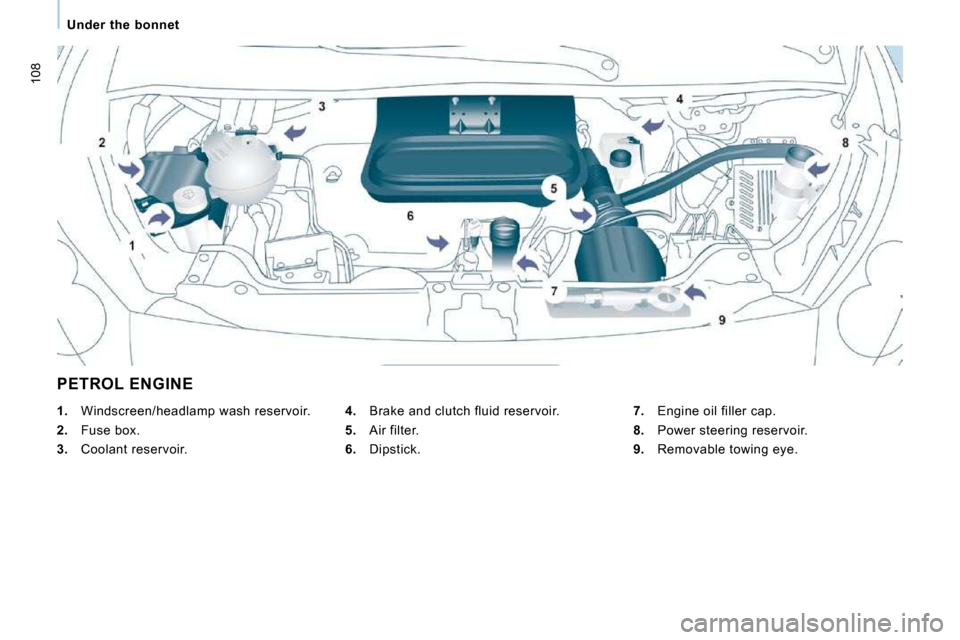
PETROL ENGINE
4. Brake and clutch fluid reservoir.
5. Air filter.
6. Dipstick.
1. Windscreen/headlamp wash reservoir.
2. Fuse box.
3. Coolant reservoir.
7. Engine oil filler cap.
8. Power steering reservoir.
9. Removable towing eye.
Page 118 of 235

Checks
CHECKS
6
CHECKS
Battery
At the start of winter, have your battery
checked by a CITROËN dealer.
Brake pads
Brake pad wear depends on the style of
driving, in particular for vehicles which are
used in town, over short distances. It may
be necessary to check the thickness of the
pads, even between services.
Unless there is a leak on the circuit, a drop
in the brake fluid level indicates that the
brake pads are worn.
Brake disc/drum wear status
For any information relating to checking
the brake disc/drum wear status, contact a
CITROËN dealer.
Handbrake
Where the handbrake travel is too great
or there is a reduction in the performance
of the system, the handbrake should be
adjusted, even between services.
Have the system checked by a CITROËN
dealer.
Oil filter
Change the filter regularly, in accordance
with the servicing schedule.
Carbon filter and passenger compartment filter
The carbon filter permits continuous and
effective filtering of dust.
If the passenger compartment filter becomes
clogged, this may reduce the performance
of the air conditioning system and generate
unpleasant odours.
We recommend the use of a combined
�p�a�s�s�e�n�g�e�r� �c�o�m�p�a�r�t�m�e�n�t� �fi� �l�t�e�r�.� �B�y� �m�e�a�n�s� �o�f�
�i�t�s� �s�e�c�o�n�d� �s�p�e�c�i�a�l� �a�c�t�i�v�e� �fi� �l�t�e�r�,� �i�t� �c�o�n�t�r�i�b�u�t�e�s�
�t�o� �t�h�e� �p�u�r�i�fi� �c�a�t�i�o�n� �o�f� �t�h�e� �a�i�r� �b�r�e�a�t�h�e�d� �b�y� �t�h�e�
occupants and the cleanness of the passenger
compartment (reduction of allergic symptoms,
unpleasant odours and greasy deposits).
Refer to the servicing booklet to find out the
replacement interval for these components.
Depending on the environment (dusty
atmosphere...) and the use of the vehicle
(urban driving...), change them twice as
often if necessary.
It is imperative that particle
emission filter maintenance
is carried out by a CITROËN
dealer.
On acceleration after the vehicle has been
running for a prolonged period at very low
speed or at idle, you may, in exceptional
circumstances, notice the emission of water
vapour at the exhaust. This water vapour
does not have any adverse effect on vehicle
handling or the environment.
Refer to the "Under the bonnet" section
of chapter 6.
Page 125 of 235

118
Repairing a wheel
- connect the compressor pipe directly to the valve of the repaired wheel.
- connect the compressor's electrical plug to the vehicle's 12 V socket again,
- start the vehicle again and let the engine run, Warning, the bottle of fluid contains
ethylene-glycol, this product is harmful
if swallowed and causes irritation to
the eyes. Keep this product out of reach of
children.
The expiry date of the fluid is indicated
under the bottle.
The bottle is intended for a single use; once
opened, it must be replaced.
After use, do not discard the bottle into the
environment, take it to a CITROËN dealer or
to a specialised waste disposal site.
Do not forget to obtain a new bottle of
sealant available from CITROËN dealers.
- adjust the pressure using the
compressor (to inflate: switch A in
position " 1 "; to deflate: switch A in
position " 0 " and press button B ), in
accordance with the vehicle's tyre
pressure label (located on the door
aperture, on the driver's side), then
remember to check that the leak has
been sealed correctly (no further
loss of pressure after several miles
(kilometres)),
- remove the compressor, then stow the complete kit,
- drive at reduced speed (50 mph (80 km/h) max) limiting the distance travelled to
approximately 125 miles (200 km),
- visit a CITROËN dealer as soon as possible to have the tyre repaired or
replaced by a technician.
Page 130 of 235

123
Snow screen
QUICK HELP
7
6. REFITTING THE REPAIRED WHEEL
The wheel is refitted as described in step 5,
not forgetting to refit the wheel trim. The spare wheel is not designed to be
used over long distances. Have the
tightening of the bolts and the tyre pressure
checked by a CITROËN dealer as soon
as possible. Also, have the original wheel
repaired and refitted by a CITROËN dealer
as soon as possible. Refer to the "Identification features"
section of chapter 8 to locate the tyre
label.
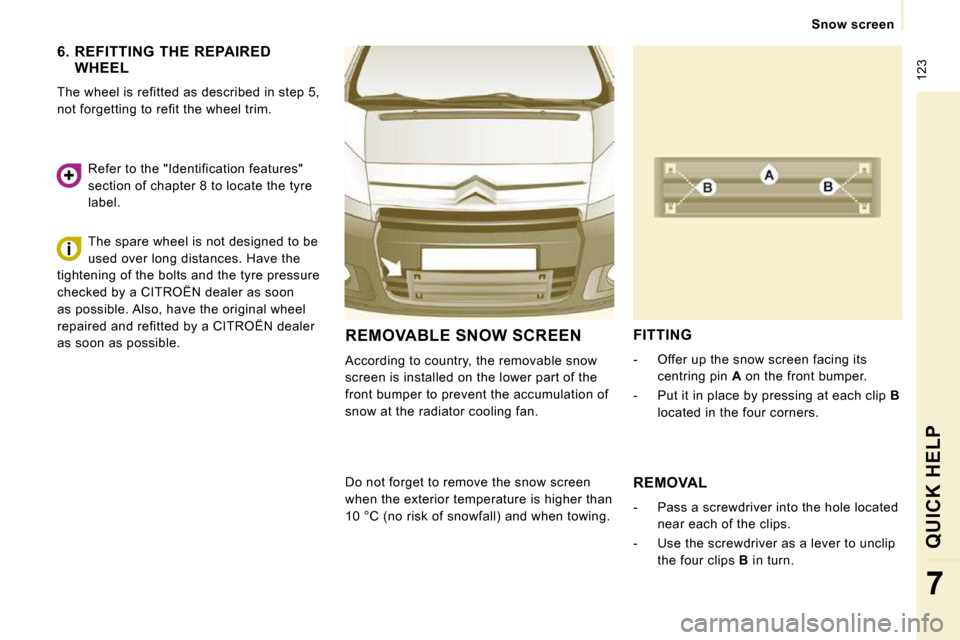
REMOVABLE SNOW SCREEN
According to country, the removable snow
screen is installed on the lower part of the
front bumper to prevent the accumulation of
snow at the radiator cooling fan.
FITTING
- Offer up the snow screen facing its
centring pin A on the front bumper.
- Put it in place by pressing at each clip B
located in the four corners.
Do not forget to remove the snow screen
when the exterior temperature is higher than
10 °C (no risk of snowfall) and when towing.
REMOVAL
- Pass a screwdriver into the hole located
near each of the clips.
- Use the screwdriver as a lever to unclip the four clips B in turn.
Page 131 of 235

123
Snow screen
QUICK HELP
7
6. REFITTING THE REPAIRED WHEEL
The wheel is refitted as described in step 5,
not forgetting to refit the wheel trim. The spare wheel is not designed to be
used over long distances. Have the
tightening of the bolts and the tyre pressure
checked by a CITROËN dealer as soon
as possible. Also, have the original wheel
repaired and refitted by a CITROËN dealer
as soon as possible. Refer to the "Identification features"
section of chapter 8 to locate the tyre
label.
REMOVABLE SNOW SCREEN
According to country, the removable snow
screen is installed on the lower part of the
front bumper to prevent the accumulation of
snow at the radiator cooling fan.
FITTING
- Offer up the snow screen facing its
centring pin A on the front bumper.
- Put it in place by pressing at each clip B
located in the four corners.
Do not forget to remove the snow screen
when the exterior temperature is higher than
10 °C (no risk of snowfall) and when towing.
REMOVAL
- Pass a screwdriver into the hole located
near each of the clips.
- Use the screwdriver as a lever to unclip the four clips B in turn.
Page 134 of 235

126
Changing a bulb
DIRECTION INDICATOR SIDE REPEATER
Type A , WY 5 W (amber)
- Push the repeater towards the rear and disengage it.
- Support the connector and turn the bulb holder a quarter turn to the left.
- Turn the bulb a quarter turn to the left, remove it and change it.
- When refitting, engage the repeater towards the rear and bring it towards the
front.
Front/Rear
Amber coloured bulbs (direction indicators
and side repeaters) must be replaced with
bulbs of identical specification and colour.
Type A , 12 V 5 W - 5 W
- Unclip the lens by sliding a screwdriver in the slots on each side of the courtesy
light.
- Pull the bulb and change it.
- Clip the lens in its housing and ensure that it is secured correctly.
High pressure washing
When using this type of washing on
stubborn dirt, do not persist on the
headlamps, the lights and their surrounds to
avoid damaging their coating and their seal.
Page 142 of 235

134
Having your vehicle towed
Without lifting (4 wheels on the road)
You should always use a towbar.
From the front
- Unclip the cover by pressing the bottom part.
- Screw in the removable towing eye until it locks.
BEING TOWED
Lifting (2 wheels on the road only)
It is preferable to raise the vehicle using
professional lifting equipment.
From the rear
- Unclip the cover using a coin or the flat part of the towing eye,
- Screw in the removable towing eye until it locks. When towing with the engine switched
off, there is no braking or steering
assistance. Vehicles fitted with a manual gearbox (diesel version)
In the case of vehicles fitted with a manual
gearbox, the gear lever must be in the
neutral position. Failure to observe this
special condition may result in damage
to certain braking components and the
absence of braking assistance the next time
the engine is started.
Page 147 of 235

140
Weights
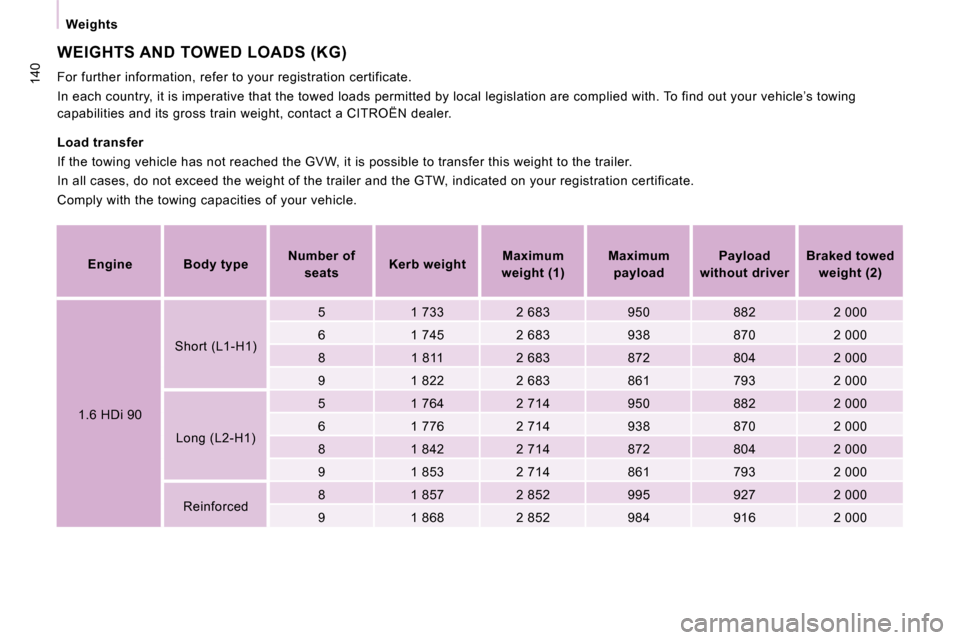
WEIGHTS AND TOWED LOADS (KG)
For further information, refer to your registration certificate.
In each country, it is imperative that the towed l oads permitted by local legislation are complied wi th. To find out your vehicle’s towing
capabilities and its gross train weight, contact a CITROËN dealer.
Load transfer
If the towing vehicle has not reached the GVW, it is possible to transfer this weight to the trailer.
In all cases, do not exceed the weight of the trai ler and the GTW, indicated on your registration cer tificate.
Comply with the towing capacities of your vehicle.
Engine Body type
Number of
seats
Kerb weight
Maximum
weight (1)
Maximum
payload
Payload
without driver
Braked towed
weight (2)
1.6 HDi 90 Short (L1-H1)
5 1 733 2 683 950 882 2 000
6 1 745 2 683 938 870 2 000
8 1 811 2 683 872 804 2 000
9 1 822 2 683 861 793 2 000
Long (L2-H1) 5 1 764 2 714 950 882 2 000
6 1 776 2 714 938 870 2 000
8 1 842 2 714 872 804 2 000
9 1 853 2 714 861 793 2 000
Reinforced 8 1 857 2 852 995 927 2 000
9 1 868 2 852 984 916 2 000
Page 148 of 235

141
Weights
TECHNICAL DATA
8
Engine Body type
Number of
seats
Kerb weight
Maximum
weight (1)
Maximum
payload
Payload
without driver
Braked towed
weight (2)
2.0 HDi 120 and
2.0 HDi 120 PEF Short (L1-H1)
5 1 809 2 759 950 882 2 000
6 1 821 2 759 938 870 2 000
8 1 887 2 759 872 804 2 000
9 1 898 2 759 861 793 2 000
Long (L2-H1) 5 1 841 2 791 950 882 2 000
6 1 853 2 791 938 870 2 000
8 1 919 2 791 872 804 2 000
9 1 930 2 791 861 793 2 000
Reinforced 8 1 934 2 932 958 930 2 000
9 1 945 2 932 987 919 2 000
(1) Gross vehicle weight (GVW).
(2) Braked towed weight with load transfer: this can be increased on condition that the equivalent o f this load is removed from the vehicle so
that the GTW is not exceeded.
High exterior temperatures may result in a reducti on in the performance of the vehicle to protect the engine. When the exterior temperature
is higher than 37 °C, limit the towed weight to 700 kg, without load transfer.
The speed of a towing vehicle must not exceed 60 m ph (100 km/h) (comply with the legislation in force in your country).
Page 149 of 235

142
Weights
Engine Body type
Number of
seats
Kerb weight
Maximum
weight (1)
Maximum
payload
Payload
without driver
Braked towed
weight (2)
2.0 HDi 136 PEF Short (L1-H1)
5 1 824 2 774 950 882 2 000
6 1 836 2 774 938 870 2 000
8 1 902 2 774 872 804 2 000
9 1 913 2 774 861 793 2 000
Long (L2-H1) 5 1 855 2 805 950 882 2 000
6 1 867 2 805 938 870 2 000
8 1 933 2 805 872 804 2 000
9 1 944 2 805 861 793 2 000
Reinforced 8 1 948 2 946 998 930 2 000
9 1 959 2 946 987 919 2 000