Citroen JUMPY RHD 2016 2.G Service Manual
Manufacturer: CITROEN, Model Year: 2016, Model line: JUMPY RHD, Model: Citroen JUMPY RHD 2016 2.GPages: 520, PDF Size: 10.54 MB
Page 41 of 520

39
Lighting dimmer
F With the exterior lighting on, press this button to raise the level of brightness.
F
W
ith the exterior lighting on, press this
button to lower the level of brightness.
As soon as the lighting reaches the required
level of brightness, release the button.
At the instrument panel With the touch screen
F Press on the Settings button.
F
Sel
ect " OPTIONS ".
F
Sel
ect "Screen configuration ". You can also switch off the screen. To do this:
F
Sel
ect the " Brightness " tab. F
P
ress on the Settings
button.
F Select Switch off screen .
F
P
ress on " Confirm" to save and
quit.
F
A
djust the brightness by moving
the cursor. The screen goes off completely.
Press on the screen again (anywhere on its
sur face) to activate it.
This system allows the brightness of the instruments and controls to be adjusted to suit the ambient
light level.
1
Instruments
Page 42 of 520

40
System that gives you information on the current journey (range, fuel consumption…).
Trip computer
Display of information
F Press the button on the end of the wiper control stalk to display the different trip
computer tabs in turn. F
O
r, depending on equipment, press the
thumbwheel on the steering wheel .-
T
he current information with:
●
t
he range,
●
t
he current fuel consumption,
●
t
he Stop & Start time counter.
Tr i p s "1" and "2" are independent but their use
is identical.
For example, trip "1" can be used for daily
figures, and trip "2" for monthly figures.
-
T
rip "2"
with:
●
t
he average speed,
●
t
he average fuel consumption,
●
t
he distance travelled,
f
or the second trip.
-
T
rip "1"
with:
●
t
he average speed,
●
t
he average fuel consumption,
●
t
he distance travelled,
f
or the first trip.
Depending on equipment, a 2
nd trip is available.
Instruments
Page 43 of 520

41
Trip reset
With LCD text instrument panel
F When the trip is displayed, press the button on the end of the wiper control stalk .
F
O
r, depending on equipment, press the
thumbwheel on the steering wheel for
more than two seconds.
F
W
hen the desired trip is displayed, press
the reset button in the instrument panel for
more than two seconds.
With LCD text or matrix
instrument panel
With LCD instrument panel
F When the trip is displayed, press the button on the end of the wiper control stalk for
two seconds.
1
Instruments
Page 44 of 520

42
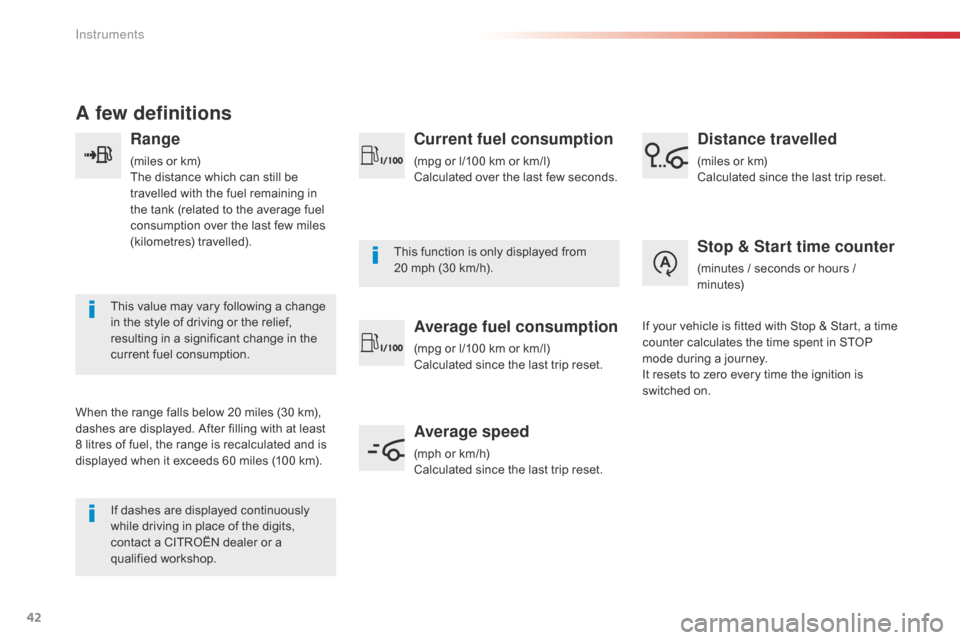
A few definitions
Range
(miles or km)
The distance which can still be
travelled with the fuel remaining in
the tank (related to the average fuel
consumption over the last few miles
(kilometres) travelled).
This value may vary following a change
in the style of driving or the relief,
resulting in a significant change in the
current fuel consumption.
When the range falls below 20 miles (30 km),
dashes are displayed. After filling with at least
8 litres of fuel, the range is recalculated and is
displayed when it exceeds 60 miles (100 km). If dashes are displayed continuously
while driving in place of the digits,
contact a CITROËN dealer or a
qualified workshop. This function is only displayed from
20 mph (30 km/h).
Current fuel consumption
(mpg or l/100 km or km/l)
Calculated over the last few seconds.
Average fuel consumption
(mpg or l/100 km or km/l)
Calculated since the last trip reset.
Average speed
(mph or km/h)
Calculated since the last trip reset.
Distance travelled
(miles or km)
Calculated since the last trip reset.
Stop & Start time counter
(minutes / seconds or hours /
minutes)
If your vehicle is fitted with Stop & Start, a time
counter calculates the time spent in STOP
mode during a journey.
It resets to zero every time the ignition is
switched on.
Instruments
Page 45 of 520

43
Use this button to confirm.
Use this button to quit.
Use the buttons on either side of the touch
screen for access to the menus, then press the
virtual buttons in the touch screen.
Menus
Driving
.
Allows certain functions to be switched
on and off and their settings adjusted.
Connectivity.
Radio Media
.
Connected navigation .
Adjust volume/Mute.
On/Off. Settings
.
Allows configuration of the display
and the system.
Telephone .
Touch screen
As a safety measure, the driver must
only carry out operations requiring
sustained attention with the vehicle
stationary.
For more information on the touch
screen, refer to the Audio and
telematics section.
1
Instruments
Page 46 of 520

44
Driving menu
The systems with settings that can be adjusted are detailed in the table below.
For more information on a driving assistance system refer to the corresponding section.Button Corresponding function Comments
Under-inflation initialisation Reinitialisation of the under-inflation system.
Blind spot monitoring
system Activation/Deactivation of the function.
Stop & Star t system Activation/Deactivation of the function.
or Lane departure warning
system
Activation/Deactivation of the function.
Automatic headlamp dip Activation/Deactivation of the function.
Instruments
Page 47 of 520

45
ButtonCorresponding function Comments
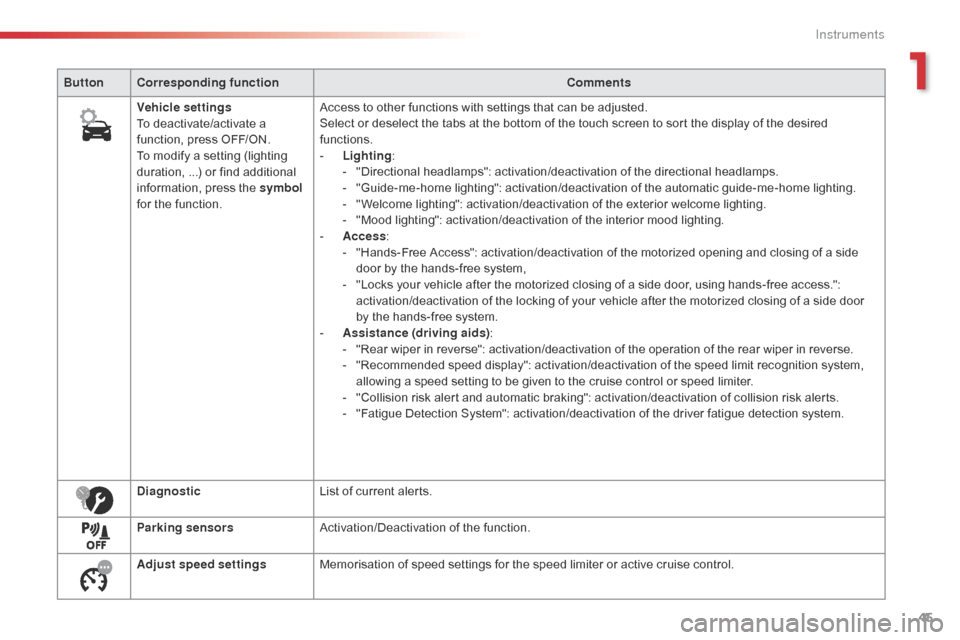
Vehicle settings
To deactivate/activate a
function, press OFF/ON.
To modify a setting (lighting
duration, ...) or find additional
information, press the symbol
for the function. Access to other functions with settings that can be adjusted.
Select or deselect the tabs at the bottom of the touch screen to sort the display of the desired
functions.
-
L
ighting:
-
"
Directional headlamps": activation/deactivation of the directional headlamps.
-
"
Guide-me-home lighting": activation/deactivation of the automatic guide-me-home lighting.
-
"
Welcome lighting": activation/deactivation of the exterior welcome lighting.
-
"
Mood lighting": activation/deactivation of the interior mood lighting.
-
A
ccess:
-
"
Hands-Free Access": activation/deactivation of the motorized opening and closing of a side
door by the hands-free system,
-
"
Locks your vehicle after the motorized closing of a side door, using hands-free access.":
activation/deactivation of the locking of your vehicle after the motorized closing of a side door
by the hands-free system.
-
A
ssistance (driving aids):
-
"
Rear wiper in reverse": activation/deactivation of the operation of the rear wiper in reverse.
-
"
Recommended speed display": activation/deactivation of the speed limit recognition system,
allowing a speed setting to be given to the cruise control or speed limiter.
-
"
Collision risk alert and automatic braking": activation/deactivation of collision risk alerts.
-
"
Fatigue Detection System": activation/deactivation of the driver fatigue detection system.
Diagnostic List of current alerts.
Parking sensors Activation/Deactivation of the function.
Adjust speed settings Memorisation of speed settings for the speed limiter or active cruise control.
1
Instruments
Page 48 of 520

46
With the touch screenSetting the time and date
F Select "Setting the time- date ".
F
P
ress on Settings
for acces to
the different menus.
F
M
odify the settings in the associated
" Date " or "Time " fields then press on
" Confirm ".
F
P
ress on " Confirm" to save and
quit.
F
Sel
ect "
OPTIONS ".
F
Sel
ect the " Date" or "Time " tab.
You can choose to synchronise the
time and date with the GPS navigation
system (if fitted to your vehicle) so
that these settings are adjusted
automatically.
With the audio system
F Press the MENU button for access to the
main menu .
F
P
ress the " 7" or " 8" button to select the
Personalisation-configuration menu,
then confirm by pressing the " OK" button.
F
P
ress the " 5" or " 6" and " 7" or " 8" buttons
to set the date and time, then confirm by
pressing the " OK" button.
F
P
ress the " 5" or " 6" button to select the
Display configuration menu then confirm
by pressing the " OK" button.
Without audio system
F Press this button to display the following
settings in turn:
-
h
ours,
-
m
inutes,
-
1
2 or 24 hour format.
Instruments
Page 49 of 520

47
Unfolding / Folding the key
If you do not press the button, you risk
damaging the remote control.
It allows the central locking or unlocking of the
vehicle using the door lock or from a distance.
It also allows the vehicle to be located, the fuel
filler cap to be removed and refitted and the
engine to be started or switched off, as well as
providing protection against theft.
Key, remote control
This separation of cab
and loading
area locking provides security in use.
It allows you to prevent access to the
part of the vehicle where you are not
present.
What is the point
of total or selective
unlocking?
Total unlocking allows all of the vehicle's doors
(front, side and rear) to be unlocked.
The remote control buttons are not
active when the ignition is switched on.
Selective unlocking allows either the cab
doors, or the loading area doors (side and
rear) to be unlocked.
Key
The key allows the central locking or unlocking
of the vehicle using the door lock.
It also allows the fuel filler cap to be removed
and refitted and the engine started or
switched
off.
F
P
ress this button to unfold or fold the key.
2
Access
Page 50 of 520

48
F To activate this selectivity between cab and loading
area , switch the ignition on and
press this button for more than
2
seconds.
Its indicator lamp comes on.
The modification is confirmed by an audible
signal and, depending on equipment, the
display of a message. F
T
o deactivate this selectivity and
return to total unlocking, switch
the ignition on and press this
button for more than 2
seconds.
Its indicator lamp goes off.
By default, selectivity between cab and
loading area is activated.
Total unlocking
Using the remote control
F Press one of these buttons
(depending on equipment) to
unlock the vehicle. Unlocking is signalled by the rapid
flashing of the direction indicators for
about two seconds.
Depending on version, the door mirrors
unfold at the same time.If fitted to your vehicle, pressing
and holding this button allows the
windows to be opened. The window
stops when you release the button.
Using the key
Using the remote control
with electric sliding
side door(s)
F To totally unlock the
vehicle and open the
side door, press and
hold this button until the
door has opened.
F
To
totally unlock the vehicle
without opening the side door,
press this button.
Programming
F To totally unlock the vehicle, turn the key
towards the front of the vehicle.
F
T
hen to open the door, pull the handle.
If your vehicle has an alarm, this is not
deactivated. Opening a door will trigger the
alarm, which can then be stopped by switching
the ignition on. Cab
and loading area selectivity
deactivated.
Access