roof Citroen JUMPY RHD 2016 2.G Owner's Manual
[x] Cancel search | Manufacturer: CITROEN, Model Year: 2016, Model line: JUMPY RHD, Model: Citroen JUMPY RHD 2016 2.GPages: 520, PDF Size: 10.54 MB
Page 5 of 520
.
.
Driving recommendations 196
Starting-switching off the engine, manual key, remote control
1
99
Starting-switching off the engine, "Keyless Entry and Starting"
2
02
Parking brake
2
05
Hill start assist
2
06
5 -speed manual gearbox
2
07
6 -speed manual gearbox
2
07
Gear ef ficiency indicator
2
08
Automatic gearbox
2
09
Electronic gearbox
2
14
Stop & Start
2
18
Head-up display
2
22
Memorising speeds
2
24
Speed limit recognition
2
25
Speed limiter
2
29
Cruise control
2
32
Dynamic cruise control
2
36
Collision Risk Alert and Active Safety Brake
2
43
Lane departure warning system
2
48
Fatigue detection system
2
50
Blind spot monitoring system
2
52
Parking sensors
2
55
Reversing camera, interior mirror
2
58
180° rear vision
2
59
Under-inflation detection
2
62Fuel tank
2 65
Diesel misfuel prevention
2 66
Snow chains
2
68
Towing a trailer
2
69
Energy economy mode
2
70
Accessories
2
71
Roof bars / Roof rack
2
73
Changing a wiper blade
2
74
Bonnet
2
76
Diesel engine
2
77
Checking levels
2
78
Checks
2
81
AdBlue
® and SCR system
(BlueHDi Diesel) 2 83
Warning triangle (stowing)
2
87
Tool box
2
87
Temporary puncture repair kit
2
90
Changing a wheel
2
96
Changing a bulb
3
03
Changing a fuse
3
16
12 V battery
3
21
Towing
325
R
unning out of fuel (Diesel)
3
27Dimensions
3
28
Engines
3
32
Weights
3
32
Identification markings
3
37
Driving
Practical information
In the event of a breakdown Technical data
Emergency or assistance 3
38
CITROËN Connect Nav 3 41
CITROËN Connect Radio
4
29
Bluetooth
® audio system 4 83
Audio and telematics
Alphabetical index
Contents
Page 7 of 520
5
Number plate lamp 311, 314
- s ide-hinged doors
-
t
ailgate
Reversing camera
2
58
180º Rear vision
2
59 -261
Changing rear bulbs
3
10, 315
Rear lamps (side-hinged doors)
3
03, 310 -312
Rear lamps (tailgate)
3
03, 313 -315
3
rd brake lamp 3 11, 314
-
s ide-hinged doors
-
t
ailgate
Warning triangle
2
87
Temporary puncture repair kit
2
90 -295
Spare wheel, jack, changing a wheel
2
96 -302
Inflation, pressures
2
95, 337Door mirrors
1
43 -144
-
m
anual
-
e
lectric
Demisting-defrosting the mirrors
1
33
Blind spot monitoring system
2
52-254
Fixed crew cab
1
17-118
Manual sliding side door(s)
7
5 -77, 84- 86
Electric sliding side door(s)
7
8 - 83, 84- 86
Hands-free sliding side door(s)
87
-90
Manual child lock
1
94
Electric child lock
1
94
Rear window child lock
1
95
Direction indicator side repeaters
3
05
Accessories
2
71-273
Roof bars / Roof rack
2
73
Towing
325
-326
Trailer towbar
1
98, 269
Rear parking sensors
2
55 -257
Side-hinged doors
9
1-93
Tailgate
9
4
Demisting-defrosting
the rear screen
1
34
Exterior (continued)
.
Over view
Page 14 of 520
12
Eco-driving is a range of everyday practices
that allow the motorist to optimise their fuel
consumption and CO
2 emissions.
Eco-driving
Optimise the use of your
gearbox
With a manual gearbox, move off gently and
change up without waiting. During acceleration
change up early.
With an automatic or electronic gearbox,
give preference to automatic mode and avoid
pressing the accelerator pedal heavily or
suddenly.
The gear efficiency indicator invites you to
engage the most suitable gear: as soon as the
indication is displayed in the instrument panel,
follow it straight away.
For vehicles fitted with an electronic or
automatic gearbox, this indicator appears only
in manual mode.
Drive smoothly
Maintain a safe distance between vehicles, use
engine braking rather than the brake pedal,
and press the accelerator progressively. These
practices contribute towards a reduction in fuel
consumption and CO
2 emissions and also help
to reduce the background traffic noise.
If your vehicle has cruise control, make use of
the system at speeds above 25 mph (40 km/h)
when the traffic is flowing well.
Control the use of your
electrical equipment
Switch off the demisting and defrosting controls,
if not automatic.
Switch off the heated seat as soon as possible.
Switch off the headlamps and front foglamps
when the level of light does not require
their
u
se.
Avoid running the engine before moving off,
particularly in winter; your vehicle will warm up
much faster while driving.
As a passenger, if you avoid connecting
your multimedia devices (film, music, video
game...), you will contribute towards limiting the
consumption of electrical energy, and so of fuel.
Disconnect your portable devices before
leaving the vehicle.
Before moving off, if the passenger compartment is
too warm, ventilate it by opening the windows and
air vents before using the air conditioning.
Above 30 mph (50 km/h), close the windows and
leave the air vents open.
Remember to make use of equipment that can
help keep the temperature in the passenger
compartment down (sunroof and window blinds...).
Switch off the air conditioning, unless it has
automatic regulation, as soon as the desired
temperature is attained.
Eco-driving
Page 15 of 520
13
Limit the causes of excess
consumption
Spread loads throughout the vehicle; place the
heaviest items in the bottom of the boot, as
close as possible to the rear seats.
Limit the loads carried in the vehicle and reduce
wind resistance (roof bars, roof rack, bicycle
carrier, trailer...). Use a roof box in preference.
Remove roof bars and roof racks after use.
At the end of winter, remove snow tyres and refit
your summer tyres.
Observe the recommendations
on maintenance
Check the tyre pressures regularly, when cold,
referring to the label in the door aperture,
driver's side.
Carry out this check in particular:
-
b
efore a long journey,
-
a
t each change of season,
-
a
fter a long period out of use.
Don't forget the spare wheel and the tyres on
any trailer or caravan.
Have your vehicle serviced regularly (engine
oil, oil filter, air filter, passenger compartment
filter...) and observe the schedule of operations
recommended in the manufacturer's service
schedule.
With a BlueHDi Diesel engine, if the SCR
system is faulty your vehicle becomes polluting;
go to a CITROËN dealer or a qualified
workshop without delay to have the emissions
of nitrogen oxides brought back to the legal
level. When refuelling, do not continue after the third
cut-off of the nozzle to avoid any over flow.
At the wheel of your new vehicle, it is only after
the first 1 800 miles (3 000 kilometres) that you
will see the fuel consumption settle down to a
consistent average.
.
Eco-driving
Page 125 of 520
123
Load retainer
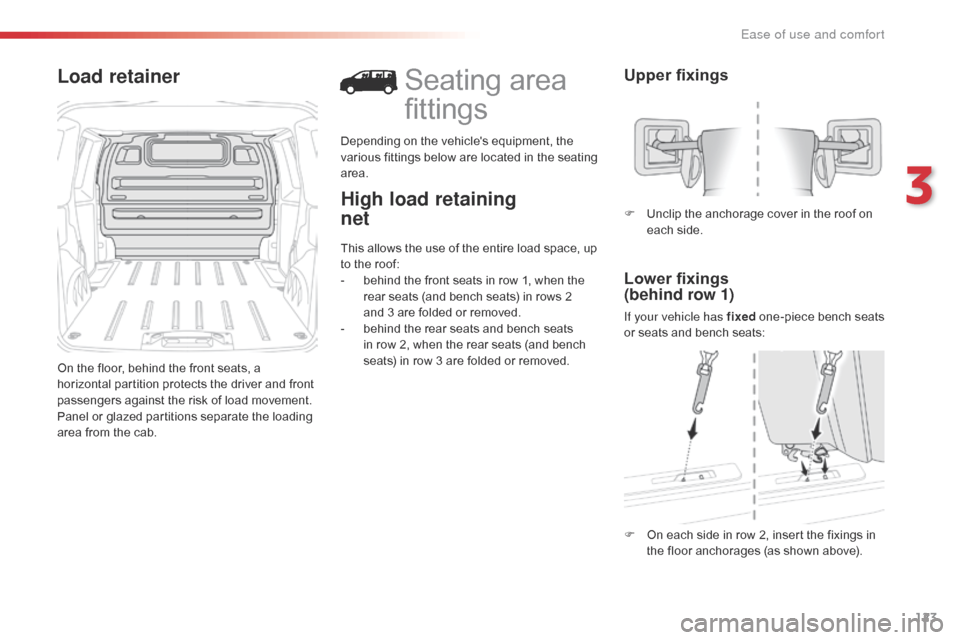
On the floor, behind the front seats, a
horizontal partition protects the driver and front
passengers against the risk of load movement.
Panel or glazed partitions separate the loading
area from the cab.
High load retaining
net
Seating area
fittings
Depending on the vehicle's equipment, the
various fittings below are located in the seating
area.
This allows the use of the entire load space, up
to the roof:
-
b
ehind the front seats in row 1, when the
rear seats (and bench seats) in rows 2
and 3 are folded or removed.
-
b
ehind the rear seats and bench seats
in row 2, when the rear seats (and bench
seats) in row 3 are folded or removed.
Upper fixings
Lower fixings
(behind row 1)
If your vehicle has fixed one-piece bench seats
or seats and bench seats: F
U
nclip the anchorage cover in the roof on
each side.
F
O
n each side in row 2, insert the fixings in
the floor anchorages (as shown above).
3
Ease of use and comfort
Page 126 of 520
124
Fit the net
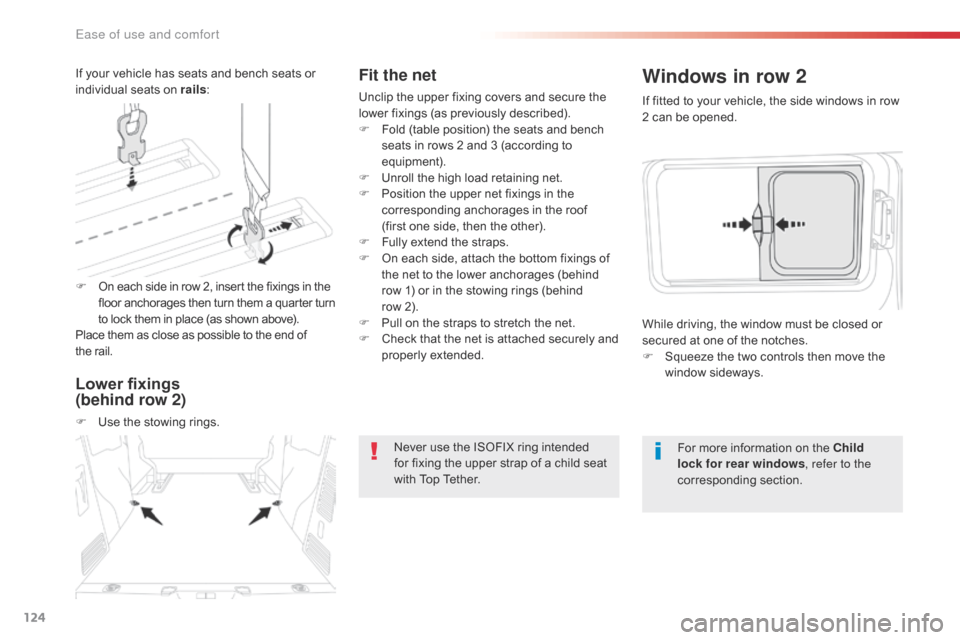
Unclip the upper fixing covers and secure the
lower fixings (as previously described).
F
F
old (table position) the seats and bench
seats in rows 2 and 3 (according to
equipment).
F
U
nroll the high load retaining net.
F
P
osition the upper net fixings in the
corresponding anchorages in the roof
(first one side, then the other).
F
F
ully extend the straps.
F
O
n each side, attach the bottom fixings of
the net to the lower anchorages (behind
row 1) or in the stowing rings (behind
row
2).
F
P
ull on the straps to stretch the net.
F
C
heck that the net is attached securely and
properly extended.
Never use the ISOFIX ring intended
for fixing the upper strap of a child seat
with Top Tether. If fitted to your vehicle, the side windows in row
2 can be opened.
Windows in row 2
For more information on the Child
lock for rear windows
, refer to the
corresponding section.
While driving, the window must be closed or
secured at one of the notches.
F
S
queeze the two controls then move the
window sideways.
F
O
n each side in row 2, insert the fixings in the
floor anchorages then turn them a quar ter turn
to lock them in place (as shown above).
Place them as close as possible to the end of
the
rail.
If your vehicle has seats and bench seats or
individual seats on rails
:
Lower fixings
(behind row 2)
F Use the stowing rings.
Ease of use and comfort
Page 139 of 520
137
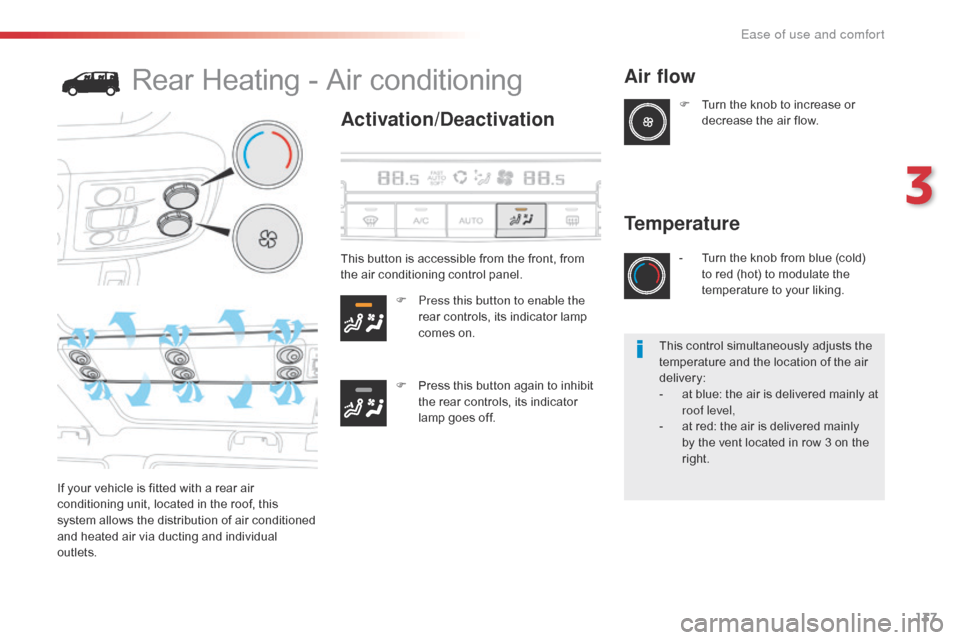
Rear Heating - Air conditioning
Activation/Deactivation
F Press this button to enable the rear controls, its indicator lamp
comes on.
F
P
ress this button again to inhibit
the rear controls, its indicator
lamp goes off.
Air flow
If your vehicle is fitted with a rear air
conditioning unit, located in the roof, this
system allows the distribution of air conditioned
and heated air via ducting and individual
outlets. F
T
urn the knob to increase or
decrease the air flow.
Temperature
- Turn the knob from blue (cold) to red (hot) to modulate the
temperature to your liking.
This button is accessible from the front, from
the air conditioning control panel.
This control simultaneously adjusts the
temperature and the location of the air
delivery:
-
a
t blue: the air is delivered mainly at
roof level,
-
a
t red: the air is delivered mainly
by the vent located in row 3 on the
right.
3
Ease of use and comfort
Page 199 of 520
197
To assure the durability of your vehicle and
your safety, remember that certain precautions,
described hereafter, should be taken when
driving your vehicle:
Load the vehicle correctly
With a load carried, the vehicle must remain
within the maximum authorised weight, the
Gross Vehicle Weight.
To avoid upsetting the balance of the vehicle,
the load should be centred and the heaviest
part placed on the floor in front of the rear
wheels.
Manoeuve cautiously, at
low speed
The dimensions of your vehicle differ from
those of a light vehicle, in width, in height, as
well as in length, and some obstacles will be
more difficult to notice.
Manoeuvre slowly.
Before turning, check that there are no
obstacles at mid-height along the sides.
Before reversing, check that there are no
obstacles, particularly at high level behind the
vehicle.
Be aware of the external dimensions, if ladders
are fitted.It is inadvisable to place heavy loads on a
roof
rack.
Loading the roof rack also requires you not
to exceed the maximum load on the roof rack
anchorages. Observe the maximum authorised
weight, available from CITROËN dealers.
Loads must be securely lashed down.
Cargo that is not properly secured inside the
vehicle can adversely affect the handling of the
vehicle and create the risk of accident.
If your vehicle is fitted with a drop-side back,
the height and width of the load must remain
within the overall dimensions of the vehicle.
Drive the vehicle in a
prudent and efficient way
Take corners gently.
Anticipate the need to brake as the stopping
distance is increased, particularly on wet or icy
roads.
Be aware of the effect of side winds on the
vehicle.
Effective eco-driving saves fuel; accelerate
progressively, anticipate the need to slow down
and adapt your speed to suit the situation.
Indicate changes of direction well in advance
so that you are seen by other road users.
Take care
The tyres must be inflated to at least the
pressures indicated on the label, even over-
inflated by 0.2 to 0.3 bar for long journeys.
After ensuring that no obstacle might prevent
closing, guide the movement of the door at the
right speed until it closes.
6
Driving
Page 246 of 520

244
The Active Safety Brake system does not
operate:
-
i
f the front bumper is damaged,
-
i
f the system has been triggered in the last
10 seconds,
-
i
f the electronic stability control system has
a fault.Limits of operation
It is recommended that the system be
deactivated in the vehicle configuration menu
in the following cases:
-
i
f the windscreen has impact damage close
to the detection camera,
-
w
hen towing a trailer or caravan,
-
w
hen a load on the roof rack extends
beyond the windscreen (for example: long
objects),
-
w
hen the vehicle is being towed, with the
engine running,
-
w
hen a "space-saver" type spare wheel is
fitted (if your vehicle has one),
-
w
hen on a rolling road for a service in a
workshop,
-
w
hen in an automatic car wash,
-
i
f the brake lamps are not working.
Following an impact, the system
is automatically disabled; contact
a CITROËN dealer or a qualified
workshop to have the system checked.
Collision Risk Alert
Depending on the degree of risk of collision
detected by the system and the alert threshold
chosen, different levels of alert can be
triggered and displayed in the instrument panel
or the head-up display.
This level of alert is based on the inter-vehicle
time between your vehicle and the vehicle
ahead. Level 1
: visual alert only, warning you
that the vehicle ahead is very close.
A message on your vigilance is
displayed as you close on the vehicle
ahead.
This information also appears in the
head-up display.
For more information on the Head-up
display
, refer to the corresponding
section.
Driving
Page 250 of 520

248
Clean the front bumper, removing the
snow, mud, ... If one of the two sensors (camera
or radar) is masked or its visibility
is reduced, while the other sensor
is able to work normally, the system
still operates, but at a lower level of
per formance. This is not indicated by a
message or a warning lamp.
To ensure correct operation of the radar
radar, do not paint over the paintwork
on the vehicle's bumper.
Keep the windscreen in front of the
camera clean.
Do not allow snow to accumulate on
the bonnet or roof of the vehicle as this
could mask the camera's view.
Lane departure warning system
System that uses a camera to recognise
continuous or broken lines on traffic lanes and
triggers an alert if the vehicle wanders off line.
If the direction indicator is not used at speeds
above 37 mph (60 km/h) and there is a risk of
one of these lines on the ground being crossed,
the system triggers the alert.
The system is particularly useful on motor ways
and fast roads.
Detection - Alert
You are alerted by the flashing of
this warning lamp in the instrument
panel, accompanied by an audible
signal.
No alert is given while the direction
indicators are operating and for
approximately 20 seconds after the
direction indicators are switched off.
The lane departure warning system
cannot in any circumstances replace
the need for vigilance on the part of the
driver.
It is necessary to observe the driving
regulations and to take a break every
two hours.
Driving