vehicle CITROEN NEMO 2013 Handbook (in English)
[x] Cancel search | Manufacturer: CITROEN, Model Year: 2013, Model line: NEMO, Model: CITROEN NEMO 2013Pages: 180, PDF Size: 9.06 MB
Page 40 of 180
38
Access
Good practice
When opening, take care not to obstruct the
guide space on the floor to allow the door to
slide correctly.
Do not block traffic.
Load space
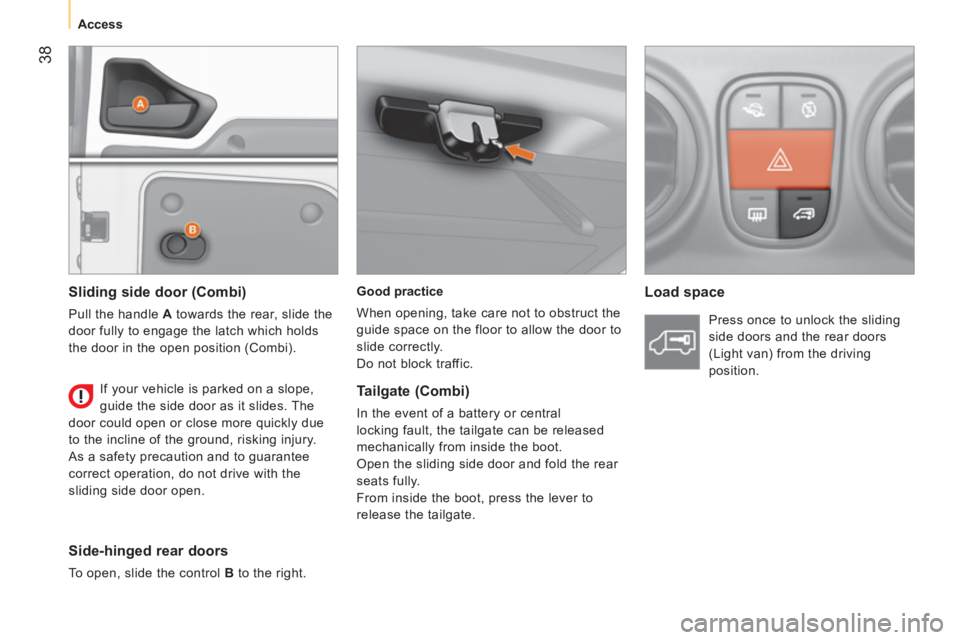
Sliding side door (Combi)
Pull the handle A
towards the rear, slide the
door fully to engage the latch which holds
the door in the open position (Combi).
Side-hinged rear doors
To open, slide the control B
to the right. If your vehicle is parked on a slope,
guide the side door as it slides. The
door could open or close more quickly due
to the incline of the ground, risking injury.
As a safety precaution and to guarantee
correct operation, do not drive with the
sliding side door open. Press once to unlock the sliding
side doors and the rear doors
(Light van) from the driving
position.
Tailgate (Combi)
In the event of a battery or central
locking fault, the tailgate can be released
mechanically from inside the boot.
Open the sliding side door and fold the rear
seats fully.
From inside the boot, press the lever to
release the tailgate.
Page 41 of 180

39
1
READY TO GO
Access
CLOSING FROM INSIDE
Central locking
Push the interior handle to lock the entire
vehicle or the door concerned. However,
if one of the doors is open or is not closed
correctly, the central locking does not work.
Always remove the key from the
ignition when leaving the vehicle, even
for a short time.
Closing from 180°
The check strap will re-attach automatically
when the hinged doors are closed, the small
door being closed first.
Load space
Press to lock the sliding side
doors and the rear doors
(Light van) from the driving
position.
Protection against attack
When the vehicle is started, the system
locks the driving position and load space
doors automatically when you reach
approximately 12 mph (20 km/h).
This "AUTOCLOSE" function is activated or
deactivated via the "MENU".
If none of the doors are opened during the
journey, the locking remains active.
This function is deactivated when the vehicle
is delivered.
Page 43 of 180
41
1
READY TO GO
Steering mounted controls
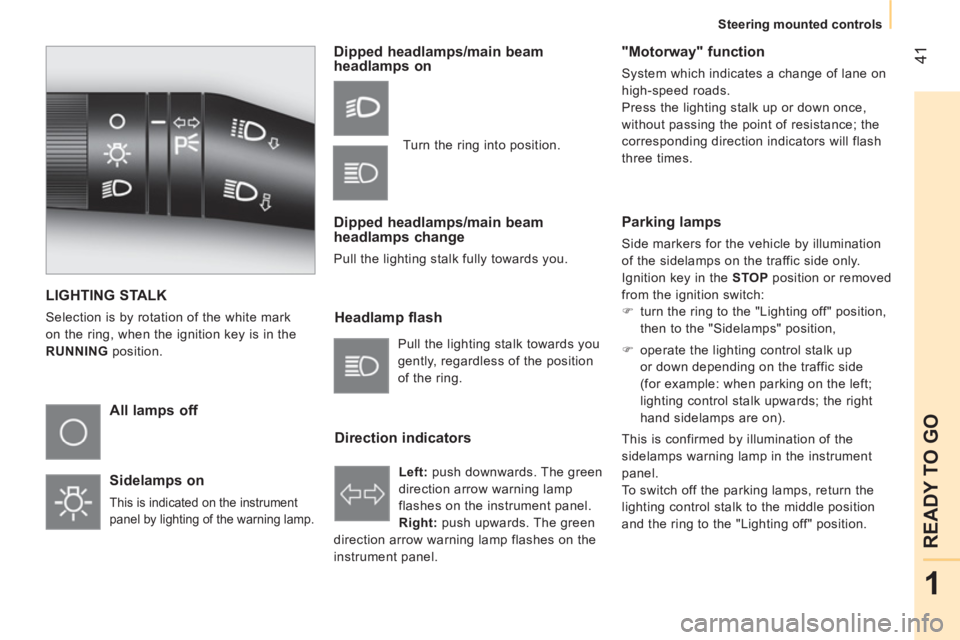
LIGHTING STALK
Selection is by rotation of the white mark
on the ring, when the ignition key is in the
RUNNING position.
All lamps off
Sidelamps on
This is indicated on the instrument
panel by lighting of the warning lamp.
Dipped headlamps/main beam
headlamps on
Dipped headlamps/main beam
headlamps change
Pull the lighting stalk fully towards you.
Headlamp flash
Direction indicators
"Motorway" function
System which indicates a change of lane on
high-speed roads.
Press the lighting stalk up or down once,
without passing the point of resistance; the
corresponding direction indicators will flash
three times.
Pull the lighting stalk towards you
gently, regardless of the position
of the ring.
Left:
push downwards. The green
direction arrow warning lamp
flashes on the instrument panel.
Right: push upwards. The green
direction arrow warning lamp flashes on the
instrument panel. Turn the ring into position.
Parking lamps
Side markers for the vehicle by illumination
of the sidelamps on the traffic side only.
Ignition key in the STOP
position or removed
from the ignition switch:
)
turn the ring to the "Lighting off" position,
then to the "Sidelamps" position,
)
operate the lighting control stalk up
or down depending on the traffic side
(for example: when parking on the left;
lighting control stalk upwards; the right
hand sidelamps are on).
This is confirmed by illumination of the
sidelamps warning lamp in the instrument
panel.
To switch off the parking lamps, return the
lighting control stalk to the middle position
and the ring to the "Lighting off" position.
Page 44 of 180
42
Steering mounted controls
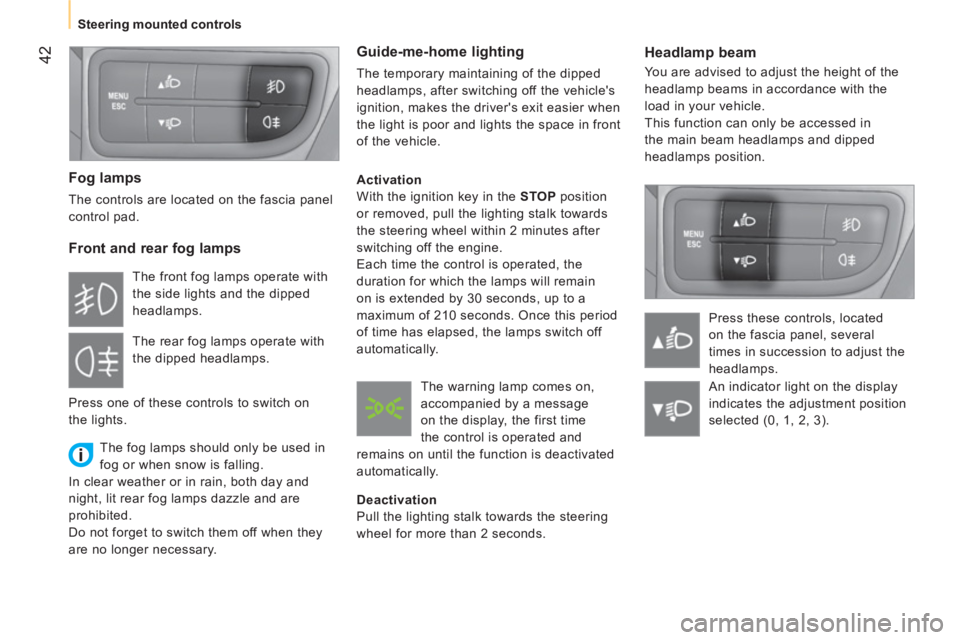
Headlamp beam
You are advised to adjust the height of the
headlamp beams in accordance with the
load in your vehicle.
This function can only be accessed in
the main beam headlamps and dipped
headlamps position.
Press these controls, located
on the fascia panel, several
times in succession to adjust the
headlamps.
Fog lamps
The controls are located on the fascia panel
control pad.
Front and rear fog lamps
The fog lamps should only be used in
fog or when snow is falling.
In clear weather or in rain, both day and
night, lit rear fog lamps dazzle and are
prohibited.
Do not forget to switch them off when they
are no longer necessary.
Guide-me-home lighting
The temporary maintaining of the dipped
headlamps, after switching off the vehicle's
ignition, makes the driver's exit easier when
the light is poor and lights the space in front
of the vehicle.
Activation
With the ignition key in the STOP position
or removed, pull the lighting stalk towards
the steering wheel within 2 minutes after
switching off the engine.
Each time the control is operated, the
duration for which the lamps will remain
on is extended by 30 seconds, up to a
maximum of 210 seconds. Once this period
of time has elapsed, the lamps switch off
automatically.
Deactivation
Pull the lighting stalk towards the steering
wheel for more than 2 seconds. The front fog lamps operate with
the side lights and the dipped
headlamps.
The rear fog lamps operate with
the dipped headlamps.
Press one of these controls to switch on
the lights. The warning lamp comes on,
accompanied by a message
on the display, the first time
the control is operated and
remains on until the function is deactivated
automatically.
An indicator light on the display
indicates the adjustment position
selected (0, 1, 2, 3).
Page 46 of 180

44
Steering mounted controls
Reactivation
- Press the button on the
end of the control again.
or
- Press the accelerator
pedal until a speed close
to the programmed
speed.
- Engage the gear selected when
programming the speed.
Your vehicle will return to the last programmed
speed.
When the system is activated, The "Cruise
control" warning lamp comes on in the
instrument panel:
CRUISE CONTROL
"This is the speed at which the driver wishes
to drive".
This aid to driving in free-flowing traffic
enables the vehicle to maintain the speed
programmed by the driver, without use of the
accelerator pedal.
In order for it to be programmed or
activated, the vehicle speed must be greater
than 18 mph (30 km/h) with at least second
gear engaged on the manual gearbox.
Selecting the function
- Place the ring in the
ON
position. The cruise
control is selected but
is not yet active and
no speed has been
programmed.
First activation/
Programming a speed
- Reach the chosen
speed by pressing the
accelerator.
- Move the control up (+) for at least one
second then release it.
This programmes the reference speed. You
can release the accelerator pedal, and the
vehicle will maintain this speed.
Temporarily exceeding
of the speed
It is possible to accelerate
and drive momentarily at
a speed greater than the
programmed speed (for
example to overtake another vehicle).
When the accelerator pedal is released, the
vehicle will return to the programmed speed.
Deactivation
- Press the button on
the end of the control.
or
- Press the brake or
clutch pedal.
The cruise control is also deactivated if the
ABS or ESP system is invoked.
Page 47 of 180

45
1
READY TO GO
Steering mounted controls
Changing the programmed speed
There are two methods of memorising a
speed higher than the previous one:
Switching the function off
- Place the ring in the
OFF
position or switch
off the ignition to switch
everything off.
Cancelling the programmed speed
When the vehicle becomes stationary, after
switching off the ignition, the system no
longer memorises a speed.
Operating fault
If the system does not operate correctly, turn
the ring to the OFF position and contact a
CITROËN dealer or a qualified workshop.
Good practice
When changing the programmed speed by
means of a maintained press, pay attention as
the speed can increase or decrease rapidly.
Do not use the cruise control on slippery
roads or in heavy traffic.
Never engage neutral while the system is
operating.
In the event of a steep slope, the cruise
control cannot prevent the vehicle from
exceeding the programmed speed.
In any event, the cruise control cannot
replace the need to observe the speed limits,
nor can it replace the need for vigilance and
responsibility on the part of the driver.
It is advisable to leave your feet near the
pedals.
To avoid any jamming under the pedals:
- ensure that the mat and its fixings on the
floor are positioned correctly,
- never place one mat on top of another.
Without using the
accelerator:
- move the control up (+).
Each brief press increases
the speed by 1 mph (km/h).
Using the accelerator:
- exceed the memorised speed until the
speed required is reached,
- move the control up (+) for at least one
second, then release it.
To memorise a speed lower
than the previous one:
- move the control
down (-); the new speed
will be memorised
automatically.
A brief press decreases the speed by 1 mph (km/h). A maintained press decreases the speed
gradually. A maintained press increases the speed
gradually.
FIXED SPEED LIMITER
This function allows a fixed maximum speed
limit to be set for the vehicle (according
to version and only on the 1.3 HDi 75 hp
engine).
The maximum speed can be set to one of
4 pre-defined values: 56, 62, 68 or 80 mph
(90, 100, 110 or 130 km/h).
A label in the passenger compartment
indicates the presence of this function
and its setting.
This function cannot be deactivated or set
by the driver.
Page 48 of 180

46
Mirrors and windows
Rear view mirror
The lever located on the lower edge moves
the mirror into two positions.
For the day position
, the lever is pushed
forwards.
For the night position
to prevent dazzle,
pull the lever towards you.
Door mirrors
The mirror glass is convex in order to widen
the lateral field of vision. Objects seen in the
mirror are in reality closer than they appear.
Therefore, this must be taken into account in
order to assess the distance correctly.
Electric controls
The electric control is located on the left
hand side, level with the mirror.
MIRRORS AND WINDOWS
To defrost the mirrors, press the
heated rear screen button. Select the mirror to be adjusted by turning
the control to the right or to the left, then
move the control in the direction of the
adjustment required.
Manual controls
The right-hand and left-hand manual
controls are located inside the vehicle at the
base of each mirror.
Move the lever in the direction of the
adjustment required.
Page 49 of 180

47
1
READY TO GO
Mirrors and windows
ELECTRIC WINDOWS
Electric controls
The electric windows have a safety anti-
pinch function and are associated with one-
touch controls for lowering and raising.
From the driver’s seat, the controls placed
on the door operate the vehicle’s front
windows.
On the passenger’s side, the control
operates the passenger’s front window.
One-touch controls
An extended press on the control raises or
lowers the window completely.
Press the control again to stop the window.
Press the control briefly to start the
movement of the window.
Manual controls
Turn the window winder located on the door
trim panel.
Good practice
Always remove the key from the ignition
when leaving the vehicle, even for a short
time.
If the electric window meets an obstacle
during operation, you must reverse the
movement of the window. To do this, press
the control concerned.
When the driver operates the passenger
electric window controls, they must ensure
that no one is preventing correct closing of
the windows.
The driver must ensure that the passenger
uses the electric window correctly.
Be aware of children when operating
the windows.
REAR WINDOWS (COMBI)
To partially open the rear windows, tilt the
lever and push it fully to lock the windows in
the open position.
Page 50 of 180
48
Gearbox and steering wheel
Good practice
To change gear smoothly, always press the
clutch pedal fully down.
To prevent the mat from becoming caught
under the pedal:
- ensure that the mat is positioned correctly,
- never fit one mat on top of another.
Avoid leaving your hand on the gear knob as
the force exerted, even if slight, may cause
wear of the internal components of the
gearbox over time.
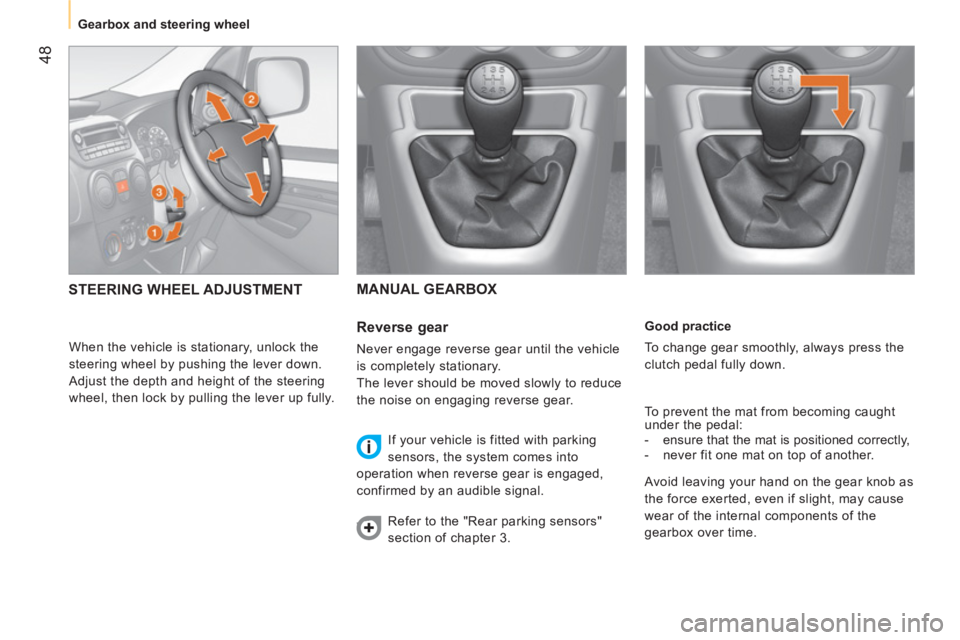
MANUAL GEARBOX
Reverse gear
Never engage reverse gear until the vehicle
is completely stationary.
The lever should be moved slowly to reduce
the noise on engaging reverse gear.
If your vehicle is fitted with parking
sensors, the system comes into
operation when reverse gear is engaged,
confirmed by an audible signal.
Refer to the "Rear parking sensors"
section of chapter 3.
STEERING WHEEL ADJUSTMENT
When the vehicle is stationary, unlock the
steering wheel by pushing the lever down.
Adjust the depth and height of the steering
wheel, then lock by pulling the lever up fully.
Page 51 of 180
49
1
READY TO GO
Gearbox and steering wheel
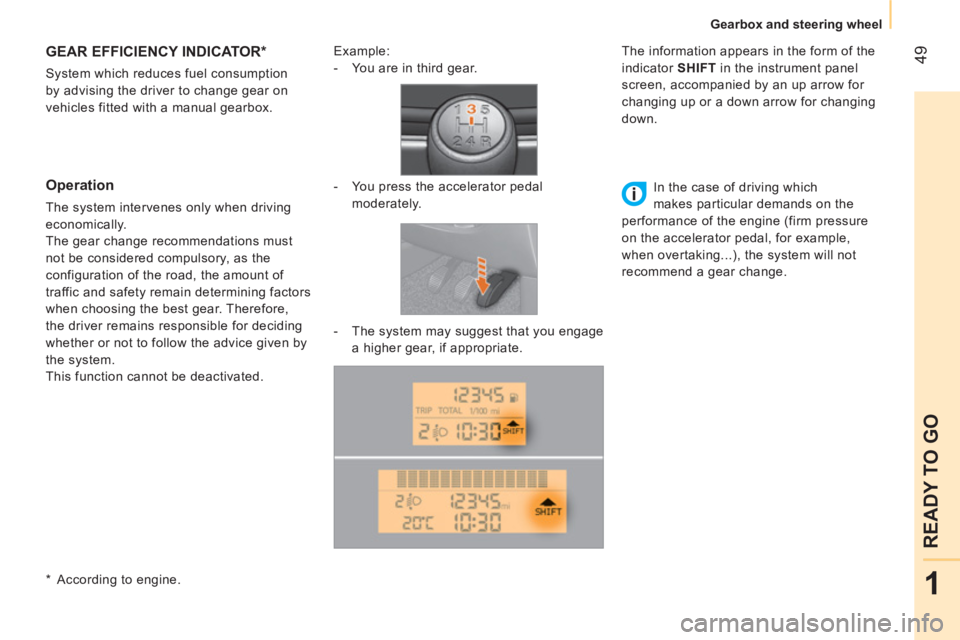
GEAR EFFICIENCY INDICATOR *
System which reduces fuel consumption
by advising the driver to change gear on
vehicles fitted with a manual gearbox.
Operation
The system intervenes only when driving
economically.
The gear change recommendations must
not be considered compulsory, as the
configuration of the road, the amount of
traffic and safety remain determining factors
when choosing the best gear. Therefore,
the driver remains responsible for deciding
whether or not to follow the advice given by
the system.
This function cannot be deactivated.
Example:
- You are in third gear.
- You press the accelerator pedal
moderately.
- The system may suggest that you engage
a higher gear, if appropriate.
The information appears in the form of the
indicator SHIFT
in the instrument panel
screen, accompanied by an up arrow for
changing up or a down arrow for changing
down.
In the case of driving which
makes particular demands on the
performance of the engine (firm pressure
on the accelerator pedal, for example,
when overtaking...), the system will not
recommend a gear change.
*
According to engine.