CITROEN NEMO DAG 2013 Handbook (in English)
Manufacturer: CITROEN, Model Year: 2013, Model line: NEMO DAG, Model: CITROEN NEMO DAG 2013Pages: 180, PDF Size: 9.06 MB
Page 91 of 180

89
TECHNOLOGY on BOARD
Bluetooth hands-free system
3
VOICE COMMANDS
Message reader
The key words which can be recognised by the system are organised into three levels (levels 1, 2 and 3).
When you say a level 1 command, the system makes the level 2 commands available; when you say a level 2 command, the
system makes the level 3 commands available.
Level 1
Level 2
Level 3
Actions
Message reader
Messages Messages received/
Received Activation of the MESS. READER menu.
Activation of the list of text messages received.
Read/read again Reads the text message selected in the list.
Call Deletion of the phone book data.
Delete Transfer of the phone books from your mobile telephone to the
hands-free system (available according to the type of mobile).
Back/Next/Next Go to the next text message in the list
Back/Previous Go to the previous test message in the list.
Read last/read last message/read message Read the last text message received.
Delete all/Delete messages/Delete Delete all text messages in the list after confirmation.
Page 92 of 180

90
Bluetooth hands-free system
Level 1
Level 2
Level 3
Actions
Read messages/
Messages Type of info/Info
Activation of the MESS. READER menu.
Deactivation of the info settings function.
Deactivate reader/
Reader not active/
Reader off Deactivates the reading of text messages.
Visual and audible
info/Visual and
audible/Visual plus
audible/Audible Reception of a text message is signalled in the instrument panel
screen and by an audible signal.
Visual info only/Only
visual/Visual Reception of a text message is signalled only in the instrument
panel screen.
Page 93 of 180

91
TECHNOLOGY on BOARD
Bluetooth hands-free system
3
Audio tracks in .mp3, .wma, .wav format
and playlists with the extension .wpl are
recognised by the system.
Selecting tracks
PORTABLE AUDIO DEVICE PLAYER
Autoplay
USB port
Connect the device to the
USB port directly or using an
appropriate cable (not provided).
Ignition on:
- activates the recognition connection and
automatically starts the playlist,
- or activates automatic play if the system
is programmed to autoplay.
Otherwise, select the track to be
played via the menu. Activate the main menu.
Select SETTINGS then MEDIA
PLAYER then TRACK PLAY.
Confirm.
Select READER or READER
OFF.
Confirm. Activate the main menu.
Select MEDIA PLAYER.
Confirm.
Choose one of the selection
modes:
FOLDERS, ARTISTS, GENRES,
ALBUMS, PLAYLISTS, SHUFFLE
(random play of tracks in the
playlist).
"Media player", then "USB
options" and finally choose
"Folders", "Artists", ...
The PLAY ALL
function enables you
to listen to the entire content of a
selection mode (folders, artists, …).
Page 94 of 180

92
Bluetooth hands-free system
Displaying the fi le information
Previous track
Confirm.
Pausing/resuming play
Next fi le
Changing the sound source
Select the file.
Start play.
This function is only available by voice
command. Pressing:
- within 3 seconds following the start of
play enables you to play the previous
track.
- after 3 seconds enables you to listen to
the current track again.
"Previous".
Press to play the next file.
"Next".
"Stop" to interrupt playback. "Play"
to continue playback. Press to select the audio source
(Radio, CD, Media player).
Pressing suspends or resumes
play. "Track info".
The voice function "Play"
is only
available if playback has been
previously interrupted by the "Stop"
command.
Page 95 of 180

93
TECHNOLOGY on BOARD
Bluetooth hands-free system
3
VOICE COMMANDS
Portable audio device
Level 1
Actions
Player/Multimedia player/Media player Activation of the MEDIA PLAYER menu.
Play/Play the track/Play the multimedia file Activation of play.
Stop/Stop the track/Stop the multimedia file Interruption of playing of the current file.
NEXT/Next track Go to the next menu or file.
PREVIOUS/Previous track/Back Go to the previous menu or file.
Shuffle on/Random play on Activation of playing of the files in random order.
Shuffle off/Random play off Deactivation of playing of the files in random order.
Track repeat on/Repeat on/Repeat Activation of playing of the files in a loop.
Track repeat off/Repeat off Deactivation of playing of the files in a loop.
Now playing/Track information/What is playing/What is this? Display of the information for the file currently being played.
USB media settings/USB settings Activation of the MEDIA PLAYER menu.
Activate automatic play Activation of automatic play on connection of a portable device.
Deactivate automatic play Deactivation of automatic play on connection of a portable device.
Shuffle/Any/Random Activation of play of all tracks in random order The key words which can be recognised by the system are organised into three levels (levels 1, 2 and 3).
When you say a level 1 command, the system makes the level 2 commands available; when you say a level 2 command,
the system makes the level 3 commands available.
Page 96 of 180

94
Bluetooth hands-free system
Level 1
Level 2
Level 3
Actions
Player/Multimedia
player/Media player/
Player Activation of the MEDIA PLAYER menu.
Advanced USB options/Other options Activation of playback options.
Folder/Explore
folders/Consult list of
folders Activation of FOLDERS menu.
Artists/List of artists Activation of ARTISTS menu.
Genres/List of
genres Activation of GENRES menu.
Album/List of
albums Activation of ALBUMS menu.
Playlist/List of
tracks Activation of PLAYLISTS menu.
Page 97 of 180

95
4
EASE OF USE and COMFORT
Seats
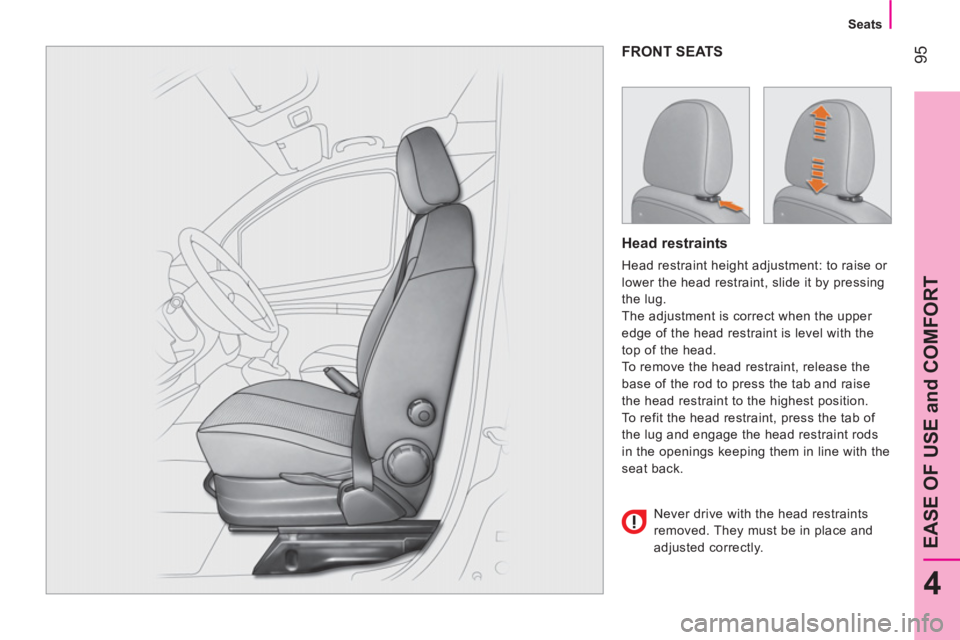
FRONT SEATS
Head restraints
Head restraint height adjustment: to raise or
lower the head restraint, slide it by pressing
the lug.
The adjustment is correct when the upper
edge of the head restraint is level with the
top of the head.
To remove the head restraint, release the
base of the rod to press the tab and raise
the head restraint to the highest position.
To refit the head restraint, press the tab of
the lug and engage the head restraint rods
in the openings keeping them in line with the
seat back.
Never drive with the head restraints
removed. They must be in place and
adjusted correctly.
Page 98 of 180

96
Seats
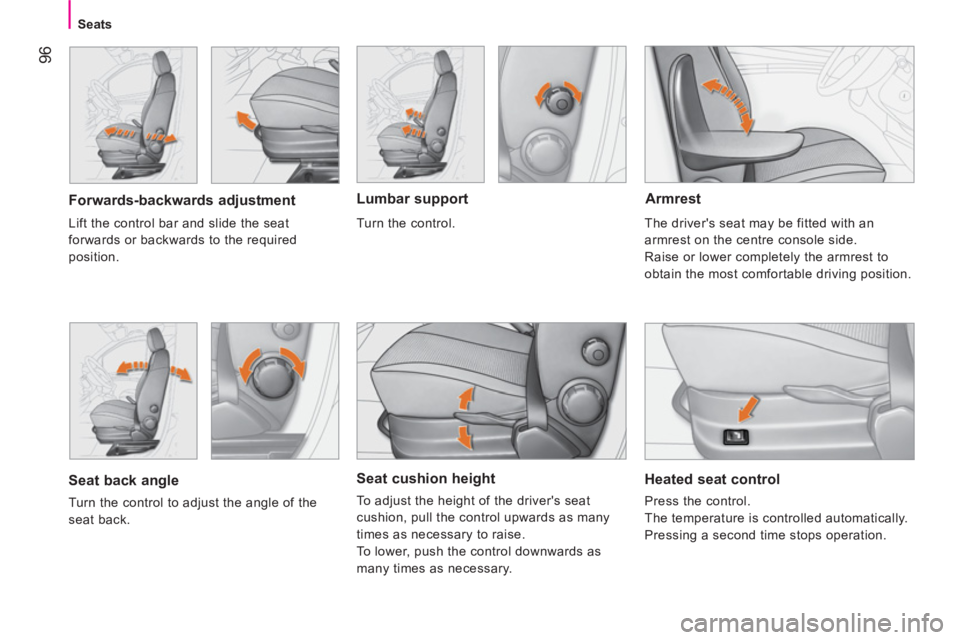
Seat cushion height
To adjust the height of the driver's seat
cushion, pull the control upwards as many
times as necessary to raise.
To lower, push the control downwards as
many times as necessary.
Forwards-backwards adjustment
Heated seat control
Press the control.
The temperature is controlled automatically.
Pressing a second time stops operation. Lift the control bar and slide the seat
forwards or backwards to the required
position.
Lumbar support
Seat back angle
Turn the control to adjust the angle of the
seat back. Turn the control.
Armrest
The driver's seat may be fitted with an
armrest on the centre console side.
Raise or lower completely the armrest to
obtain the most comfortable driving position.
Page 99 of 180

97
4
EASE OF USE and COMFORT
Seats
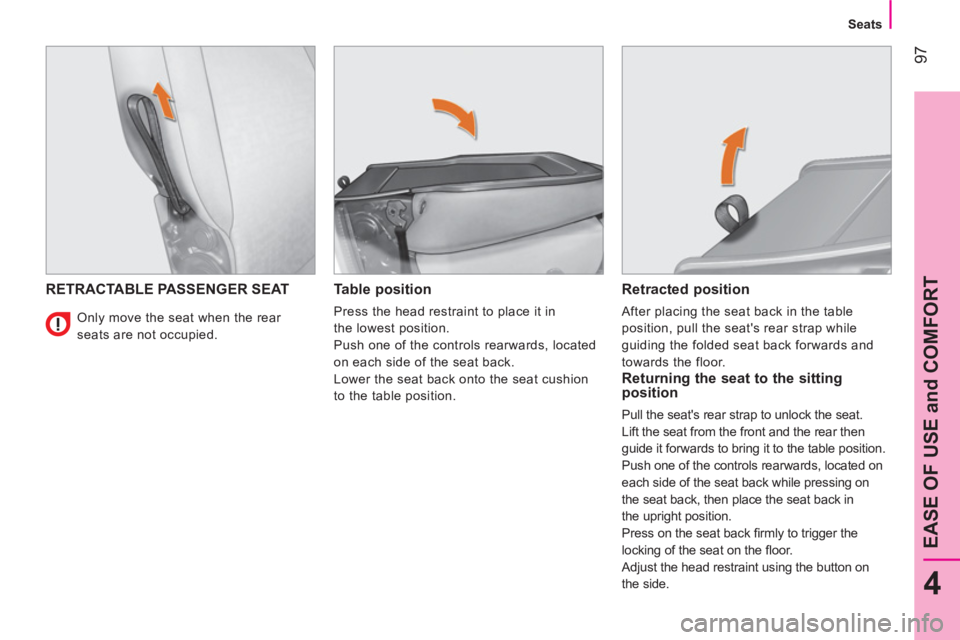
RETRACTABLE PASSENGER SEAT
Table position
Press the head restraint to place it in
the lowest position.
Push one of the controls rearwards, located
on each side of the seat back.
Lower the seat back onto the seat cushion
to the table position.
Retracted position
After placing the seat back in the table
position, pull the seat's rear strap while
guiding the folded seat back forwards and
towards the floor.
Returning the seat to the sitting
position
Pull the seat's rear strap to unlock the seat.
Lift the seat from the front and the rear then
guide it forwards to bring it to the table position.
Push one of the controls rearwards, located on
each side of the seat back while pressing on
the seat back, then place the seat back in
the upright position.
Press on the seat back fi rmly to trigger the
locking of the seat on the fl oor.
Adjust the head restraint using the button on
the side. Only move the seat when the rear
seats are not occupied.
Page 100 of 180

98
Seats
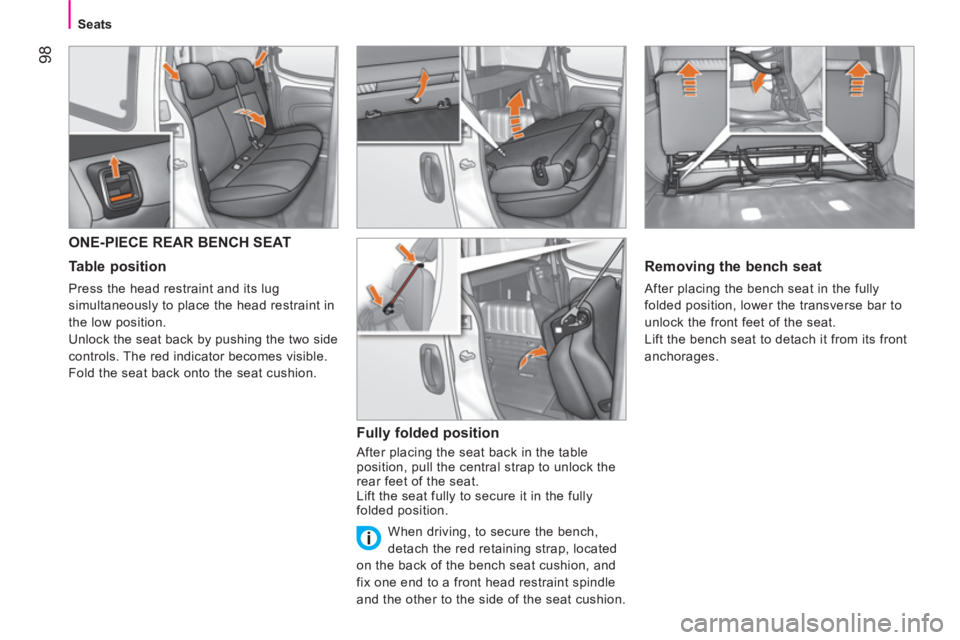
ONE-PIECE REAR BENCH SEAT
Table position
Press the head restraint and its lug
simultaneously to place the head restraint in
the low position.
Unlock the seat back by pushing the two side
controls. The red indicator becomes visible.
Fold the seat back onto the seat cushion.
Fully folded position
After placing the seat back in the table
position, pull the central strap to unlock the
rear feet of the seat.
Lift the seat fully to secure it in the fully
folded position.
Removing the bench seat
After placing the bench seat in the fully
folded position, lower the transverse bar to
unlock the front feet of the seat.
Lift the bench seat to detach it from its front
anchorages.
When driving, to secure the bench,
detach the red retaining strap, located
on the back of the bench seat cushion, and
fix one end to a front head restraint spindle
and the other to the side of the seat cushion.