Screen Citroen NEMO RHD 2015 1.G User Guide
[x] Cancel search | Manufacturer: CITROEN, Model Year: 2015, Model line: NEMO RHD, Model: Citroen NEMO RHD 2015 1.GPages: 193, PDF Size: 8.3 MB
Page 30 of 193
28
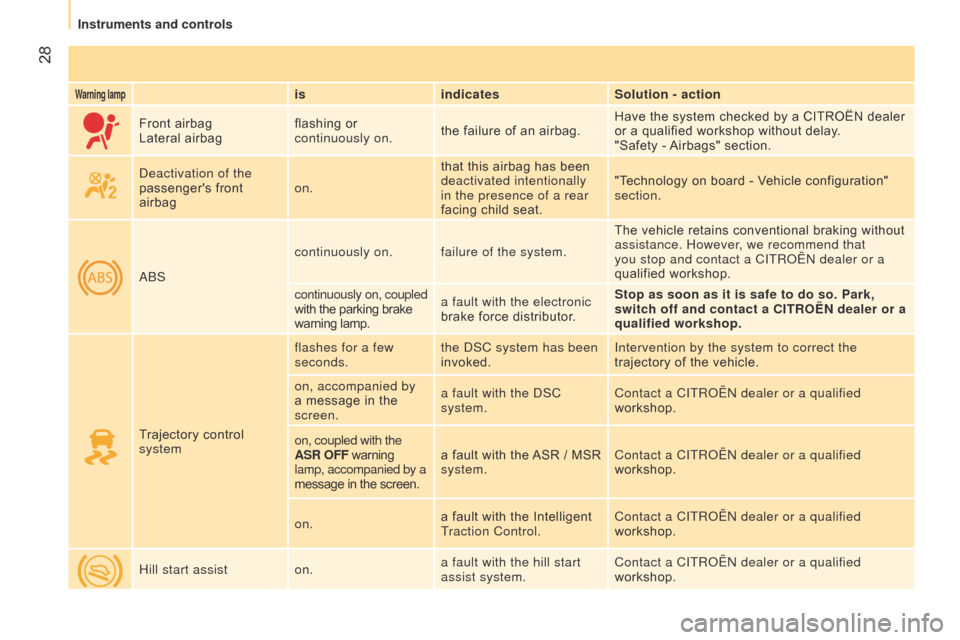
Warning lampisindicates Solution - action
Front airbag
Lateral airbag flashing or
continuously on.
the failure of an airbag. Have the system checked by a CITROËN dealer
or a qualified workshop without delay.
"Safety - Airbags" section.
d
eactivation of the
passenger's front
airbag on.that this airbag has been
deactivated intentionally
in the presence of a rear
facing child seat. "Technology on board - Vehicle configuration"
section.
ab
S continuously on. failure of the system.
The vehicle retains conventional braking without
assistance. However, we recommend that
you stop and contact a CITR
o Ë n dealer or a
qualified workshop.
continuously on, coupled
with the parking brake
warning lamp. a fault with the electronic
brake force distributor. Stop as soon as it is safe to do so. Park,
switch off and contact a
CITROËN dealer or a
qualified workshop.
Trajectory control
system flashes for a few
seconds.
the
d SC system has been
invoked. Intervention by the system to correct the
trajectory of the vehicle.
on, accompanied by
a message in the
screen. a fault with the
d SC
system. Contact a CITR
o Ë n dealer or a qualified
workshop.
on, coupled with the
ASR OFF warning
lamp, accompanied by a
message in the screen. a fault with the ASR / MSR
system.
Contact a CITR
o Ë n dealer or a qualified
workshop.
on. a fault with the Intelligent
Traction Control. Contact a CITR
o Ë n dealer or a qualified
workshop.
Hill start assist on.a fault with the hill start
assist system. Contact a CITR
o Ë n dealer or a qualified
workshop.
Instruments and controls
Page 31 of 193
29
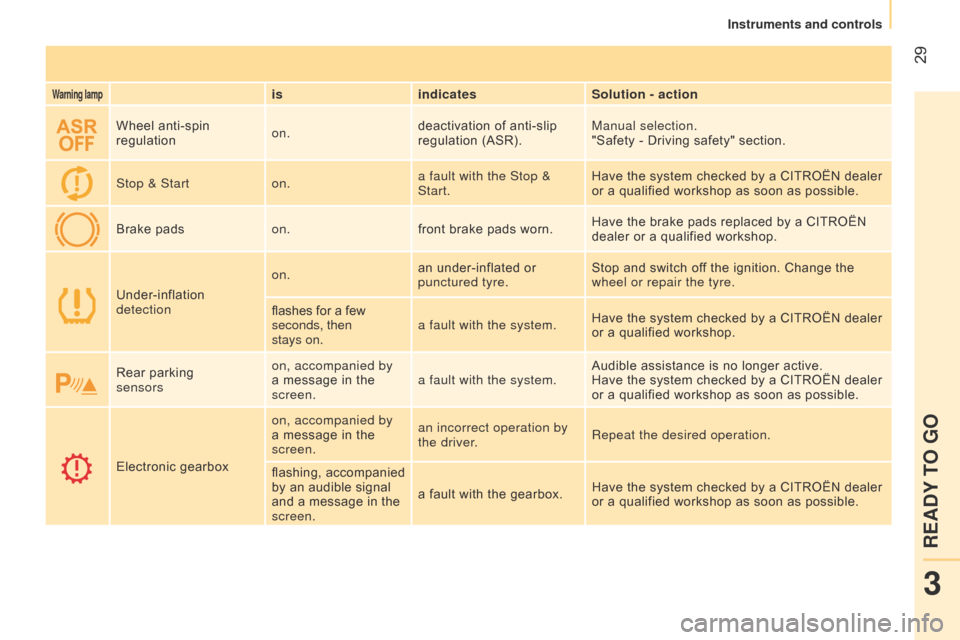
Warning lampisindicates Solution - action
Wheel anti-spin
regulation on.deactivation of anti-slip
regulation (ASR). Manual selection.
"Safety - Driving safety" section.
Stop & Start on.a fault with the Stop &
Start. Have the system checked by a CITROËN dealer
or a qualified workshop as soon as possible.
Brake pads on.front brake pads worn. Have the brake pads replaced by a CITROËN
dealer or a qualified workshop.
Under-inflation
detection on.
an under-inflated or
punctured tyre. Stop and switch off the ignition. Change the
wheel or repair the tyre.
flashes for a few
seconds, then
stays on. a fault with the system.
Have the system checked by a CITROËN dealer
or a qualified workshop.
Rear parking
sensors on, accompanied by
a message in the
screen.
a fault with the system. Audible assistance is no longer active.
Have the system checked by a CITROËN dealer
or a qualified workshop as soon as possible.
Electronic gearbox on, accompanied by
a message in the
screen.
an incorrect operation by
the driver.
Repeat the desired operation.
flashing, accompanied
by an audible signal
and a message in the
screen. a fault with the gearbox.
Have the system checked by a CITROËN dealer
or a qualified workshop as soon as possible.
3
READY TO GO
Instruments and controls
Page 32 of 193
30
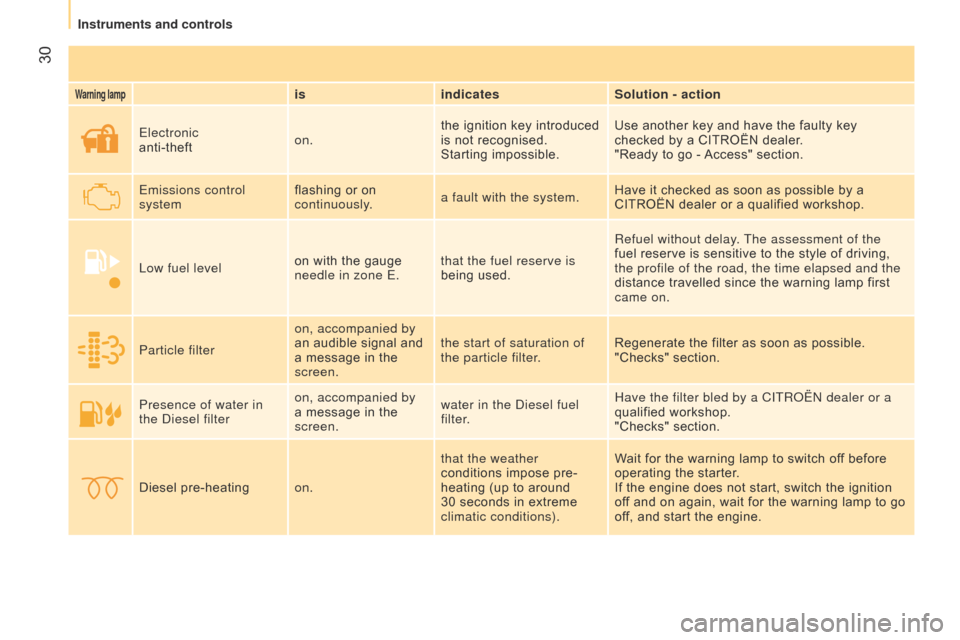
Warning lampisindicates Solution - action
Electronic
anti-theft on.the ignition key introduced
is not recognised.
Starting impossible. Use another key and have the faulty key
checked by a CITROËN dealer.
"Ready to go - Access" section.
Emissions control
system flashing or on
continuously.
a fault with the system. Have it checked as soon as possible by a
CITROËN dealer or a qualified workshop.
Low fuel level on with the gauge
needle in zone E.that the fuel reserve is
being used. Refuel without delay. The assessment of the
fuel reserve is sensitive to the style of driving,
the profile of the road, the time elapsed and the
distance travelled since the warning lamp first
came on.
Particle filter on, accompanied by
an audible signal and
a message in the
screen.the start of saturation of
the particle filter.
Regenerate the filter as soon as possible.
"Checks" section.
Presence of water in
the
d
iesel filter on, accompanied by
a message in the
screen. water in the
d iesel fuel
filter. Have the filter bled by a CITR
o Ë n dealer or a
qualified workshop.
"Checks" section.
Diesel pre-heating on.that the weather
conditions impose pre-
heating (up to around
30 seconds in extreme
climatic conditions). Wait for the warning lamp to switch off before
operating the starter.
If the engine does not start, switch the ignition
off and on again, wait for the warning lamp to go
off, and start the engine.
Instruments and controls
Page 35 of 193

33
Displaydisplaysindicates Solution - action
Stop & Start on.
engine STOP mode
invoked following a stop of
the vehicle.
a
s soon as you want to move off, the
warning lamp goes off and the engine starts
automatically in ST
a
RT mode.
flashes for a few
seconds then
goes off. temporary unavailability
of ST
o
P mode or
START mode invoked
automatically. Particular case with ST
o
P mode and ST
a
RT
mode.
"Ready to go - Starting and stopping" section.
Gear shift indicator the arrow pointing up. a suggested change up. "Ready to go - Gearbox and steering wheel"
section.
Headlamp beam height adjustment of the
headlamps.a position from 0 to 3
according to the load in
the vehicle. Adjust using the buttons in the side control
panel.
"Ready to go - Steering mounted controls
section".
a
mbient temperature
(°C /°F) the temperature,
flashing and
accompanied by a
message in the screen.weather conditions
which could result in the
presence of ice on the
road.
Be especially vigilant and do not brake sharply.
"Safety - Driving safety" section.
Date (YYYY/MM/DD)
Time (HH:MM) a setting:
of the
d ate.
of the Time. a configuration via the
SET / Back button on the
side control panel.
"Technology on board - Vehicle configuration"
menu.
3
READY TO GO
Instruments and controls
Page 37 of 193
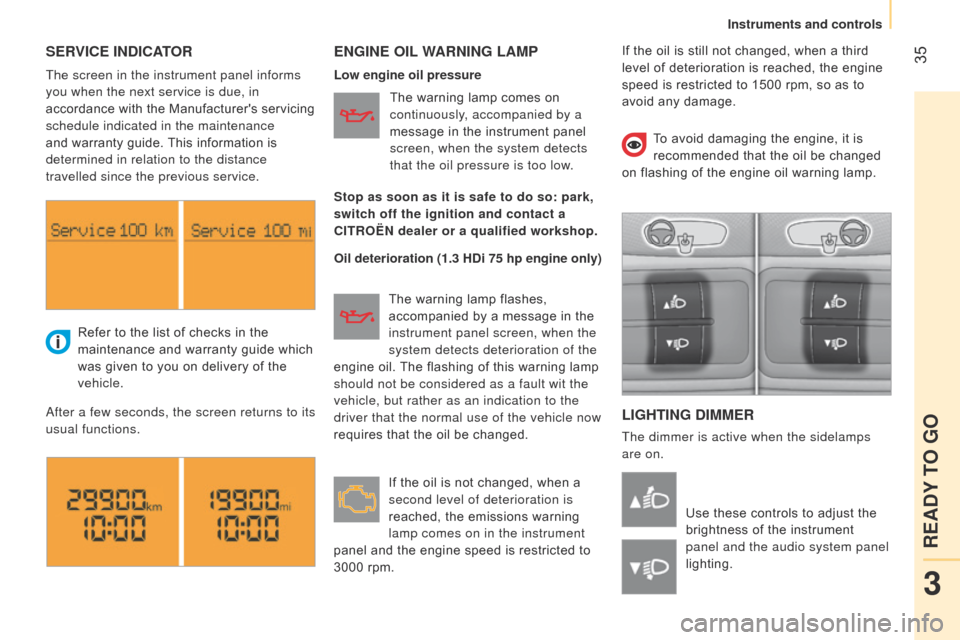
35SERVICE INDICATORENGINE OIL WARNING LAMP
L IGHTING DIMMER
The dimmer is active when the sidelamps
are on.
Refer to the list of checks in the
maintenance and warranty guide which
was given to you on delivery of the
vehicle.
a
fter a few seconds, the screen returns to its
usual functions.
Use these controls to adjust the
brightness of the instrument
panel and the audio system panel
lighting.
The screen in the instrument panel informs
you when the next service is due, in
accordance with the Manufacturer's servicing
schedule indicated in the maintenance
and warranty guide. This information is
determined in relation to the distance
travelled since the previous service.
Low engine oil pressure
Oil deterioration (1.3 HDi 75 hp engine only)The warning lamp comes on
continuously, accompanied by a
message in the instrument panel
screen, when the system detects
that the oil pressure is too low.
The warning lamp flashes,
accompanied by a message in the
instrument panel screen, when the
system detects deterioration of the
engine oil. The flashing of this warning lamp
should not be considered as a fault wit the
vehicle, but rather as an indication to the
driver that the normal use of the vehicle now
requires that the oil be changed.
If the oil is not changed, when a
second level of deterioration is
reached, the emissions warning
lamp comes on in the instrument
panel and the engine speed is restricted to
3000 rpm. To avoid damaging the engine, it is
recommended that the oil be changed
on flashing of the engine oil warning lamp.
Stop as soon as it is safe to do so: park,
switch off the ignition and contact a
CITROËN dealer or a qualified workshop. If the oil is still not changed, when a third
level of deterioration is reached, the engine
speed is restricted to 1500 rpm, so as to
avoid any damage.
3
READY TO GO
Instruments and controls
Page 49 of 193
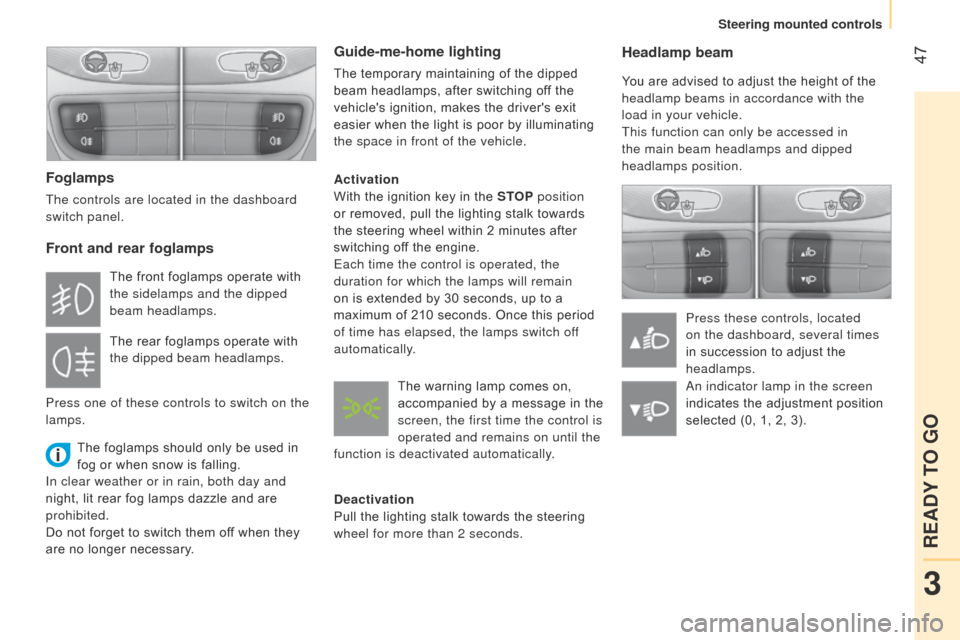
47Headlamp beam
You are advised to adjust the height of the
headlamp beams in accordance with the
load in your vehicle.
This function can only be accessed in
the main beam headlamps and dipped
headlamps position.Press these controls, located
on the dashboard, several times
in succession to adjust the
headlamps.
Foglamps
The controls are located in the dashboard
switch panel.
Front and rear foglamps
The foglamps should only be used in
fog or when snow is falling.
In clear weather or in rain, both day and
night, lit rear fog lamps dazzle and are
prohibited.
Do not forget to switch them off when they
are no longer necessary.
Guide-me-home lighting
The temporary maintaining of the dipped
beam headlamps, after switching off the
vehicle's ignition, makes the driver's exit
easier when the light is poor by illuminating
the space in front of the vehicle.
Activation
With the ignition key in the STOP position
or removed, pull the lighting stalk towards
the steering wheel within 2 minutes after
switching off the engine.
Each time the control is operated, the
duration for which the lamps will remain
on is extended by 30 seconds, up to a
maximum of 210 seconds. Once this period
of time has elapsed, the lamps switch off
automatically.
Deactivation
Pull the lighting stalk towards the steering
wheel for more than 2 seconds.
The front foglamps operate with
the sidelamps and the dipped
beam headlamps.
The rear foglamps operate with
the dipped beam headlamps.
Press one of these controls to switch on the
lamps. The warning lamp comes on,
accompanied by a message in the
screen, the first time the control is
operated and remains on until the
function is deactivated automatically.
a
n indicator lamp in the screen
indicates the adjustment position
selected (0, 1, 2, 3).
3
READY TO GO
Steering mounted controls
Page 50 of 193

48
WIPER STALK
Windscreen wipers
Wiping is only active when the ignition key is
in the RUNNING position.
The stalk may have four different positions.
Three speeds can be selected by turning
the ring.
T
o change the blades, refer to the
"Quick help - Changing a wiper blade"
section.
Good practice
Check that the windscreen wiper blades can
operate freely when using the wipers in icy
weather.
Intermittent.
Slow continuous.
Fast continuous.
Single wipe: by pushing up.
Windscreen wash
Push the stalk down, the windscreen wash
alone is activated.
Hold the stalk down, the windscreen wash
is accompanied by a timed sweep of the
wipers. To top up the levels, refer to the
"Checks - Levels" section.
Rear wiper
This is positioned on the window
of the large rear door.
Turn the ring.
Rear screen wash
The rear screen wash is incorporated next to
the third brake lamp.
Push the stalk up, the rear screen wash
alone is activated.
Hold the stalk up, the rear screen wash is
accompanied by a timed sweep of the wiper.
Steering mounted controls
Page 53 of 193
51
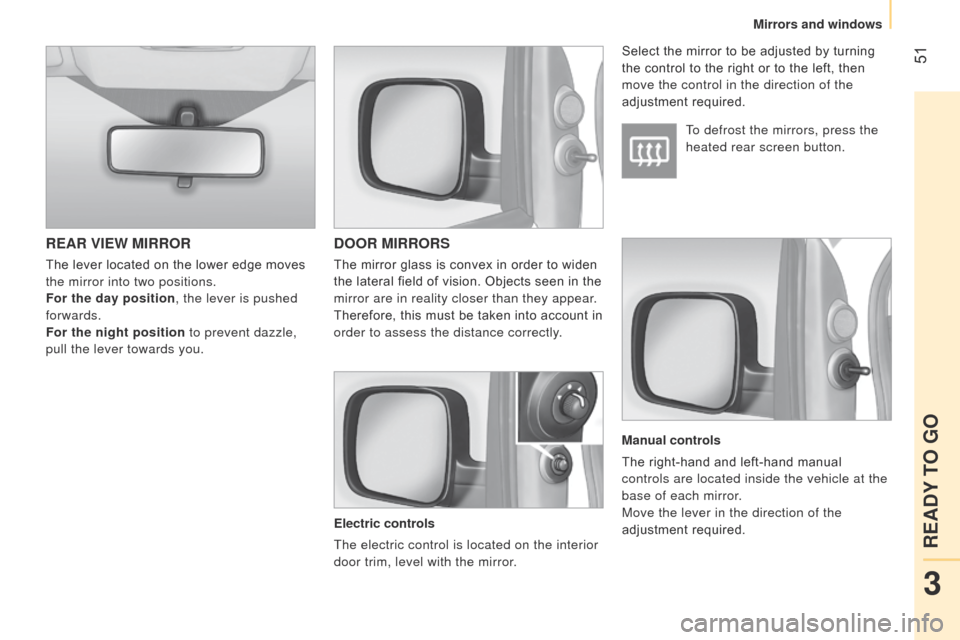
REAR VIEW MIRRORDOOR MIRRORS
Electric controls
The electric control is located on the interior
door trim, level with the mirror. To defrost the mirrors, press the
heated rear screen button.
Select the mirror to be adjusted by turning
the control to the right or to the left, then
move the control in the direction of the
adjustment required.
Manual controls
The right-hand and left-hand manual
controls are located inside the vehicle at the
base of each mirror.
Move the lever in the direction of the
adjustment required.
The lever located on the lower edge moves
the mirror into two positions.
For the day position, the lever is pushed
forwards.
For the night position to prevent dazzle,
pull the lever towards you.
The mirror glass is convex in order to widen
the lateral field of vision. Objects seen in the
mirror are in reality closer than they appear.
Therefore, this must be taken into account in
order to assess the distance correctly.
3
READY TO GO
Mirrors and windows
Page 57 of 193
55
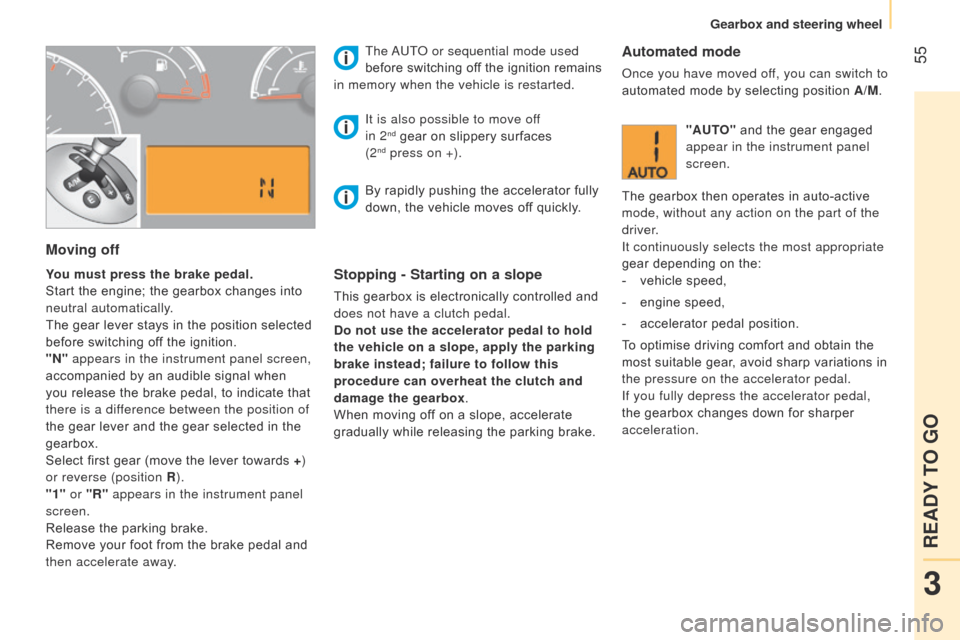
Moving off
You must press the brake pedal.
Start the engine; the gearbox changes into
neutral automatically.
The gear lever stays in the position selected
before switching off the ignition.
"N" appears in the instrument panel screen,
accompanied by an audible signal when
you release the brake pedal, to indicate that
there is a difference between the position of
the gear lever and the gear selected in the
gearbox.
Select first gear (move the lever towards +)
or reverse (position R ).
"1" or "R" appears in the instrument panel
screen.
Release the parking brake.
Remove your foot from the brake pedal and
then accelerate away. The
a
UT
o
or sequential mode used
before switching off the ignition remains
in memory when the vehicle is restarted.Stopping - Starting on a slope
This gearbox is electronically controlled and
does not have a clutch pedal.
Do not use the accelerator pedal to hold
the vehicle on a slope, apply the parking
brake instead; failure to follow this
procedure can overheat the clutch and
damage the gearbox.
When moving off on a slope, accelerate
gradually while releasing the parking brake.
It is also possible to move of
f
in 2
nd gear on slippery surfaces
(2nd press on +).
Automated mode
once you have moved off, you can switch to
automated mode by selecting position A/M.
"AUTO" and the gear engaged
appear in the instrument panel
screen.
The gearbox then operates in auto-active
mode, without any action on the part of the
driver.
It continuously selects the most appropriate
gear depending on the:
-
vehicle speed,
-
engine speed,
-
accelerator pedal position.
T
o optimise driving comfort and obtain the
most suitable gear, avoid sharp variations in
the pressure on the accelerator pedal.
If you fully depress the accelerator pedal,
the gearbox changes down for sharper
acceleration.
By rapidly pushing the accelerator fully
down, the vehicle moves off quickly.
3
READY TO GO
Gearbox and steering wheel
Page 58 of 193
56Stopping the vehicle
To switch off the engine, with your foot on
the brake pedal, you should:
-
select first gear or reverse.
-
apply the parking brake to immobilise the
vehicle.
-
switch of
f the ignition.
Temporarily changing gear in AUTO mode
You can also request a gear change using
the gear lever.
This action does not deactivate the
automated mode, but allows temporary
use of the sequential mode functions (for
example: for overtaking another vehicle...).
"AUTO" remains displayed in the instrument
panel screen.
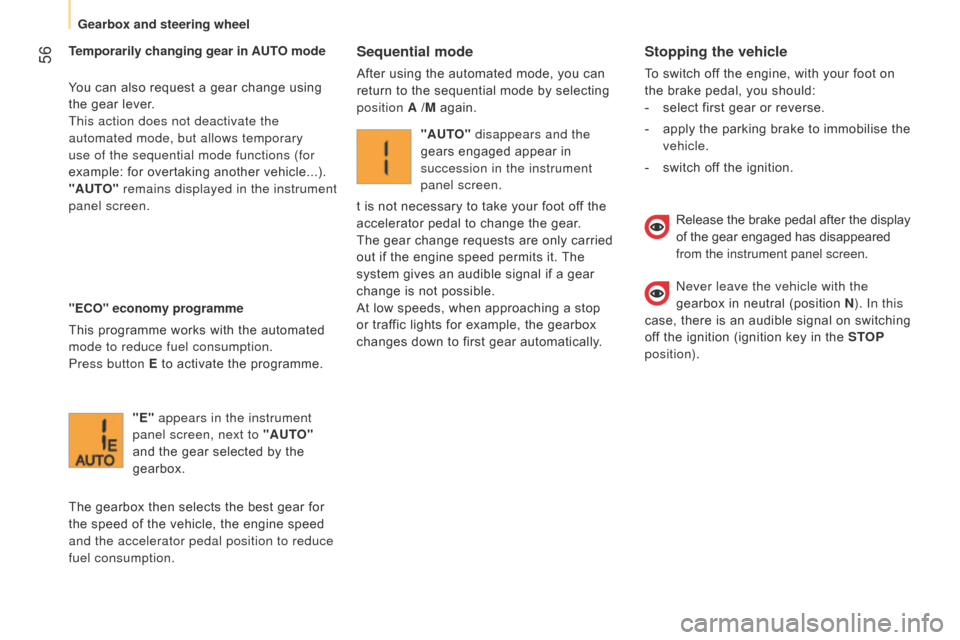
"ECO" economy programme
This programme works with the automated
mode to reduce fuel consumption.
Press button E
to activate the programme.
Sequential mode
After using the automated mode, you can
return to the sequential mode by selecting
position A /M again.
"E" appears in the instrument
panel screen, next to "AUTO"
and the gear selected by the
gearbox.
The gearbox then selects the best gear for
the speed of the vehicle, the engine speed
and the accelerator pedal position to reduce
fuel consumption. "AUTO" disappears and the
gears engaged appear in
succession in the instrument
panel screen.
t is not necessary to take your foot off the
accelerator pedal to change the gear.
The gear change requests are only carried
out if the engine speed permits it. The
system gives an audible signal if a gear
change is not possible.
At low speeds, when approaching a stop
or traffic lights for example, the gearbox
changes down to first gear automatically.
Release the brake pedal after the display
of the gear engaged has disappeared
from the instrument panel screen.
n
ever leave the vehicle with the
gearbox in neutral (position N ). In this
case, there is an audible signal on switching
off the ignition (ignition key in the STOP
position).
Gearbox and steering wheel