CITROEN RELAY 2014 Handbook (in English)
Manufacturer: CITROEN, Model Year: 2014, Model line: RELAY, Model: CITROEN RELAY 2014Pages: 186, PDF Size: 4.72 MB
Page 71 of 186

69
3
EASE OF USE
and
COMFOR
T
Seats
REAR BENCH SEATS
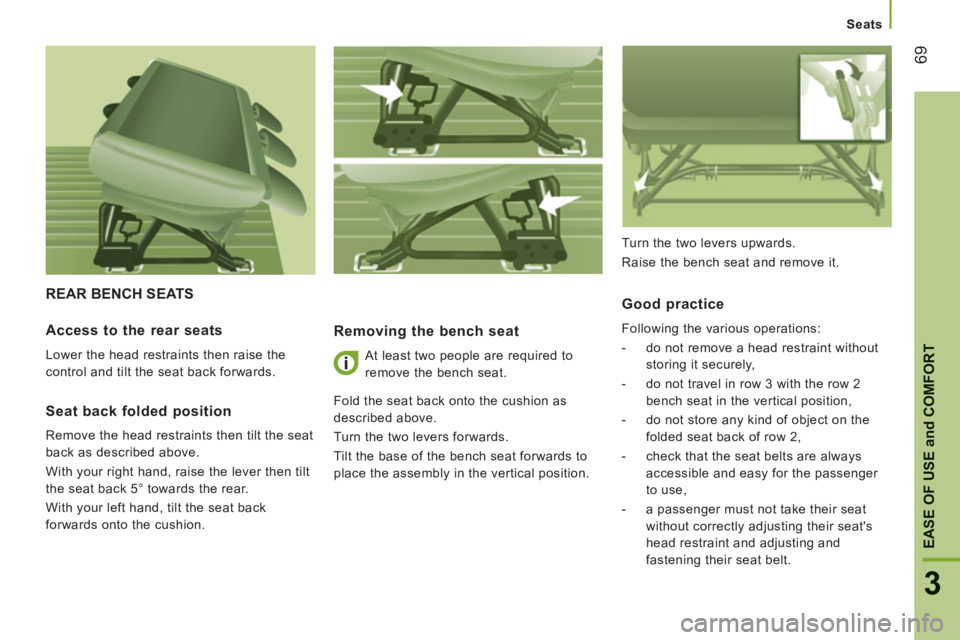
Removing the bench seat
At least two people are required to
remove the bench seat.
Fold the seat back onto the cushion as
described above.
Turn the two levers forwards.
Tilt the base of the bench seat forwards to
place the assembly in the vertical position.
Good practice
Following the various operations:
- do not remove a head restraint without
storing it securely,
- do not travel in row 3 with the row 2
bench seat in the vertical position,
- do not store any kind of object on the
folded seat back of row 2,
- check that the seat belts are always
accessible and easy for the passenger
to use,
- a passenger must not take their seat
without correctly adjusting their seat's
head restraint and adjusting and
fastening their seat belt.
Access to the rear seats
Lower the head restraints then raise the
control and tilt the seat back forwards.
Seat back folded position
Remove the head restraints then tilt the seat
back as described above.
With your right hand, raise the lever then tilt
the seat back 5° towards the rear.
With your left hand, tilt the seat back
forwards onto the cushion. Turn the two levers upwards.
Raise the bench seat and remove it.
Page 72 of 186

70
Seats
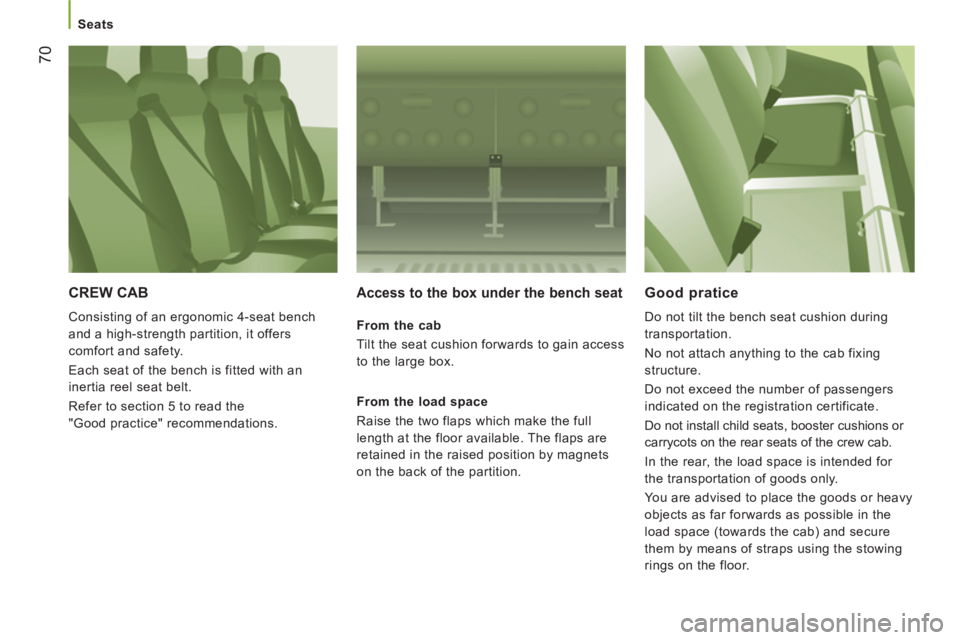
CREW CAB
Consisting of an ergonomic 4-seat bench
and a high-strength partition, it offers
comfort and safety.
Each seat of the bench is fitted with an
inertia reel seat belt.
Refer to section 5 to read the
"Good practice" recommendations.
Access to the box under the bench seat
From the cab
Tilt the seat cushion forwards to gain access
to the large box.
From the load space
Raise the two flaps which make the full
length at the floor available. The flaps are
retained in the raised position by magnets
on the back of the partition.
Good pratice
Do not tilt the bench seat cushion during
transportation.
No not attach anything to the cab fixing
structure.
Do not exceed the number of passengers
indicated on the registration certificate.
Do not install child seats, booster cushions or
carrycots on the rear seats of the crew cab.
In the rear, the load space is intended for
the transportation of goods only.
You are advised to place the goods or heavy
objects as far forwards as possible in the
load space (towards the cab) and secure
them by means of straps using the stowing
rings on the floor.
Page 73 of 186

71
3
EASE OF USE
and
COMFOR
T
Practical information
CAB FITTINGS
Front seat stora
ge
There is a storage drawer, located under the
front seat (driver's).
The location under the passenger's seat
is used for storing the tools required when
changing a wheel.
If your vehicle is fitted with a seat with
variable vibration reduction, it does not have
any storage compartments.
Folding writing table
This is located in the centre of the fascia
panel.
The clip can be used to secure documents,
slips, ...
Pull or push the top of the table to unfold or
fold it.
PRACTICAL INFORMATION
Central stora
ge tray
This may be lockable (according to
specification).
If your vehicle is fitted with a front
passenger airbag, the table cannot be
raised.
Page 74 of 186

72
Practical information
Glove box Cooled glove box
This is located on the top left part of the
dashboard
The air supplied into the glove box is the
same as from the vents.
Sun visor
To avoid glare from ahead, fold the sun visor
down.
Pockets are arranged in the sun visors for
storing toll cards, tickets, ...
Page 75 of 186

73
3
EASE OF USE
and
COMFOR
T
Practical information
12 volt socket
Press and wait a few moments until the
lighter pops out automatically.
When used as a socket: 180 W max.
Cigarette lighter / Portable ashtray
After opening the ashtray, pull it upwards
then empty it into a bin.
Overhead storage compartment
This is located above the sun visors.
Maximum load: approximately 20 kg.
Page 76 of 186

74
Practical information
Courtesy lamp
This is a double courtesy lamp located in
the centre of the roof. It can be activated by
means of:
- the switches located on the courtesy
lamp, with the ignition on - RUNNING
position,
- opening or closing one of the front
doors,
- locking/unlocking the vehicle.
It switches off automatically:
- if the switch is not pressed to the right or
to the left,
- in all cases after 15 minutes, if the doors
remain open or when the ignition is
switched on.
Reading lamps
These are controlled by the switches.
The driver's switch controls both reading lamps
simultaneously.
The passenger switch controls either the driver's
reading lamp or the passenger reading lamp.
Fittings/storage compartment in the
door pockets
Switches on the bottom right of
the dashboard allow the driver
to switch the passenger reading
lamp on and off.
Page 77 of 186

75
3
EASE OF USE
and
COMFOR
T
Practical information
LOAD SPACE FITTINGS
Support for stowing rail
Supports for securing a stowing rail are
available above the trims, on each side of
the vehicle.
12 volt socket
When used as a power socket: 180 W max.
Stowing rings
Eight stowing rings are provided for securing
your loads. Six rings are located on the floor
and two on the partition behind the cab.
As a safety precaution in case of sharp
braking, you are advised to place heavy
objects as far forwards towards the cab as
possible.
Trims
The lower parts of the sides are fitted with
load protection trims.
Page 78 of 186

76
Practical information
Sliding side windows
Depending on the vehicle's
equipment, the side windows of
row 2 can be opened.
Squeeze the two controls then
slide the window.
While driving, the window must be closed or
secured in an intermediate position.
Step
To make access and exit easier, your vehicle
may be fitted with a step which unfolds when
the sliding side door is opened.
Courtesy lamps
If fitted on your vehicle, one or two courtesy
lamps are located above the rear and side
doors.
They can be activated by:
- tilting the courtesy lamp (to the left or to
the right),
- opening or closing the rear or side
doors.
This lighting switches off automatically, after
a few minutes, if the doors are left open.
Reading lamps
They are located above each row of seats.
Roof box
This is a storage compartment located in the
load space, above the cab roof. Its capacity
varies depending on the height of the van roof.
Torch
If provided in your vehicle.
Ladder type vertical partition
Behind the driver's seat, a ladder type
vertical partition protects the driver against
the risk of load movement.
Load retainer
On the floor, behind the front seats, a
horizontal partition protects the driver and
front passengers against the risk of load
movement.
Glazed separation partition
Use the control to open/close the sliding
window of the separation partition.
Page 79 of 186

77
3
EASE OF USE
and
COMFOR
T
Mirrors and windows
MIRRORS AND WINDOWS
MIRROR
S Door mirrors
These are divided into two zones:
A -
Upper mirror
B -
Lower mirror
The mirror glass is spherical in order to
widen the lateral field of vision. Objects
seen in the mirror are in reality closer than
they appear. Therefore, this must be taken
into account in order to assess the distance
correctly.
The shell incorporates the direction indicator
side repeater and the aerials, according to
the equipment available on board (GPS,
GSM, Radio, ...).
Electrical controls
The ignition switch must be in the MAR
position.
Turn the control to select the mirror zone.
1
Driver's mirror:
A1 -
Upper mirror
B1 -
Lower mirror
Then move the control in the direction of the
adjustment required.
2
Passenger mirror:
A2 -
Upper mirror
B2 -
Lower mirror
Then move the control in the direction of the
adjustment required.
Rear view mirror
The lever located on the lower edge moves
the mirror into two positions.
For the day position, the lever is pushed.
For the night position to prevent dazzle, pull
the lever towards you.
Electric folding
Press this control.
Defrosting the mirrors
Press the rear screen defrosting
button.
Page 80 of 186

78
Mirrors and windows
ELECTRIC WINDOWS
A.
Driver's electric window control
B.
Passenger's electric window control
You have two options:
Automatic operation
Press or pull control A/B
, beyond the point
of resistance: the window opens or closes
fully when the control is released.
Pressing the control again stops the
movement of the window.
Manual operation
Press or pull control A
, without passing the
point of resistance.
The window stops when you release the
control.
Good practice
Always remove the key from the ignition
when leaving the vehicle, even for a short
time.
If the electric windows meet an obstacle
during operation, you must reverse the
movement of the window. To do this, press
the control concerned.
When the driver operates the passenger
electric window controls, they must ensure
that no one is preventing correct closing of
the windows.
The driver must ensure that the passengers
use the electric windows correctly.
Be aware of children when operating the
windows.