Levels CITROEN RELAY 2014 Handbook (in English)
[x] Cancel search | Manufacturer: CITROEN, Model Year: 2014, Model line: RELAY, Model: CITROEN RELAY 2014Pages: 186, PDF Size: 4.72 MB
Page 5 of 186
3
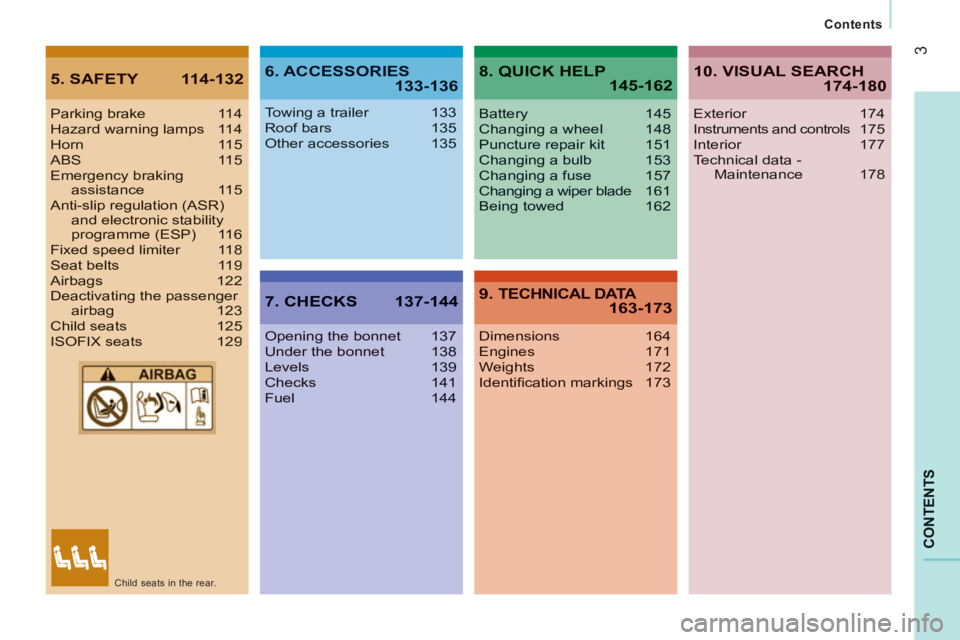
CONTENT
S
Contents
5. SAFETY 114-1326. ACCESSORIES133-136
7. CHECKS 137-144
8. QUICK HELP145-162
9. TECHNICAL DATA 163-173
Parking brake 114Hazard warning lamps 114Horn 115ABS 115Emergency brakingassistance 115Anti-slip regulation (ASR) and electronic stabilityprogramme (ESP) 116Fixed speed limiter 118Seat belts 119Airbags 122Deactivating the passenger airbag 123Child seats 125ISOFIX seats 129
Towing a trailer 133Roof bars 135Other accessories 135
Opening the bonnet 137Under the bonnet 138Levels 139Checks 141Fuel 144
Battery 145Changing a wheel 148Puncture repair kit 151Changing a bulb 153Changing a fuse 157Changing a wiper blade 161Being towed 162
Dimensions 164Engines 171Weights 172Identifi cation markings 173
10. VISUAL SEARCH 174-180
Exterior 174Instruments and controls175Interior 177Technical data - Maintenance 178
Child seats in the rear.
Page 33 of 186
31
2
READY TO G
O
Instruments and controls
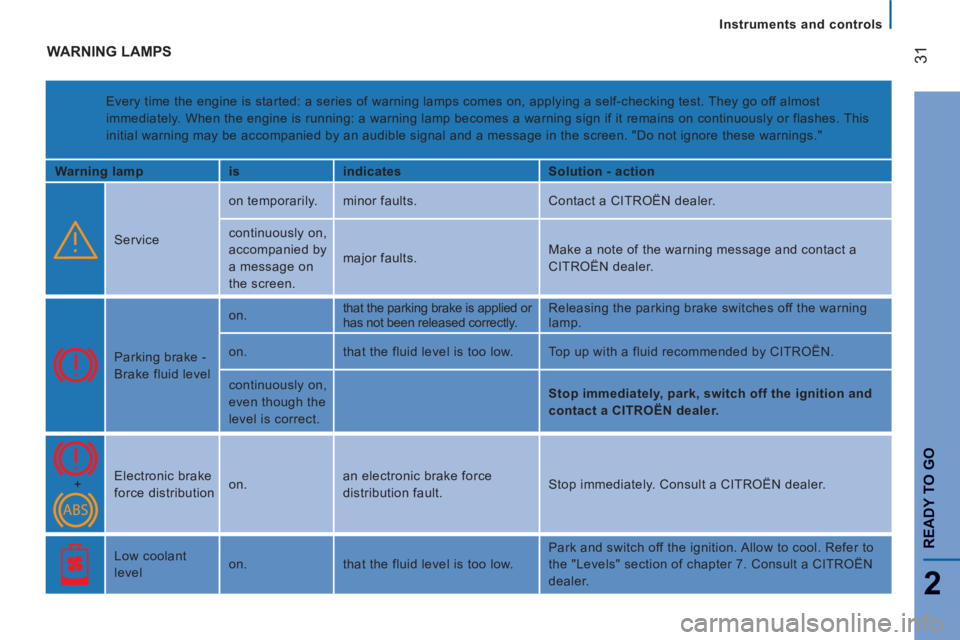
WARNING LAMPS
Every time the engine is started: a series of warning lamps comes on, applying a self-checking test. They go off almost
immediately. When the engine is running: a warning lamp becomes a warning sign if it remains on continuously or flashes. This
initial warning may be accompanied by an audible signal and a message in the screen. "Do not ignore these warnings."
Warning lamp
is
indicates
Solution - action
Service on temporarily. minor faults. Contact a CITROËN dealer.
continuously on,
accompanied by
a message on
the screen. major faults. Make a note of the warning message and contact a
CITROËN dealer.
Parking brake -
Brake fluid level on. that the parking brake is applied or
has not been released correctly. Releasing the parking brake switches off the warning
lamp.
on. that the fluid level is too low. Top up with a fluid recommended by CITROËN.
continuously on,
even though the
level is correct.
Stop immediately, park, switch off the ignition and
contact a CITROËN dealer.
+ Electronic brake
force distribution on. an electronic brake force
distribution fault. Stop immediately. Consult a CITROËN dealer.
Low coolant
level on. that the fluid level is too low. Park and switch off the ignition. Allow to cool. Refer to
the "Levels" section of chapter 7. Consult a CITROËN
dealer.
Page 34 of 186
32
Instruments and controls
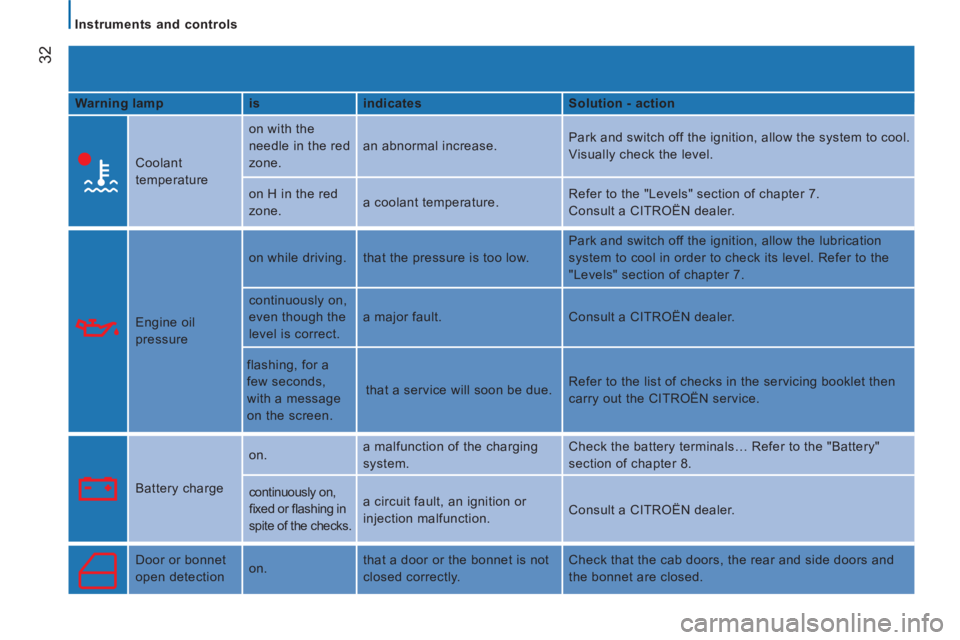
Warning lamp
is
indicates
Solution - action
Coolant
temperature on with the
needle in the red
zone. an abnormal increase. Park and switch off the ignition, allow the system to cool.
Visually check the level.
on H in the red
zone. a coolant temperature. Refer to the "Levels" section of chapter 7.
Consult a CITROËN dealer.
Engine oil
pressure on while driving. that the pressure is too low. Park and switch off the ignition, allow the lubrication
system to cool in order to check its level. Refer to the
"Levels" section of chapter 7.
continuously on,
even though the
level is correct. a major fault. Consult a CITROËN dealer.
flashing, for a
few seconds,
with a message
on the screen. that a service will soon be due. Refer to the list of checks in the servicing booklet then
carry out the CITROËN service.
Battery charge on. a malfunction of the charging
system. Check the battery terminals… Refer to the "Battery"
section of chapter 8.
continuously on,
fi xed or fl ashing in
spite of the checks. a circuit fault, an ignition or
injection malfunction. Consult a CITROËN dealer.
Door or bonnet
open detection on. that a door or the bonnet is not
closed correctly. Check that the cab doors, the rear and side doors and
the bonnet are closed.
Page 40 of 186
38
Instruments and controls
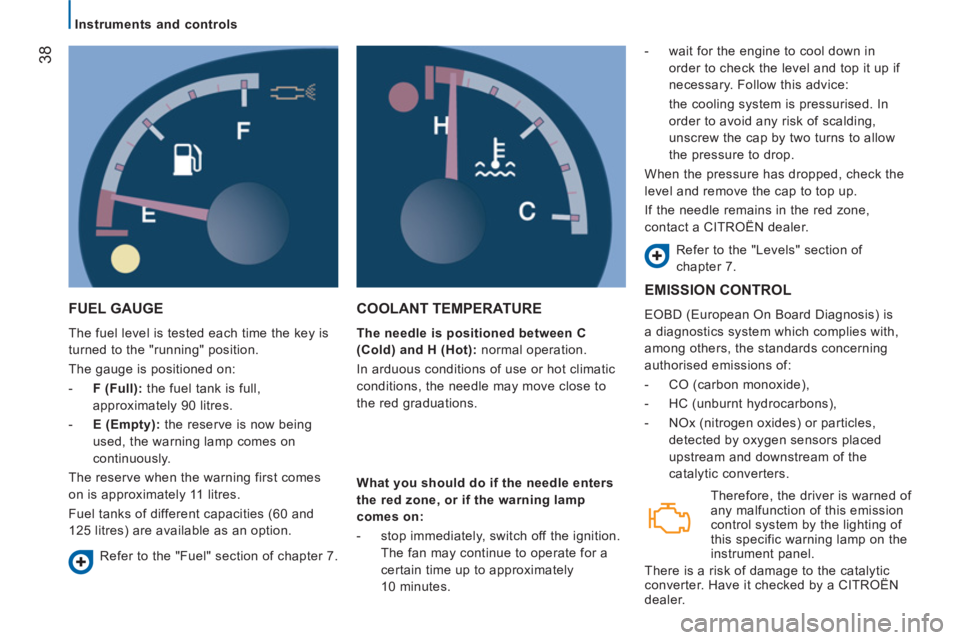
FUEL GAUGE
The fuel level is tested each time the key is
turned to the "running" position.
The gauge is positioned on:
- F (Full):
the fuel tank is full,
approximately 90 litres.
- E (Empty):
the reserve is now being
used, the warning lamp comes on
continuously.
The reserve when the warning first comes
on is approximately 11 litres.
Fuel tanks of different capacities (60 and
125 litres) are available as an option.
COOLANT TEMPERATURE
The needle is positioned between C
(Cold) and H (Hot):
normal operation.
In arduous conditions of use or hot climatic
conditions, the needle may move close to
the red graduations.
- wait for the engine to cool down in
order to check the level and top it up if
necessary. Follow this advice:
the cooling system is pressurised. In
order to avoid any risk of scalding,
unscrew the cap by two turns to allow
the pressure to drop.
When the pressure has dropped, check the
level and remove the cap to top up.
If the needle remains in the red zone,
contact a CITROËN dealer.
Refer to the "Levels" section of
chapter 7.
Refer to the "Fuel" section of chapter 7.
What you should do if the needle enters
the red zone, or if the warning lamp
comes on:
- stop immediately, switch off the ignition.
The fan may continue to operate for a
certain time up to approximately
10 minutes.
EMISSION CONTROL
EOBD (European On Board Diagnosis) is
a diagnostics system which complies with,
among others, the standards concerning
authorised emissions of:
- CO (carbon monoxide),
- HC (unburnt hydrocarbons),
- NOx (nitrogen oxides) or particles,
detected by oxygen sensors placed
upstream and downstream of the
catalytic converters.
Therefore, the driver is warned of
any malfunction of this emission
control system by the lighting of
this specific warning lamp on the
instrument panel.
There is a risk of damage to the catalytic
converter. Have it checked by a CITROËN
dealer.
Page 41 of 186
39
2
READY TO G
O
Instruments and controls
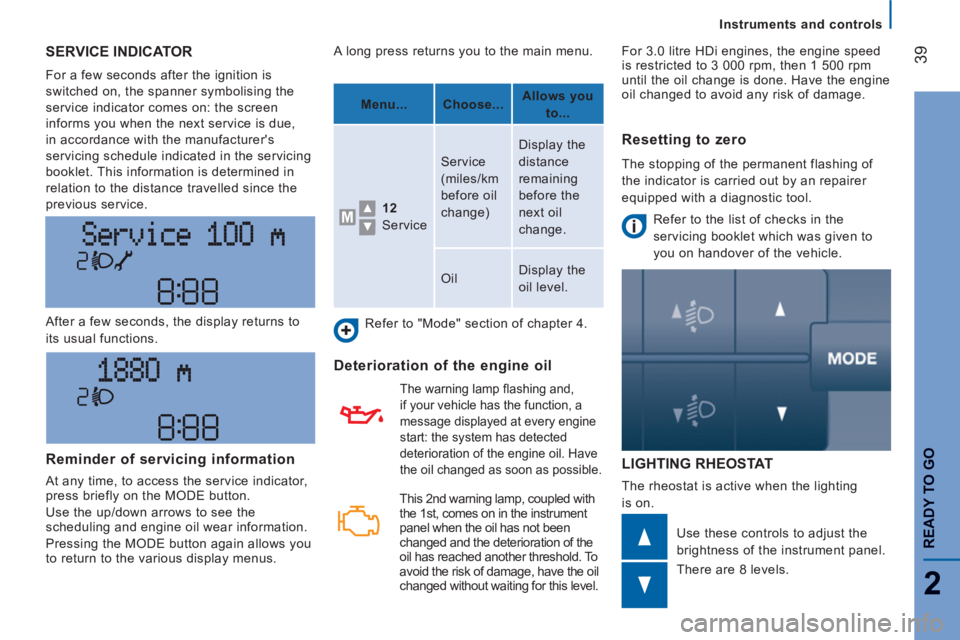
SERVICE INDICATOR
For a few seconds after the ignition is
switched on, the spanner symbolising the
service indicator comes on: the screen
informs you when the next service is due,
in accordance with the manufacturer's
servicing schedule indicated in the servicing
booklet. This information is determined in
relation to the distance travelled since the
previous service.
LIGHTING RHEOSTAT
The rheostat is active when the lighting
is on. After a few seconds, the display returns to
its usual functions.
Use these controls to adjust the
brightness of the instrument panel.
There are 8 levels. A long press returns you to the main menu.
Refer to "Mode" section of chapter 4.
Deterioration of the engine oil
The warning lamp fl ashing and,
if your vehicle has the function, a
message displayed at every engine
start: the system has detected
deterioration of the engine oil. Have
the oil changed as soon as possible.
Reminder of servicing information
At any time, to access the service indicator,
press briefly on the MODE button.
Use the up/down arrows to see the
scheduling and engine oil wear information.
Pressing the MODE button again allows you
to return to the various display menus.
Menu...
Choose...
Allows you
to...
12
Service Service
(miles/km
before oil
change) Display the
distance
remaining
before the
next oil
change.
Oil Display the
oil level.
Resetting to zero
The stopping of the permanent flashing of
the indicator is carried out by an repairer
equipped with a diagnostic tool.
Refer to the list of checks in the
servicing booklet which was given to
you on handover of the vehicle. For 3.0 litre HDi engines, the engine speed
is restricted to 3 000 rpm, then 1 500 rpm
until the oil change is done. Have the engine
oil changed to avoid any risk of damage.
This 2 nd warning lamp, coupled with
the 1 st , comes on in the instrument
panel when the oil has not been
changed and the deterioration of the
oil has reached another threshold. To
avoid the risk of damage, have the oil
changed without waiting for this level.
Page 52 of 186

50
Steering mounted controls
WIPER STALK
Slow continuous wiping: 2 notches downwards. Do not cover the rain sensor, located at
the top centre of the windscreen.
When washing the vehicle, switch off the
ignition or deactivate the automatic rain
sensitive wipers.
Screenwash and headlamp wash
Pull the stalk towards you, the wash-wipe
is accompanied by a timed operation the
wipers.
The headlamp wash is linked with the
screenwash, it is triggered if the dipped
beam headlamps are on.
Windscreen wipers
Wiping is only active when the ignition key is
in the RUNNING
position.
The stalk has five different positions:
Wipers off.
Intermittent wiping:
1 notch downwards.
In this position, four speeds
can be selected by turning the ring:
- very slow intermittent,
- slow intermittent,
- intermittent,
- fast intermittent.
Automatic rain sensitive windscreen
wipers
If your vehicle is fitted with this system, the
wiping speed is adapted automatically to the
intensity of the rainfall.
Automatic wiping: 1 notch downwards. This is
confi rmed by one wipe. Must be reactivated
each time the ignition is switched on.
In this position, the sensitivity of the rain
sensor can be increased by turning the ring.
Good practice
Check that the windscreen wiper blades can
operate freely when using the wipers in icy
weather.
Use the step in the front bumper, to remove
any accumulation of snow at the base of the
windscreen and on the blades.
To change the blades, refer to the
"Changing a wiper blade" section of
chapter 8.
To top up the levels, refer to the
"Levels" section of chapter 7. Fast continuous wiping: 3 notches
downwards.
Single wipe, pull the control towards the
steering wheel.
With Stop & Start, when the wiper
control stalk is in the fast wipe position,
the STOP mode is not available.
Page 88 of 186

86
Pneumatic suspension
PNEUMATIC SUSPENSION
If your vehicle is fitted with pneumatic
suspension, you can adjust the height of
the rear of the vehicle to make loading and
unloading easier.
The control panel is located on the
dashboard.
There is a nominal level as well as 6 height
adjustment levels, raising (from +1 to +3) or
lowering (from -1 to -3). Each level reached
is indicated on the instrument panel screen.
Manual adjustment of the loadingheight
Raise: upwards adjustment
of the load floor
Make a quick press on the control
to select the next level up. Each
press (LED on) raises the floor by
one level: +1 to +3.
A long press selects the highest
level (+3).
Lower: downwards adjustment of the
load floor
Make a quick press on the control
to select the next level down.
Each press (LED on) lowers the
floor by one level: -1 to -3.
A long press selects the lowest
level (-3).
Page 106 of 186

104
Bluetooth hands-free system
VOICE COMMANDS
The key words which can be recognised by the system are organised into three levels (levels 1, 2 and 3).
When you say a level 1 command, the system makes the level 2 commands available; when you say a level 2 command, the
system makes the level 3 commands available.
Settings/pairing
Level 1
Level 2
Level 3
Actions
Settings
Adjust
Configure User data Activation of the hands-free system SETTINGS menu.
Activation of the USER DATA menu.
Delete users Deletion of the data recorded for all of the users.
Delete contacts /
Delete directory /
Delete numbers Deletion of the phone book data.
Copy phone book /
Copy phonebook /
Copy numbers Transfer of the phone books from your mobile telephone to the
hands-free system (available according to the type of mobile
telephone).
Add Contacts Transfer of the names from your mobile telephone to the hands-free
system (available according to the type of mobile).
Delete all Deletion of the pairing data and of the phone books / contacts of all
of the telephones paired, with restoration of the default settings of
the hands-free system.
Pairing / Pair / Pair the user Activation of the pairing procedure for a new mobile telephone.
Advanced options Activation of the ADVANCED OPTIONS menu.
Page 107 of 186

105
Bluetooth hands-free system
4
TECHNOLOGY
on
BOAR
D
The key words which can be recognised by the system are organised into three levels (levels 1, 2 and 3).
When you say a level 1 command, the system makes the level 2 commands available; when you say a level 2 command, the
system makes the level 3 commands available.
VOICE COMMANDS
Mobile telephone with hands-free function
Level 1
Level 2
Level 3
Actions
Dial / Dial a number One, Two, ... , Plus,
Star, Hash
Call / Dial Entering the digits or symbols to dial the telephone number.
Delete / Correct Deletion of the last group of digits entered.
Start over Deletion of all of the groups of digits entered with the option
of entering a new number.
Repeat Repeating the telephone number entered and recognised by the
hands-free system.
Cancel Cancellation of dialling of the number.
Sending the call to the number entered verbally.
Call [ Name ] Yes / No Call to the name of the person, stored in the system's phone book.
Mobile
Call to the name of the person with personalisation if there are
several numbers stored in the system. Home
Work / Office
Redial Call to the last person called.
Callback Call to the last person who called.
Page 110 of 186

108
Bluetooth hands-free system
VOICE COMMANDS
Message reader
The key words which can be recognised by the system are organised into three levels (levels 1, 2 and 3).
When you say a level 1 command, the system makes the level 2 commands available; when you say a level 2 command, the
system makes the level 3 commands available.
Level 1
Level 2
Level 3
Actions
Message reader
Messages Messages received /
Received Activation of the MESS. READER menu.
Activation of the list of text messages received.
Read/ read again Reads the text message selected in the list.
Call Deletion of the phone book data.
Delete Transfer of the phone books from your mobile telephone to the
hands-free system (available according to the type of mobile).
Back / Next / Next Go to the next text message in the list
Back / Previous Go to the previous test message in the list.
Read last / read last message / read message Read the last text message received.
Delete all / Delete messages / Delete Delete all text messages in the list after confirmation.