buttons CITROEN RELAY 2014 Handbook (in English)
[x] Cancel search | Manufacturer: CITROEN, Model Year: 2014, Model line: RELAY, Model: CITROEN RELAY 2014Pages: 186, PDF Size: 4.72 MB
Page 8 of 186
222
6
Familiarisation
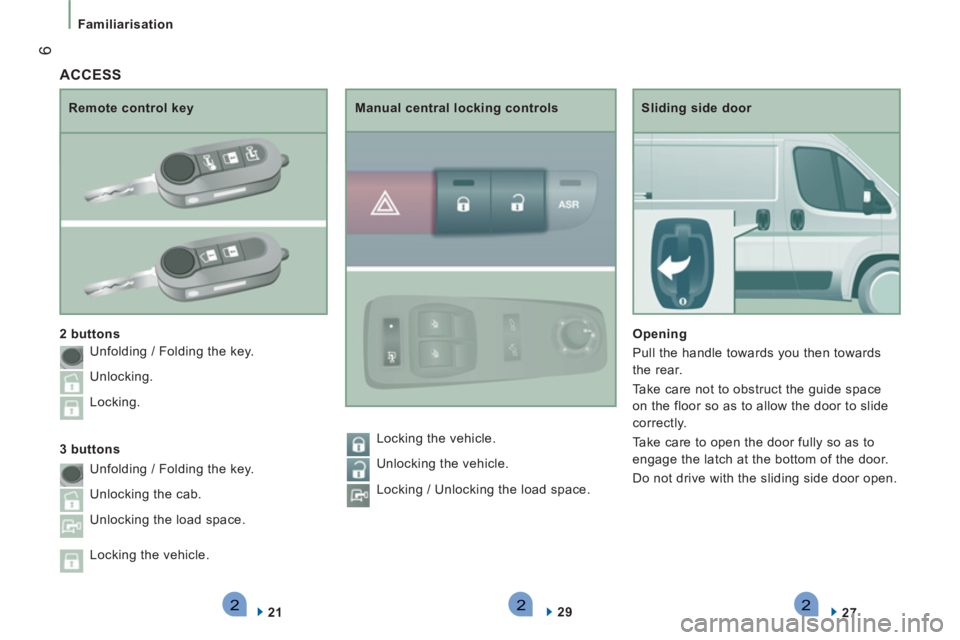
Sliding side door
Opening
Pull the handle towards you then towards
the rear.
Take care not to obstruct the guide space
on the floor so as to allow the door to slide
correctly.
Take care to open the door fully so as to
engage the latch at the bottom of the door.
Do not drive with the sliding side door open.
27
Remote control key
2 buttons
21
Manual central locking controls
29
ACCESS
3 buttons Unfolding / Folding the key.
Unlocking.
Locking.
Unfolding / Folding the key.
Unlocking the cab.
Unlocking the load space.
Locking the vehicle. Locking the vehicle.
Unlocking the vehicle.
Locking / Unlocking the load space.
Page 17 of 186
221
FAMILIARISATION
15
Familiarisation
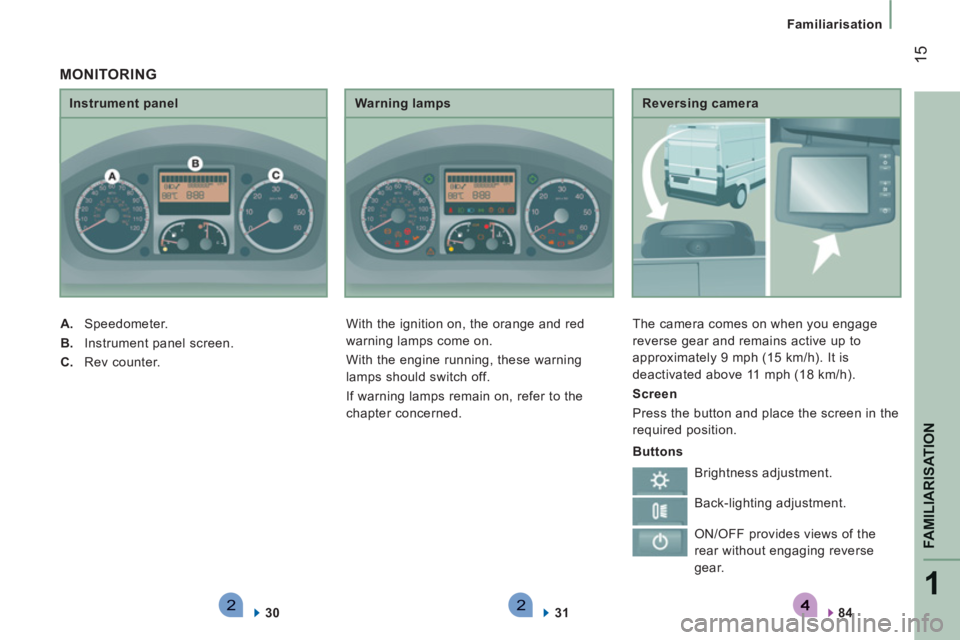
Reversing camera
The camera comes on when you engage
reverse gear and remains active up to
approximately 9 mph (15 km/h). It is
deactivated above 11 mph (18 km/h).
Screen
Press the button and place the screen in the
required position.
84
Instrument panel
A.
Speedometer.
B.
Instrument panel screen.
C.
Rev counter.
30
Warning lamps
With the ignition on, the orange and red
warning lamps come on.
With the engine running, these warning
lamps should switch off.
If warning lamps remain on, refer to the
chapter concerned.
31
MONITORING
Buttons
Brightness adjustment.
Back-lighting adjustment.
ON/OFF provides views of the
rear without engaging reverse
gear.
Page 61 of 186
59
3
EASE OF USE
and
COMFOR
T
Ventilation
Comfort value adjustment ring
The settings range between:
- increasing the interior ambient air
temperature HI (High) which goes up to
to a maximum setting of 32,
- cooling the interior ambient air
temperature LO (Low) which goes down
to a setting of 16.
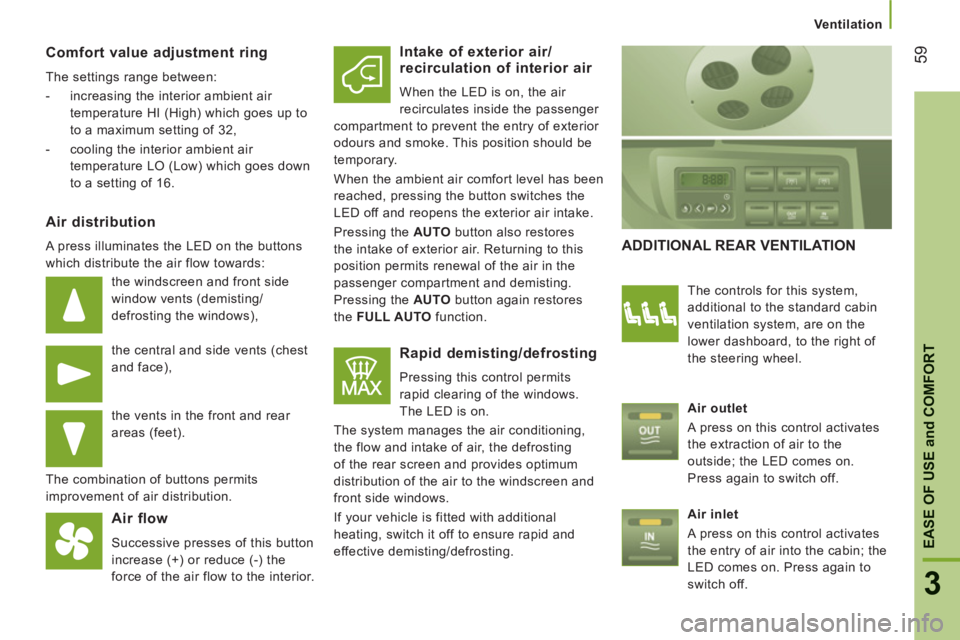
Air distribution
A press illuminates the LED on the buttons
which distribute the air flow towards:
the windscreen and front side
window vents (demisting/
defrosting the windows),
the central and side vents (chest
and face),
the vents in the front and rear
areas (feet).
The combination of buttons permits
improvement of air distribution.
Air flow
Successive presses of this button
increase (+) or reduce (-) the
force of the air flow to the interior.
Intake of exterior air/
recirculation of interior air
When the LED is on, the air
recirculates inside the passenger
compartment to prevent the entry of exterior
odours and smoke. This position should be
temporary.
When the ambient air comfort level has been
reached, pressing the button switches the
LED off and reopens the exterior air intake.
Pressing the AUTO
button also restores
the intake of exterior air. Returning to this
position permits renewal of the air in the
passenger compartment and demisting.
Pressing the AUTO
button again restores
the FULL AUTO
function.
Rapid demisting/defrosting
Pressing this control permits
rapid clearing of the windows.
The LED is on.
The system manages the air conditioning,
the flow and intake of air, the defrosting
of the rear screen and provides optimum
distribution of the air to the windscreen and
front side windows.
If your vehicle is fitted with additional
heating, switch it off to ensure rapid and
effective demisting/defrosting.
ADDITIONAL REAR VENTILATION
The controls for this system,
additional to the standard cabin
ventilation system, are on the
lower dashboard, to the right of
the steering wheel.
Air outlet
A press on this control activates
the extraction of air to the
outside; the LED comes on.
Press again to switch off.
Air inlet
A press on this control activates
the entry of air into the cabin; the
LED comes on. Press again to
switch off.
Page 64 of 186
62
Ventilation
PROGRAMMABLE ADDITIONAL
HEATING
If your vehicle is fitted with separate
programmable heating: it gradually brings
the engine up to a good temperature to
facilitate starting. An integrated clock permits programming of
its start time. The passenger compartment
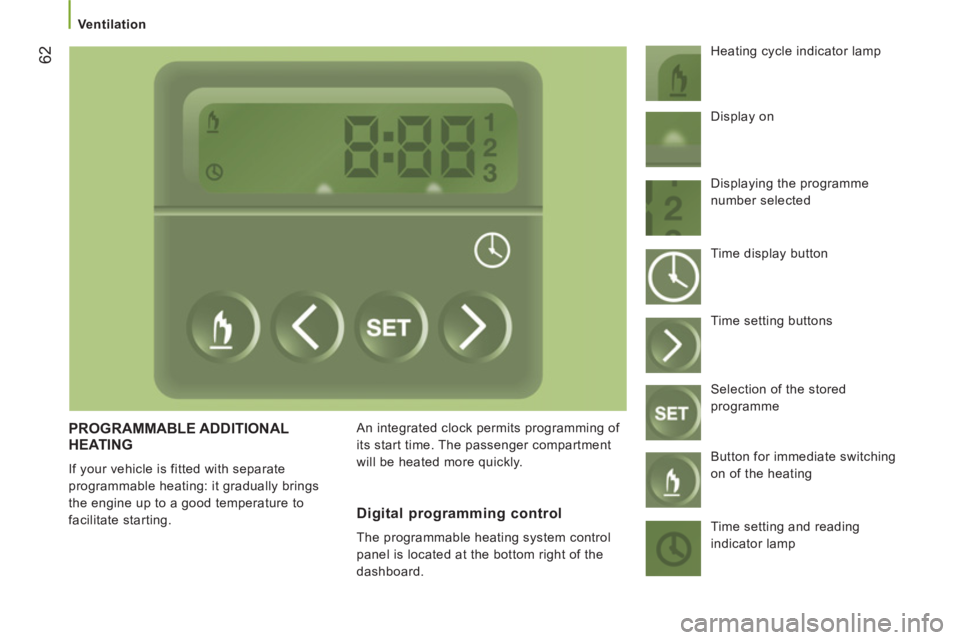
will be heated more quickly. Heating cycle indicator lamp
Digital programming control
The programmable heating system control
panel is located at the bottom right of the
dashboard. Display on
Displaying the programme
number selected
Time display button
Time setting buttons
Selection of the stored
programme
Button for immediate switching
on of the heating
Time setting and reading
indicator lamp
Page 65 of 186
63
3
EASE OF USE
and
COMFOR
T
Ventilation
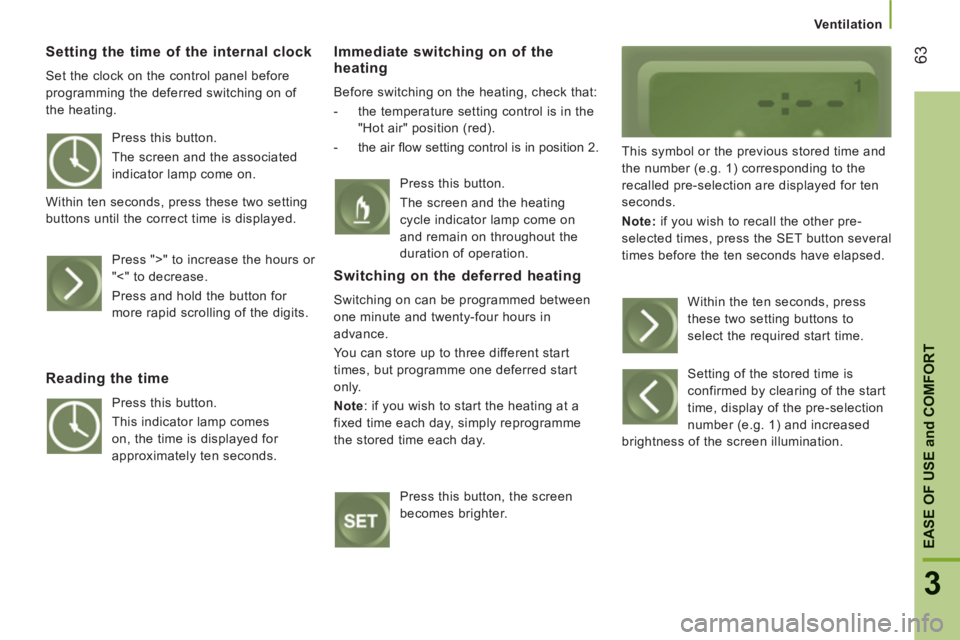
Setting the time of the internal clock
Set the clock on the control panel before
programming the deferred switching on of
the heating.
Immediate switching on of the heating
Before switching on the heating, check that:
- the temperature setting control is in the
"Hot air" position (red).
- the air fl ow setting control is in position 2.
This symbol or the previous stored time and
the number (e.g. 1) corresponding to the
recalled pre-selection are displayed for ten
seconds.
Note:
if you wish to recall the other pre-
selected times, press the SET button several
times before the ten seconds have elapsed. Press this button.
The screen and the associated
indicator lamp come on.
Within ten seconds, press these two setting
buttons until the correct time is displayed.
Press ">" to increase the hours or
"<" to decrease.
Press and hold the button for
more rapid scrolling of the digits.
Reading the time
Press this button.
This indicator lamp comes
on, the time is displayed for
approximately ten seconds. Press this button.
The screen and the heating
cycle indicator lamp come on
and remain on throughout the
duration of operation.
Switching on the deferred heating
Switching on can be programmed between
one minute and twenty-four hours in
advance.
You can store up to three different start
times, but programme one deferred start
only.
Note
:
if you wish to start the heating at a
fixed time each day, simply reprogramme
the stored time each day.
Press this button, the screen
becomes brighter. Within the ten seconds, press
these two setting buttons to
select the required start time.
Setting of the stored time is
confirmed by clearing of the start
time, display of the pre-selection
number (e.g. 1) and increased
brightness of the screen illumination.
Page 84 of 186
82
Mode
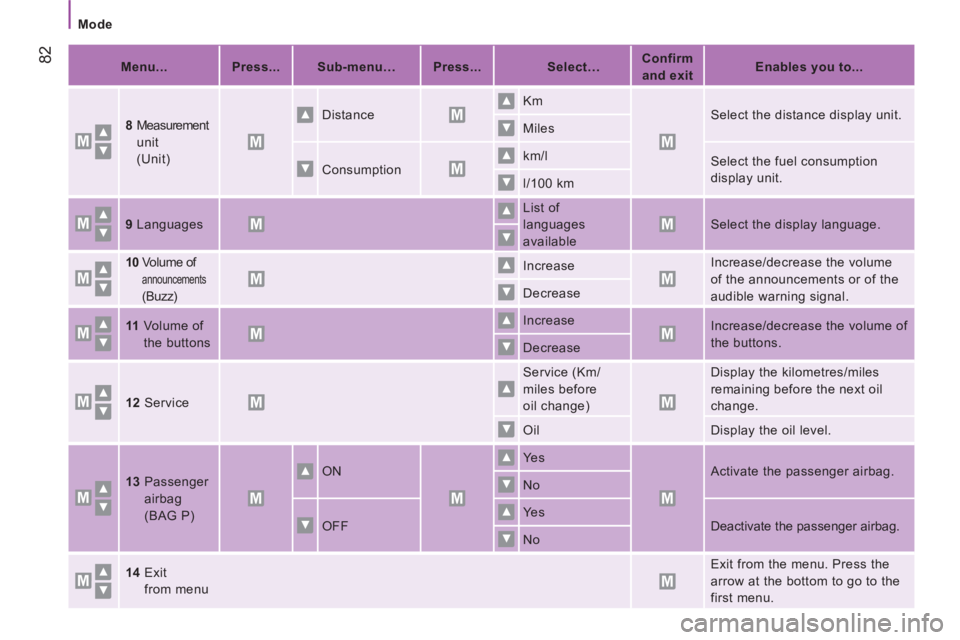
Menu...
Press...
Sub-menu…
Press...
Select…
Confirm
and exit
Enables you to...
8
Measurement
unit
(Unit) Distance
Km
Select the distance display unit.
Miles
Consumption km/l
Select the fuel consumption
display unit.
l/100 km
9
Languages
List of
languages
available
Select the display language.
10
Volume of
announcements
(Buzz) Increase
Increase/decrease the volume
of the announcements or of the
audible warning signal. Decrease
11
Volume of
the buttons Increase
Increase/decrease the volume of
the buttons.
Decrease
12
Service
Service (Km/
miles before
oil change) Display the kilometres/miles
remaining before the next oil
change.
Oil Display the oil level.
13
Passenger
airbag
(BAG P) ON
Ye s
Activate the passenger airbag.
No
OFF Ye s
Deactivate the passenger airbag.
No
14
Exit
from menu Exit from the menu. Press the
arrow at the bottom to go to the
first menu.
Page 86 of 186
84
Reversing camera
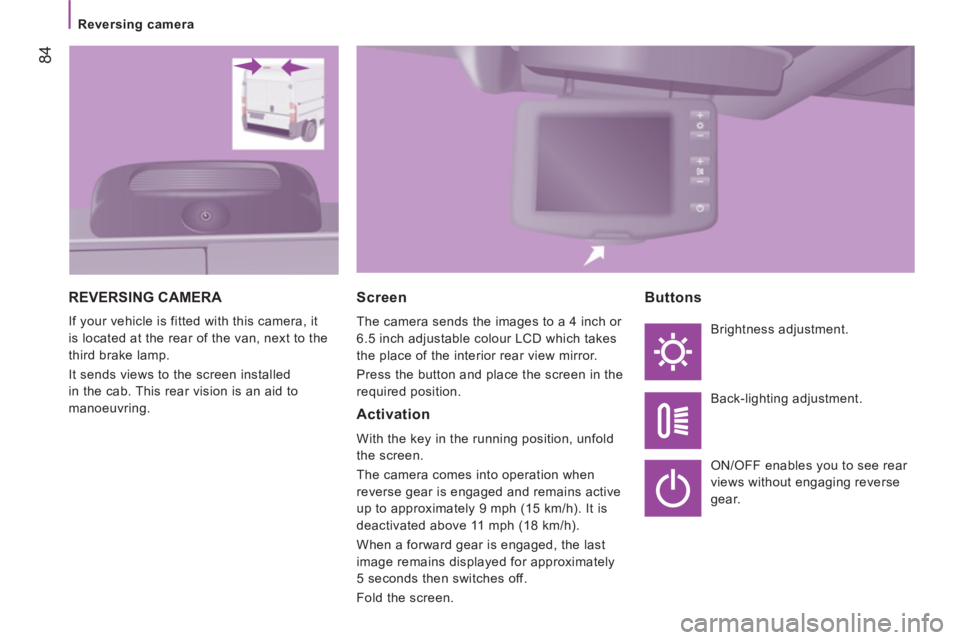
REVERSING CAMERA
If your vehicle is fitted with this camera, it
is located at the rear of the van, next to the
third brake lamp.
It sends views to the screen installed
in the cab. This rear vision is an aid to
manoeuvring.
Screen
The camera sends the images to a 4 inch or
6.5 inch adjustable colour LCD which takes
the place of the interior rear view mirror.
Press the button and place the screen in the
required position.
Activation
With the key in the running position, unfold
the screen.
The camera comes into operation when
reverse gear is engaged and remains active
up to approximately 9 mph (15 km/h). It is
deactivated above 11 mph (18 km/h).
When a forward gear is engaged, the last
image remains displayed for approximately
5 seconds then switches off.
Fold the screen.
Buttons
Brightness adjustment.
Back-lighting adjustment.
ON/OFF enables you to see rear
views without engaging reverse
gear.
Page 97 of 186
Audio equipment
95
4
TECHNOLOGY
on
BOAR
D
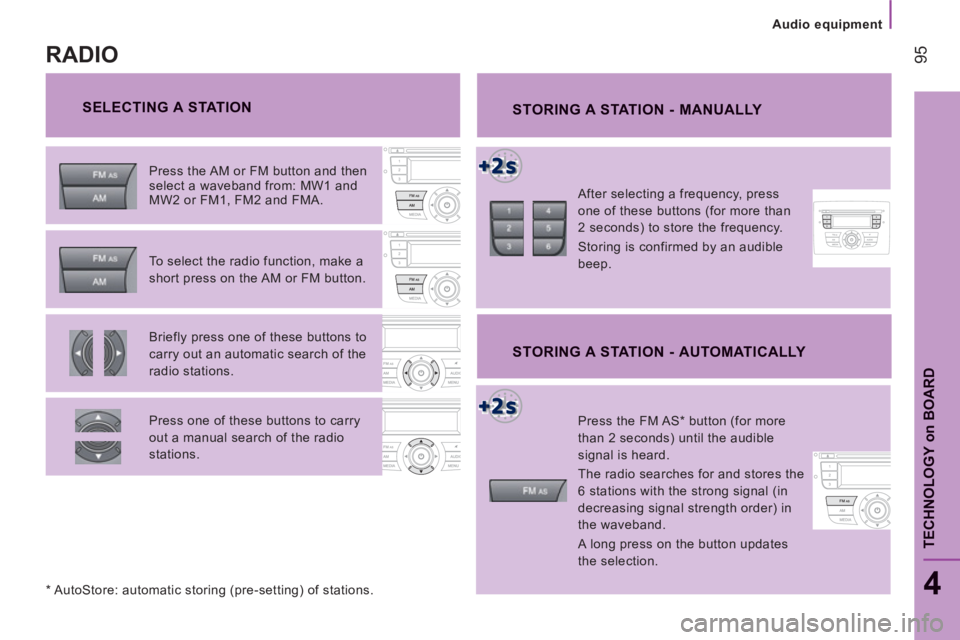
SELECTING A STATION
STORING A STATION - MANUALLY
After selecting a frequency, press
one of these buttons (for more than
2 seconds) to store the frequency.
Storing is confirmed by an audible
beep.
Press the AM or FM button and then
select a waveband from: MW1 and
MW2 or FM1, FM2 and FMA.
To select the radio function, make a
short press on the AM or FM button.
Briefly press one of these buttons to
carry out an automatic search of the
radio stations.
Press one of these buttons to carry
out a manual search of the radio
stations.
RADIO
Press the FM AS * button (for more
than 2 seconds) until the audible
signal is heard.
The radio searches for and stores the
6 stations with the strong signal (in
decreasing signal strength order) in
the waveband.
A long press on the button updates
the selection.
STORING A STATION - AUTOMATICALLY
* AutoStore: automatic storing (pre-setting) of stations.
Page 98 of 186
22
11
33
Audio equipment
96
The MP3 format, an abbreviation of MPEG 1.2 & 2.5 Audio
Layer 3, is an audio compression standard which permits the
recording of several tens of music files on a single disc.
MP3
In order to be able to play a recorded CDR or CDRW, when
recording it is preferable to select standards ISO 9660
level 1.2 or Joliet.
If the disc is recorded in another format, it may not be played
correctly.
It is recommended that the same recording standard is
always used for an individual disc, with as low a speed as
possible (4x maximum) for optimum sound quality.
In the particular case of a multi-session CD, the Joliet
standard is recommended.
The audio equipment will only play files with the extension
".mp3" with a sampling rate of 22.05 KHz or 44.1 KHz. No
other type of file (.wma, .mp4, m3u...) can be played.
It is advisable to restrict file names to 20 characters without
using special characters (e.g.: () " " ? ; , space) to avoid any
playing or displaying problems.
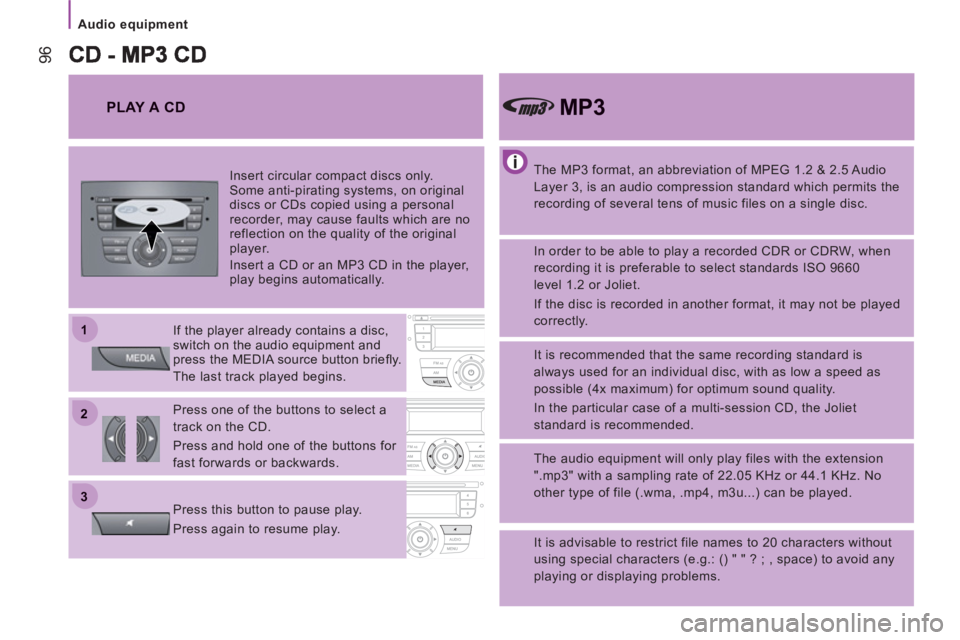
PLAY A CD
Insert circular compact discs only.
Some anti-pirating systems, on original
discs or CDs copied using a personal
recorder, may cause faults which are no
reflection on the quality of the original
player.
Insert a CD or an MP3 CD in the player,
play begins automatically.
If the player already contains a disc,
switch on the audio equipment and
press the MEDIA source button briefl y.
The last track played begins.
Press one of the buttons to select a
track on the CD.
Press and hold one of the buttons for
fast forwards or backwards.
Press this button to pause play.
Press again to resume play.
Page 99 of 186
97
Bluetooth hands-free system
4
TECHNOLOGY
on
BOAR
D
When you switch on the audio system, you may have to enter a
code for access to its functions.
In this cases, the message " Radio Code
" is displayed in the
screen, followed by 4 dashes.
The 4-number code should be entered using the buttons 1 to 6.
You have 20 seconds to enter the code.
If the wrong code is entered, the audio system gives an audible
signal and the message message " Radio blocked/wait
" is
displayed. You should then start the procedure again.
Keep your code in a safe place, never inside the
vehicle
.
TELEPHONE PRE-EQUIPMENT
If the hands-free kit is fitted to your vehicle, you can use the
audio system and the steering mounted controls to manage your
telephone calls.
During an incoming call, the audio system is deactivated, and
the message " PHONE
" is displayed.
The volume can be adjusted and stored via the " EXTERNAL
AUDIO
" menu.
Each time an incorrect code is entered, the waiting time before
the code can be entered again increases progressively (1 minute,
2 minutes, 4 minutes, 8 minutes, 16 minutes, 30 minutes, 1 hour,
2 hours, 4 hours, 8 hours, 16 hours, 24 hours).
The language of the Bluetooth system adapts automatically
by detecting the language set on your telephone.
SYSTEM
INTRODUCTION
This system allows you to:
- send and receive calls via the Bluetooth® connection with your
mobile telephone,
- display the names of your contacts and numbers from the
directory of your mobile phone in the instrument panel screen,
- use voice commands to make a call and manage your
contacts while keeping both hands on the steering wheel,
- hear your text messages via the voice synthesiser built into
the system,
- listen to MP3, WMA, AAC, M4A, MP4 and WAV audio files
from a USB storage device,
- display information on the track being played in the radio
screen (title, artist, etc...),
- control vocally a portable music player (iPod
® type),
- recharge your portable music player (iPod
® type) via the USB
port.
Audio equipment