clock CITROEN RELAY 2015 Handbook (in English)
[x] Cancel search | Manufacturer: CITROEN, Model Year: 2015, Model line: RELAY, Model: CITROEN RELAY 2015Pages: 248, PDF Size: 8.86 MB
Page 168 of 248

01
" Telephone "
allows the connection of a mobile telephone via Bluetooth.
" Vehicle information "
gives access to the ambient temperature, the clock, the compass and the trip computer.
" Settings "
allows certain functions to be activated, deactivated or settings adjusted.
" Radio "
allows the selection of different radio sources and certain functions to be activated, deactivated or settings adjusted.
" Navigation "
allows settings for the navigation system and the choice of a destination.
" Media "
allows selection of different music sources and certain functions to be activated, deactivated or settings adjusted.
GENERAL OPERATION
10.2
Page 197 of 248

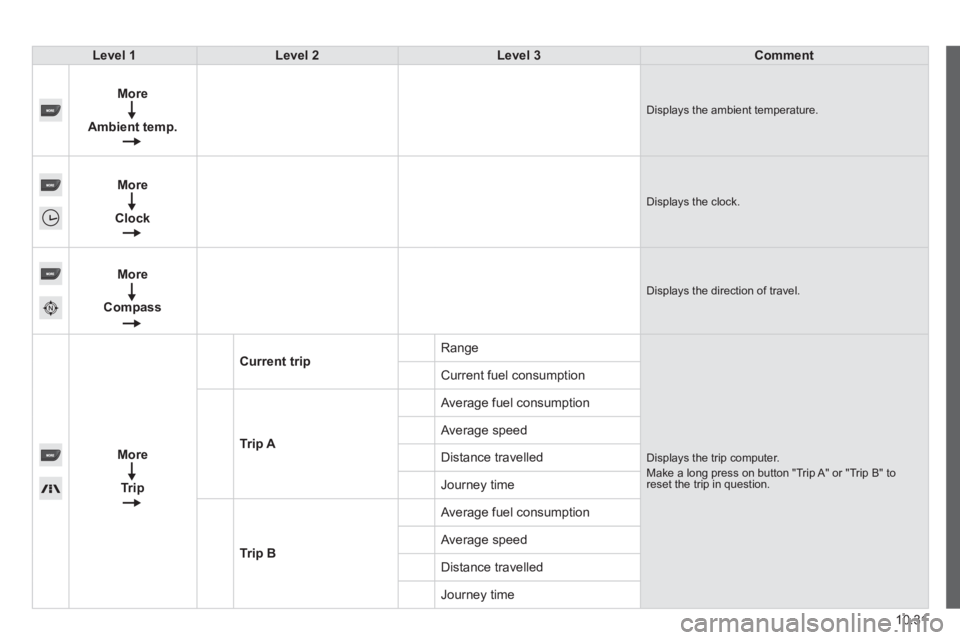
10.31
Level 1Level 2Level 3Comment
More
Ambient temp. Displays the ambient temperature.
More
Clock Displays the clock.
More
Compass Displays the direction of travel.
More
Trip
Current trip Range
Displays the trip computer. Make a long press on button "Trip A" or "Trip B" to reset the trip in question.
Current fuel consumption
Trip A
Average fuel consumption
Average speed
Distance travelled
Journey time
Trip B
Average fuel consumption
Average speed
Distance travelled
Journey time
Page 201 of 248

10.35
Level 1Level 2Level 3Comment
Settings
Voice commands
Voice response time
Brief
Set the response time for the voice system.
Long
Display command list
Never
Display suggestions with the different options during a voice session. With help
Always
Settings
Clock and Date
Set time and format Set the time.
Display time mode
On
Set the display mode for the digital clock in the status bar.
Off
Sync time
On
Set the automatic display of time.
Off
Set date Set the date.
Page 207 of 248

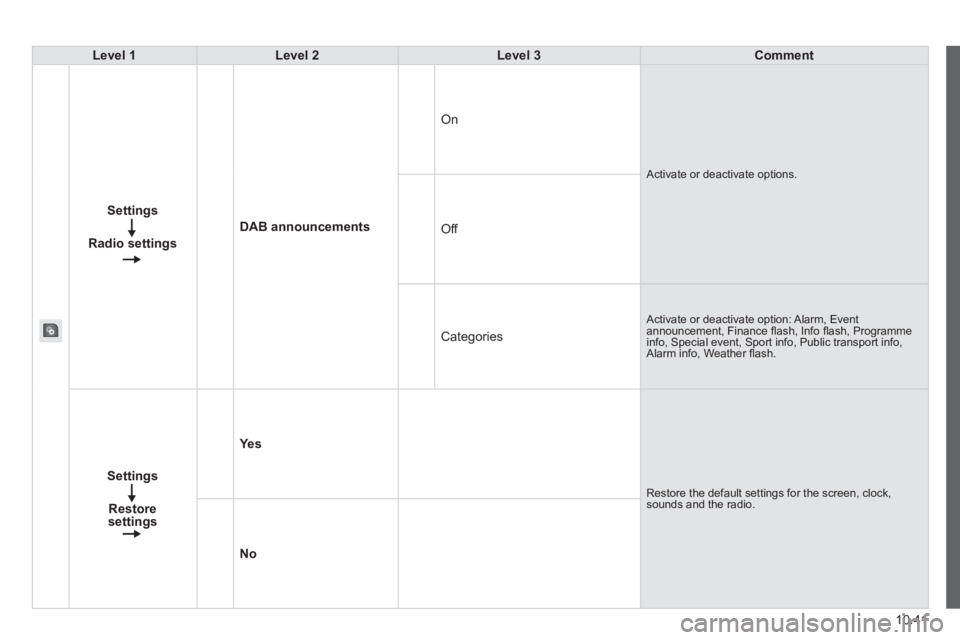
10.41
Level 1Level 2Level 3Comment
Settings
Radio settings
DAB announcements
On
Activate or deactivate options.
Off
Categories
Activate or deactivate option: Alarm, Event announcement, Finance fl ash, Info fl ash, Programme info, Special event, Sport info, Public transport info, Alarm info, Weather fl ash.
Settings
Restoresettings
Ye s
Restore the default settings for the screen, clock, sounds and the radio.
No
Page 241 of 248

1
3
EASE OF USE and COMFORT
Ventilation
Setting the time of the internal clock
Set the clock on the control panel before
programming the deferred switching on of
the heating. Press and hold the " set " button.
The time setting screen and
indicator come on.
Within ten seconds, press one of the two
setting buttons until the correct time is
displayed: - ">" to increase the time,
or
- "<" reduce the time.
Reading the time
Press the " < " or " > " button.
This time reading indicator comes
on and the time is displayed for
approximately ten seconds.
PROGRAMMABLE ADDITIONAL HEATING
If your vehicle is fitted with separate
programmable heating, it gradually brings
the engine up to a good temperature to
facilitate starting.
An integrated clock permits programming of
its start time. The passenger compartment
will be heated more quickly. Time display
Digital programming control
The programmable heating control panel
is located to the side of the steering wheel
below the
MODE switch panel. Heating cycle indicator
Time setting and reading
indicator
Display of the programme
number selected
Ventilation indicator
Time setting buttons
Programme selection button
Button for immediate switching on
of the heating
Press and hold the button for more rapid
scrolling of the digits.
Release the
"set" button.
When the screen is off, the time is
memorised.
Page 246 of 248

6
Transport solutions
Fitting the tow ball
Below the rear bumper, remove the
protective plug from the tow ball carrier. Insert the end of the tow ball
4 into the
carrier 1 and push upwards; it locks in place
automatically. Check that the mechanism has correctly
locked in to place (position
A ).
Close the lock 6 using the key.
The locking wheel 5 turns a quarter of a turn
anti-clockwise; take care to keep your hands
clear. Always remove the. The key cannot be
removed when the lock is open.
Clip the cap onto the lock.
Page 248 of 248

8
Transport solutions
Grasp the tow ball 4 firmly with one hand;
with the other hand, pull and turn the locking
wheel 5 clockwise as far as it will go; do not
release the locking wheel.
Maintenance
Correct operation is only possible if the tow ball
and its carrier remain clean.
Before cleaning the vehicle with a high pressure
jet wash, the tow ball must be removed and the
blanking plug inserted in the carrier.
Apply the label provided to a clearly
visible area, close to the carrier or in
the boot.
For any work on the towbar, got to a
CITROËN dealer or a qualified workshop.
Refit the protective blanking plug to the
carrier.
Carefully stow the tow ball in its bag away
from knocks and dirt.
Extract the tow ball from the bottom of its
carrier 1 .
Release the locking wheel; this automatically
stops in the unlocked position (position B ).