key CITROEN RELAY 2017 Handbook (in English)
[x] Cancel search | Manufacturer: CITROEN, Model Year: 2017, Model line: RELAY, Model: CITROEN RELAY 2017Pages: 292, PDF Size: 9.04 MB
Page 93 of 292

91
ELEctrIc WIndOWS
A. d river's electric window
B.
Passenger's electric window Y
ou have two options:Manual operation
Press or pull control switch A/B, without
passing the point of resistance.
The window stops when you release the
control switch.
Automatic operation
Press or pull control switch A , beyond the
point of resistance: the window opens or
closes fully when the control is released.
Pressing the control switch again stops the
movement of the window.
Good practice
Always remove the key from the ignition
when leaving the vehicle, even for a short
time.
If the electric windows meet an obstacle
during operation, you must reverse the
movement of the window. To do this, press
the control switch in question.
When the driver operates the passenger
electric windows, they must ensure that
no one is preventing correct closing of the
windows.
The driver must ensure that the passengers
use the electric windows correctly.
Be particularly aware of children when
operating the windows.
3
EASE OF uSE and cOMFOrt
Mirrors and windows
Page 120 of 292

118
cAB SEAt BELt S
If you install a front bench seat as
an accessory, it it must be fitted with
approved seat belts.
Fastening
Pull the strap in front of you with an even
movement, ensuring that it does not twist.
Engage the tongue in its buckle.
Check that the seat belt is fastened securely
and that the automatic locking system is
operating correctly by pulling the strap
rapidly.
unfastening
Press the red button on the buckle, the
seat belt reels in automatically but you are
advised to guide it.
As a safety measure, these operations
should not be carried out while the
vehicle is moving.
Seat belts not fastened
warning lamp
If the driver's seat belt is unfastened,
START mode of Stop & Start will not be
invoked. Engine restarting is only possible
with the ignition key. When the vehicle is started, this warning
lamp comes on, accompanied by an
increasing audible signal, if the driver and/
or the front passenger has not fastened their
seat belt.
The alert operates both for versions with
an individual passenger front seat and for
versions with a 2-seat front bench seat.
The driver's seat is fitted with a pyrotechnic
pretensioner and a force limiter.
On versions with a passenger's front airbag,
the passenger's seat is also fitted with a
pyrotechnic pretensioner and a force limiter.
The front bench seat is fitted with two seat
belts.
Height adjustment
For the driver or outer passenger seat,
squeeze the control at the adjustable top
mounting, slide the assembly, then release
at the desired position to lock it.
The height of the seat belt for the centre
seat cannot be adjusted.
Seat belts
Page 134 of 292

132
Good practice
children at the front
The legislation on carrying a child on the
front passenger seat is specific to each
country. Refer to the legislation in force in
your country.
Deactivate the passenger's airbag when a
rearward facing child seat is installed on the
front seat.
Otherwise, the child would risk being
seriously injured or killed if the airbag were
deployed. As a safety precaution, never leave:
-
one or more children alone and
unsupervised in a vehicle,
- a child or an animal in a vehicle which
is exposed to the sun, with the windows
closed,
-
the keys within reach of children inside
the vehicle.
To prevent accidental opening of the doors,
use the "Child Lock".
Take care not to open the rear windows by
more than one third.
To protect young children from the rays of
the sun, fit side blinds to the rear windows. Installing a booster seat
The chest part of the seat belt must be
positioned on the child's shoulder without
touching the neck.
Ensure that the lap part of the seat belt
passes correctly over the child's thighs.
CITROËN recommends the use of a booster
seat which has a back, fitted with a seat belt
guide at shoulder level.
For the optimum installation of a forward
facing child seat, ensure that the back of
the child seat is as close as possible to the
backrest of the vehicle's seat, or in contact
if possible.
The head restraint must be removed before
installing a child seat with a backrest on the
passenger seat.
Ensure that the head restraint is stowed or
attached securely so that it is not thrown
around the vehicle in the event of sharp
braking.
Refit the head restraint as soon as the child
seat is removed.
At the rear, always leave sufficient space
between the front seat and:
-
a rearward facing child seat,
-
the feet of a child seated in a forward
facing child seat.
For this, move the front seat forward and, if
necessary, straighten its backrest as well. The incorrect installation of a child seat in a
vehicle compromises the child's protection in
the event of an accident.
Check that there is no seat belt or seat belt
buckle under the child seat, as this could
destabilise the seat.
Remember to fasten the seat belts or the
child seat harnesses keeping the slack
relative to the child's body to a minimum,
even for short journeys.
For the installation of a child seat using
the seat belt, ensure that the seat belt is
well tensioned on the child seat and that
it is holding the child seat firmly against
the vehicle's seat. If the passenger seat is
adjustable, move it forward if necessary.
child safety
Page 141 of 292

139
On the inside
This operation must only be carried out with the
vehicle stationary and the driver's door open.
Pull the release lever on the side of the
dashboard towards you.
On the outside
Raise the safety catch lever located above
the grille to the right and raise the bonnet.Before closing the bonnet, put the stay back
in its housing.
Lower the bonnet and release it at the end
of its travel. Check that the bonnet has
latched.
OPEnInG tHE BOnnEt
Do not open the bonnet in strong
winds.
When the engine is hot, handle the safety
catch and stay with care (risk of burns).
Before doing anything under the
bonnet, switch off the ignition with the
key to avoid any risk of injury resulting from
an automatic change to START mode of the
Stop & Start system.
cLOSInG tHE BOnnEt
Bonnet stay
Unclip the stay and tilt it to insert it in the
first notch, then the second.
Because of the presence of electrical
equipment under the bonnet, it is
recommended that exposure to water (rain,
washing, ...) be limited.
7
under the bonnet
cHEcKS
Page 144 of 292

142
cooling system
Check the coolant level regularly,
according to the use made of your
vehicle (every 3 000 miles or 5 000 kms
/
3
months);
if necessary, top-up using coolant
recommended by the manufacturer.
Topping-up the coolant between services is
normal.
The check and top-up must be done with the
engine cold.
A low coolant level presents the risk of
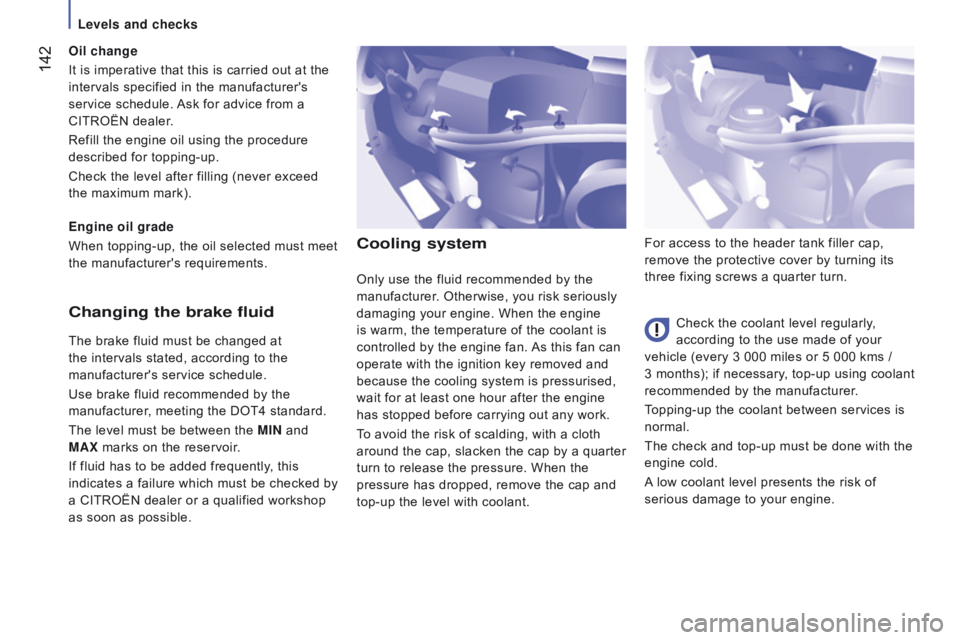
serious damage to your engine. For access to the header tank filler cap,
remove the protective cover by turning its
three fixing screws a quarter turn.
Only use the fluid recommended by the
manufacturer. Otherwise, you risk seriously
damaging your engine. When the engine
is warm, the temperature of the coolant is
controlled by the engine fan. As this fan can
operate with the ignition key removed and
because the cooling system is pressurised,
wait for at least one hour after the engine
has stopped before carrying out any work.
To avoid the risk of scalding, with a cloth
around the cap, slacken the cap by a quarter
turn to release the pressure. When the
pressure has dropped, remove the cap and
top-up the level with coolant.changing the brake fluid
The brake fluid must be changed at
the intervals stated, according to the
manufacturer's service schedule.
Use brake fluid recommended by the
manufacturer, meeting the DOT4 standard.
The level must be between the MI
n and
MA
x marks on the reservoir.
If fluid has to be added frequently, this
indicates a failure which must be checked by
a CITROËN dealer or a qualified workshop
as soon as possible. Engine oil grade
When topping-up, the oil selected must meet
the manufacturer's requirements. Oil change
It is imperative that this is carried out at the
intervals specified in the manufacturer's
service schedule. Ask for advice from a
CITROËN dealer.
Refill the engine oil using the procedure
described for topping-up.
Check the level after filling (never exceed
the maximum mark).
Levels and checks
Page 149 of 292

147
Low fuel level
rEF
u
ELLI
n
G
In low temperatures
In mountainous and/or cold areas, it is
advisable to use a "winter" type fuel suited
to low or minus temperatures.
With Stop & Start, never refuel with
the system in STOP mode; you must
switch off the ignition with the key. When the fuel tank level E
(Empty) is reached, this warning
lamp comes on.
You then have around 10 to
12 litres in the reserve, depending on the
capacity of the tank and the engine.
Refuel without delay to avoid running out of
fuel.
The fuel tank must be filled with the engine
off.
-
Open the fuel filler flap.
-
Support the black cap with one hand.
-
With the other hand, insert the key
, then
turn it anticlockwise.
-
Remove the black cap and hook it onto
the clip located on the inside of the flap. A label affixed to the inside of the flap
reminds you of the type of fuel to be used.
When filling the fuel tank, do not continue
after the 3rd cut-off of the nozzle. This could
cause malfunctions.
-
After filling the fuel tank, lock the black
cap and close the flap.
BlueH d i and AdBlue
The blue cap is only present on BlueHDi
Diesel versions.
For more information, refer to the "AdBlue"
section.
To understand the significance of the
precautions mentioned on the labels,
refer to the "Quick help - Label glossary"
section.
The capacity of the fuel tank is
approximately 90
litres.
Fuel tanks of different capacities may be
fitted, 60 and 120 litres, depending on the
engine.
7
cHEcKS
Fuel
Page 180 of 292

178
tOWBAr WItH QuIcKLY
d E t
A
c HABLE t
OWBALL
Presentation
This towball can be fitted and removed
quickly and easily without the use of tools. For information on the maximum
trailer weight and the recommended
nose weight, refer to the "Technical data -
Weights" section.
For information on safely towing a trailer,
refer to the "Accessories - Towing a trailer"
section.
1.
Carrier
2.
Connector socket.
3.
Safety eye.
4.
Detachable towball.
5.
Locking / unlocking wheel.
6.
Key lock.
7.
Key reference label. A.
Locked
position; the locking wheel is in
contact with towball (no gap).
B.
u
nlocked position; the locking wheel
and towball are no longer in contact
(gap of about 5 mm). Before each use
Check that the towball is correctly
locked and verify the following points:
- the green mark on the locking wheel
is in line with the green mark on the
towball,
-
the locking wheel is in contact with the
towball,
-
the key lock is on and the key removed;
the locking wheel can no longer be
operated,
-
the towball must no longer move at all in
its carrier; try to shake it by hand.
d
uring use
Never unlock the device when a trailer or
load carrier is fitted to the towball.
Never exceed the maximum authorised
weight for the vehicle (the Gross Vehicle
Weight - GVW), the trailer, or the sum of the
two (the Gross Train Weight - GTW).
Observe the legislation in force in the
country in which you are driving. After use
For journeys made without a trailer or load
carrier, the towball must be removed and
the blanking plug inserted in the carrier. This
measure applies particularly if the towball
could hinder visibility of the number plate or
lighting.
transport solutions
Page 181 of 292

179
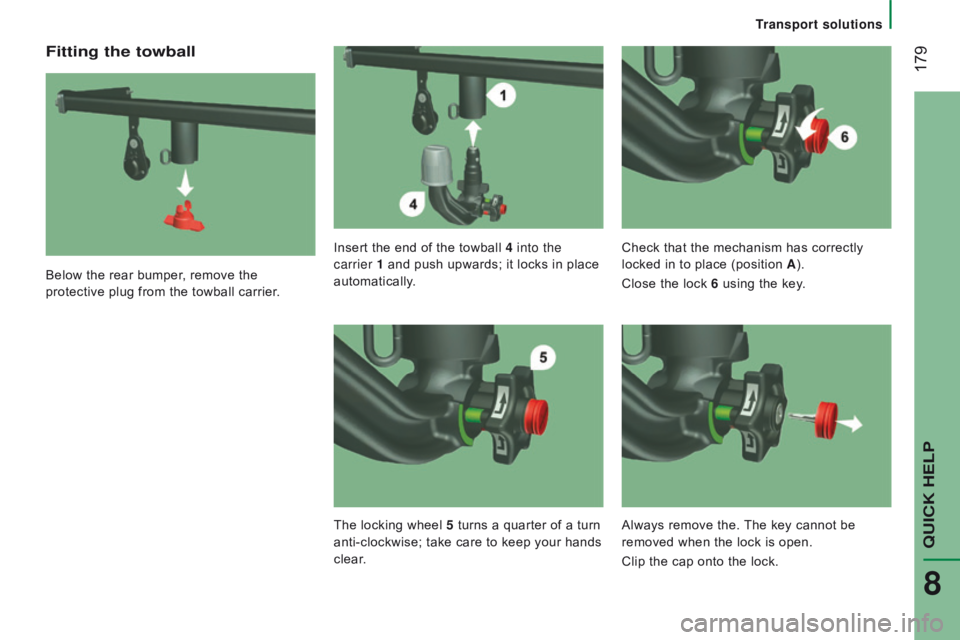
Fitting the towball
Below the rear bumper, remove the
protective plug from the towball carrier.Insert the end of the towball 4
into the
carrier 1 and push upwards; it locks in place
automatically. Check that the mechanism has correctly
locked in to place (position A
).
Close the lock 6 using the key.
The locking wheel 5 turns a quarter of a turn
anti-clockwise; take care to keep your hands
clear. Always remove the. The key cannot be
removed when the lock is open.
Clip the cap onto the lock.
transport solutions
QuIcK HELP
8
Page 182 of 292

180
removing the towball
Disconnect the trailer harness from the
socket 2 on the carrier.
Detach the cable on the trailer from the
safety ring 3 on the carrier.
Unhook the trailer from the towball.
Refit the protective cover to the towball.
Remove the protective cover from the
towball.
Attach the trailer to the towball.
Attach the cable on the trailer to the safety
ring 3
on the carrier.
Connect the trailer harness to the socket 2
on the carrier. Remove the cap from the lock and press it
onto the head of the key.
Insert the key into the lock 6
.
Open the lock using the key.
transport solutions
Page 184 of 292

182
GLOSSArY OF LABELS
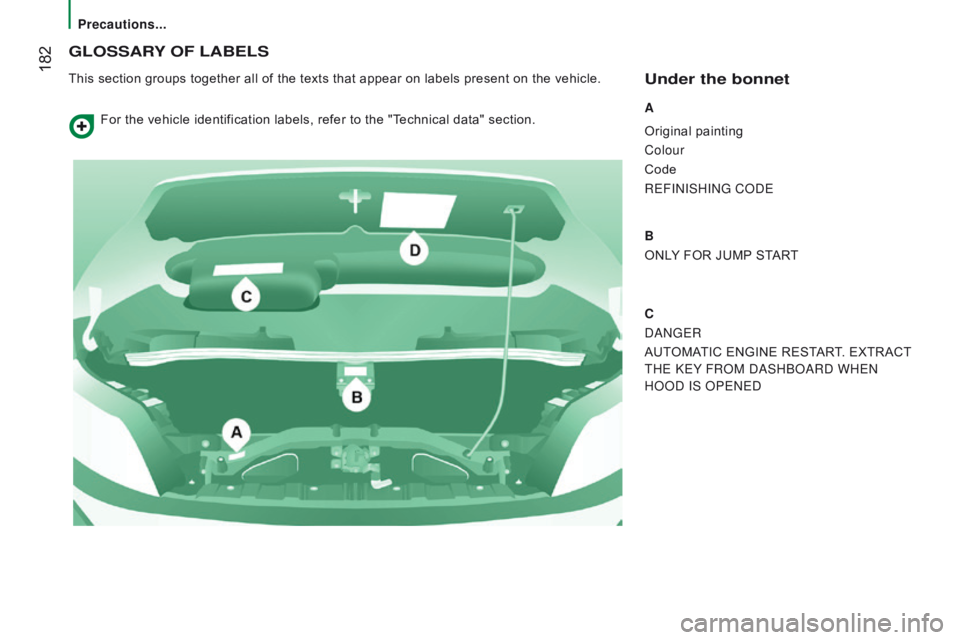
This section groups together all of the texts that appear on labels present on the vehicle.under the bonnet
A
Original painting
Colour
Code
REFINISHING CODE
B
ONLY FOR JUMP START
c
DANGER
AUT
OMATIC ENGINE RESTART. EXTRACT
THE KEY FROM DASHBOARD WHEN
HOOD IS OPENED
For the vehicle identification labels, refer to the "Technical data" section.
Precautions...