ignition CITROEN RELAY 2017 Handbook (in English)
[x] Cancel search | Manufacturer: CITROEN, Model Year: 2017, Model line: RELAY, Model: CITROEN RELAY 2017Pages: 292, PDF Size: 9.04 MB
Page 154 of 292
152
range indicators
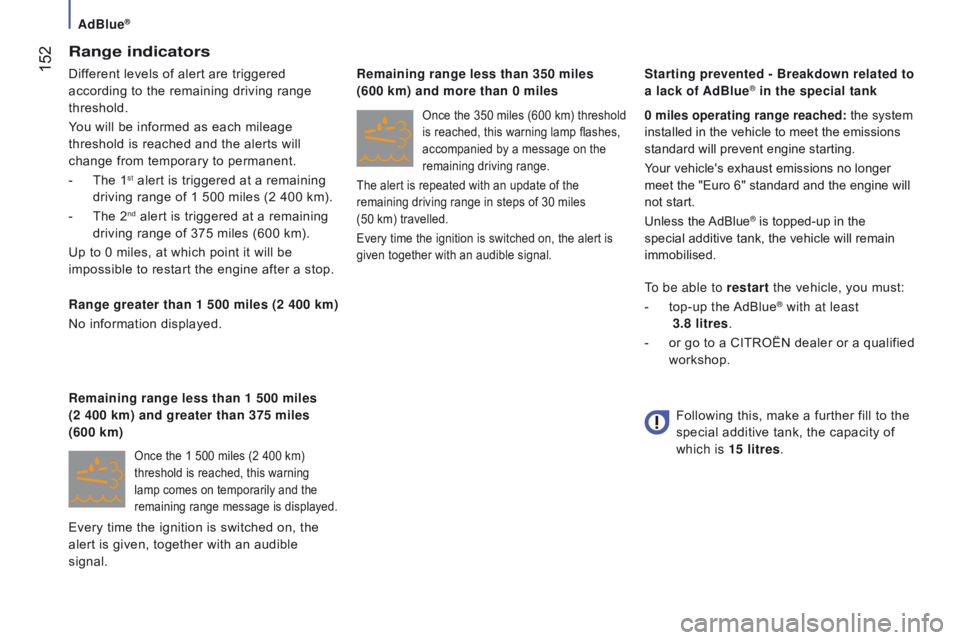
Different levels of alert are triggered
according to the remaining driving range
threshold.
You will be informed as each mileage
threshold is reached and the alerts will
change from temporary to permanent.
-
The 1st alert is triggered at a remaining
driving range of 1 500 miles (2 400 km).
-
The 2nd alert is triggered at a remaining
driving range of 375 miles (600 km).
Up to 0 miles, at which point it will be
impossible to restart the engine after a stop.
r
ange greater than 1 500 miles (2 400 km)
No information displayed.
Once the 1 500 miles (2 400 km)
threshold is reached, this warning
lamp comes on temporarily and the
remaining range message is displayed.
remaining range less than 1 500 miles
(2 400 km) and greater than 375 miles
(600 km)
Once the 350 miles (600 km) threshold
is reached, this warning lamp flashes,
accompanied by a message on the
remaining driving range.
The alert is repeated with an update of the
remaining driving range in steps of 30 miles
(50 km) travelled.
Every time the ignition is switched on, the alert is
given together with an audible signal.0 miles operating range reached: the system
installed in the vehicle to meet the emissions
standard will prevent engine starting.
Your vehicle's exhaust emissions no longer
meet the "Euro 6" standard and the engine will
not start.
Unless the AdBlue
® is topped-up in the
special additive tank, the vehicle will remain
immobilised.
To be able to restart the vehicle, you must:
-
top-up the
AdBlue® with at least
3.8 litres.
-
or
go to a CITROËN dealer or a qualified
workshop.
r
emaining range less than 350 miles
(600 km) and more than 0 miles Starting prevented - Breakdown related to
a lack of AdBlue
®
in the special tank
Following this, make a further fill to the
special additive tank, the capacity of
which is 15 litres.
Every time the ignition is switched on, the
alert is given, together with an audible
signal.
AdBlue®
Page 155 of 292

153
Fault with the Scr system
The diagnostic warning lamp
comes on.
Every time the ignition is
switched on, the emissions fault
is confirmed by an audible signal and a
message.
If it is a temporary fault, the alert disappears
as soon as the exhaust emissions return to
the levels required by the standard. Fault confirmed
In addition to the previous signals, the
remaining range allowed will be displayed in
miles (kilometres) in the instrument panel.
The alert will be repeated every 30 seconds
with an update of the driving range.
Go to a CITROËN dealer or a qualified
workshop as soon as possible.
You risk not being able to start the engine.
Starting prevented, having covered the
250 miles (400 km)
d
etection
At each attempt at starting,
the alert is activated and the
message on starting prevention is
displayed.
On the other hand, if the warning lamp
is still on after 30 miles (50 km) of
driving, the fault is confirmed.
An engine start prevention system
will be activated automatically after
250
miles (400 km) travelled following this
confirmation.
Go to a CITROËN dealer or a qualified
workshop.
AdBlue®
7
cHEcKS
Page 157 of 292
155
refit the filler cap
-
Refit the blue cap to the tank and turn it
a 6
th of a turn clockwise, to its stop.
-
Close the filler flap.
r
estart the engine
-
Switch the ignition on, without starting.
-
W
ait 10 seconds before starting the
engine.
Keep AdBlue
® out of the reach of
children, in its original container.
Never transfer AdBlue
® to another container:
it would loose its purity.
Never dilute the fluid with water.
Never pour the fluid into the Diesel fuel tank.
recommendations on storage
Never store containers or bottles of
AdBlue® in your vehicle.
Freezing of the AdBlue
®
The SCR system includes an AdBlue®
tank heater that ensures operation of
the vehicle in normal conditions.
In exceptional situations, such as when the
vehicle is kept at temperatures below -15°C
(5°F) for a long period, there may be an
emission fault alert related to freezing of the
AdBlue
® additive.
Park the vehicle in an area at a more
moderate temperature for a few hours until
the AdBlue
® becomes a fluid again.
The emissions warning lamp does not go off
immediately, but does so after a few miles
of driving.
Never dispose of AdBlue® fluid bottles
in the household waste.
Place them in a special container provided
this purpose or take them to your dealer.
AdBlue® freezes at about -11°C
(12.2° F) and deteriorates above 25°C
(77°F).
It is recommended that containers and
bottles be stored in a cool area and
protected from direct sunlight.
Under these conditions, the fluid can be kept
for at least a year.
Additive that has been frozen can be used
once it has thawed out in ambient air.
AdBlue®
7
cHEcKS
Page 159 of 292
157
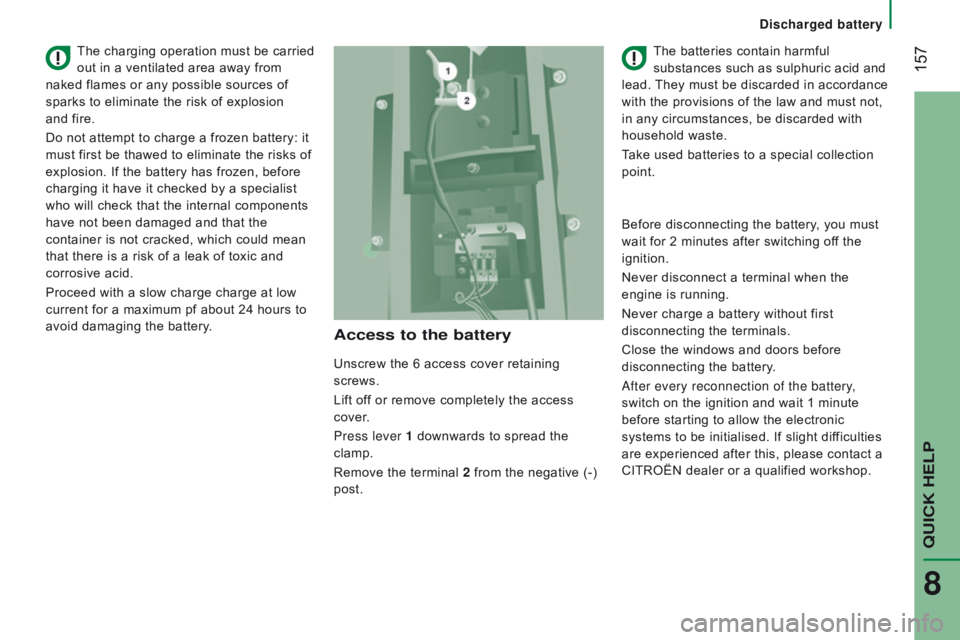
Access to the battery
Unscrew the 6 access cover retaining
screws.
Lift off or remove completely the access
cover.
Press lever 1 downwards to spread the
clamp.
Remove the terminal 2 from the negative (-)
post. The batteries contain harmful
substances such as sulphuric acid and
lead. They must be discarded in accordance
with the provisions of the law and must not,
in any circumstances, be discarded with
household waste.
Take used batteries to a special collection
point.
The charging operation must be carried
out in a ventilated area away from
naked flames or any possible sources of
sparks to eliminate the risk of explosion
and
fire.
Do not attempt to charge a frozen battery: it
must first be thawed to eliminate the risks of
explosion. If the battery has frozen, before
charging it have it checked by a specialist
who will check that the internal components
have not been damaged and that the
container is not cracked, which could mean
that there is a risk of a leak of toxic and
corrosive acid.
Proceed with a slow charge charge at low
current for a maximum pf about 24 hours to
avoid damaging the battery. Before disconnecting the battery, you must
wait for 2 minutes after switching off the
ignition.
Never disconnect a terminal when the
engine is running.
Never charge a battery without first
disconnecting the terminals.
Close the windows and doors before
disconnecting the battery.
After every reconnection of the battery,
switch on the ignition and wait 1 minute
before starting to allow the electronic
systems to be initialised. If slight difficulties
are experienced after this, please contact a
CITROËN dealer or a qualified workshop.
discharged battery
QuIcK HELP
8
Page 162 of 292
160FusesA (amps) Allocation
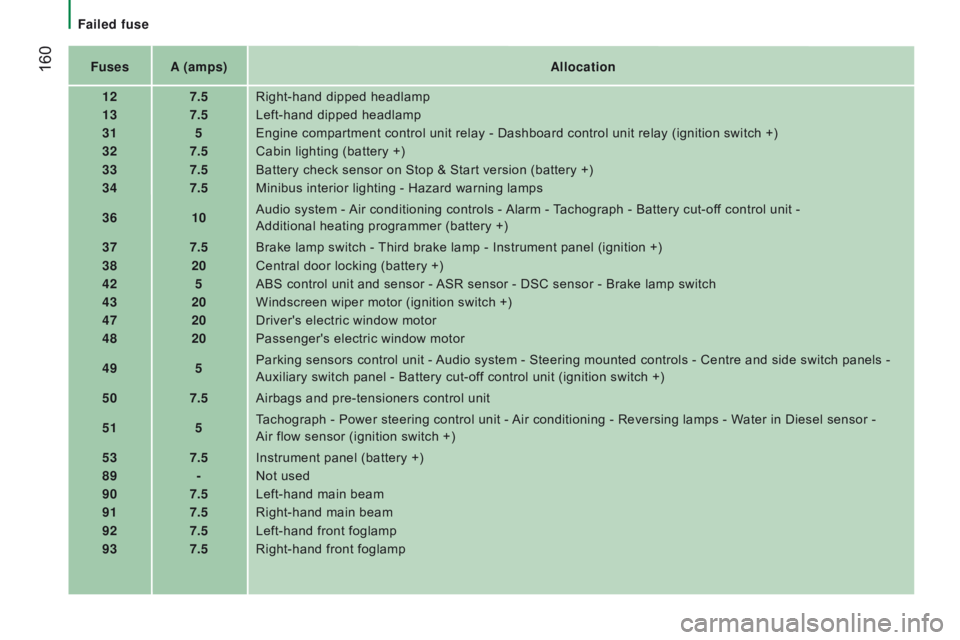
12 7.5Right-hand dipped headlamp
13 7.5Left-hand dipped headlamp
31 5Engine compartment control unit relay - Dashboard control unit relay (ignition switch +)
32 7.5Cabin lighting (battery +)
33 7.5Battery check sensor on Stop & Start version (battery +)
34 7.5Minibus interior lighting - Hazard warning lamps
36 10Audio system - Air conditioning controls - Alarm - Tachograph - Battery cut-off control unit -
Additional heating programmer (battery +)
37 7.5Brake lamp switch - Third brake lamp - Instrument panel (ignition +)
38 20Central door locking (battery +)
42 5ABS control unit and sensor - ASR sensor - DSC sensor - Brake lamp switch
43 20Windscreen wiper motor (ignition switch +)
47 20Driver's electric window motor
48 20Passenger's electric window motor
49 5Parking sensors control unit - Audio system - Steering mounted controls - Centre and side switch panels -
Auxiliary switch panel - Battery cut-off control unit (ignition switch +)
50 7.5Airbags and pre-tensioners control unit
51 5Tachograph - Power steering control unit - Air conditioning - Reversing lamps - Water in Diesel sensor -
Air
flow sensor (ignition switch +)
53 7.5Instrument panel (battery +)
89 -Not used
90 7.5Left-hand main beam
91 7.5Right-hand main beam
92 7.5Left-hand front foglamp
93 7.5Right-hand front foglamp
Failed fuse
Page 164 of 292
162
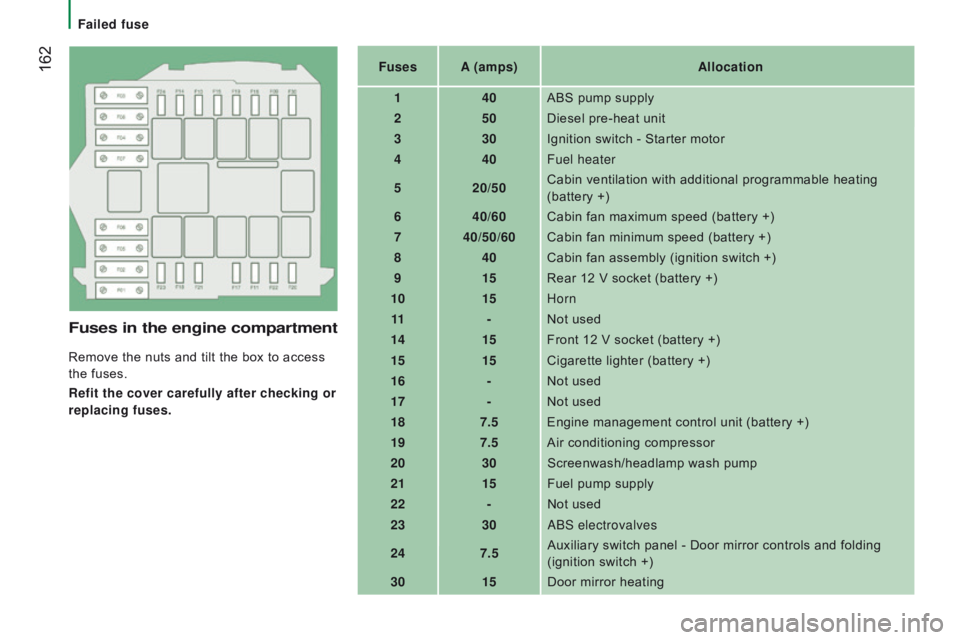
Fuses in the engine compartment
Remove the nuts and tilt the box to access
the fuses.
r
efit the cover carefully after checking or
replacing fuses. Fuses
A (amps) Allocation
1 40ABS pump supply
2 50Diesel pre-heat unit
3 30Ignition switch - Starter motor
4 40Fuel heater
5 20/50Cabin ventilation with additional programmable heating
(battery +)
6 40/60Cabin fan maximum speed (battery +)
7 40/50/60 Cabin fan minimum speed (battery +)
8 40Cabin fan assembly (ignition switch +)
9 15Rear 12 V socket (battery +)
10 15Horn
11 -Not used
14 15Front 12 V socket (battery +)
15 15Cigarette lighter (battery +)
16 -Not used
17 -Not used
18 7.5Engine management control unit (battery +)
19 7.5Air conditioning compressor
20 30Screenwash/headlamp wash pump
21 15Fuel pump supply
22 -Not used
23 30ABS electrovalves
24 7.5Auxiliary switch panel - Door mirror controls and folding
(ignition switch +)
30 15Door mirror heating
Failed fuse
Page 172 of 292
170
Parking the vehicle
Where possible, park the vehicle on level,
stable and non-slippery ground.
Apply the parking brake, switch off the
ignition and engage first gear.
Wear a high visibility vest and position the
warning triangle on the road.
You must ensure that the occupants get out
of the vehicle and wait in a safe location.
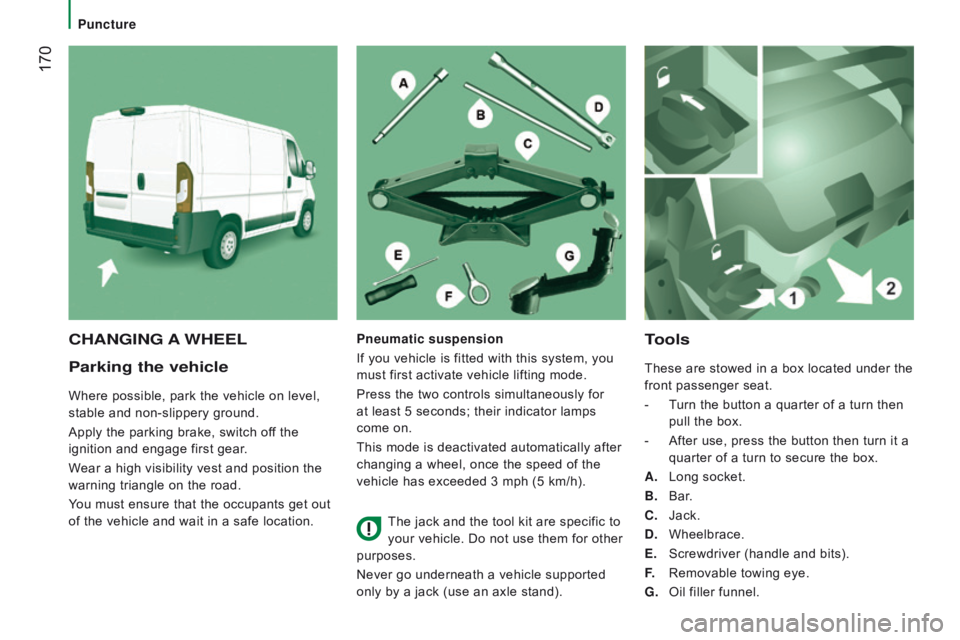
tools
These are stowed in a box located under the
front passenger seat.
-
T
urn the button a quarter of a turn then
pull the box.
-
After use, press the button then turn it a
quarter of a turn to secure the box.
A.
Long socket.
B.
Bar
.
c
.
Jack.
d
.
Wheelbrace.
E.
Screwdriver (handle and bits).
F.
Removable towing eye.
G.
Oil filler funnel.
cHAnGInG A WHEELPneumatic suspension
If you vehicle is fitted with this system, you
must first activate vehicle lifting mode.
Press the two controls simultaneously for
at least 5 seconds; their indicator lamps
come on.
This mode is deactivated automatically after
changing a wheel, once the speed of the
vehicle has exceeded 3 mph (5 km/h).
The jack and the tool kit are specific to
your vehicle. Do not use them for other
purposes.
Never go underneath a vehicle supported
only by a jack (use an axle stand).
Puncture
Page 229 of 292

227Level 1Level 2 Level 3co mment
rAd
IO
Audio Equaliser
Adjust the bass, mid-range and treble.
Balance / Fade Bass
Adjust the balance of the speakers, front and rear,
left and right.
Press the button in the middle of the arrows to
balance the adjustments.
Mid-range
Treble
Volume / Speed Select the desired setting, the option is
highlighted.
Loudness Optimise audio quality at low volume.
Automatic radio Adjust the radio on startup or restore the active
state the last time the ignition was switched to
S T O P.
ra
dio off delay Adjust the setting.
Adjust A
u
x vol. Adjust the settings.
touch Screen Audio - telematic System
AudIO and tELEMAtIcS
10
Page 235 of 292

233Level 1Level 2 Level 3co mment
ME d
I
A
ra
ndom Press the button to play the tracks on the CD,
USB, iPod or Bluetooth
device in random order.
ME
d
I
A
rep
eat Press the button to activate this function.
ME
d
I
A
Audio Equaliser
Adjust the bass, mid-range and treble.
Balance / Fade Bass
Adjust the balance of the speakers, front and rear,
left and right.
Press the button in the middle of the arrows to
balance the adjustments.
Mid-range
Treble
Volume / Speed Select the desired setting, the option is
highlighted.
Loudness Optimise audio quality at low volume.
Automatic radio Adjust the radio on startup or restore the active
state the last time the ignition was switched to
S T O P.
ra
dio off delay Adjust the setting.
Adjust A
u
x vol. Adjust the setting.
touch Screen Audio - telematic System
AudIO and tELEMAtIcS
10
Page 236 of 292

234
uSB player
The system builds playlists (in temporary
memory), an operation which can take from
a few seconds to several minutes at the first
connection.
Reduce the number of non-music files and the
number of folders to reduce the waiting time.
The playlists are updated every time the
ignition is switched off or connection of a USB
memory stick. However, the audio system
memorises these lists and if they are not
modified, the loading time will be shorter. Insert a USB memory stick or connect a
peripheral device to the USB port in the central
storage space, provided for transferring data to
the system, using a suitable cable
(not supplied).
Auxiliary socket (Aux)
Connect the portable device (MP3 player…) to
the auxiliary Jack socket using an audio cable
(not supplied).
Located on the centre console, this port is used
only for powering and recharging the portable
device connected.
uSB port
First adjust the volume on your portable device
(to a high level). Then adjust the volume of your
audio system.
Control is via the portable device.
The functions of the device connected to the
"AUX" socket are controlled directly from the
device itself: changing track / folder / playlist or
starting/ending/pausing play using the audio
system control panel or steering mounted
controls is therefore not possible.
Do not leave the cable of your portable device
connected to the AUX socket when not in use,
to avoid possible noises from the speakers.
touch Screen Audio - telematic System