buttons CITROEN RELAY 2017 Handbook (in English)
[x] Cancel search | Manufacturer: CITROEN, Model Year: 2017, Model line: RELAY, Model: CITROEN RELAY 2017Pages: 292, PDF Size: 9.04 MB
Page 33 of 292

31
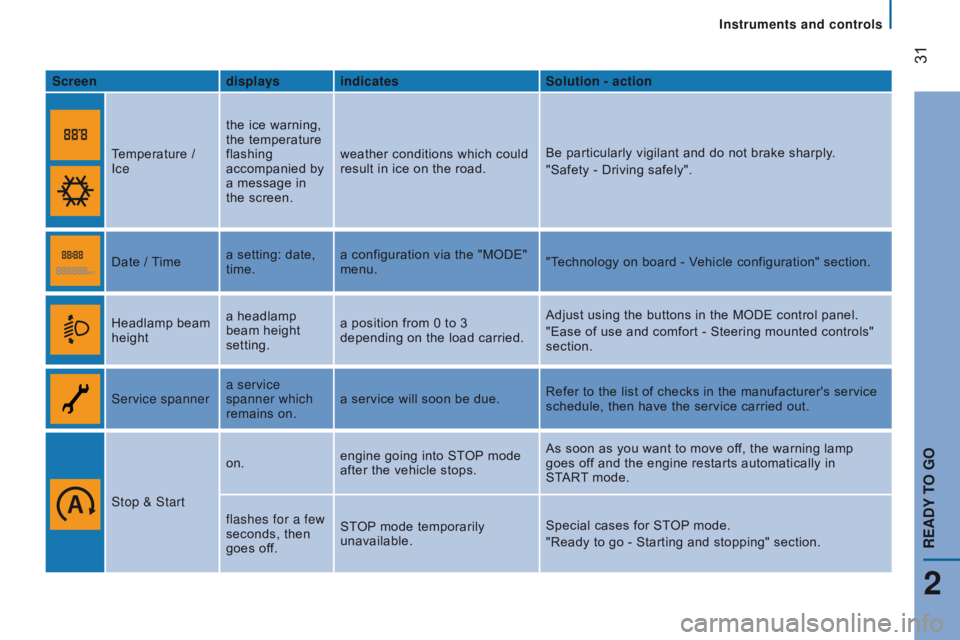
Screendisplays indicates Solution - action
Temperature /
Ice the ice warning,
the temperature
flashing
accompanied by
a message in
the screen.weather conditions which could
result in ice on the road.
Be particularly vigilant and do not brake sharply.
"Safety - Driving safely".
Date
/ Timea setting: date,
time. a configuration via the "MODE"
menu.
"Technology on board
- Vehicle configuration" section.
Headlamp beam
height a headlamp
beam height
setting.a position from 0 to 3
depending on the load carried. Adjust using the buttons in the MODE control panel.
"Ease of use and comfort - Steering mounted controls"
section.
Service spanner a service
spanner which
remains on.a service will soon be due.
Refer to the list of checks in the manufacturer's service
schedule, then have the service carried out.
Stop & Start on.
engine going into STOP mode
after the vehicle stops. As soon as you want to move off, the warning lamp
goes off and the engine restarts automatically in
START
mode.
flashes for a few
seconds, then
goes off. STOP mode temporarily
unavailable.
Special cases for STOP mode.
"Ready to go
- Starting and stopping" section.
2
rEAdY tO GO
Instruments and controls
Page 71 of 292

69comfort value adjustment
ring
The settings range between:
-
increasing the interior ambient air
temperature HI (High) which goes up to
to a maximum setting of 32,
-
cooling the interior ambient air
temperature LO (Low) which goes down
to a setting of 16.
Air distribution
A press illuminates the LED on the buttons
which distribute the air flow towards:
the windscreen and front side
window vents (demisting/
defrosting the windows),
the central and side vents (chest
and face),
the vents in the front and rear
areas (feet).
The combination of buttons permits
improvement of air distribution.
Air flow
Successive presses of this button
increase (+) or reduce (-) the
force of the air flow to the interior.
Intake of exterior air / r ecirculation of interior air
When the LED is on, the air
recirculates inside the passenger
compartment to prevent the entry of exterior
odours and smoke. This position should be
temporary.
When the ambient air comfort level has been
reached, pressing the button switches the
LED off and reopens the exterior air intake.
Pressing the A
ut
O
button also restores
the intake of exterior air. Returning to this
position permits renewal of the air in the
passenger compartment and demisting.
Pressing the A
ut
O
button again restores
the F
u
LL A ut
O
function.
rapid demisting / defrosting
Pressing this control permits
rapid clearing of the windows.
The LED is on.
The system manages the air conditioning,
the flow and intake of air, the defrosting
of the rear screen and provides optimum
distribution of the air to the windscreen and
front side windows.
If your vehicle is fitted with additional
heating, switch it off to ensure rapid and
effective demisting/defrosting.
AddItIOnAL r EA r VE nt ILAt IO n
The controls for this system, additional to
the standard cabin ventilation system, are
on the lower dashboard, to the left of the
steering wheel.
Air outlet
A press on this control activates
the extraction of air to the
outside; the LED comes on.
Press again to switch off.
Air inlet
A press on this control activates
the entry of air into the cabin; the
LED comes on. Press again to
switch off.
3
EASE OF uSE and cOMFOrt
Ventilation
Page 74 of 292

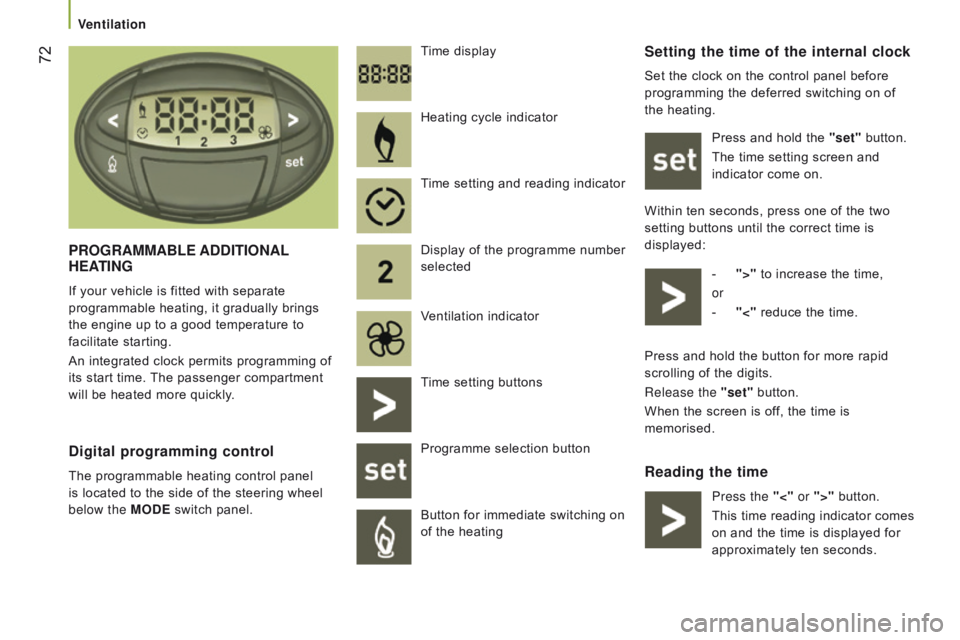
72Setting the time of the internal clock
Set the clock on the control panel before
programming the deferred switching on of
the heating.Press and hold the "set" button.
The time setting screen and
indicator come on.
Within ten seconds, press one of the two
setting buttons until the correct time is
displayed: -
">"
to increase the time,
or
-
"<"
reduce the time.
reading the time
Pr
OG
r
AMMABLE
A
dd
I
t
IO
n
AL
HEAt
I
n
G
If your vehicle is fitted with separate
programmable heating, it gradually brings
the engine up to a good temperature to
facilitate starting.
An integrated clock permits programming of
its start time. The passenger compartment
will be heated more quickly. Time display
digital programming control
The programmable heating control panel
is located to the side of the steering wheel
below the MO
d E switch panel. Heating cycle indicator
Time setting and reading indicator
Display of the programme number
selected
Ventilation indicator
Time setting buttons
Programme selection button
Button for immediate switching on
of the heating
Press and hold the button for more rapid
scrolling of the digits.
Release the "set" button.
When the screen is off, the time is
memorised.
Press the "<" or ">" button.
This time reading indicator comes
on and the time is displayed for
approximately ten seconds.
Ventilation
Page 210 of 292

208PrESEntAtIO n
The tipper body is raised by a electro-hydraulic unit powered by the
vehicle's battery.
Raising and lowering the the tipper body done is by pressing and
holding the corresponding buttons on the magnetic and portable
remote control mounted on on a carrier in the cab. Power to raise the tipper body is generated by the motor in the
electro-hydraulic unit.
The tipper body is lowered by an electrovalve that opens a fluid
return from the ram.
A safety device prevents the tipper body from dropping when static
or being raised.
tipper body
Page 222 of 292

220First steps
Use the buttons arranged below the touch
screen for access to the main menus, then
press the virtual buttons in the touch screen.In very hot conditions, the volume
may be limited to protect the system.
Return to the initial situation take place
once the temperature in the passenger
compartment drops.
The system may also go into standby
(screen and sound completely off) for a
minimum period of 5 minutes.
Touch Screen Audio - Telematic System
Page 227 of 292

225Level 1Level 2 Level 3co mment
rAd
IO Briefly press the buttons for an automatic search.
Press and hold the buttons for a quick search.
rAd
IO
Preset Make a long press on the button to present the
current radio station.
The current station is highlighted.
Press the "All" button to display all of the preset
radio stations in the waveband selected.
rAd
IO
n
avigate List of stations
Selection a station with a press.
Update the list according to reception.
Press these buttons to scroll through the radio
stations received.
Go directly to the desired letter in the list.
rAd
IO
AM/FM/
d
A
B
ch
oose the waveband Choose the waveband
rAd
IO
Adjustment
dir
ect adjustment The screen virtual keypad can used to enter a
single number corresponding to a station.
The symbols allow precise adjustment of the
frequency.
rAd
IO
Info Information
Display information on the current radio station.
touch Screen Audio - telematic System
AudIO and tELEMAtIcS
10
Page 233 of 292

231Level 1Level 2 Level 3co mment
ME d
I
A Briefly press the buttons to play the previous/next
track.
Press and hold the buttons for fast for ward or
back in the track selected.
ME
d
I
A
n
avigate
cur
rently playing Navigate and select tracks on the active device.
The selection possibilities depend on the device
connected or the type of CD inserted.
Artists
Albums
Genres
tr
a c k s
Playlists
Audio books
Podcasts
ME
d
I
A
Source
cdS
elect the desired audio source from those
available or insert a device intended for this
purpose, the system starts playing the source
automatically.
A
ux
u
SB
Bluetooth Sources connected
Pair a Bluetooth audio device.
Add device
Tel. connect.
ME
d
I
A
Info Information
Display information on the track playing.
touch Screen Audio - telematic System
AudIO and tELEMAtIcS
10
Page 245 of 292

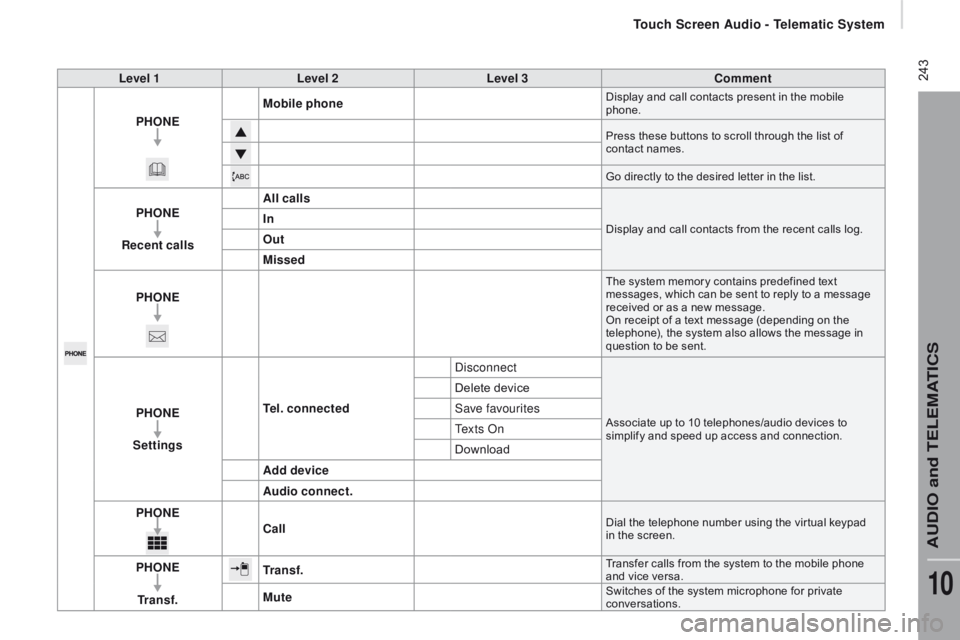
243Level 1Level 2 Level 3co mment
PHO
nE M
obile phone
Display and call contacts present in the mobile
phone.
Press these buttons to scroll through the list of
contact names.
Go directly to the desired letter in the list.
PHOnE
re
cent calls All callsDisplay and call contacts from the recent calls log.In
Out
Missed
PHO
nE
The system memory contains predefined text
messages, which can be sent to reply to a message
received or as a new message.
On receipt of a text message (depending on the
telephone), the system also allows the message in
question to be sent.
PHOnE
S ettingste l. connected DisconnectAssociate up to 10 telephones/audio devices to
simplify and speed up access and connection.
Delete device
Save favourites
Te x t s O n
Download
Add device
Audio connect.
PHO
nEc
all
Dial the telephone number using the vir tual keypad
in the screen.
PHOnE
tr
a n s f .tr a n s f .Transfer calls from the system to the mobile phone
and vice versa.
MuteSwitches of the system microphone for private
conversations.
touch Screen Audio - telematic System
AudIO and tELEMAtIcS
10
Page 260 of 292

258Voice commands
Steering mounted controls
Information - using the system
Instead of touching the screen, you can
use your voice to issue commands to
the system. Voice interaction can be quickly used
if these buttons are pressed during
a voice message from the system; It
allows a voice command to be issued
di r e c t l y.
For example, if the system is speaking
a voice help message and if you want
to know the command to give the
system, by pressing these buttons, the
voice message is interrupted and the
desired voice command can be spoken
directly (so avoiding the need to listed
to the complete voice help message).
When the system is waiting for a voice
command from the user, pressing these
buttons closes the voice session.
To ensure that your voice commands
are always recognised by the system,
we recommend that you follow the
advice below:
-
s
peak with a normal tone of voice,
-
b
efore speaking, always wait for
the "beep" (audible signal),
-
t
he system is able to recognise
the voice commands delivered,
independent off gender, tone and
inflexion of the voice of the person
speaking,
-
k
eep the noise level inside the
vehicle as low as possible,
-
b
efore speaking a voice command,
ask other passengers not to speak.
As the system recognizes voice
commands whatever is said, when
more than one person speaks
at the same time, it is possible
that the system will recognise
commands different or additional to
the one intended, Every time a button is pressed, a
"beep" (audible signal) is produced
and the screen displays a page of
suggestions asking the user to speak a
command.
-
f or best operation, it is
recommended that the windows
and opening roof (for versions/
markets where it is available) be
closed to avoid inter ference from
extraneous noises.
This button switches on the
"Telephone" voice recognition mode,
which makes it possible to start calls,
view the log of recent /received/made,
display contacts, etc.
This button switches on the "Radio/
Media" voice recognition mode,
which makes it possible to tune to a
specific radio station radio or specific
AM/FM radio frequency, play a track
or an album on a USB memory stick /
iPod/MP3 CD.
touch Screen Audio - telematic System
Page 270 of 292

268First steps
On/off, volume setting.
Select FM and AM wavebands.
Display the list of connected
telephones.Rotate: scroll through a list or adjust
radio station.
Press: confirm the option displayed in
the screen.
Select USB or AUX source. Information on the current radio
station or media.Repeat play.
Select preset stations.
FM-A, FM-B, FM- C, AM-A, AM-B,
AM-C. Mute / restore sound. Radio buttons 1 to 6:
Select a pre-set radio station.
Long press: pre-set a station.
Random (shuffle) play
Automatic frequency search up.
Select the next USB track.
Press and hold: fast for ward.
Display the menu and adjust options. Automatic frequency search down.
Select the previous USB track.
Press and hold: fast back.
Abandon the current operation.
Go up one level (menu or folder).
Audio System