ignition CITROEN RELAY 2019 Handbook (in English)
[x] Cancel search | Manufacturer: CITROEN, Model Year: 2019, Model line: RELAY, Model: CITROEN RELAY 2019Pages: 232, PDF Size: 8.21 MB
Page 25 of 232

23
You have access to all the menus if your
vehicle is fitted with the audio system.
If your vehicle is fitted with the touch screen
audio system, certain menus are only
accessible using the audio system control
panel.
As a
safety measure, some menus can
only be accessed when the ignition is off.
The corresponding information appears in the
instrument panel screen.
Languages available: Italian, English, German,
French, Spanish, Portuguese, Dutch, Brazilian,
Polish, Russian, Turkish and Arabic.
This MODE button enables
you to:
-
a
ccess the menus and
sub-menus,
-
c
onfirm your selections,
within a
menu,
-
q
uit the menus. Hold it down to return to the
home page.
This button enables you to:
-
s
croll up through a menu,
-
i
ncrease a value.
This button enables you to:
-
s
croll down through a menu,
-
d
ecrease a value.
1
Dashboard instruments
Page 29 of 232

27
Using the touch screen
audio system
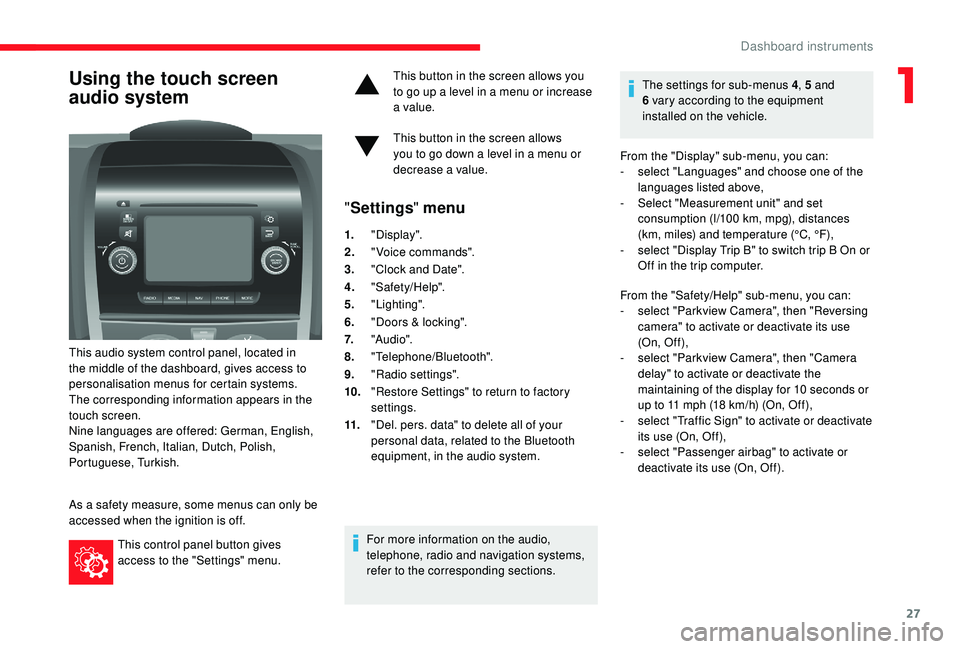
This audio system control panel, located in
the middle of the dashboard, gives access to
personalisation menus for certain systems.
The corresponding information appears in the
touch screen.
Nine languages are offered: German, English,
Spanish, French, Italian, Dutch, Polish,
Portuguese, Turkish.
As a
safety measure, some menus can only be
accessed when the ignition is off.
This control panel button gives
access to the "Settings" menu. This button in the screen allows you
to go up a
level in a menu or increase
a value.
This button in the screen allows
you to go down a level in a menu or
decrease a
value.
"
Settings " menu
1."Display".
2. "Voice commands".
3. "Clock and Date".
4. "Safety/Help".
5. "Lighting".
6. "Doors & locking".
7. "Audi o".
8. "Telephone/Bluetooth".
9. "Radio settings".
10. "Restore Settings" to return to factory
settings.
11. "Del. pers. data" to delete all of your
personal data, related to the Bluetooth
equipment, in the audio system.
For more information on the audio,
telephone, radio and navigation systems,
refer to the corresponding sections. The settings for sub-menus 4
, 5 and
6 vary according to the equipment
installed on the vehicle.
From the "Display" sub-menu, you can:
-
s
elect "Languages" and choose one of the
languages listed above,
-
S
elect "Measurement unit" and set
consumption (l/100 km, mpg), distances
(km, miles) and temperature (°C, °F),
- s elect "Display Trip B" to switch trip B On or
Off in the trip computer.
From the "Safety/Help" sub-menu, you can:
-
s
elect "Parkview Camera", then "Reversing
camera" to activate or deactivate its use
(On, Of f ),
-
s
elect "Parkview Camera", then "Camera
delay" to activate or deactivate the
maintaining of the display for 10
seconds or
up to 11
mph (18 km/h) (On, Off),
-
s
elect "Traffic Sign" to activate or deactivate
its use (On, Off),
-
s
elect "Passenger airbag" to activate or
deactivate its use (On, Off).
1
Dashboard instruments
Page 31 of 232

29
Current fuel consumption A
This is the average fuel consumption during the
last few seconds.
Average speed A
This is the average speed calculated since the
last trip computer zero reset (with the ignition
o n).
Trip duration A
This indicates the total time since the last trip
computer zero reset.
If TRIP B is activated in the MODE menu:
-
D
istance B
-
A
verage fuel consumption B
-
A
verage speed B
-
T
rip duration B
Tachograph
When the card is inserted, all of the data can
be:
-
d
isplayed on the tachograph screen,
-
printed,
-
t
ransferred to external storage media via an
inter face.
For further information, refer to the documents
supplied by the manufacturer of the
tachograph.
If your vehicle is fitted with a
tachograph,
disconnection of the negative (-) terminal
of the battery (located under the floor
on the left-hand side, in the cab) is
recommended if the vehicle is not to be
used for a
period of more than 5 days.
If your vehicle is fitted with a
tachograph, this
permits storing of all of the data relating to the
vehicle in the unit and on a
card inserted in it.
Example: at the beginning of each journey or
change of team.
1
Dashboard instruments
Page 34 of 232

32
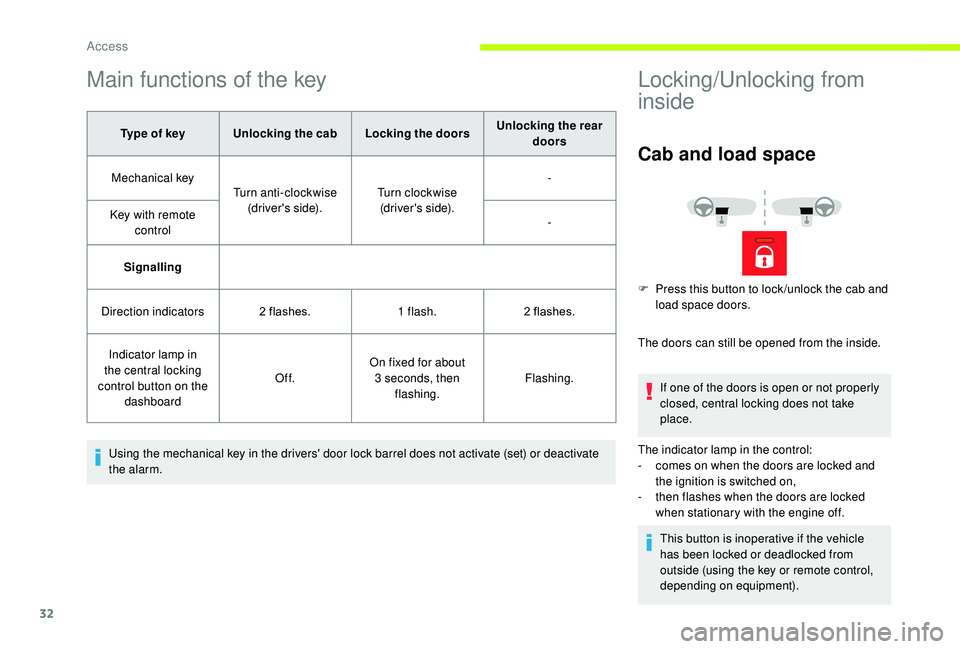
Main functions of the key
Type of keyUnlocking the cab Locking the doorsUnlocking the rear
doors
Mechanical key Turn anti-clockwise
(driver's side). Turn clockwise
(driver's side). -
Key with remote control -
Signalling
Direction indicators 2
flashes.1
flash.2
flashes.
Indicator lamp in
the central locking
control button on the dashboard Of f.
On fixed for about
3
seconds, then flashing. Flashing.
Using the mechanical key in the drivers' door lock barrel does not activate (set) or deactivate
the alarm.
Locking/Unlocking from
inside
Cab and load space
The doors can still be opened from the inside. If one of the doors is open or not properly
closed, central locking does not take
place.
The indicator lamp in the control:
-
c
omes on when the doors are locked and
the ignition is switched on,
-
t
hen flashes when the doors are locked
when stationary with the engine off.
This button is inoperative if the vehicle
has been locked or deadlocked from
outside (using the key or remote control,
depending on equipment).
F
P
ress this button to lock /unlock the cab and
load space doors.
Access
Page 37 of 232

35
Opening to 180°
If your vehicle is fitted with this equipment,
a retractable check strap system permits
extending of the opening from 96° to 180°.
Closing
F To close, start with the left-hand door then close the right-hand door.
Alarm
System which protects and provides a deterrent
a gainst theft and break-ins. If your vehicle is
so equipped, it provides the following types of
monitoring:
- Perimeter monitoring
The system ensures exterior perimeter
protection by detectors on the openings (doors,
bonnet) and in the electrical power supply.
- Anti-tilt monitoring
The system checks for any change in the
attitude of the vehicle.
Activation
F Press this button on the remote control.
The protection provided by the alarm
system becomes active after a
few
seconds.
Triggering of the alarm
The alarm then returns to monitoring
mode but the triggering event is
stored and is indicated by illumination
of the electronic immobiliser warning
lamp for about 10
seconds when the
ignition is switched on.
The alarm is also triggered after interruption
of the electrical supply and when it is
reconnected.
From inside
F Pull the handle on the door panel towards you, then push to open the right-hand door.
F
P
ush the lever to open the left-hand door.
Do not drive with a
rear door open. F
P
ress the button, located on the door trim
pad, to widen the angle of the door.
The check strap will engage again
automatically on closing. F
T
urn the ignition off and exit the vehicle.
This is signalled by the siren sounding and flashing
of the direction indicators for thirty seconds.
2
Access
Page 38 of 232

36
Deactivation using the
remote control
F Press this button.
Deactivation of the anti-tilt
protection
F Press this control to deactivate the protection (when towing the
vehicle with the alarm on, for
example).
Failure of the remote
control
F Unlock the doors by using the key in the door lock; the alarm is triggered.
F
S
witch on the ignition, recognition of the key
code stops the alarm.
Deactivation occurs when the vehicle is
unlocked.
(Depending on engine).
The protection remains active until the doors
are unlocked with the central locking.
Locking the doors using the key in the
door lock does not set the alarm. To deactivate the siren quickly
following a
false alarm:
F
s
witch on the ignition, recognition of
the key code stops the alarm,
F
p
ress the unlocking button (cab and
key) on the remote control.
To avoid setting the alarm, when washing
the vehicle for example, lock the vehicle
using the key.
Unlocking the vehicle using the remote
control deactivates the siren automatically.
Electric windows
A. Driver's window control
B. Passenger's window control
Manual operation
F To open or close the window, press or pull
switch A/B gently, without passing the
resistance point. The window stops as soon
as the switch is released.
Automatic operation
F To open or close the window, press or pull the control A fully, beyond the resistance
point: the window opens or closes
completely when the switch is released.
Pressing the switch again stops the
movement of the window.
Always remove the key from the ignition
when leaving the vehicle, even for a
short
time.
If an obstacle is encountered during
operation of the electric windows, you must
reverse the movement of the window. To do
this, press the window control concerned.
When the driver operates the passenger
electric windows, they must ensure that
no-one is preventing correct closing of the
windows.
The driver must ensure that the passengers
use the electric windows correctly.
Be particularly aware of children when
operating the windows.
Access
Page 48 of 232

46
Air outlet
Press this control to activate
extraction of air to the outside; the
LED comes on. Press again to
switch off.
Air intake
Pressing this control activates the
exterior air intake into the passenger
compartment; the LED comes on.
Press again to switch off.
Additional heating
systems
Additional heating
This is passenger compartment heating,
additional to the standard equipment.
It can operate independently of the engine.
Additional heater or
programmable additional
heating
This is an additional, programmable and
separate system which heats the Diesel engine
hot coolant loop to make starting easier.
It improves the demisting and defrosting
per formance and that of the heated seats, if
fitted to the vehicle.
Automatic additional
heating
This is an additional system which starts
automatically when the ignition is switched
on. Its activation depends on the exterior
temperature and the temperature inside the
vehicle.
It switches off automatically once the heating
system is started manually. The passenger compartment heating is brought
up to temperature more rapidly.
This system must be programmed to start up
before you enter the vehicle.
Supplementary heating
On the 2-3 seats model, this is located under
t he seat on the driver's side with air diffusion
directed forwards.
On the 5 -9
seats model, it is
located at the rear. Depending
on the model, the air diffusion
is either direct from the rear
or comes from the rail located
under each of the two rows of
seats.
F
P
ress this control to activate/
deactivate the heating. The
LED comes on if the heating is
activated.
When rapid demisting and defrosting is
required, switch off the control.
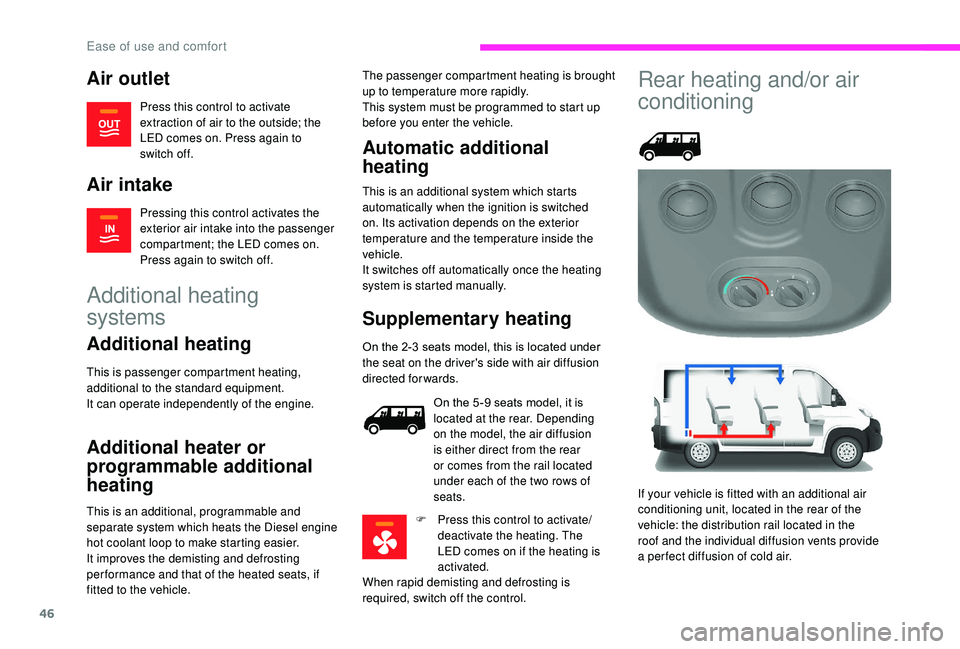
Rear heating and/or air
conditioning
If your vehicle is fitted with an additional air
conditioning unit, located in the rear of the
vehicle: the distribution rail located in the
roof and the individual diffusion vents provide
a
per fect diffusion of cold air.
Ease of use and comfort
Page 58 of 232

56
Portable ashtray
F After opening the ashtray, pull it upwards then empty it into a bin.
Overhead storage
This is located above the sun visors.
Maximum load: approximately 20 kg.
Reading lamps
Controls located at the bottom
of the dashboard on the driver's
side allow the driver to switch
the passenger reading lamp on
or of f.
These are controlled by the switches.
The driver's switch controls both reading lamps
simultaneously.
The passenger switch controls either the
driver's reading lamp or the passenger's
reading lamp.
Courtesy lamp
It can be activated by means of:
-
t he switches on the courtesy lamp, with the
ignition on – MAR position,
-
o
pening or closing one of the front doors,
-
l
ocking/unlocking the vehicle.
It switches off automatically:
-
i
f the switch is not pressed to the right or to
the left,
-
i
n all cases after 15 minutes, if the doors
remain open,
-
o
r when the ignition is switched on.
Ease of use and comfort
Page 61 of 232

59
Glazed partition
Depending on the country of sale, a glazed
partition separates the cabin from the load
space.
However, you can use the control to open/close
its sliding window.
To r c h
Remove the torch from its base by pressing the
button then pivoting the torch downwards by
90
de
grees.
To switch on the torch, slide the switch
forwards.
To change the 4
batteries (NiMH type), remove
the protective cover, located on the torch.
To put the torch back in place, engage it in the
notches on the base and pivot it upwards.
If your vehicle has one, the magnetic torch is
located at the rear courtesy lamp.
A light is installed in the centre of the torch
base. With the vehicle stationary, key in the
ignition switch or removed, recharging
of and lighting from the torch stops after
around 15
minutes.
The torch batteries recharge automatically
while driving.Sliding side windows
While driving, the window must be closed
or secured in an intermediate position.
Do not project long objects outside the
vehicle through the window.
Depending on the vehicle's equipment, the side
windows of row 2
can be opened.
F
S
queeze the two controls then slide the
window.
3
Ease of use and comfort
Page 63 of 232

61
Lighting controls
Selection and control of the various front and
rear lamps providing the vehicle's lighting.In some weather conditions (e.g. low
temperature or humidity), the presence
of misting on the internal sur face of the
glass of the headlamps and rear lamps is
normal; it disappears after the lamps have
been on for a
few minutes.
Travelling abroad
If using your vehicle in a
country that
drives on the other side of the road, the
headlamps must be adjusted to avoid
dazzling oncoming drivers.
Contact a
CITROËN dealer or a qualified
workshop.
Selection of main lighting
mode
Lighting off (ignition off)/
Daytime running lamps (engine
running).
Dipped beam headlamps/Main
beam headlamps.
Automatic illumination of the dipped
beam/main beam headlamps.
Switching the headlamps
(dipped beam/main beam)
F Pull the lighting control stalk towards you to switch between dipped and main beam
headlamps.
To flash the headlamps, pull the lighting control
stalk towards you, regardless of the position of
the ring.
Direction indicators
F Turn the ring to align the white mark with the symbol required. F
L
eft: lower the lighting control stalk passing
the point of resistance.
F
R
ight: raise the lighting control stalk passing
the point of resistance.
" Motorway " function
F Press briefly upwards or downwards,
without going beyond the point of
resistance; the direction indicators will flash
five times.
Foglamps
If your vehicle is equipped with foglamps,
they operate with the dipped or main beam
headlamps.
4
Lighting and visibility