ignition CITROEN RELAY 2019 Handbook (in English)
[x] Cancel search | Manufacturer: CITROEN, Model Year: 2019, Model line: RELAY, Model: CITROEN RELAY 2019Pages: 232, PDF Size: 8.21 MB
Page 104 of 232
102
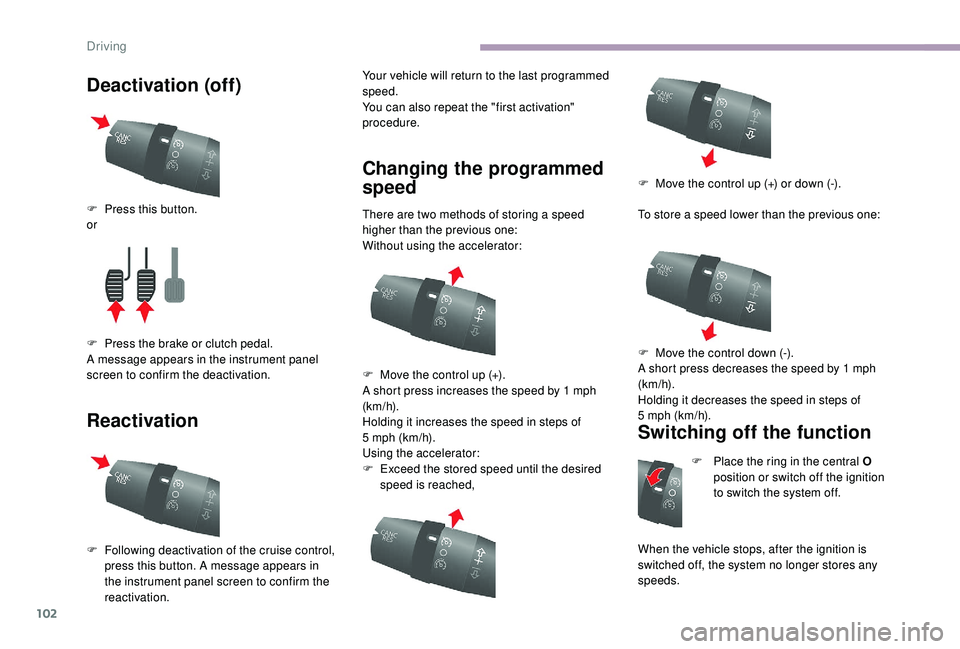
Deactivation (off)
ReactivationYour vehicle will return to the last programmed
speed.
You can also repeat the "first activation"
procedure.
Changing the programmed
speed
There are two methods of storing a speed
h igher than the previous one:
Without using the accelerator:
Using the accelerator:
F
E
xceed the stored speed until the desired
speed is reached, To store a
speed lower than the previous one:
Switching off the function
F Place the ring in the central O
position or switch off the ignition
to switch the system off.
When the vehicle stops, after the ignition is
switched off, the system no longer stores any
speeds.
F
P
ress this button.
or
F
P
ress the brake or clutch pedal.
A message appears in the instrument panel
screen to confirm the deactivation.
F
F
ollowing deactivation of the cruise control,
press this button. A message appears in
the instrument panel screen to confirm the
reactivation. F
M
ove the control up (+).
A short press increases the speed by 1
mph
(km/h).
Holding it increases the speed in steps of
5
mph (km/h). F
M
ove the control up (+) or down (-).
F
M
ove the control down (-).
A short press decreases the speed by 1 mph
(km/h).
Holding it decreases the speed in steps of
5
mph (km/h).
Driving
Page 107 of 232

105
Restore – RES
To restore the vehicle's programmed speed
(for example after pressing the brake or clutch
pedal):The indicator comes on and the
cruise control function is restored.
F
G
o back gradually to the selected speed
and press RES .
Cancelling the programmed
speed
When the vehicle stops, after the ignition is
switched off, the system no longer stores any
speeds.
Malfunction
In the event of a fault, the system is
s witched off and the indicator goes
out.
Have it checked by a
CITROËN dealer or by
a
qualified workshop. Use the cruise control only when traffic
conditions allow you to travel at a
constant
speed for a certain period of time whilst
keeping a sufficiently safe distance from
other vehicles.
Do not activate the cruise control in urban
areas, in heavy traffic, on winding or steep
roads, on slippery or flooded roads, or in
conditions of poor visibility (heavy rain,
fog, falling snow, etc.).
In some circumstances, it may not
be possible to maintain or reach the
programmed speed: towing, vehicle
heavily loaded, steep climb, etc.
The use of mats not approved by
CITROËN may impair the operation of the
cruise control.
To avoid any risk of jamming of the pedals:
-
e
nsure that the mat is positioned
c o r r e c t l y,
-
d
o not fit one mat on top of another.
Lane Departure Warning
System
System which detects the involuntary crossing
of longitudinal traffic lane markings on the
ground (solid or broken line).
The lane departure warning system
cannot, in any circumstances, replace the
need for vigilance on the part of the driver.
A camera fitted at the top centre of the
windscreen monitors the road and detects lane
markings and the position of the vehicle with
respect to them.
With the vehicle running at a
speed higher than
37
mph (60 km/h), it triggers a warning if the
vehicle drifts off line.
This system is particularly useful on motor ways
and main roads.
6
Driving
Page 108 of 232
106
If the windscreen is damaged, it is strongly
recommended that you go to a CITROËN
dealer or a
qualified workshop for any
replacement and calibration of the camera.
Operation
The system starts automatically when moving
of f.
A check of the operating conditions
takes place: these two warning
lamps come on in the instrument
panel.
When these conditions are met, these two
indicator lamps go off. The system is activated.
If the operating conditions are not met, the
system is activated but is no longer effective.
This is signalled by the fixed illumination of
these two warning lamps in the instrument
panel.
Operating conditions
Once running, the system is only active when
the operating conditions are met:
-
T
he vehicle is moving for wards.
-
N
o malfunction is detected in the vehicle.
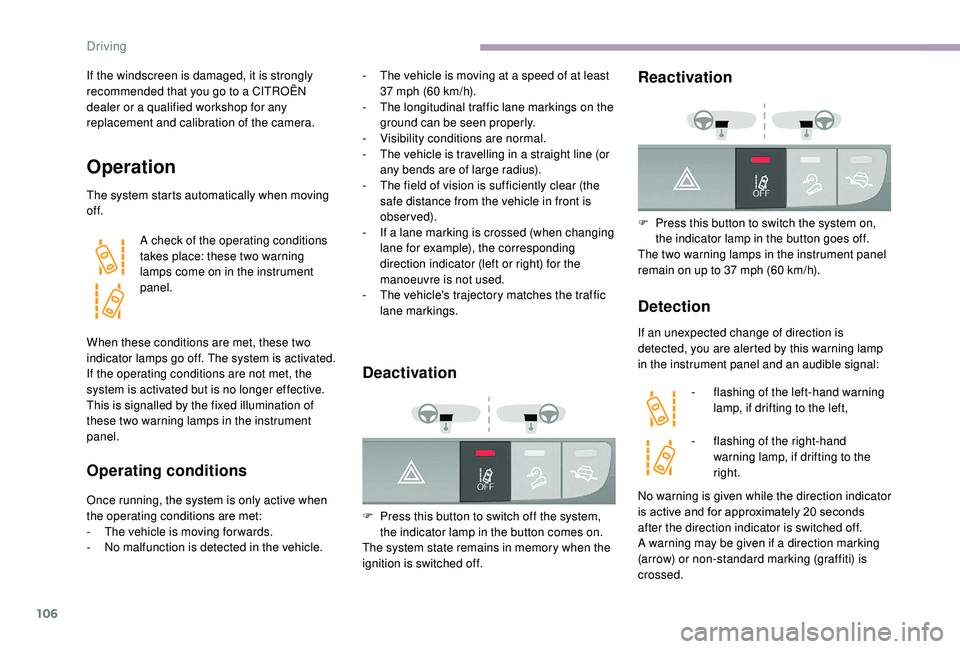
Deactivation
F Press this button to switch off the system, the indicator lamp in the button comes on.
The system state remains in memory when the
ignition is switched off.
Reactivation
F Press this button to switch the system on, the indicator lamp in the button goes off.
The two warning lamps in the instrument panel
remain on up to 37
mph (60 km/h).
Detection
If an unexpected change of direction is
detected, you are alerted by this warning lamp
in the instrument panel and an audible signal:-
f
lashing of the left-hand warning
lamp, if drifting to the left,
-
f
lashing of the right-hand
warning lamp, if drifting to the
right.
-
T
he vehicle is moving at a
speed of at least
37
mph (60
km/h).
-
T
he longitudinal traffic lane markings on the
ground can be seen properly.
-
V
isibility conditions are normal.
-
T
he vehicle is travelling in a
straight line (or
any bends are of large radius).
-
T
he field of vision is sufficiently clear (the
safe distance from the vehicle in front is
observed).
-
I
f a
lane marking is crossed (when changing
lane for example), the corresponding
direction indicator (left or right) for the
manoeuvre is not used.
-
T
he vehicle's trajectory matches the traffic
lane markings.
No warning is given while the direction indicator
is active and for approximately 20 seconds
after the direction indicator is switched off.
A warning may be given if a
direction marking
(arrow) or non-standard marking (graffiti) is
crossed.
Driving
Page 118 of 232
116
Fuel
The capacity of the tank is about 90 litres.
F uel tanks of different capacities may be fitted,
60
and 120 litres, depending on the engine.
Low fuel level
When the E (Empty) level is
reached, this warning lamp lights up.
You then have around 10
to 12 litres in
reser ve, depending on the capacity of the tank
and the engine.
Refuel without delay to avoid running out of
fuel.
Refilling
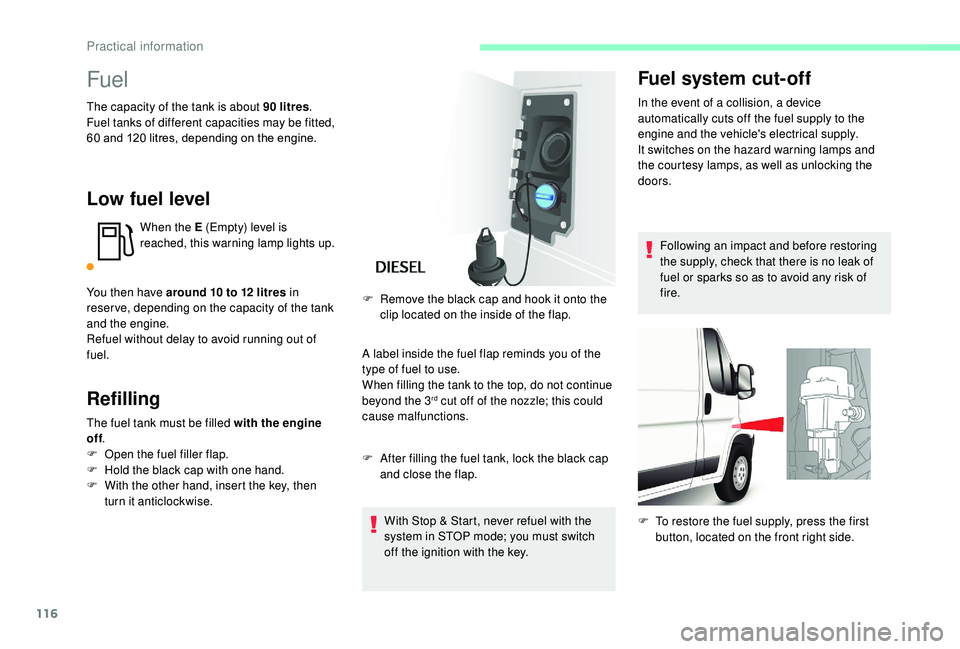
The fuel tank must be filled with the engine
off .
F
O
pen the fuel filler flap.
F
H
old the black cap with one hand.
F
W
ith the other hand, insert the key, then
turn it anticlockwise. A label inside the fuel flap reminds you of the
type of fuel to use.
When filling the tank to the top, do not continue
beyond the 3
rd cut off of the nozzle; this could
cause malfunctions.
F
A
fter filling the fuel tank, lock the black cap
and close the flap.
With Stop & Start, never refuel with the
system in STOP mode; you must switch
off the ignition with the key.
F
R
emove the black cap and hook it onto the
clip located on the inside of the flap.
Fuel system cut-off
In the event of a collision, a device
a utomatically cuts off the fuel supply to the
engine and the vehicle's electrical supply.
It switches on the hazard warning lamps and
the courtesy lamps, as well as unlocking the
doors.
Following an impact and before restoring
the supply, check that there is no leak of
fuel or sparks so as to avoid any risk of
fire.
F
T
o restore the fuel supply, press the first
button, located on the front right side.
Practical information
Page 130 of 232

128
For access to the reser voir filler cap, remove
the protective cover by turning its three fixing
screws a quarter turn, then remove the second
cover fitted to the cap.
Engine coolant level
Check the coolant level regularly.
It is normal to top up this fluid
between two services.
Check the coolant level regularly,
according to the use made of your vehicle
(every 3,000
miles (5,000 km)/3 months);
if necessary, top up using coolant
recommended by the manufacturer.
The check and top up must only be done
with the engine cold.
A low coolant level presents a
risk of
serious damage to your engine.
When the engine is hot, the temperature of the
coolant is regulated by the electric fan. This
may operate with the ignition off; furthermore,
because the cooling system is under pressure,
wait for at least one hour after the engine has
stopped before carrying out any work. F
F
or access to the header tank filler cap,
remove the protective cover by turning its
three fixing screws a quarter turn.
F
T
o avoid the risk of scalding, place a cloth
around the cap, then loosen the cap by
a
quarter turn to release the pressure.
F
W
hen the pressure has dropped, remove
the cap and top up the level with coolant.
To p p i n g u p
The level must be between the MIN and MAX
marks on the expansion bottle.
As close as possible to the MAX mark is
recommended.
If more than 1
litre of fluid is required to top
up the level, have the system checked by
a
CITROËN dealer or a qualified workshop.
Screenwash and headlamp
wash level
To check the level or top up the fluid
on vehicles fitted with headlamp
washers, immobilise the vehicle and
switch off the engine.
Capacity of the reservoir: approximately
5.5
litres.
F
F
or access to the reser voir filler cap, pull on
the telescopic filler pipe and unclip the cap.
Practical information
Page 133 of 232
131
Brake disc wear
For information on checking brake
disc wear, contact a CITROËN or
a
qualified workshop.
Parking brake
If excessive travel or a loss of
e ffectiveness of this system is
noticed, the parking brake must
be checked, even between two
services.
This system must be checked by a
CITROËN
dealer or a
qualified workshop.
Diesel fuel filter
The Diesel fuel filter is located under the
bonnet, close to the brake fluid reser voir. If this warning lamp comes on, the
filter must be purged to remove
water.
You can also purge the fuel filter
regularly, every time the engine oil
is changed.
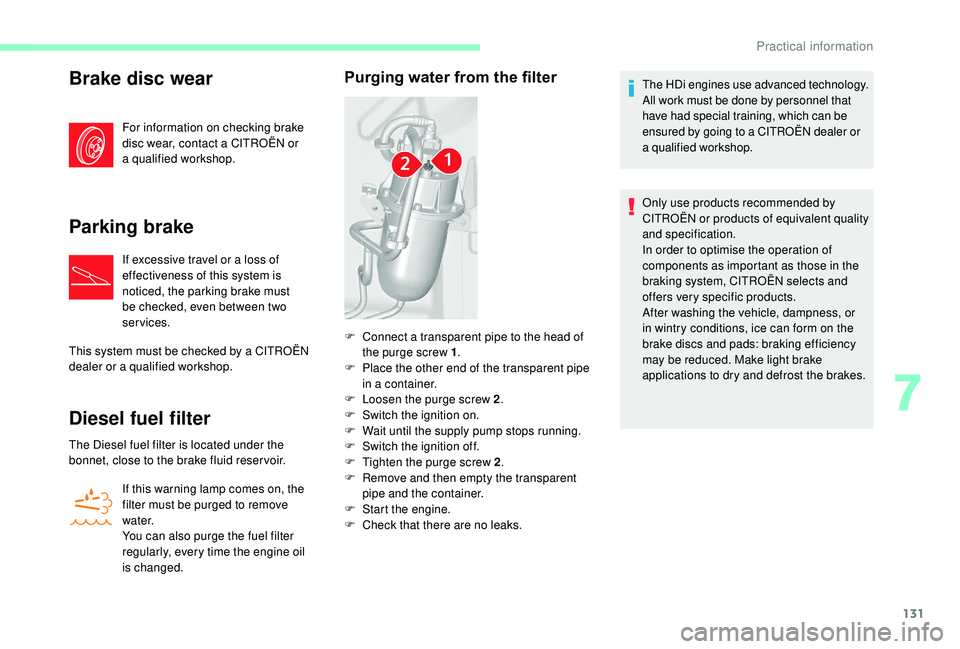
Purging water from the filterThe HDi engines use advanced technology.
All work must be done by personnel that
have had special training, which can be
ensured by going to a
CITROËN dealer or
a
qualified workshop.
Only use products recommended by
CITROËN or products of equivalent quality
and specification.
In order to optimise the operation of
components as important as those in the
braking system, CITROËN selects and
offers very specific products.
After washing the vehicle, dampness, or
in wintry conditions, ice can form on the
brake discs and pads: braking efficiency
may be reduced. Make light brake
applications to dry and defrost the brakes.
F
C
onnect a
transparent pipe to the head of
the purge screw 1 .
F
P
lace the other end of the transparent pipe
in a
container.
F
L
oosen the purge screw 2 .
F
S
witch the ignition on.
F
W
ait until the supply pump stops running.
F
S
witch the ignition off.
F
T
ighten the purge screw 2 .
F
R
emove and then empty the transparent
pipe and the container.
F
S
tart the engine.
F
C
heck that there are no leaks.
7
Practical information
Page 135 of 232
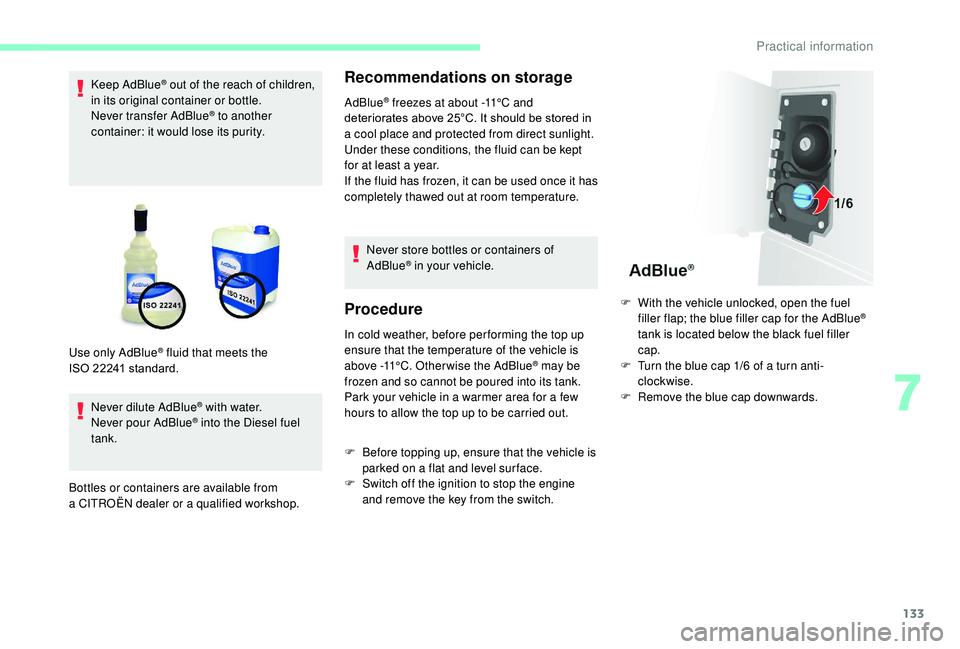
133
Keep AdBlue® out of the reach of children,
in its original container or bottle.
Never transfer AdBlue
® to another
container: it would lose its purity.
Never dilute AdBlue
® with water.
Never pour AdBlue® into the Diesel fuel
tank.
Bottles or containers are available from
a
CITROËN dealer or a
qualified workshop.
Recommendations on storage
AdBlue® freezes at about -11°C and
deteriorates above 25°C. It should be stored in
a
cool place and protected from direct sunlight.
Under these conditions, the fluid can be kept
for at least a
year.
If the fluid has frozen, it can be used once it has
completely thawed out at room temperature.
Never store bottles or containers of
AdBlue
® in your vehicle.
Procedure
In cold weather, before per forming the top up
ensure that the temperature of the vehicle is
above -11°C. Other wise the AdBlue
® may be
frozen and so cannot be poured into its tank.
Park your vehicle in a
warmer area for a few
hours to allow the top up to be carried out.
Use only AdBlue
® fluid that meets the
ISO
22241
standard.
F
B
efore topping up, ensure that the vehicle is
parked on a
flat and level sur face.
F
S
witch off the ignition to stop the engine
and remove the key from the switch. F
W
ith the vehicle unlocked, open the fuel
filler flap; the blue filler cap for the AdBlue
®
tank is located below the black fuel filler
cap.
F
T
urn the blue cap 1/6 of a turn anti-
clockwise.
F
R
emove the blue cap downwards.
7
Practical information
Page 136 of 232
134
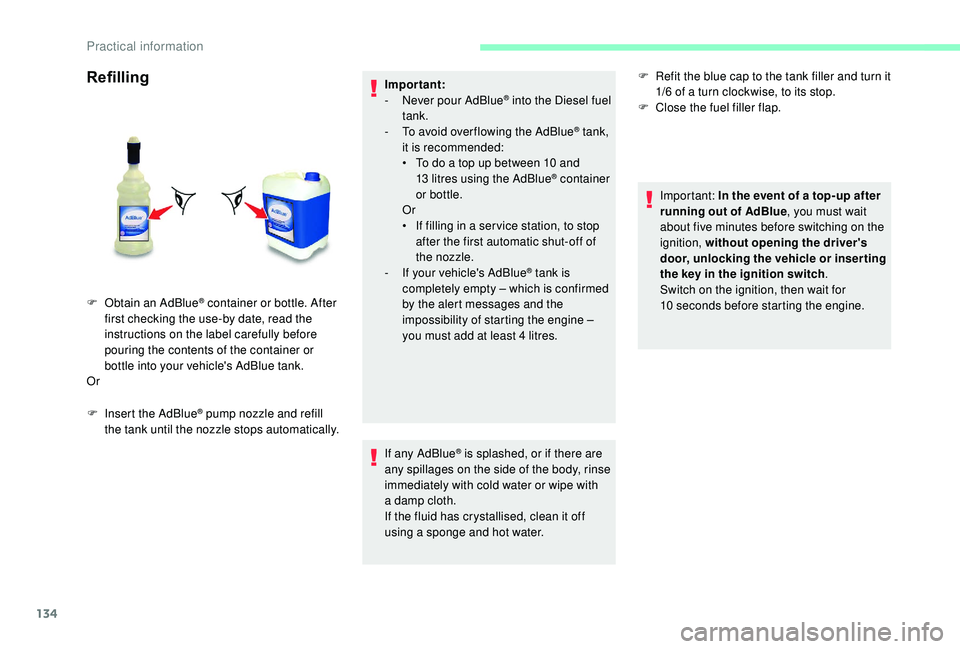
Refilling
F Insert the AdBlue® pump nozzle and refill
the tank until the nozzle stops automatically. Important:
-
N
ever pour AdBlue
® into the Diesel fuel
tank.
-
T
o avoid over flowing the AdBlue
® tank,
it is recommended:
•
T
o do a
top up between 10
and
13
litres using the AdBlue
® container
or bottle.
Or
•
I
f filling in a
ser vice station, to stop
after the first automatic shut-off of
the nozzle.
-
I
f your vehicle's AdBlue
® tank is
completely empty – which is confirmed
by the alert messages and the
impossibility of starting the engine –
you must add at least 4
litres.
If any AdBlue
® is splashed, or if there are
any spillages on the side of the body, rinse
immediately with cold water or wipe with
a
damp cloth.
If the fluid has crystallised, clean it off
using a
sponge and hot water.
F
O
btain an
AdBlue
® container or bottle. After
first checking the use-by date, read the
instructions on the label carefully before
pouring the contents of the container or
bottle into your vehicle's AdBlue tank.
Or F
R
efit the blue cap to the tank filler and turn it
1/6 of a turn clockwise, to its stop.
F
C
lose the fuel filler flap.
Important: In the event of a top-up after
running out of AdBlue , you must wait
about five minutes before switching on the
ignition, without opening the driver's
door, unlocking the vehicle or inser ting
the key in the ignition switch .
Switch on the ignition, then wait for
10 seconds before starting the engine.
Practical information
Page 139 of 232

137
Special feature with pneumatic
suspension
If the vehicle is fitted with this system, you must
activate vehicle lifting mode before lifting the
vehicle with a jack. For vehicles with the steering wheel on the
right, the buttons are located on the right of the
steering wheel.
F
W
ith the ignition on, simultaneously press
buttons 1 and 2 for at least 5 seconds.
Their indicator lamps come on fixed.
F
T
o leave this mode, simultaneously press
buttons 1 and 2 for another 5
seconds.
Their indicator lamps go off and the system
becomes fully operational again.
This mode deactivates itself automatically if the
speed of about 3 mph (5 km/h) is exceeded.
Spare wheel
Parking
F Park the vehicle where it does not block
traffic: the ground must be level, stable and
non-slippery.
F
I
f the road is sloping or damaged, place an
object under the wheels to act as a
chock.
F
W
ith a
manual gearbox, engage first gear
then switch off the ignition to block the
wheels.
F
A
pply the parking brake and check that the
warning lamp is on in the instrument panel.
F
T
he passengers must get out of the vehicle
and wait where they are safe.
F
P
ut on the high visibility vest and signal that
the vehicle is immobile by using the devices
envisaged by the legislation in force in the
country where you are driving (warning
triangle, hazard warning lamps, etc.).
F
E
quip yourself with the tools. Once your vehicle is properly secured, you
should proceed in this order:
1-Take the tools.
2- Remove the spare wheel from its
compartment.
3- Position the jack.
4- Change the wheel to be repaired.
5- Put away the wheel to be repaired.
1 - Take the tools
These are stowed in a box located under the
f ront passenger seat.
F
T
urn the button a quarter of a turn then pull
the box.
F
A
fter use, press the button then turn it
a
quarter of a turn to secure the box.
8
In the event of a breakdown
Page 145 of 232

143
With steel wheels:
With alloy wheels :
For more information on Identification
markings, including in particular the tyre
pressure label, refer to the corresponding
section.
F
H
ook the carrier I to the outer part.
F
S
crew in the handle H to secure the carrier
and steel wheel.
F
P
osition the support J on the carrier I .
F
T
ighten the handle H .
F
T
ighten the three fixing bolts K of the carrier
I onto the alloy wheel. F
I
nstall the long socket A, the wheelbrace D
and the bar B on the retaining bolt.
F
T
urn the assembly clockwise to fully draw
in the cable and raise the wheel under the
vehicle.
F
C
heck that the wheel is positioned
horizontally flat against the floor of the
vehicle and that the cut-out for the carrier
system is visible.
F
S
tow the tools and the trim (depending on
model).Changing a bulb
The headlamps have polycarbonate
lenses with a
protective coating:
F
d
o not clean them using a dr y or
abrasive cloth, nor with a
detergent
or solvent product,
F
u
se a sponge and soapy water or a pH
neutral product,
F
w
hen using a high pressure washer
on persistent marks, do not keep the
lance directed towards the lamps or
their edges for too long, so as not to
damage their protective coating and
seals.
Changing a
bulb must only be done with
the ignition off and after the headlamp has
been switched off for several minutes –
Risk of serious burns!
F
D
o not touch the bulb directly with your
fingers, use a
lint-free cloth.
It is essential only to use anti-ultraviolet
(UV) type bulbs, so as not to damage the
headlamp.
Always replace a
failed bulb with a new
bulb with the same type and specification.
8
In the event of a breakdown