engine CITROEN RELAY 2019 Handbook (in English)
[x] Cancel search | Manufacturer: CITROEN, Model Year: 2019, Model line: RELAY, Model: CITROEN RELAY 2019Pages: 232, PDF Size: 8.21 MB
Page 133 of 232
131
Brake disc wear
For information on checking brake
disc wear, contact a CITROËN or
a
qualified workshop.
Parking brake
If excessive travel or a loss of
e ffectiveness of this system is
noticed, the parking brake must
be checked, even between two
services.
This system must be checked by a
CITROËN
dealer or a
qualified workshop.
Diesel fuel filter
The Diesel fuel filter is located under the
bonnet, close to the brake fluid reser voir. If this warning lamp comes on, the
filter must be purged to remove
water.
You can also purge the fuel filter
regularly, every time the engine oil
is changed.
Purging water from the filterThe HDi engines use advanced technology.
All work must be done by personnel that
have had special training, which can be
ensured by going to a
CITROËN dealer or
a
qualified workshop.
Only use products recommended by
CITROËN or products of equivalent quality
and specification.
In order to optimise the operation of
components as important as those in the
braking system, CITROËN selects and
offers very specific products.
After washing the vehicle, dampness, or
in wintry conditions, ice can form on the
brake discs and pads: braking efficiency
may be reduced. Make light brake
applications to dry and defrost the brakes.
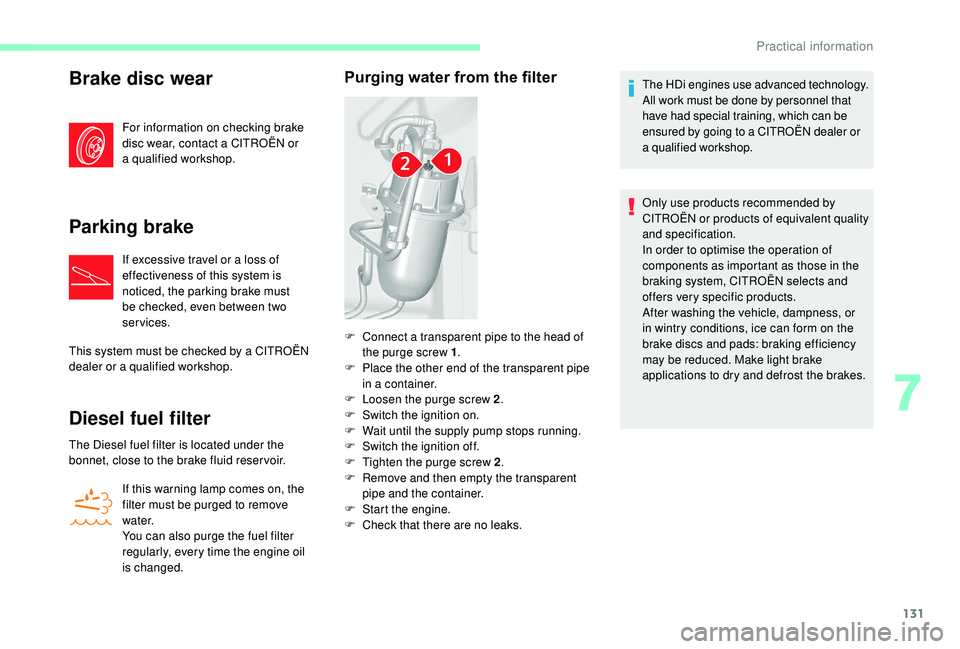
F
C
onnect a
transparent pipe to the head of
the purge screw 1 .
F
P
lace the other end of the transparent pipe
in a
container.
F
L
oosen the purge screw 2 .
F
S
witch the ignition on.
F
W
ait until the supply pump stops running.
F
S
witch the ignition off.
F
T
ighten the purge screw 2 .
F
R
emove and then empty the transparent
pipe and the container.
F
S
tart the engine.
F
C
heck that there are no leaks.
7
Practical information
Page 134 of 232
132
Freezing of the AdBlue®
AdBlue® freezes at temperatures below
around -11°C.
The SCR system includes a
heater for the
AdBlue
® tank, allowing you to continue
driving in very cold conditions.
Topping up with AdBlue®
Before topping up, please read the
following warnings carefully.
Precautions for use
AdBlue® is a urea-based solution. This fluid
is
non-flammable, colourless and odourless
(stored in a
cool place).
In the event of contact with the skin, wash the
affected area with soap and running water. In
the event of contact with the eyes, immediately
rinse the eyes with large amounts of water
or with an eye wash solution for at least
15
minutes. If a burning sensation or irritation
persists, get medical attention.
If swallowed, immediately wash out the mouth
with clean water and then drink plenty of water.
In certain conditions (high exterior temperature,
for example), the risk of ammonia being
released cannot be excluded: do not inhale
the vapours. Ammonia has an irritant effect on
mucous membranes (eyes, nose and throat).
AdBlue® (BlueHDi
engines)
To respect the environment and ensure
compliance with the Euro 6
standard, without
adversely affecting the per formance or fuel
consumption of Diesel engines, CITROËN
has taken the decision to equip its vehicles
with a
system that associates SCR (Selective
Catalytic Reduction) with a
Diesel particle filter
(DPF) for the treatment of exhaust gases.
SCR system
Using a liquid called AdBlue® containing urea, a
catalytic converter turns up to 85% of nitrogen
oxides (NOx) into nitrogen and water, which are
harmless to health and the environment.
The AdBlue
® is contained in a special tank with
a
capacity of approximately 14 litres.
It has an exterior filler located behind the fuel
filler flap below the fuel filler cap and closed
with a
blue filler cap .
An alarm system is triggered once the
remaining range is 1,500 (2,400 km), in other
words once the reser ve level is reached. Once the AdBlue
® tank is empty, a
regulatory device prevents the engine
from being restarted.
If the SCR system is faulty, the level of
emissions from your vehicle no longer
meet the Euro 6
regulations: your vehicle
becomes polluting.
In the event of a
confirmed fault with the
SCR system, you must go to a
CITROËN
dealer or a
qualified workshop as soon
as possible: having travelled 250 miles
(400 km), a device will be triggered
automatically to prevent the engine from
starting.
Practical information
Page 135 of 232
133
Keep AdBlue® out of the reach of children,
in its original container or bottle.
Never transfer AdBlue
® to another
container: it would lose its purity.
Never dilute AdBlue
® with water.
Never pour AdBlue® into the Diesel fuel
tank.
Bottles or containers are available from
a
CITROËN dealer or a
qualified workshop.
Recommendations on storage
AdBlue® freezes at about -11°C and
deteriorates above 25°C. It should be stored in
a
cool place and protected from direct sunlight.
Under these conditions, the fluid can be kept
for at least a
year.
If the fluid has frozen, it can be used once it has
completely thawed out at room temperature.
Never store bottles or containers of
AdBlue
® in your vehicle.
Procedure
In cold weather, before per forming the top up
ensure that the temperature of the vehicle is
above -11°C. Other wise the AdBlue
® may be
frozen and so cannot be poured into its tank.
Park your vehicle in a
warmer area for a few
hours to allow the top up to be carried out.
Use only AdBlue
® fluid that meets the
ISO
22241
standard.
F
B
efore topping up, ensure that the vehicle is
parked on a
flat and level sur face.
F
S
witch off the ignition to stop the engine
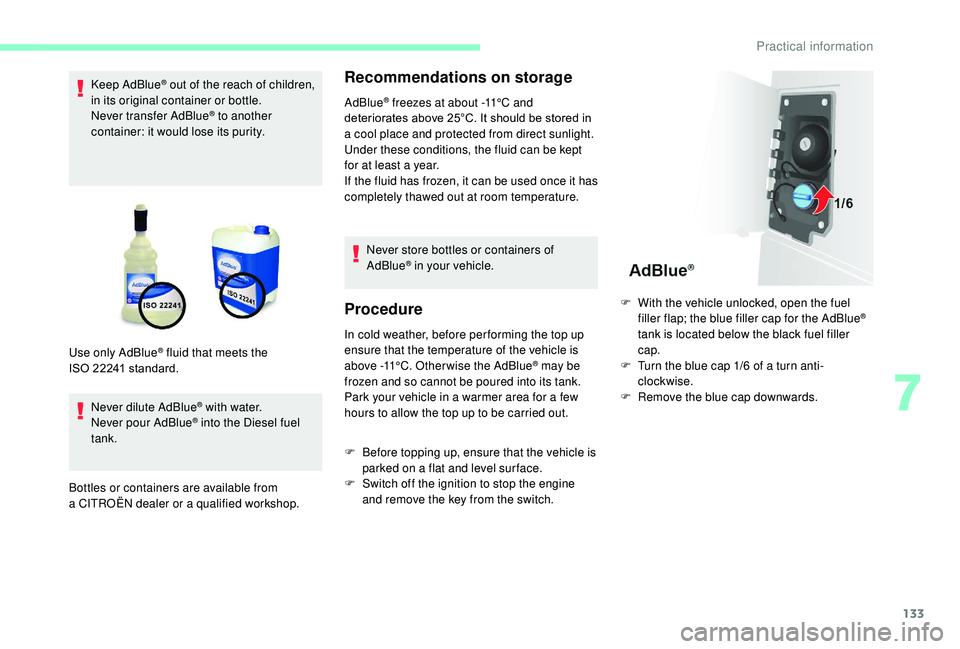
and remove the key from the switch. F
W
ith the vehicle unlocked, open the fuel
filler flap; the blue filler cap for the AdBlue
®
tank is located below the black fuel filler
cap.
F
T
urn the blue cap 1/6 of a turn anti-
clockwise.
F
R
emove the blue cap downwards.
7
Practical information
Page 136 of 232
134
Refilling
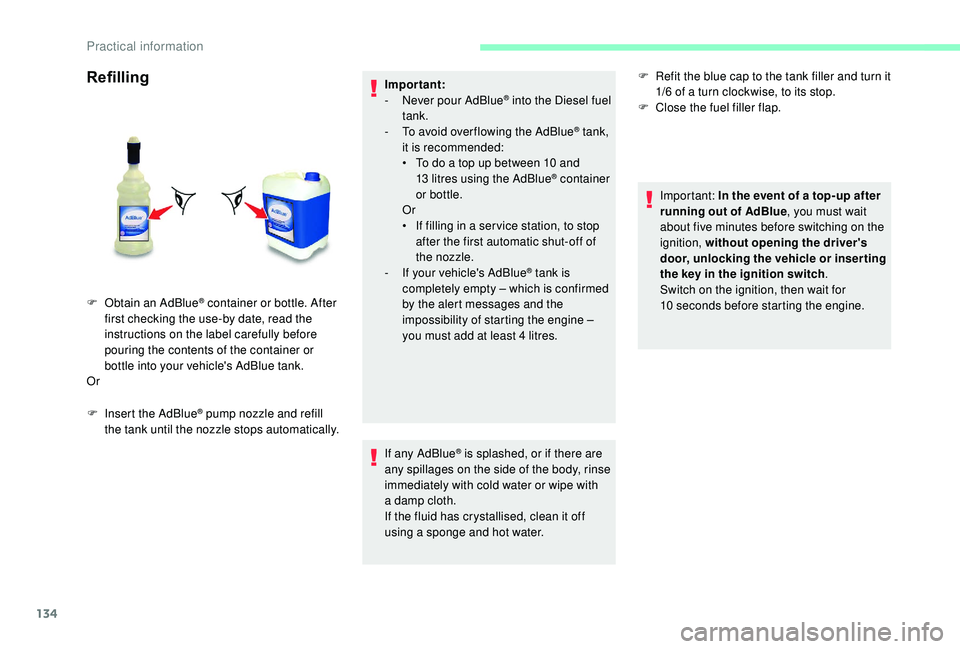
F Insert the AdBlue® pump nozzle and refill
the tank until the nozzle stops automatically. Important:
-
N
ever pour AdBlue
® into the Diesel fuel
tank.
-
T
o avoid over flowing the AdBlue
® tank,
it is recommended:
•
T
o do a
top up between 10
and
13
litres using the AdBlue
® container
or bottle.
Or
•
I
f filling in a
ser vice station, to stop
after the first automatic shut-off of
the nozzle.
-
I
f your vehicle's AdBlue
® tank is
completely empty – which is confirmed
by the alert messages and the
impossibility of starting the engine –
you must add at least 4
litres.
If any AdBlue
® is splashed, or if there are
any spillages on the side of the body, rinse
immediately with cold water or wipe with
a
damp cloth.
If the fluid has crystallised, clean it off
using a
sponge and hot water.
F
O
btain an
AdBlue
® container or bottle. After
first checking the use-by date, read the
instructions on the label carefully before
pouring the contents of the container or
bottle into your vehicle's AdBlue tank.
Or F
R
efit the blue cap to the tank filler and turn it
1/6 of a turn clockwise, to its stop.
F
C
lose the fuel filler flap.
Important: In the event of a top-up after
running out of AdBlue , you must wait
about five minutes before switching on the
ignition, without opening the driver's
door, unlocking the vehicle or inser ting
the key in the ignition switch .
Switch on the ignition, then wait for
10 seconds before starting the engine.
Practical information
Page 137 of 232
135
Temporary puncture
repair kit
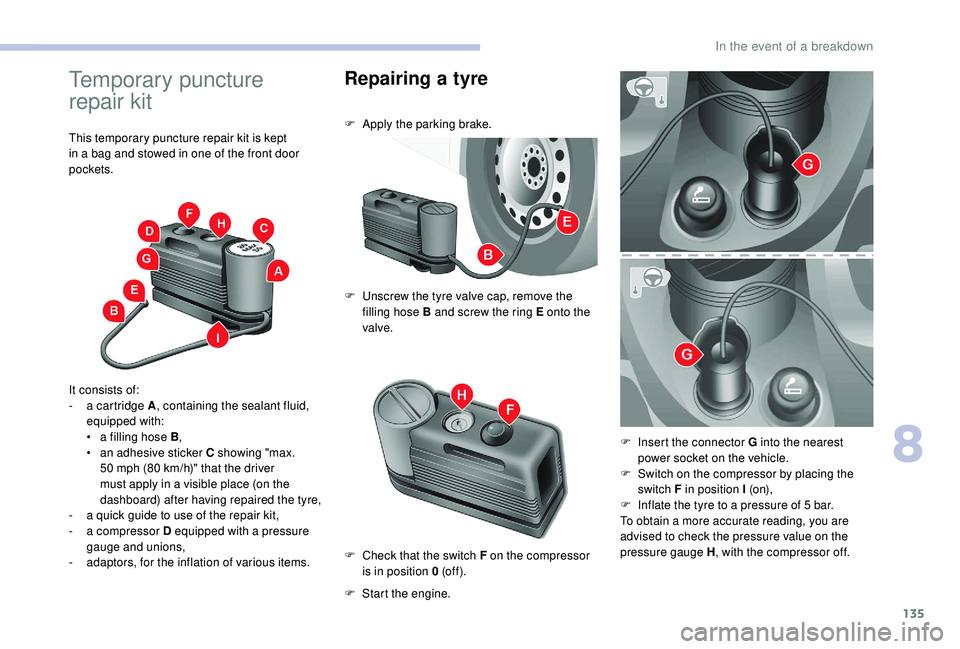
This temporary puncture repair kit is kept
in a bag and stowed in one of the front door
pockets.
It consists of:
-
a c
artridge A , containing the sealant fluid,
equipped with:
•
a f
illing hose B ,
•
a
n adhesive sticker C showing "max.
50
mph (80 km/h)" that the driver
must apply in a
visible place (on the
dashboard) after having repaired the tyre,
-
a q
uick guide to use of the repair kit,
-
a c
ompressor D equipped with a pressure
gauge and unions,
-
a
daptors, for the inflation of various items.
Repairing a tyre
F Apply the parking brake.
F
U
nscrew the tyre valve cap, remove the
filling hose B and screw the ring E onto the
valve.
F
S
tart the engine.
F
C
heck that the switch F on the compressor
is in position 0 (of f ). F
I
nsert the connector G into the nearest
power socket on the vehicle.
F
S
witch on the compressor by placing the
switch F in position I (o n),
F
I
nflate the tyre to a pressure of 5 bar.
To obtain a
more accurate reading, you are
advised to check the pressure value on the
pressure gauge H , with the compressor off.
8
In the event of a breakdown
Page 151 of 232

149
Third brake lamp
Ty p e A, W5W – 5W (x 4)
F
R
emove the two lamp fixing screws.
F
R
emove the lamp by pulling it towards you.
F
R
emove the bulb holder by squeezing the
two tongues inwards.
F
R
emove the failed bulb by pulling it out.
F
C
hange the bulb.
Changing a fuse
The three fuseboxes are located on the
dashboard on the left-hand side, in the pillar
on the right-hand side and in the engine
compartment.
The designations provided are only for the
fuses that can be replaced by the user. For
any other work, visit a
CITROËN dealer or
a
qualified workshop. Professional repairers: for full information
on the fuses and relays, consult the
wiring information and diagrams via the
CITROËN dealer network.
Removing and fitting a fuse
CITROËN accepts no responsibility for the
cost incurred in repairing your vehicle or
for rectifying malfunctions resulting from
the installation of accessories not supplied
by and not recommended by CITROËN
and not installed in accordance with its
specifications, in particular when the
combined power consumption of all of the
additional equipment connected exceeds
10
milliamperes.Good
Failed
Before changing a fuse, the cause of the fault
must be found and rectified. The numbers of
the fuses are indicated on the fusebox.
Always replace a faulty fuse with a fuse of
the same rating.
8
In the event of a breakdown
Page 152 of 232
150
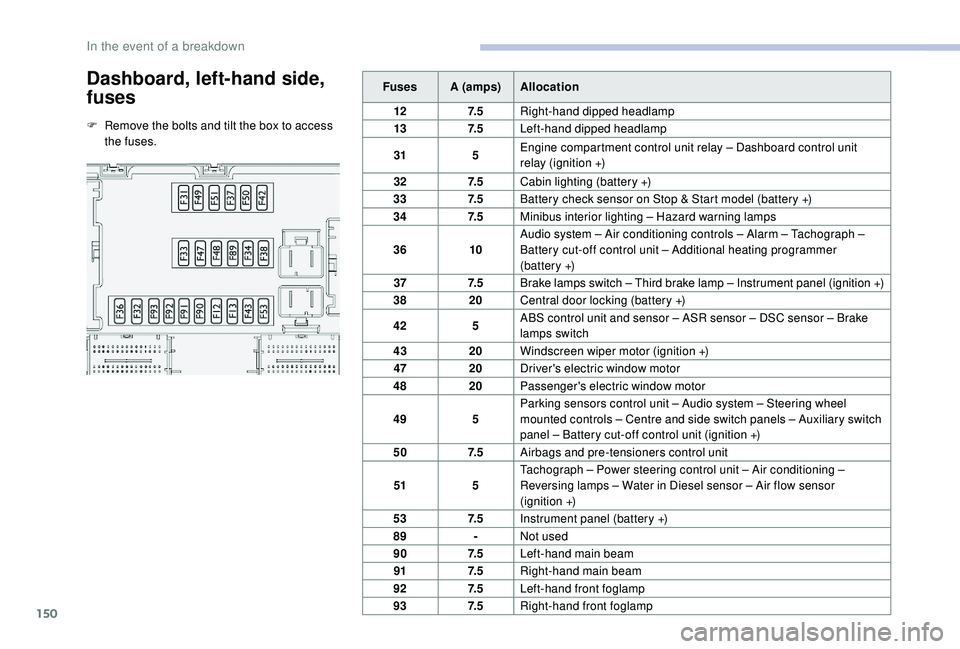
Dashboard, left-hand side,
fuses
F Remove the bolts and tilt the box to access the fuses. Fuses A (amps)
Allocation
12 7. 5Right-hand dipped headlamp
13 7. 5Left-hand dipped headlamp
31 5Engine compartment control unit relay – Dashboard control unit
relay (ignition +)
32 7. 5Cabin lighting (battery +)
33 7. 5Battery check sensor on Stop & Start model (battery +)
34 7. 5Minibus interior lighting – Hazard warning lamps
36 10Audio system – Air conditioning controls – Alarm – Tachograph
–
Battery cut-off control unit – Additional heating programmer
(battery
+)
37 7. 5Brake lamps switch – Third brake lamp – Instrument panel (ignition +)
38 20Central door locking (battery +)
42 5ABS control unit and sensor – ASR sensor – DSC sensor – Brake
lamps switch
43 20Windscreen wiper motor (ignition +)
47 20Driver's electric window motor
48 20Passenger's electric window motor
49 5Parking sensors control unit – Audio system – Steering wheel
mounted controls – Centre and side switch panels – Auxiliary switch
panel – Battery cut-off control unit (ignition +)
50 7. 5Airbags and pre-tensioners control unit
51 5Tachograph – Power steering control unit – Air conditioning –
Reversing lamps – Water in Diesel sensor – Air flow sensor
(ignition +)
53 7. 5Instrument panel (battery +)
89 -Not used
90 7. 5Left-hand main beam
91 7. 5Right-hand main beam
92 7. 5Left-hand front foglamp
93 7. 5Right-hand front foglamp
In the event of a breakdown
Page 154 of 232

152
Fuses in the engine
compartment
F Remove the nuts and tilt the box to access the fuses.
When you have finished, close the cover
very carefully. Fuses A (amps)
Allocation
1 40ABS pump feed
2 50Diesel pre-heating unit
3 30Ignition switch – Starter motor
4 40Fuel heater
5 20/50Cabin ventilation with additional programmable heating (battery +)
6 40/60Cabin fan maximum speed (battery +)
7 40/50/60 Cabin fan minimum speed (battery +)
8 40Cabin fan (ignition +)
9 15Rear 12
V socket (battery +)
10 15Horn
11 -Not used
14 15Front 12
V socket (battery +)
15 15Cigarette lighter (battery +)
16 -Not used
17 -Not used
18 7. 5Engine management control unit (battery +)
19 7. 5Air conditioning compressor
20 30Screenwash/headlamp wash pump
21 15Fuel pump supply
22 -Not used
23 30ABS solenoids
24 7. 5Auxiliary switch panel – Door mirror controls and folding (ignition +)
30 15Door mirror heating
In the event of a breakdown
Page 155 of 232

153
Battery
Batteries contain harmful substances
such as sulphuric acid and lead.
They must be disposed of in accordance
with regulations and must not, in any
circumstances, be discarded with
household waste.
Take used remote control batteries and
vehicle batteries to a special collection
point.
Access to the battery
Procedure for starting the engine using another
battery or charging a discharged battery.
Lead-acid starter batteries
Protect your eyes and face before
handling the battery.
All operations on the battery must be
carried out in a
well ventilated area and
away from naked flames and sources of
sparks, so as to avoid the risk of explosion
or fire.
Wash your hands afterwards. The battery is located under the front left floor.
F
U
nscrew the 6 access cover retaining
screws.
F
L
ift off or remove completely the access
c ove r. F
P
ress lever 1 downwards to spread the
clamps.
F
R
emove the clamps 2 from the negative (-)
terminal.
Wait 2 minutes after switching off the
ignition before disconnecting the battery.
Never disconnect the clamps when the
engine is running.
Never charge a
battery without first
disconnecting the clamps.
Close the windows and doors before
disconnecting the battery.
8
In the event of a breakdown
Page 156 of 232
154
Starting using another
battery
Never try to start the engine by connecting
a battery charger.
Never use a
24 V or higher battery
b o o s t e r.
Check beforehand that the backup
battery has a
nominal voltage of 12 V and
a
capacity at least equal to that of the
discharged battery.
The two vehicles must not be in contact
with each other.
Switch off all the electrical consumers
on both vehicles (audio system, wipers,
lighting, etc.).
Make sure that the jump leads are not
close to moving parts of the engine (fan,
belts, etc.).
Do not disconnect the (+) terminal while
the engine is running.
After every reconnection of the battery, switch
on the ignition and wait 1
minute before
starting to allow the electronic systems to be
initialised. If slight difficulties are experienced
after this, please contact a
CITROËN dealer or
a
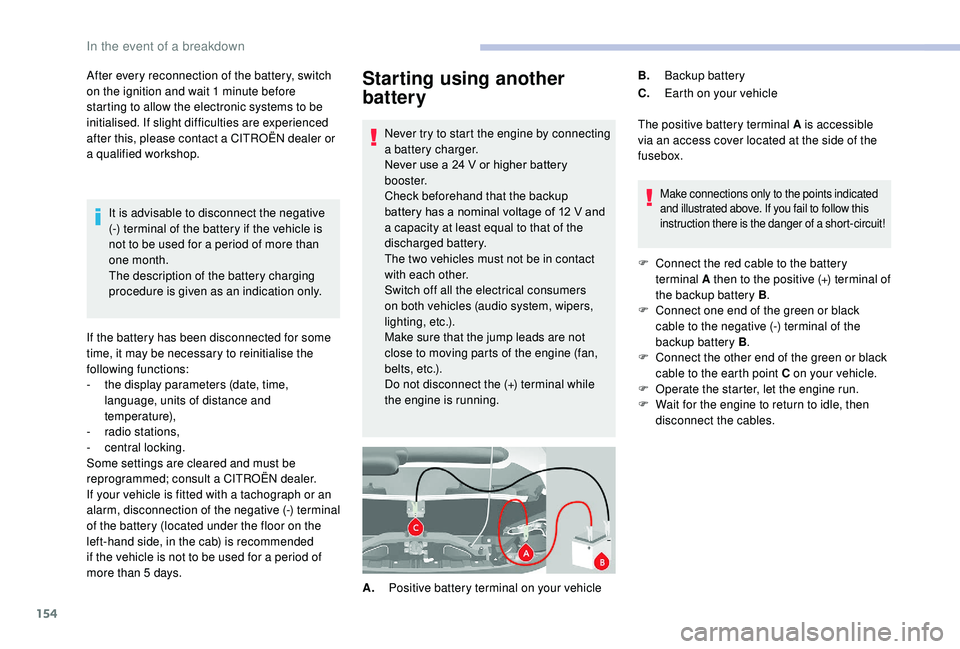
qualified workshop. The positive battery terminal A is accessible
via an access cover located at the side of the
fusebox.
Make connections only to the points indicated
and illustrated above. If you fail to follow this
instruction there is the danger of a
short-circuit!
F Connect the red cable to the battery terminal A then to the positive (+) terminal of
the backup battery B .
F
C
onnect one end of the green or black
cable to the negative (-) terminal of the
backup battery B .
F
C
onnect the other end of the green or black
cable to the earth point C on your vehicle.
F
O
perate the starter, let the engine run.
F
W
ait for the engine to return to idle, then
disconnect the cables.
A. Positive battery terminal on your vehicle B.
Backup battery
C. Earth on your vehicle
It is advisable to disconnect the negative
(-) terminal of the battery if the vehicle is
not to be used for a
period of more than
one month.
The description of the battery charging
procedure is given as an indication only.
If the battery has been disconnected for some
time, it may be necessary to reinitialise the
following functions:
-
t
he display parameters (date, time,
language, units of distance and
temperature),
-
r
adio stations,
-
c
entral locking.
Some settings are cleared and must be
reprogrammed; consult a
CITROËN dealer.
If your vehicle is fitted with a
tachograph or an
alarm, disconnection of the negative (-) terminal
of the battery (located under the floor on the
left-hand side, in the cab) is recommended
if the vehicle is not to be used for a
period of
more than 5
days.
In the event of a breakdown