buttons CITROEN RELAY 2019 Handbook (in English)
[x] Cancel search | Manufacturer: CITROEN, Model Year: 2019, Model line: RELAY, Model: CITROEN RELAY 2019Pages: 232, PDF Size: 8.21 MB
Page 19 of 232

17
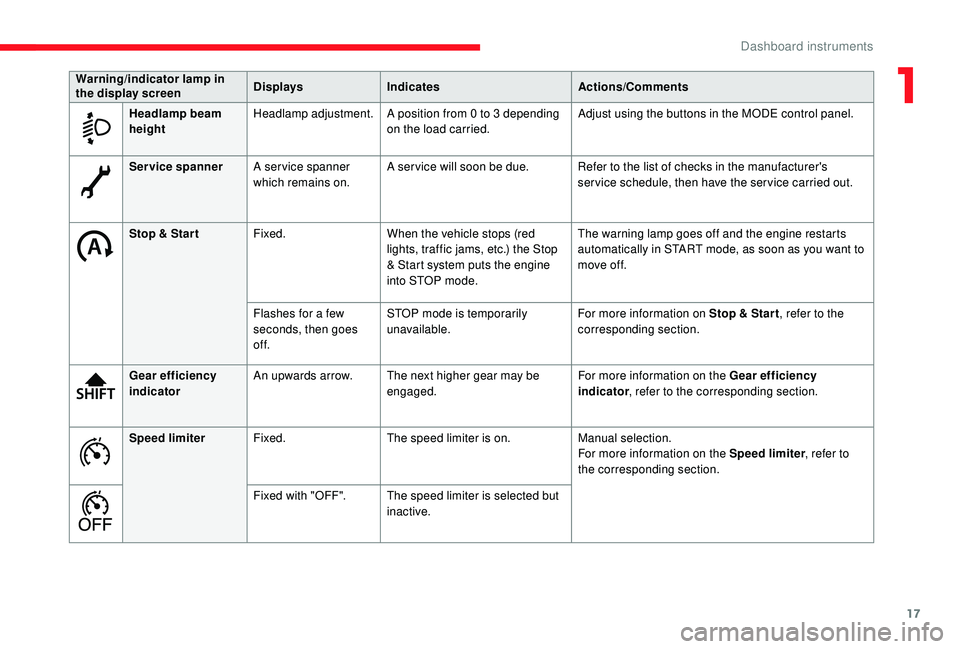
Service spannerA ser vice spanner
which remains on. A ser vice will soon be due. Refer to the list of checks in the manufacturer's
service schedule, then have the service carried out.
Stop & Star t Fixed. When the vehicle stops (red
lights, traffic jams, etc.) the Stop
& Start system puts the engine
into STOP mode. The warning lamp goes off and the engine restarts
automatically in START mode, as soon as you want to
move off.
Flashes for a
few
seconds, then goes
of f. STOP mode is temporarily
unavailable.
For more information on Stop & Star t
, refer to the
corresponding section.
Gear efficiency
indicator An upwards arrow. The next higher gear may be
engaged. For more information on the Gear efficiency
indicator
, refer to the corresponding section.
Speed limiter Fixed. The speed limiter is on. Manual selection.
For more information on the Speed limiter , refer to
the corresponding section.
Fixed with "OFF". The speed limiter is selected but inactive.
Warning/indicator lamp in
the display screen
Displays
Indicates Actions/Comments
Headlamp beam
height Headlamp adjustment.
A position from 0 to 3 depending
on the load carried. Adjust using the buttons in the MODE control panel.
1
Dashboard instruments
Page 46 of 232

44
Automatic single zone air
conditioning
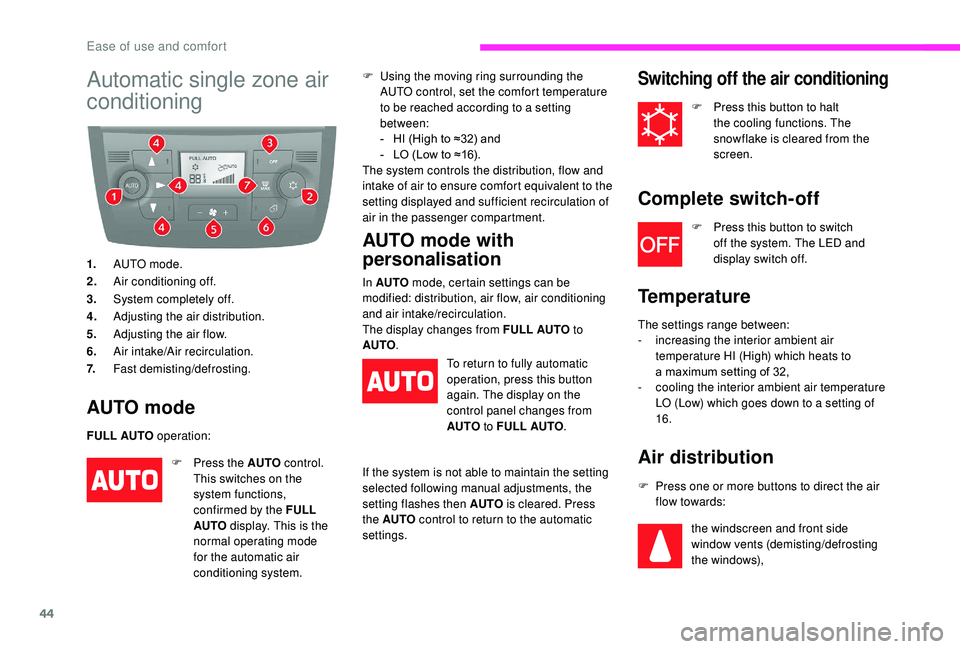
1.AUTO mode.
2. Air conditioning off.
3. System completely off.
4. Adjusting the air distribution.
5. Adjusting the air flow.
6. Air intake/Air recirculation.
7. Fast demisting/defrosting.
AUTO mode
FULL AUTO operation: F
U
sing the moving ring surrounding the
AUTO control, set the comfort temperature
to be reached according to a setting
between:
-
H
I (High to ≈32) and
-
L
O (Low to ≈16).
The system controls the distribution, flow and
intake of air to ensure comfort equivalent to the
setting displayed and sufficient recirculation of
air in the passenger compartment.
F
P
ress the AUTO control.
This switches on the
system functions,
confirmed by the FULL
AUTO display. This is the
normal operating mode
for the automatic air
conditioning system.
AUTO mode with
personalisation
In AUTO mode, certain settings can be
modified: distribution, air flow, air conditioning
and air intake/recirculation.
The display changes from FULL AUTO to
AUTO .
To return to fully automatic
operation, press this button
again. The display on the
control panel changes from
AUTO to FULL AUTO .
If the system is not able to maintain the setting
selected following manual adjustments, the
setting flashes then AUTO is cleared. Press
the AUTO control to return to the automatic
settings.
Switching off the air conditioning
F Press this button to halt the cooling functions. The
snowflake is cleared from the
screen.
Complete switch-off
F Press this button to switch off the system. The LED and
display switch off.
Temperature
The settings range between:
- i ncreasing the interior ambient air
temperature HI (High) which heats to
a
maximum setting of 32,
-
c
ooling the interior ambient air temperature
LO (Low) which goes down to a
setting of
16.
Air distribution
F Press one or more buttons to direct the air flow towards:
the windscreen and front side
window vents (demisting/defrosting
the windows),
Ease of use and comfort
Page 47 of 232

45
the central and side vents (chest
a n d f a c e),
the vents in the front and rear areas
(feet).
The combination of buttons permits
improvement of air distribution.
Air flow
F Press this button to increase air f low.
F
P
ress this button to decrease air
f low.
Air intake/Air recirculation
Additional rear ventilation
This system supplements
the passenger compartment
ventilation equipment.
The intake of exterior air prevents the formation
of mist on the windscreen and side windows.
Recirculation of the interior air isolates the
passenger compartment from exterior odours
and fumes.
This function allows hot or cold air to be
delivered selectively and more quickly. Return to exterior air intake as soon as possible
to avoid deterioration of the air quality and the
formation of mist.
F
P
ress this button to recirculate
the interior air. The indicator
lamp comes on.
Pressing the AUTO button also restores
the exterior air intake. Returning to this
position permits renewal of the air in the
passenger compartment and demisting.
Pressing the AUTO button again restores
the FULL AUTO function.
Pressing this button again turns the indicator
lamp off and re-opens the exterior air intake.
3
Ease of use and comfort
Page 50 of 232

48
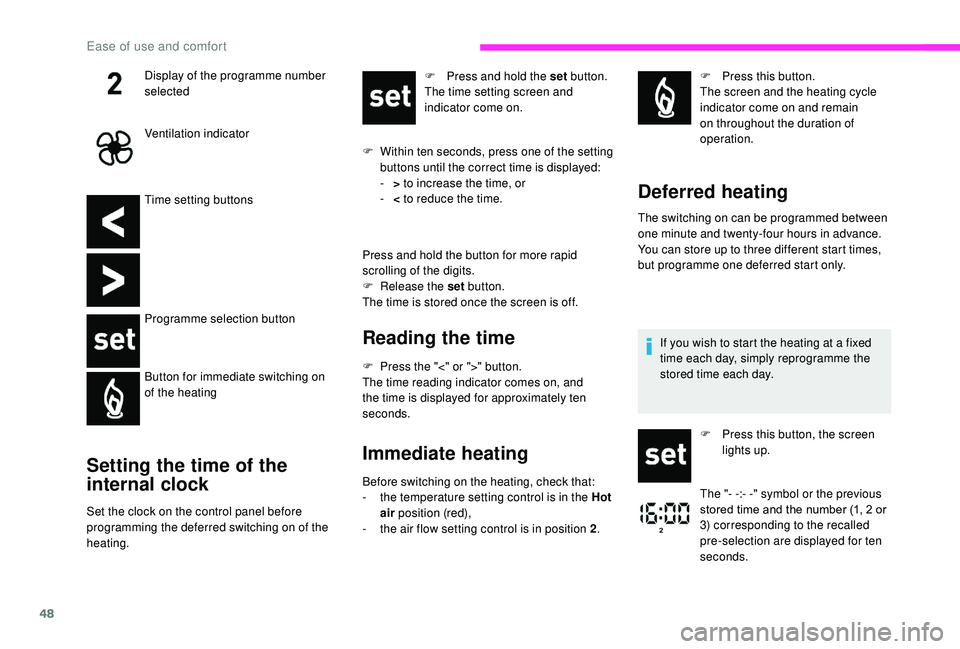
Time setting buttons
Programme selection button
Button for immediate switching on
of the heating
Setting the time of the
internal clock
Set the clock on the control panel before
programming the deferred switching on of the
heating.F
P
ress and hold the set button.
The time setting screen and
indicator come on.
F
W
ithin ten seconds, press one of the setting
buttons until the correct time is displayed:
-
>
to increase the time, or
-
<
to reduce the time.
Press and hold the button for more rapid
scrolling of the digits.
F
R
elease the set
button.
The time is stored once the screen is off.
Reading the time
F Press the "<" or ">" button.
The time reading indicator comes on, and
the time is displayed for approximately ten
seconds.
Immediate heating
Before switching on the heating, check that:
- t he temperature setting control is in the Hot
air position (red),
-
t
he air flow setting control is in position 2 .F
P
ress this button.
The screen and the heating cycle
indicator come on and remain
on throughout the duration of
operation.
Deferred heating
The switching on can be programmed between
one minute and twenty-four hours in advance.
You can store up to three different start times,
but programme one deferred start only.
Display of the programme number
selected
Ventilation indicator
If you wish to start the heating at a fixed
time each day, simply reprogramme the
stored time each day.
F
P
ress this button, the screen
lights up.
The "- -:- -" symbol or the previous
stored time and the number (1, 2
or
3) corresponding to the recalled
pre-selection are displayed for ten
seconds.
Ease of use and comfort
Page 139 of 232

137
Special feature with pneumatic
suspension
If the vehicle is fitted with this system, you must
activate vehicle lifting mode before lifting the
vehicle with a jack. For vehicles with the steering wheel on the
right, the buttons are located on the right of the
steering wheel.
F
W
ith the ignition on, simultaneously press
buttons 1 and 2 for at least 5 seconds.
Their indicator lamps come on fixed.
F
T
o leave this mode, simultaneously press
buttons 1 and 2 for another 5
seconds.
Their indicator lamps go off and the system
becomes fully operational again.
This mode deactivates itself automatically if the
speed of about 3 mph (5 km/h) is exceeded.
Spare wheel
Parking
F Park the vehicle where it does not block
traffic: the ground must be level, stable and
non-slippery.
F
I
f the road is sloping or damaged, place an
object under the wheels to act as a
chock.
F
W
ith a
manual gearbox, engage first gear
then switch off the ignition to block the
wheels.
F
A
pply the parking brake and check that the
warning lamp is on in the instrument panel.
F
T
he passengers must get out of the vehicle
and wait where they are safe.
F
P
ut on the high visibility vest and signal that
the vehicle is immobile by using the devices
envisaged by the legislation in force in the
country where you are driving (warning
triangle, hazard warning lamps, etc.).
F
E
quip yourself with the tools. Once your vehicle is properly secured, you
should proceed in this order:
1-Take the tools.
2- Remove the spare wheel from its
compartment.
3- Position the jack.
4- Change the wheel to be repaired.
5- Put away the wheel to be repaired.
1 - Take the tools
These are stowed in a box located under the
f ront passenger seat.
F
T
urn the button a quarter of a turn then pull
the box.
F
A
fter use, press the button then turn it
a
quarter of a turn to secure the box.
8
In the event of a breakdown
Page 182 of 232

180
Tipper
Safety recommendations
The tipper body is raised by an electro-
hydraulic unit powered by the vehicle's battery.The tipper body is raised and lowered by
pressing and holding the corresponding
buttons on the magnetic and portable remote
control situated on a
support in the cab.
The tipper body is raised by the motor in the
electro-hydraulic unit.
The tipper body is lowered by a solenoid valve
that opens the fluid return of the ram.
A safety device prevents the tipper body from
dropping when it is not moving or is being
raised. •
N
ever drive with a drop panel lowered.
•
E
nsure that there is no person or
obstacle nearby (below or above)
when unloading.
•
N
ever leave the tipper body raised
when not in use.
•
A
lways discharge the load with the
upper part of the rear drop panel
secured.
•
O
bser ve the maximum payload on the
weight plate on the vehicle.
•
C
heck regularly that the suspension
is in good condition and that the tyres
are inflated to the recommended
pressures.
•
D
istribute the load uniformly in the
tipper body.
•
T
ransport similar products that
discharge easily.
•
N
ever drive, even slowly, with the
tipper body raised.
Tip onto a
sur face that is flat
and hard: a sur face that is
sloping or loose could cause
the centre of gravity to shift,
making the whole vehicle
unstable.
Special features
Page 187 of 232

1
Touch screen Audio-Telematic system
Multimedia audio system –
Bluetooth® telephone – GPS
navigation
Contents
First steps
1
G
lossary
2
S
teering wheel mounted controls
3
M
enus
3
R
adio
4
D
AB radio (Digital Audio Broadcasting)
5
M
edia
6
N
avigation
9
T
elephone
1
2
Vehicle information
1
4
Settings
1
4
Voice commands
1
6The system is protected in such a
way that
it will only operate in your vehicle.
For safety reasons, the vehicle must
always be stationary for the driver to
perform operations that require close
attention.
When the engine is switched off and to
prevent discharging of the battery, the
system switches off after activation of
energy economy mode.
First steps
Use the buttons arranged below the touch
screen for access to the main menus, then
press the virtual buttons in the touch screen.
The screen is of the "resistive" type, it is
necessary to press firmly, particularly for
"flick" gestures (scrolling through a
list,
moving the map, etc.). A simple wipe will
not be enough. Pressing with more than
one finger is not recognised.
The screen can be used with gloves. This
technology allows use at all temperatures.
To clean the screen, use a
soft non-
abrasive cloth (e.g. spectacles cloth)
without any additional product.
Do not use sharp objects on the screen.
Do not touch the screen with wet hands.
In very hot conditions, the volume may be
limited to protect the system. This returns
to normal when the temperature in the
passenger compartment drops.
The system may also go into standby
(screen and sound completely off) for
a
minimum period of 5 minutes.
.
Touch screen Audio-Telematic system
Page 190 of 232

4
Vehicle information
Access to the exterior temperature,
the clock, the compass and the trip
computer.
Navigation
Enter navigation settings and
choose a destination.
Settings
Activate, deactivate, and configure
certain functions of the system and
the vehicle.
Media
Select from the different music
sources.
Activate, deactivate, and adjust
certain functions.
Radio
Press "RADIO " to display the radio
menus:
Press the 9
or: buttons briefly for an
automatic search.
Press and hold the buttons for a
quick search.
Pressing Pre-set
Press and hold the button to pre-set the current
radio station.
The current station is highlighted.
Press the "All" button to display all the pre-set
radio stations in the frequency band selected.
Navigate
-
L
ist of stations .
Select a
station by pressing once.
-
U
pdate the list according to reception.
-
P
ress the 5 or 6 buttons to scroll through
the radio stations received.
-
G
o directly to the desired letter in the list.
AM/DAB
-
C
hoose the band .
Choose the waveband.
Touch screen Audio-Telematic system
Page 192 of 232

6
Media
Press "MEDIA" to display the media
menus:
Press the 9
or: buttons to play the previous/
next track.
Press and hold the buttons for fast for ward or
rewind in the track selected.
Navigate
-
N
avigate by: Playing currently, Ar tists,
Albums, Genres, Tracks, Playlists, Audio
books, Podcasts .
Navigate and select tracks on the active
device.
The selection options depend on the device
connected or type of CD inserted.
Source
-
C
D, AUX, USB .
Select the desired audio source from those
available or insert a
device intended for
this purpose; the system starts playing the
source automatically.
-
Bl
uetooth
®.
Pair a
Bluetooth® audio device.
Info
-
I
nformation .
Display information on the track playing. Random
Press the button to play tracks on the CD, USB,
iPod or Bluetooth
® device in random order.
Repeat
Press the button to activate this function.
Audio
-
E
qualiser .
Adjust the bass, mid-range and treble.
-
B
alance/Fade .
Adjust the balance of the speakers, front
and rear, left and right.
Press the button in the middle of the arrows
to balance the adjustments.
-
V
olume/Speed .
Select the desired setting, the option is
highlighted.
-
L
oudness .
Optimise audio quality at low volume.
-
A
utomatic radio .
Adjust the radio on startup or restore the
active state the last time the ignition was
switched to STOP.
-
R
adio off delay .
Adjust the setting.
-
A
UX vol. adjustment .
Adjust the settings.
USB port
Insert a USB memory stick or connect
a peripheral device to the USB port in
the central storage space , provided for
transferring data to the system, using a
suitable
cable (not supplied).
To protect the system, do not use a
USB
hub.
The system builds playlists (in temporary
memory), an operation which can take from
a
few seconds to several minutes at the first
connection.
Reduce the number of non-music files and the
number of folders to reduce the waiting time.
The playlists are updated every time the
ignition is switched off or a
USB memory stick
is connected. The lists are stored: if they are
not modified, the subsequent loading time will
b e s h o r t e r.
Touch screen Audio-Telematic system
Page 198 of 232

12
If the USB device contains new software,
the system starts by updating the navigation
software. The system must restart once the
software has been updated.
F
Sel
ect "OK".
Before the system starts updating the map, it
advises you that the map will take at least thirty
minutes to install.
Do not remove the USB device or switch
off the system before updating has ended.
The system cannot be used before
updating has been completed. Start
the system update again if updating is
interrupted.
The following message appears when the map
has been updated:
" Update ended "
You can now safely remove your USB
device.
Problem solving You should perhaps prepare the USB device
again.
-
T
he version of the map on the USB device
is the same as on the system or even older.
If so, download the map again onto the USB
device using "TomTom HOME".
You should perhaps prepare the USB
device again.
Telephone
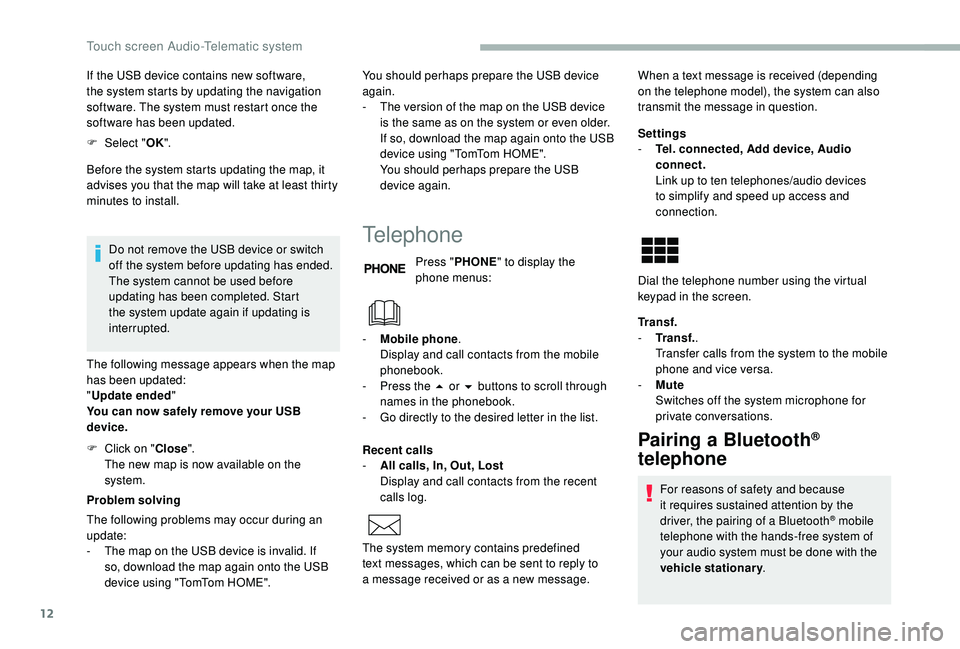
Press " PHONE " to display the
phone menus:
Recent calls
-
A
ll calls, In, Out, Lost
Display and call contacts from the recent
calls log. Settings
-
T
el. connected, Add device, Audio
connect.
Link up to ten telephones/audio devices
to simplify and speed up access and
connection.
Transf.
-
T
ransf..
Transfer calls from the system to the mobile
phone and vice versa.
-
Mu
te
Switches off the system microphone for
private conversations.
Pairing a Bluetooth®
telephone
For reasons of safety and because
it requires sustained attention by the
driver, the pairing of a
Bluetooth
® mobile
telephone with the hands-free system of
your audio system must be done with the
vehicle stationary .
The following problems may occur during an
update:
-
T
he map on the USB device is invalid. If
so, download the map again onto the USB
device using "TomTom HOME". -
M
obile phone
.
Display and call contacts from the mobile
phonebook.
-
P
ress the 5
or 6
buttons to scroll through
names in the phonebook.
-
G
o directly to the desired letter in the list.
The system memory contains predefined
text messages, which can be sent to reply to
a
message received or as a
new message. When a
text message is received (depending
on the telephone model), the system can also
transmit the message in question.
Dial the telephone number using the virtual
keypad in the screen.
F
C
lick on "
Close".
The new map is now available on the
system.
Touch screen Audio-Telematic system