tow bar CITROEN RELAY 2019 Handbook (in English)
[x] Cancel search | Manufacturer: CITROEN, Model Year: 2019, Model line: RELAY, Model: CITROEN RELAY 2019Pages: 232, PDF Size: 8.21 MB
Page 5 of 232

3
.
.
10
Driving recommendations 87
Anti-theft protection 8 9
Starting-switching off the engine
9
0
Battery standby system
9
1
Parking brake
9
1
Manual gearbox
9
2
Gear ef ficiency indicator
9
2
Stop & Start
9
3
Hill start assist
9
5
Traf fic sign recognition
9
6
Speed limiter
9
9
Fixed speed limiter
1
00
Cruise control
1
01
Cruise control (3
litre HDi engine)
1
03
Lane Departure Warning System
1
05
Under-inflation detection
1
10
Rear parking sensors, audible assistance
1
11
Reversing camera
1
12
Pneumatic suspension
1
13F u e l
11 6
Compatibility of fuels 1 18
Snow chains
1
19
Towing a
trailer
1
19
Towbar with quickly detachable towball
1
20
Roof carrying systems
1
23
Changing a
wiper blade
1
24
Bonnet
12
4
Diesel engines
1
26
Checking levels
1
26
Chec ks
12
9
AdBlue
® (BlueHDi engines) 1 32
Temporary puncture repair kit
1
35
Spare wheel
1
37
Changing a
bulb
1
43
Changing a
fuse
1
49
Battery
153
To w i n g
15 5Engine technical data and towed loads
1
57
Diesel engines
1
58
Weights and towed loads
1
59
Dimensions
1
62
Identification markings
1
67
Glossary of labels
1
68
Driving
Practical information
In the event of a breakdown Technical data
Alphabetical index Special features
Crew cab 1
71
Chassis cab/Floor cab 1 72
Double cab
1
76
Tipper
18
0
Audio and telematics
.
Contents
Page 90 of 232

88
Manoeuvre cautiously, at low
speed
The dimensions of your vehicle differ from
those of a light vehicle, in width, in height, as
well as in length, and some obstacles will be
more difficult to notice.
Manoeuvre slowly.
Before turning, check that there are no
obstacles at mid-height along the sides.
Before reversing, check that there are no
obstacles, particularly at high level behind the
vehicle.
Be aware of the external dimensions, if ladders
are fitted.
Load the vehicle correctly
With a load, the vehicle must remain within the
m aximum authorised weight, the Gross Vehicle
Weight.
To avoid upsetting the balance of the vehicle,
the load should be centred and the heaviest part
placed on the floor in front of the rear wheels.
It is inadvisable to place heavy loads on a
roof
rack.
Loading also implies adherence to the
maximum load of the roof bar anchor points.
Adhere to the maximum permissible weight,
according to CITROËN dealer specifications.
Loads must be securely lashed down.
A load that is not properly secured inside the
vehicle may affect vehicle handling and create
a
risk of accident.
Drive the vehicle in a prudent
a nd efficient way
Take corners gently.
Anticipate the need to brake as the stopping
distance is increased, particularly on wet or icy
roads.
Be aware of the effect of side winds on the
vehicle.
Effective eco-driving saves fuel; accelerate
progressively, anticipate the need to slow down
and adapt your speed to suit the situation.
Indicate changes of direction well in advance
so that you are seen by other road users.
Take care
The tyres must be inflated to at least the
pressures indicated on the label, even over-
inflated by 0.2
to 0.3 bar for long journeys.
In case of towing
Driving with a trailer places greater
d emands on the towing vehicle and
requires extra care from the driver.
Distribution of loads
F Distribute the load in the trailer so that the heaviest items are as close as possible to
the axle and the nose weight approaches
the maximum permitted without
exceeding it.
Air density decreases with altitude, thus
reducing engine performance. The maximum
towed load must be reduced by 10% for every
1,000
metres of altitude.
For more information on the Technical
data of your vehicle and particularly on
towable loads, refer to the corresponding
section.
Side wind
F Take into account the increased sensitivity to wind.
If your vehicle is fitted with a
drop-side back,
the height and width of the load must remain
within the overall dimensions of the vehicle.
Driving
Page 91 of 232

89
Cooling
Towing a trailer on a slope increases the
t emperature of the coolant.
As the fan is electrically controlled, its cooling
capacity is not dependent on the engine speed.
F
T
o lower the engine speed, reduce your
speed.
The maximum towable load on an incline
depends on the gradient and the exterior
temperature.
In all cases, keep a
check on the coolant
temperature.
F
I
f this warning lamp and the
STOP warning lamp come on,
stop the vehicle and switch off
the engine as soon as possible.
New vehicle
Do not pull a
trailer before having driven at
least 620
miles (1,000 kilometres).
Braking
Towing a trailer increases the braking distance.
T o avoid overheating of the brakes, the use of
engine braking is recommended.
Ty r e s
F Check the tyre pressures of the towing vehicle and of the trailer, observing the
recommended pressures.
Lighting
F Check the electrical lighting and signalling on the trailer and the headlamp beam height
of your vehicle.
For more information on Headlamp
beam height adjustment , refer to the
corresponding section.
The rear parking sensors will be
deactivated automatically to avoid the
audible signal if a
genuine CITROËN
towbar is used.
Anti-theft protection
Electronic immobiliser
The keys contain an electronic immobiliser
device.
This device locks the engine supply system.
It activates automatically when the key is
removed from the ignition.
This warning lamp goes off after the
key has been recognised, the ignition is
switched on and the engine can be started.
If the key is not recognised, the engine
cannot be started. Use another key
and have the faulty key checked by
a
CITROËN dealer.
Note the number of the keys carefully; in
case of loss, inter vention by the CITROËN
dealer will be more efficient and quicker
if you present this number and the
confidential card.
When the ignition switch is turned on, a
dialogue is set up between the key and the
electronic immobiliser.
Do not make any modifications to the
electronic immobiliser system.
Operating the remote control, even when it
is in your pocket, may result in involuntary
unlocking of the doors.
The simultaneous use of other high
frequency equipment (mobile telephones,
domestic alarms, etc.), may inter fere
with the operation of the remote control
temporarily.
The remote control does not operate
while the key is in the ignition, even if the
ignition is off, except for reinitialisation.
6
Driving
Page 93 of 232

91
In low temperatures
In mountainous and/or cold areas, it is
advisable to use a "winter" type fuel suited
to low or minus temperatures.
Battery standby system
If the vehicle is not to be used for a prolonged
p eriod, such as for winter storage, for example,
it is strongly recommended that the battery
be placed on standby in order to protect it and
optimise its ser vice life.
When the battery is on standby, access to
the vehicle is only possible by unlocking
the vehicle using the key in the lock barrel
in the driver's door.
After the battery is switched off, the
information (time, date, radio stations,
etc.) is stored.
To take the battery out of standby:
F
T
urn the key to the MAR position.
F
S
tart the engine normally (AV V position).
To place the battery on standby:
F
S
witch off the engine ( STOP position). F
P
ress the red button, then turn the key to
the B AT T position.
The battery goes into standby about 7 minutes
later.
This time is necessary to:
-
A
llow the user to get out of the vehicle and
lock the doors with the remote control.
-
E
nsure that all of the vehicle's electrical
systems are deactivated.
Parking brake
Applying
F Pull the parking brake lever up to immobilise your vehicle.
F
C
heck that the parking brake is applied
firmly before leaving the vehicle.
There is no advantage in engaging a
gear after
parking the vehicle, particularly if the vehicle is
loaded.
When parking on a
slope, turn your
wheels towards the kerb and pull the
parking brake lever up.
In the exceptional case of use of the
parking brake when the vehicle is moving,
apply the brake by pulling gently to avoid
locking the rear wheels (risk of skidding).
6
Driving
Page 122 of 232

120
For more information on the Technical
data of the vehicle and particularly on
weights and towable loads, refer to the
corresponding section.
You will then have information on your vehicle's
ability to tow a
trailer, a caravan, a boat, etc.
We recommend the use of genuine
CITROËN towbars and their harnesses
that have been tested and approved from
the design stage of your vehicle, and
that the fitting of the towbar is entrusted
to a
member of the CITROËN dealer
network.
These genuine towbars are compatible
with the operation of the rear parking
sensors and the reversing camera, if your
vehicle is so equipped.
If the towbar is not fitted by a
CITROËN
dealer, it must still be fitted in accordance
with the vehicle manufacturer's
instructions.Towbar with quickly
detachable towball
Presentation
This genuine manufacturer towball can be
fitted and removed quickly and easily. These
operations do not require the use of any tools.
1. Carrier.
2. Connection socket.
3. Safety eye.
4. Detachable towball.
5. Locking/unlocking wheel.
6. Security key lock with removable cap.
7. Key reference label. For more information on the Technical
data
of the vehicle and particularly on
weights and towable loads, refer to the
corresponding section.
A. Locked position; the locking wheel is in
contact with the towball (no gap).
B. Unlocked position; the locking wheel is
no longer in contact with the towball (gap
of around 5
mm).
Adhere to the applicable law in the country
in which you are driving.
These values are also given in the sales
brochures.
Practical information
Page 123 of 232

121
Before each use
Check that the towball is correctly locked by
verifying the following points:
-
t
he green mark on the locking wheel is in line
with the green mark on the towball,
-
t
he locking wheel is in contact with the towball,
-
t
he security lock is locked and the key
removed; the locking wheel can no longer be
operated,
-
t
he towball must not be able to move in its
carrier; test by trying to shake it with your hand.
During use
Never release the locking system with
a trailer or load carrier on the towball.
Never exceed the maximum authorised
weight for the vehicle (the Gross Vehicle
Weight – GV W), the trailer, or the sum of
the two (the Gross Train Weight – GTW).
Following use
When travelling without a trailer or load on
a towbar-mounted carrier, the towball must be
removed and the protective plug inserted in
the carrier. This measure applies particularly
where the towball might obscure visibility of the
number plate or its lighting.
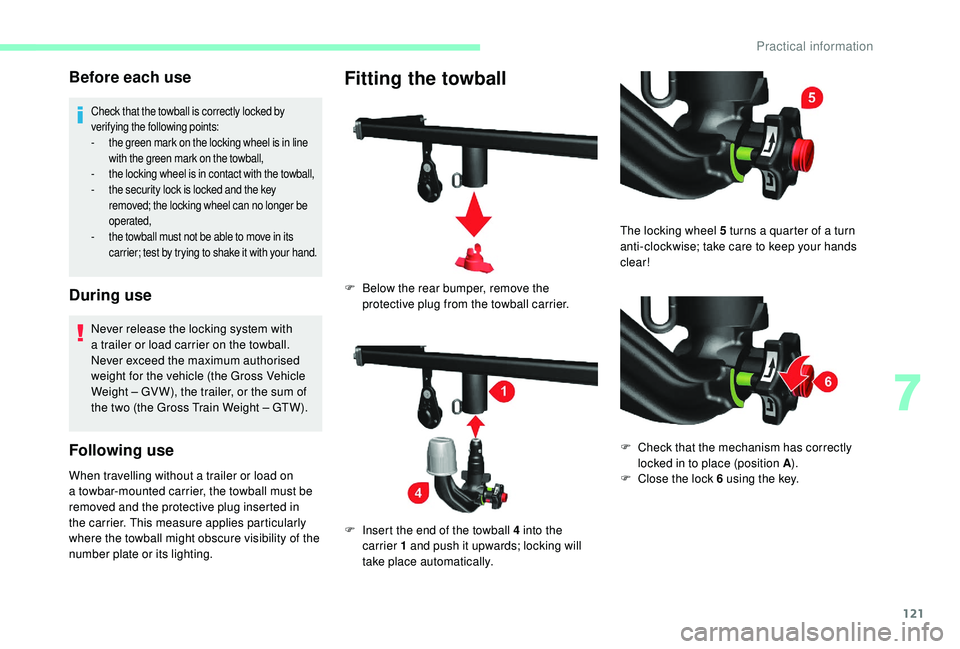
Fitting the towball
F Below the rear bumper, remove the protective plug from the towball carrier.
F
I
nsert the end of the towball 4 into the
carrier 1
and push it upwards; locking will
take place automatically. The locking wheel 5
turns a quarter of a turn
anti-clockwise; take care to keep your hands
clear!
F
C
heck that the mechanism has correctly
locked in to place (position A ).
F
C
lose the lock 6 using the key.
7
Practical information
Page 125 of 232

123
Maintenance
Correct operation is only possible if the towball
and its carrier are kept clean.
Before cleaning the vehicle with a high-
pressure jet wash, the towball must be removed
and the protective plug fitted to the carrier.
Apply the label provided to a
clearly visible
area, close to the carrier or in the boot.
Go to a
CITROËN dealer or a qualified
workshop for any work on the towbar
system.
Roof carrying systems
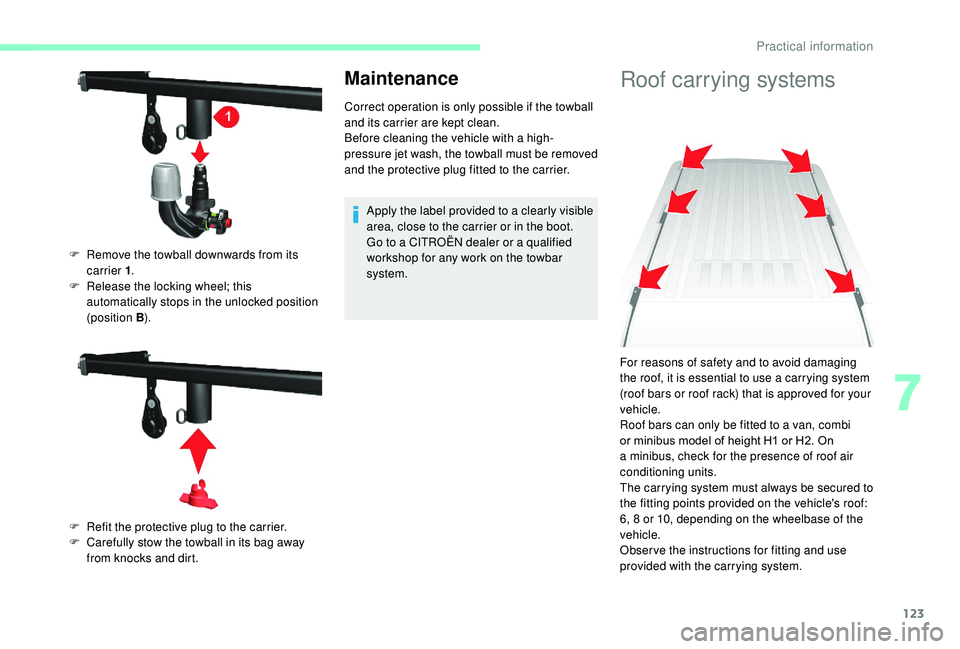
F Remove the towball downwards from its carrier 1 .
F
R
elease the locking wheel; this
automatically stops in the unlocked position
(position B ).
F
R
efit the protective plug to the carrier.
F
C
arefully stow the towball in its bag away
from knocks and dirt. For reasons of safety and to avoid damaging
the roof, it is essential to use a
carrying system
(roof bars or roof rack) that is approved for your
vehicle.
Roof bars can only be fitted to a
van, combi
or minibus model of height H1
or H2. On
a
minibus, check for the presence of roof air
conditioning units.
The carrying system must always be secured to
the fitting points provided on the vehicle's roof:
6, 8
or 10, depending on the wheelbase of the
vehicle.
Obser ve the instructions for fitting and use
provided with the carrying system.
7
Practical information
Page 137 of 232

135
Temporary puncture
repair kit
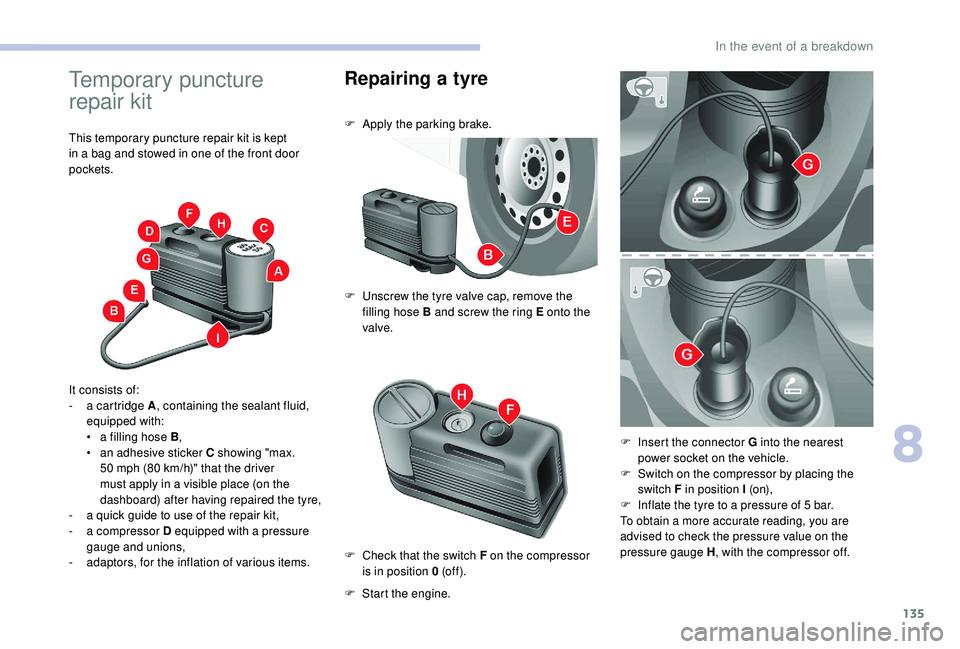
This temporary puncture repair kit is kept
in a bag and stowed in one of the front door
pockets.
It consists of:
-
a c
artridge A , containing the sealant fluid,
equipped with:
•
a f
illing hose B ,
•
a
n adhesive sticker C showing "max.
50
mph (80 km/h)" that the driver
must apply in a
visible place (on the
dashboard) after having repaired the tyre,
-
a q
uick guide to use of the repair kit,
-
a c
ompressor D equipped with a pressure
gauge and unions,
-
a
daptors, for the inflation of various items.
Repairing a tyre
F Apply the parking brake.
F
U
nscrew the tyre valve cap, remove the
filling hose B and screw the ring E onto the
valve.
F
S
tart the engine.
F
C
heck that the switch F on the compressor
is in position 0 (of f ). F
I
nsert the connector G into the nearest
power socket on the vehicle.
F
S
witch on the compressor by placing the
switch F in position I (o n),
F
I
nflate the tyre to a pressure of 5 bar.
To obtain a
more accurate reading, you are
advised to check the pressure value on the
pressure gauge H , with the compressor off.
8
In the event of a breakdown
Page 145 of 232

143
With steel wheels:
With alloy wheels :
For more information on Identification
markings, including in particular the tyre
pressure label, refer to the corresponding
section.
F
H
ook the carrier I to the outer part.
F
S
crew in the handle H to secure the carrier
and steel wheel.
F
P
osition the support J on the carrier I .
F
T
ighten the handle H .
F
T
ighten the three fixing bolts K of the carrier
I onto the alloy wheel. F
I
nstall the long socket A, the wheelbrace D
and the bar B on the retaining bolt.
F
T
urn the assembly clockwise to fully draw
in the cable and raise the wheel under the
vehicle.
F
C
heck that the wheel is positioned
horizontally flat against the floor of the
vehicle and that the cut-out for the carrier
system is visible.
F
S
tow the tools and the trim (depending on
model).Changing a bulb
The headlamps have polycarbonate
lenses with a
protective coating:
F
d
o not clean them using a dr y or
abrasive cloth, nor with a
detergent
or solvent product,
F
u
se a sponge and soapy water or a pH
neutral product,
F
w
hen using a high pressure washer
on persistent marks, do not keep the
lance directed towards the lamps or
their edges for too long, so as not to
damage their protective coating and
seals.
Changing a
bulb must only be done with
the ignition off and after the headlamp has
been switched off for several minutes –
Risk of serious burns!
F
D
o not touch the bulb directly with your
fingers, use a
lint-free cloth.
It is essential only to use anti-ultraviolet
(UV) type bulbs, so as not to damage the
headlamp.
Always replace a
failed bulb with a new
bulb with the same type and specification.
8
In the event of a breakdown
Page 157 of 232

155
To w i n g
General recommendations
Obser ve the legislation in force in your
c o u nt r y.
Ensure that the weight of the towing
vehicle is higher than that of the towed
vehicle.
The driver must remain at the wheel of
the towed vehicle and must have a valid
driving licence.
When towing a
vehicle with all four wheels
on the ground, always use an approved
towbar; rope and straps are prohibited.
The towing vehicle must move off gently.
When the vehicle is towed with its engine
off, there is no longer braking and steering
assistance.
In the following cases, you must always
call on a
professional recovery ser vice:
-
v
ehicle broken down on a motor way or
main road,
-
f
our-wheel drive vehicle,
-
w
hen it is not possible to put the
gearbox into neutral, unlock the
steering, or release the parking brake,
-
t
owing with only two wheels on the
ground,
-
w
here there is no approved towbar
available.
The charging operation must be carried
out in a
ventilated area away from naked
flames or any possible sources of sparks
to eliminate the risk of explosion and fire.
Do not try to charge a
frozen battery: it
must first be thawed out to avoid the risk
of explosion. If the battery has frozen,
before charging it have it checked by
a
specialist who will verify that the internal
components have not been damaged and
that the case is not cracked, which could
mean that there is a
risk of a
leak of toxic
and corrosive acid.
Proceed with a
slow charge at low current
for a
maximum of about 24
hours to avoid
damaging the battery.
Charging the battery using
a battery charger
F Go to the battery located in the front left
f l o o r.
F
D
isconnect the battery.
F
F
ollow the instructions for use provided by
the manufacturer of the charger.
F
R
econnect starting with the negative (-)
terminal.
F
C
heck the condition of the terminals and
clamps. If they are covered with sulphate
(whitish or greenish deposits), disconnect
them and clean them all.
After refitting of the battery by a
CITROËN
dealer or a
qualified workshop, the Stop
& Start system will only be active after
a
continuous period of immobilisation
of the vehicle, a period which depends
on the climatic conditions and the state
of charge of the battery (up to about
8
h o u r s).
The presence of this label, in particular
with the Stop & Start system, indicates
the use of a
12 V lead-acid battery with
special technology and specification;
the involvement of a
CITROËN dealer or
a
qualified workshop is essential when
replacing or disconnecting the battery.
8
In the event of a breakdown