steering CITROEN RELAY 2020 Handbook (in English)
[x] Cancel search | Manufacturer: CITROEN, Model Year: 2020, Model line: RELAY, Model: CITROEN RELAY 2020Pages: 196, PDF Size: 34.07 MB
Page 53 of 196
51
Safety
5General safety
recommendations
Do not remove the labels attached in
different places on your vehicle. They
include safety warnings as well as
identification information for the vehicle.
For all work on your vehicle, use a
qualified workshop that has the technical
information, skills and equipment required, all
of which a CITROËN dealer is able to
provide.
Depending on country regulations,
certain safety equipment may be
mandatory: high visibility safety vests,
warning triangles, breathalysers, spare bulbs,
spare fuses, fire extinguisher, first aid kit, mud
flaps at the rear of the vehicle, etc.
Installing electrical accessories:
– The fitting of electrical equipment or
accessories not approved by CITROËN may
cause excessive current consumption and
faults and failures with the electrical system
of your vehicle. Contact a CITROËN dealer
for information on the range of approved
accessories.
– As a safety measure, access to the
diagnostic socket, used for the vehicle's
electronic systems, is reserved strictly for
CITROËN dealers or qualified workshops,
equipped with the special tools required (risk
of malfunctions of the vehicle's electronic
systems that could cause breakdowns or
serious accidents). The Manufacturer cannot
be held responsible if this advice is not
followed.
– Any modification or adaptation not intended
or authorised by CITROËN or carried out
without meeting the technical requirements
defined by the Manufacturer will result in the
suspension of the commercial warranty.
Installation of accessory radio
communication transmitters
Before installing a radio communication
transmitter with an external aerial, you must
without fail contact a CITROËN dealer for
the specification of transmitters which can
be fitted (frequency, maximum power, aerial
position, specific installation requirements),
in line with the Vehicle Electromagnetic
Compatibility Directive (2004/104/EC).
Declarations of conformity for radio
equipment
The relevant certificates are available on the
http://service.citroen.com/ACddb/ website.
Hazard warning lamps
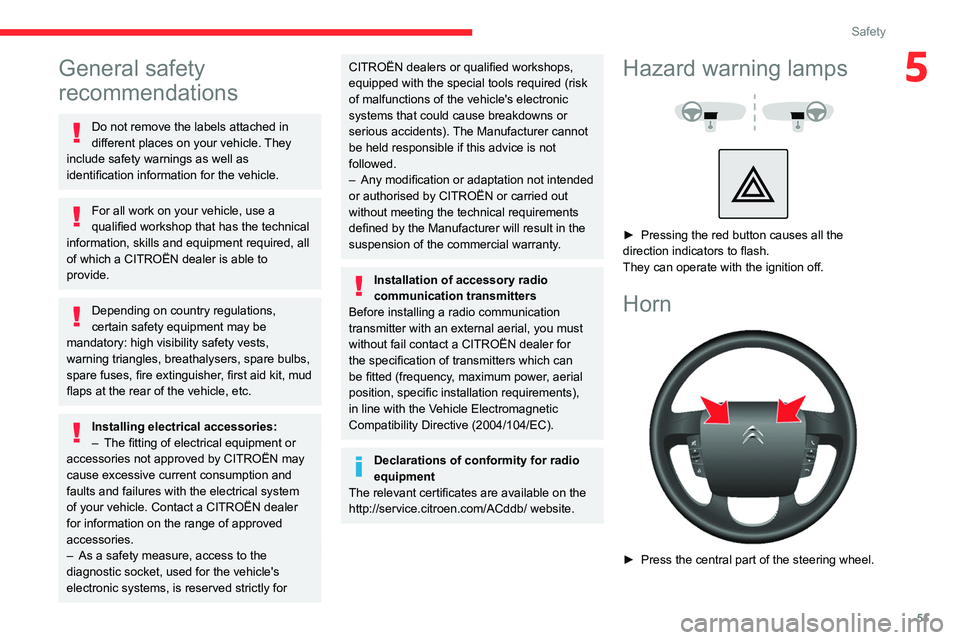
► Pressing the red button causes all the
direction indicators to flash.
They can operate with the ignition off.
Horn
► Press the central part of the steering wheel.
Page 54 of 196

52
Safety
Dynamic stability control
(DSC)
Switching on
The DSC system is activated automatically every
time the vehicle is started.
It comes into operation in the event of a grip or
trajectory problem.
This is indicated by the flashing of this warning lamp on the instrument panel.
Deactivation
This system cannot be deactivated by the driver.
Malfunction
The lighting of this warning lamp, accompanied by an audible signal and
confirmed by a message on the instrument panel
display, indicates a malfunction of the DSC
system.
Have the system checked by a CITROËN dealer
or a qualified workshop.
Anti-slip regulation (ASR)
Deactivation / Reactivation
The ASR system is activated automatically every
time the vehicle is started.
In exceptional conditions (starting a vehicle
which is bogged down, stuck in snow, on soft
ground, etc.), it may be advisable to deactivate
Electronic stability control
(ESC)
Electronic stability control (ESC: Electronic
Stability Control) integrating the following
systems:
– anti-lock braking system (ABS) and electronic
brake force distribution (EBFD),
– emergency braking assistance (EBA),
– wheel anti-slip regulation (ASR) or traction
control,
– dynamic stability control (DSC).
Definitions
Anti-lock braking system (ABS) and
Electronic brake force distribution
(EBFD)
This system improves the stability and handling
of your vehicle when braking and contributes
towards improved control on bends, in particular
on poor or slippery road surfaces.
ABS prevents wheel locking in the event of
emergency braking.
EBFD manages the braking pressure wheel by
wheel.
Emergency braking assistance (EBA)
In an emergency, this system enables you
to reach the optimum braking pressure more
quickly and therefore reduce the stopping
distance. It is triggered in relation to the speed at which
the brake pedal is depressed. The effect of this
is a reduction in the resistance of the pedal and
an increase in braking efficiency.
Anti-slip regulation (ASR)
The ASR system (also known as Traction
Control) optimises traction in order to limit
wheel slip, by acting on the brakes of the driving
wheels and on the engine. It also improves the
directional stability of the vehicle on acceleration.
Dynamic stability control (DSC)
If there is a difference between the path followed
by the vehicle and that required by the driver, the
DSC monitors each wheel and automatically acts
on the brake of one or more wheels and on the
engine to return the vehicle to the required path,
within the limits of the laws of physics.
Anti-lock braking system (ABS) and electronic brake
force distribution (EBD)
If this warning lamp comes on,
accompanied by an audible signal and a
message in an instrument panel screen, it
indicates a fault with the anti-lock braking system
(ABS) which could result in loss of control of the
vehicle when braking.
If these warning lamps come on,
accompanied by a message in the
instrument panel screen, it indicates a fault with
the electronic brake force distribution (EBFD)
system which could result in loss of control of the
vehicle when braking.
You must stop as soon as it is safe to do so.
In both cases, contact a CITROËN dealer or a
qualified workshop.
For maximum braking efficiency, a
bedding-in period of around 300 miles
(500 kilometres) is needed. During this
period, it is advisable to avoid any sudden,
repeated and prolonged braking.
The ABS does not provide shorter braking distances. On very slippery
surfaces (ice, oil, etc.) the ABS may extend
braking distances.
When changing wheels (tyres and rims),
ensure that these are approved for your
vehicle.
For emergency braking, press the
brake pedal very hard and do not
release it, even on a slipper surface; you
will then be able to continue steering the
vehicle to avoid an obstacle.
After an impact, have these systems checked by a CITROËN dealer or a
qualified workshop.
Page 59 of 196

57
Safety
5Airbags
The airbags have been designed to optimise the
safety of the occupants in the event of a serious
collision; they work in conjunction with the force
limiting seat belts.
In the event of a serious collision, electronic
detectors record and analyse any abrupt
deceleration of the vehicle:
– if there is a violent impact, the airbags deploy
instantly and help better protect occupants of the
vehicle; immediately after the impact, the airbags
deflate rapidly in order not to hinder the visibility
or the possible exit of the occupants.
– in the case of a minor or rear impact or in
certain rollover conditions, the airbags are not
deployed; the seat belt alone contributes towards
ensuring your protection in these situations.
The airbags do not operate when the
engine is not running.
This equipment will only deploy once. If a
second impact occurs (during the same or a
subsequent accident), the airbag will not be
deployed again.
Deployment of the airbags is
accompanied by a slight discharge of
smoke and a noise, resulting from activation
of the pyrotechnic charge incorporated in the
system.
Although this smoke is not harmful, sensitive
individuals may experience slight irritation.
The noise of the detonation may result in a
slight loss of hearing for a short time.
Front airbags
System that protects the driver and front
passenger(s) in the event of a serious front
impact, in order to limit the risk of head and
chest injury.
The driver's airbag is fitted in the centre of the
steering wheel; the front passenger(s) airbag is
fitted in the dashboard above the glove box.
Lateral airbags and curtain
airbags
If fitted to your vehicle, the lateral airbags are
built into the backrests of the front seats, on the
side by the door.
The curtain airbags are built into the pillars and
the upper passenger compartment area, in the
roof above the front seats.
They inflate between the occupant and the
window.
They deploy on one side only (the side where
the collision occurs).
Malfunction
If this warning lamp comes on, contact a
CITROËN dealer to have the system
checked.
Advice
For the airbags to be fully effective,
observe the safety recommendations
below.
Adopt a normal upright sitting position.
Fasten the seat belt ensuring it is correctly
positioned and adjusted.
Do not leave anything between the occupants
and the airbags (a child, pet, object, etc.), nor
fix or attach anything close to or in the way of
the airbag release trajectory; this could cause
injuries during their deployment.
Never modify the original definition of your
vehicle, particularly in the area directly around
the airbags.
After an accident or if the vehicle has been
stolen, have the airbag systems checked.
All work on the airbag systems must only
be performed by a CITROËN dealer or a
qualified workshop.
Even if all of the precautions mentioned
are observed, a risk of injury or of minor
burns to the head, chest or arms cannot be
ruled out when an airbag is deployed. The
airbag inflates almost instantly (within a few
milliseconds) then deflates within the same
Page 60 of 196

58
Safety
Installing a booster seat
The chest part of the seat belt must be
positioned on the child's shoulder without
touching the neck.
Ensure that the lap part of the seat belt
passes correctly over the child's thighs.
Use a booster seat with backrest, equipped
with a belt guide at shoulder level.
Additional protections
To prevent accidental opening of the
doors and rear windows, use the "Child lock".
Take care not to open the rear windows by
more than one third.
To protect young children from the rays of the
sun, fit side blinds on the rear windows.
As a safety precaution, do not leave:
– a child alone and unattended in a vehicle,
– a child or an animal in a vehicle which is
exposed to the sun, with the windows closed,
– the keys within reach of children inside the
vehicle.
Child seat at the rear
time discharging the hot gas via openings
provided for this purpose.
Front airbags
Do not drive holding the steering wheel
by its spokes or resting your hands on the
centre part of the wheel.
Passengers must not place their feet on the
dashboard.
Do not smoke as deployment of the airbags
can cause burns or the risk of injury from a
cigarette or pipe.
Never remove or pierce the steering wheel or
hit it violently.
Do not fix or attach anything to the steering
wheel or dashboard, as this could cause
injuries when the airbags are deployed.
Lateral airbags
Use only approved covers on the seats,
compatible with the deployment of the lateral
airbags. For information on the range of seat
covers suitable for your vehicle, contact a
CITROËN dealer.
Do not fix or attach anything to the seat
backrests (clothes, etc.), as this could cause
injuries to the thorax or arm when the lateral
airbag is deployed.
Do not sit with the upper part of the body any
nearer to the door than necessary.
Curtain airbags
Do not fix or attach anything to the roof,
as this could cause head injuries when the
curtain airbag is deployed.
Do not remove the grab handles installed on
the roof, as they play a part in securing the
curtain airbags.
Child seats
The regulations on carrying children are specific to each country. Refer to the
legislation in force in your country.
For maximum safety, please observe the
following recommendations:
– In accordance with European regulations, all
children under the age of 12 or less than 4
ft 11” (150 cm) tall must travel in approved
child seats suited to their weight , on seats
fitted with a seat belt or ISOFIX mountings.
– Statistically, the safest seats in your
vehicle for carrying children are the rear
seats.
– Children weighing less than 9 kg must
travel in the "rear facing" position, whether in
the front or rear of the vehicle.
It is recommended that children travel
on the rear seats of the vehicle:
– ‘rear facing’ up to the age of 3,
– ‘forward facing’ over the age of 3.
Make sure that the seat belt is correctly
positioned and tightened.
For child seats with a support leg, ensure that
the support leg is in firm and steady contact
with the floor.
Advice
An incorrectly installed child seat compromises the child's safety in the
event of an accident.
Ensure that there is no seat belt or seat belt
buckle under the child seat, as this could
destabilise it.
Remember to fasten the seat belts or the
harness of child seats, keeping the slack
relative to the child's body to a minimum,
even for short journeys.
When installing a child seat using the seat
belt, ensure that the seat belt is tightened
correctly on the child seat and that it secures
the child seat firmly on the seat of the vehicle.
If the passenger seat is adjustable, move it
forwards if necessary.
Remove the head restraint before
installing a child seat with a backrest on a
passenger seat.
Ensure that the head restraint is stored or
attached securely to prevent it from being
thrown around the vehicle in the event of
sharp braking. Refit the head restraint once
the child seat has been removed.
Page 74 of 196
72
Driving
The inflation pressures defined for the vehicle can be found on the tyre pressure
label.
Tyre pressures should be checked when the
tyres are "cold" (vehicle stopped for 1 hour or
after a journey of less than 6 miles (10 km) at
moderate speeds). Otherwise, add 0.3 bar to
the pressures shown on the label.
For more information on Identification
markings, including the tyre pressure label,
refer to the corresponding section.
The tyre pressure measurement unit can be configured with the MODE button: in
the "Tyre pressure measurement” menu, select
"psi/bar/kPa".
For more information on Vehicle configuration
(MODE), refer to the corresponding section.
Under-inflation alert
This is signalled by the fixed illumination of this warning lamp, accompanied by an
audible signal and, depending on equipment, the
display of a message.
In the event of an anomaly noted on just one of
the tyres, depending on equipment, the symbol
or the message displayed identifies it.
► Reduce speed immediately, avoid excessive
steering movements and avoid sudden braking.
► Stop the vehicle as soon as it is safe to do
so.
The loss of pressure detected does not always cause visible bulging of the tyre.
Do not rely on just a visual check.
► Using a compressor, such as the one in
the temporary puncture repair kit, check the
pressures of the four tyres when cold.
► If it is not possible to make this check
immediately, drive carefully at reduced speed.
► In the event of a puncture, use the
temporary puncture repair kit or the spare wheel
(depending on equipment).
The alert is kept active until the tyre/tyres concerned is/are reinflated, repaired or
replaced.
Malfunction
The flashing and then fixed illumination of this warning lamp, accompanied by the
illumination of the service warning lamp, and
depending on equipment, the display of a
message, indicates a fault with the system.
In this case, the tyre pressures are no longer
monitored.
This alert is also displayed if at least one wheel is not equipped with a sensor.
Contact a CITROËN dealer or a qualified
workshop to have the system checked or,
following a puncture, to have the original wheel,
equipped with a sensor, refitted.
Pneumatic suspension
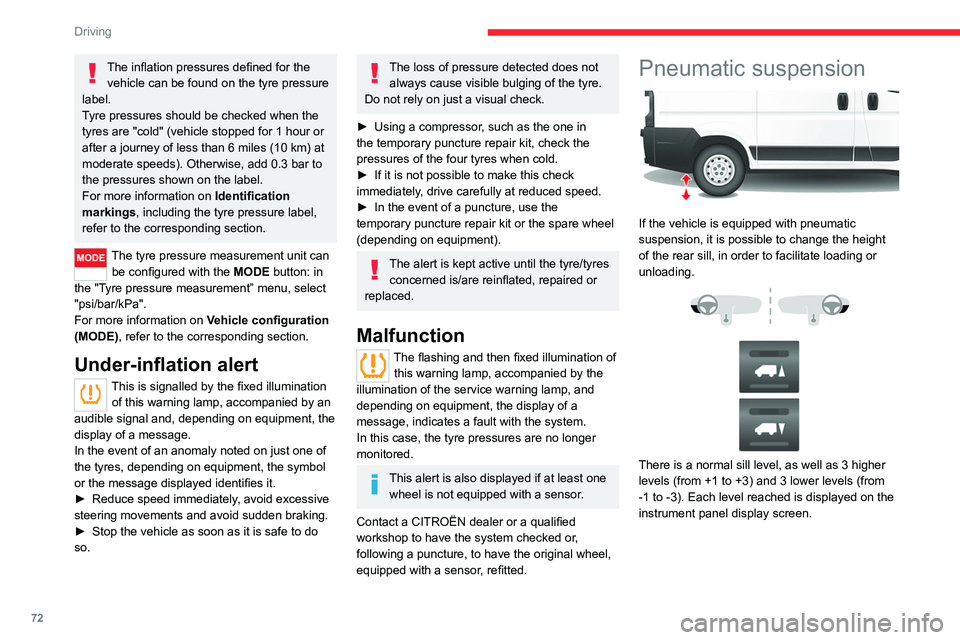
If the vehicle is equipped with pneumatic
suspension, it is possible to change the height
of the rear sill, in order to facilitate loading or
unloading.
There is a normal sill level, as well as 3 higher
levels (from +1 to +3) and 3 lower levels (from
-1 to -3). Each level reached is displayed on the
instrument panel display screen.
Loading sill height manual
correction
Adjusting the platform sill up or down
► A quick press on one of the controls selects
the upper or lower level. Each press (diode lit)
increases or decreases by one level.
A long press on one of the controls selects the
maximum corresponding level (-3 or +3).
Returning to the normal sill height
► Press the same number of times in the
opposite direction of the displayed position.
Deactivation/Reactivation
► Press and hold both controls simultaneously
to deactivate/reactivate the system.
Deactivation is confirmed by the lighting of the
control LEDs.
Beyond a speed of 3 mph (5 km/h), the
system reactivates automatically.
Loading sill height
automatic correction
Beyond a speed of 12 mph (20 km/h), the
system automatically restores the rear sill height
to its normal level.
Page 75 of 196
73
Driving
6Loading sill height manual
correction
Adjusting the platform sill up or down
► A quick press on one of the controls selects
the upper or lower level. Each press (diode lit)
increases or decreases by one level.
A long press on one of the controls selects the
maximum corresponding level (-3 or +3).
Returning to the normal sill height
► Press the same number of times in the
opposite direction of the displayed position.
Deactivation/Reactivation
► Press and hold both controls simultaneously
to deactivate/reactivate the system.
Deactivation is confirmed by the lighting of the
control LEDs.
Beyond a speed of 3 mph (5 km/h), the
system reactivates automatically.
Loading sill height
automatic correction
Beyond a speed of 12 mph (20 km/h), the
system automatically restores the rear sill height
to its normal level.
Malfunction
If a fault occurs with the system, this
warning lamp comes on.
Have the system checked by a CITROËN dealer
or a qualified workshop.
Driving with the suspension set too high
or too low poses risk of damaging
components under the body.
The height may be adjusted automatically to
take account of changes in temperature or
loading.
You must avoid using this control in the
following circumstances:
– when working underneath the vehicle,
– when changing a wheel,
– when the vehicle is being transported by
lorry, train, ferry, boat, etc.
To avoid damaging the vehicle or injuring
anyone, check that there is nothing or no
person that might be close to or come into
contact with the vehicle, before raising or
lowering the suspension.
Driving and manoeuvring
aids - General
recommendations
Driving and manoeuvring aids cannot, in
any circumstances, replace the need for
vigilance on the part of the driver.
The driver must comply with the Highway
Code, must remain in control of the vehicle in
all circumstances and must be able to retake
control of it at all times. The driver must adapt
the speed to climactic conditions, traffic and
the state of the road.
It is the driver's responsibility to constantly
check the traffic, to assess the relative
distances and speeds of other vehicles and to
anticipate their movements before indicating
and changing lane.
The systems cannot exceed the limits of the
laws of physics.
Driving aids
You should hold the steering wheel
with both hands, always use the interior and
exterior rear view mirrors, always keep the
feet close to the pedals and take a break
every two hours.
Manoeuvring aids
The driver must always check the
surroundings of the vehicle before and during
Page 88 of 196

86
Driving
The message "Vehicle close" is displayed.Level 2 (red): visual and audible alert,
signalling that a collision is imminent.
The message "Brake! " is displayed.
Level 3: finally, in some cases, a haptic alert
in the form of micro-braking can be given,
confirming the risk of collision.
Where the speed of your vehicle is too
high approaching another vehicle, the
first level of alert may not be displayed: the
level 2 alert may be displayed directly.
Important: the level 1 alert is never displayed
for a stationary obstacle or when the " Close"
trigger threshold has been selected.
Intelligent emergency
braking assistance
If the driver brakes, but not sufficiently to avoid a
collision, this system will supplement the braking,
within the limits of the laws of physics.
This assistance will only be provided if the driver
presses the brake pedal.
Active Safety Brake
This function, also called automatic emergency
braking, intervenes following the alerts if the
driver does not react quickly enough and does
not operate the vehicle's brakes.
It aims to reduce the speed of impact or avoid a
collision where the driver fails to react.
Operation
The system operates under the following
conditions:
– The vehicle's speed does not exceed 50 mph
(80 km/h) when a stationary vehicle is detected.
– The vehicle's speed is between 3 mph and
53 mph (5 km/h and 85 km/h) when a moving
vehicle is detected.
This warning lamp flashes (for about 10 seconds) once the function is acting
on the vehicle's brakes.
With a manual gearbox, in the event of automatic
emergency braking until the vehicle comes to a
complete stop, the engine may stall.
The driver can maintain control of the vehicle at any time by sharply turning the
steering wheel and/or pressing the
accelerator pedal.
Operation of the function may be felt by
slight vibration in the brake pedal.
If the vehicle comes to a complete stop, the
automatic braking is maintained for 1 to 2
seconds.
Malfunction
In the event of a system malfunction, this
warning lamp comes on on the instrument
panel, accompanied by an onscreen message
and an audible signal.
Contact a CITROËN dealer or a qualified
workshop to have the system checked.
If these warning lamps come on
after the engine has been switched
off and then restarted, contact a CITROËN
dealer or a qualified workshop to have the
system checked.
Audible rear parking sensors
Refer to the General recommendations on the
use of driving and manoeuvring aids .
If fitted to your vehicle, the system consists of 4
proximity sensors installed in the rear bumper.
They detect any obstacle, e.g. person, vehicle,
tree, barrier, which is behind the vehicle while
manoeuvring.
Certain types of obstacle detected at the
beginning of the manoeuvre will no longer be
detected at the end of manoeuvre if they are
located in the blind spots between and under the
sensors. Examples: stake, roadworks cone or
pavement post.
The rear parking sensors may be associated
with the reversing camera.
Switching on
► Engage reverse gear with the gear lever.
Page 97 of 196
95
Practical information
7
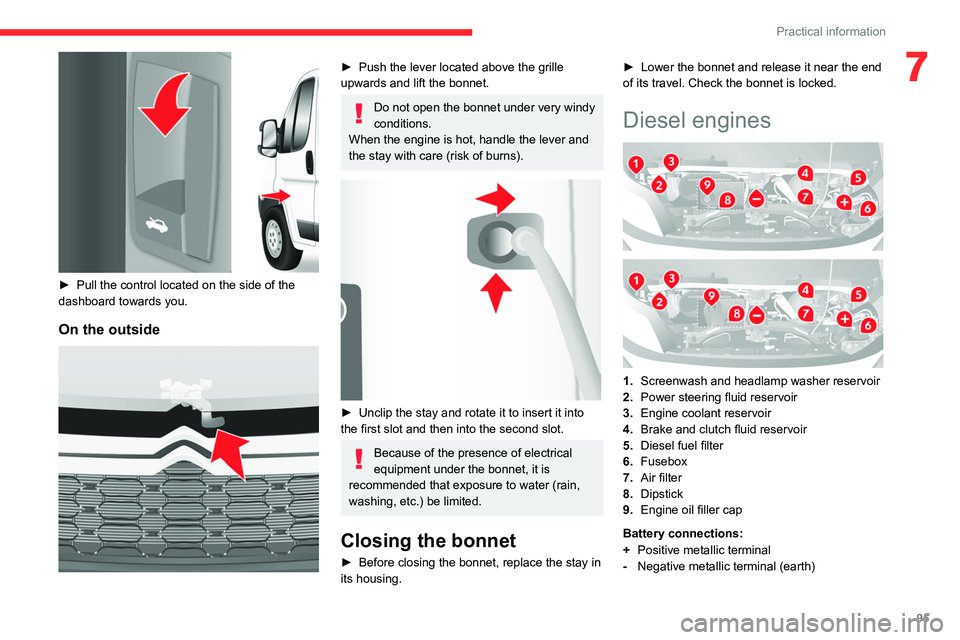
► Pull the control located on the side of the
dashboard towards you.
On the outside
► Push the lever located above the grille
upwards and lift the bonnet.
Do not open the bonnet under very windy
conditions.
When the engine is hot, handle the lever and
the stay with care (risk of burns).
► Unclip the stay and rotate it to insert it into
the first slot and then into the second slot.
Because of the presence of electrical
equipment under the bonnet, it is
recommended that exposure to water (rain,
washing, etc.) be limited.
Closing the bonnet
► Before closing the bonnet, replace the stay in
its housing. ►
Lower the bonnet and release it near the end
of its travel. Check the bonnet is locked.
Diesel engines
1. Screenwash and headlamp washer reservoir
2. Power steering fluid reservoir
3. Engine coolant reservoir
4. Brake and clutch fluid reservoir
5. Diesel fuel filter
6. Fusebox
7. Air filter
8. Dipstick
9. Engine oil filler cap
Battery connections:
+ Positive metallic terminal
- Negative metallic terminal (earth)
Page 99 of 196
97
Practical information
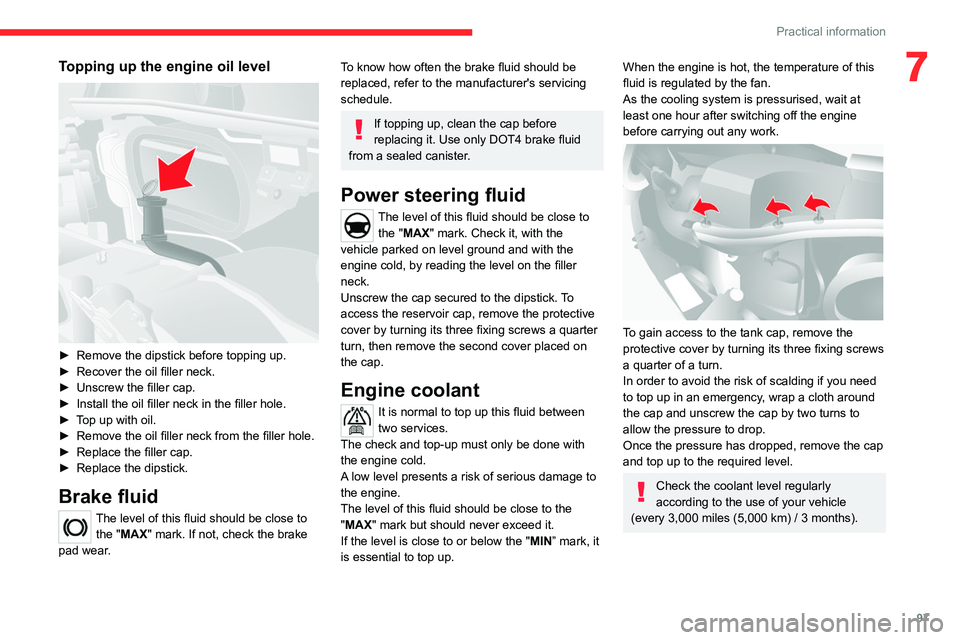
7Topping up the engine oil level
► Remove the dipstick before topping up.
► Recover the oil filler neck.
► Unscrew the filler cap.
► Install the oil filler neck in the filler hole.
► Top up with oil.
► Remove the oil filler neck from the filler hole.
► Replace the filler cap.
► Replace the dipstick.
Brake fluid
The level of this fluid should be close to
the "MAX" mark. If not, check the brake
pad wear.
To know how often the brake fluid should be
replaced, refer to the manufacturer's servicing
schedule.
If topping up, clean the cap before
replacing it. Use only DOT4 brake fluid
from a sealed canister.
Power steering fluid
The level of this fluid should be close to the "MAX" mark. Check it, with the
vehicle parked on level ground and with the
engine cold, by reading the level on the filler
neck.
Unscrew the cap secured to the dipstick. To
access the reservoir cap, remove the protective
cover by turning its three fixing screws a quarter
turn, then remove the second cover placed on
the cap.
Engine coolant
It is normal to top up this fluid between
two services.
The check and top-up must only be done with
the engine cold.
A low level presents a risk of serious damage to
the engine.
The level of this fluid should be close to the
"MAX" mark but should never exceed it.
If the level is close to or below the " MIN” mark, it
is essential to top up.
When the engine is hot, the temperature of this
fluid is regulated by the fan.
As the cooling system is pressurised, wait at
least one hour after switching off the engine
before carrying out any work.
To gain access to the tank cap, remove the
protective cover by turning its three fixing screws
a quarter of a turn.
In order to avoid the risk of scalding if you need
to top up in an emergency, wrap a cloth around
the cap and unscrew the cap by two turns to
allow the pressure to drop.
Once the pressure has dropped, remove the cap
and top up to the required level.
Check the coolant level regularly
according to the use of your vehicle
(every 3,000 miles (5,000 km) / 3 months).
Page 107 of 196

105
In the event of a breakdown
8► Disconnect hose I and directly connect it
to the tyre valve; the cartridge will thereby be
connected to the compressor and the sealant will
not be injected.
If the tyre needs to be deflated, connect hose
I to the tyre valve and press the yellow button
located in the centre of the compressor switch.
Replacing the cartridge
To replace the sealant cartridge, proceed as
follows:
► Disconnect the hose I.
► Turn the cartridge to be replaced anti-
clockwise and lift it.
► Insert the new cartridge and turn it clockwise,
► Reconnect the hose I and connect pipe B to
its location.
The cartridge contains ethylene glycol, which is harmful if swallowed and irritates
the eyes.
It must be kept out of the reach of children.
After use, do not discard the cartridge in standard waste, take it to a
CITROËN dealer or an authorised waste
disposal site.
Spare wheel
Parking
► Park the vehicle where it does not block
traffic: the ground must be level, stable and
non-slippery.
► If the road is sloping or damaged, place an
object under the wheels to act as a chock.
► With a manual gearbox, engage first gear
then switch off the ignition to block the wheels.
► Apply the parking brake and check that the
warning lamp is on in the instrument panel.
► The passengers must get out of the vehicle
and wait where they are safe.
► Put on the high visibility vest and signal that
the vehicle is immobile by using the devices
envisaged by the legislation in force in the
country where you are driving (warning triangle,
hazard warning lamps, etc.).
► Equip yourself with the tools.
Special feature with pneumatic
suspension
If fitted to the vehicle, activate the vehicle lifting
mode before lifting the vehicle with a jack.
For right-hand drive vehicles, the buttons are
located on the right of the steering wheel.
► With the ignition on, press both buttons 1 and
2 simultaneously for at least 5 seconds.
Their indicator lamps light up, and remain fixed.
► To exit this mode, press buttons 1 and 2
simultaneously for an additional 5 seconds.
Their indicator lamps go out and the system
becomes fully operational again.
This mode is automatically deactivated if you
exceed the speed by about 3 mph (5 km/h).
Once the vehicle is well secured, proceed in the
following order:
1- Getting the tools.
2- Removing the spare wheel from its
housing.
3- Positioning the jack.
4- Replacing the wheel to be repaired.
5- Storing the wheel to be repaired.