Bonnet vent CITROEN RELAY 2020 Handbook (in English)
[x] Cancel search | Manufacturer: CITROEN, Model Year: 2020, Model line: RELAY, Model: CITROEN RELAY 2020Pages: 196, PDF Size: 34.07 MB
Page 5 of 196
3
Contents
Compatibility of fuels 91
Snow chains 91
Towing a trailer 92
Towbar with quickly detachable towball 92
Roof-mounted carrying system 94
Bonnet 94
Diesel engines 95
Checking levels 96
Checks 98
AdBlue® (BlueHDi engines)
101
8In the event of a breakdown
Temporary puncture repair kit 104
Spare wheel 105
Changing a bulb 111
Changing a fuse 11 6
12 V battery 120
Towing 122
9Technical data
Engine technical data and towed loads 124
Diesel engines 124
Weights 125
Dimensions 129
Identification markings 133
Glossary of labels 133
10Special features
Crew cab 136
Chassis cab / Flatbed cab 136
Double cab 141
Drop-side back 145
11Audio system
First steps 151
Steering mounted controls 151
Radio 152
Media 152
Telephone 154
Settings 154
Voice commands
155
12 Touch screen audio and telematicssystem
First steps
158
Steering mounted controls 159
Menus 159
Radio 160
DAB (Digital Audio Broadcasting) radio 161
Media 161
Navigation 163
Telephone 166
Vehicle information 168
Settings 168
Voice commands 169
13ALPINE® X902D system
First steps 173
Menus 174
■
Alphabetical index
Page 26 of 196
24
Access
Opening
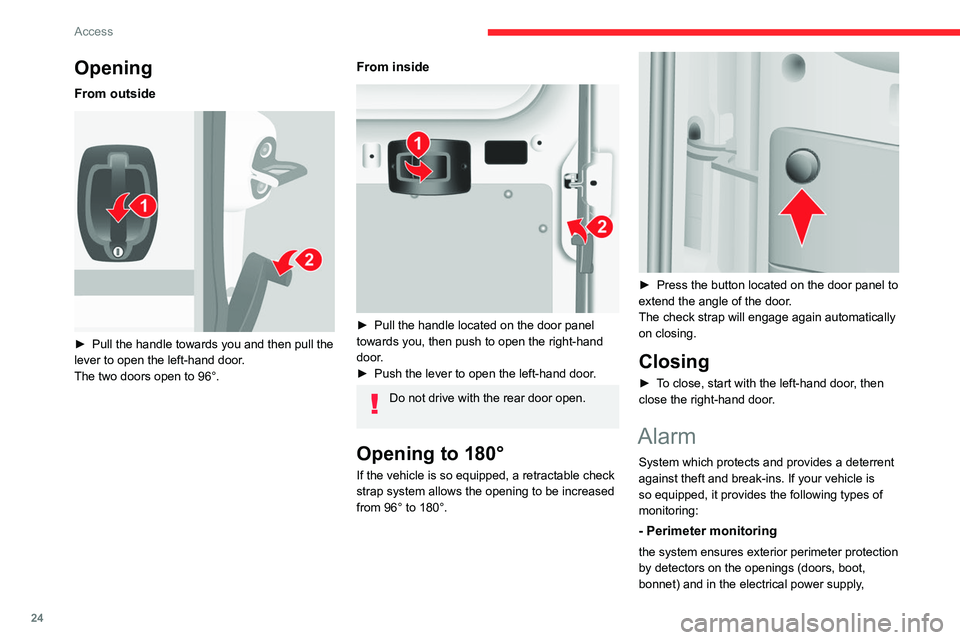
From outside
► Pull the handle towards you and then pull the
lever to open the left-hand door.
The two doors open to 96°.
From inside
► Pull the handle located on the door panel
towards you, then push to open the right-hand
door.
► Push the lever to open the left-hand door.
Do not drive with the rear door open.
Opening to 180°
If the vehicle is so equipped, a retractable check
strap system allows the opening to be increased
from 96° to 180°.
► Press the button located on the door panel to
extend the angle of the door.
The check strap will engage again automatically
on closing.
Closing
► To close, start with the left-hand door, then
close the right-hand door.
Alarm
System which protects and provides a deterrent
against theft and break-ins. If your vehicle is
so equipped, it provides the following types of
monitoring:
- Perimeter monitoring
the system ensures exterior perimeter protection
by detectors on the openings (doors, boot,
bonnet) and in the electrical power supply,
- Anti-tilt monitoring
The system checks for any change in the attitude
of the vehicle.
Activation
► Switch off the ignition and exit the vehicle.► Press this button of the remote
control.
The protections are active after a few seconds.
Triggering of the alarm
This is signalled by the siren sounding and
flashing of the direction indicators for thirty
seconds.
The alarm then returns to monitoring mode but the triggering event is stored
and is indicated by illumination of the electronic
immobiliser warning lamp for about 10 seconds
when the ignition is switched on.
The alarm is also triggered after interruption of
the electrical supply and when it is reconnected.
Deactivation using the
remote control
► Press this button.
The standby mode is deactivated when the
vehicle is unlocked.
Page 98 of 196
96
Practical information
Topping up the engine oil level
► Remove the dipstick before topping up.
► Recover the oil filler neck.
► Unscrew the filler cap.
► Install the oil filler neck in the filler hole.
► Top up with oil.
► Remove the oil filler neck from the filler hole.
► Replace the filler cap.
► Replace the dipstick.
Brake fluid
The level of this fluid should be close to
the "MAX" mark. If not, check the brake
pad wear.
The Diesel circuit is under very high pressure.
All work on this circuit must be carried out
only by a CITROËN dealer or a qualified
workshop.
Checking levels
Check all of the following levels regularly in
accordance with the manufacturer's service
schedule. Top them up if required, unless
otherwise indicated.
If a level drops significantly, have the
corresponding system checked by a CITROËN
dealer or a qualified workshop.
The fluids must comply with the manufacturer's requirements and with
the vehicle's engine.
Take care when working under the bonnet, as certain areas of the engine
may be extremely hot (risk of burns) and the
cooling fan could start at any time (even with
the ignition off).
If the engine cover is to be removed /
refitted, handle it with care to avoid
damaging the mounting clips.
Used products
Avoid prolonged contact of used oil or fluids with the skin.
Most of these fluids are harmful to health and
very corrosive.
Do not discard used oil or fluids into
sewers or onto the ground.
Empty used oil into the containers reserved
for this purpose at a CITROËN dealer or a
qualified workshop.
Engine oil
The level is checked, with the engine having been switched off for at least 30
minutes and on level ground, using the dipstick.
It is normal to top up the oil level between two
services (or oil changes). It is recommended
that you check the level, and top up if necessary,
every 3,000 miles (5,000 km).
In order to maintain the reliability of the
engine and emissions control system,
never use additives in the engine oil.
Checking using the dipstick
For the location of the dipstick, please refer
to the illustration of the corresponding engine
compartment.
► Grasp the dipstick by its coloured grip and
pull it out completely.
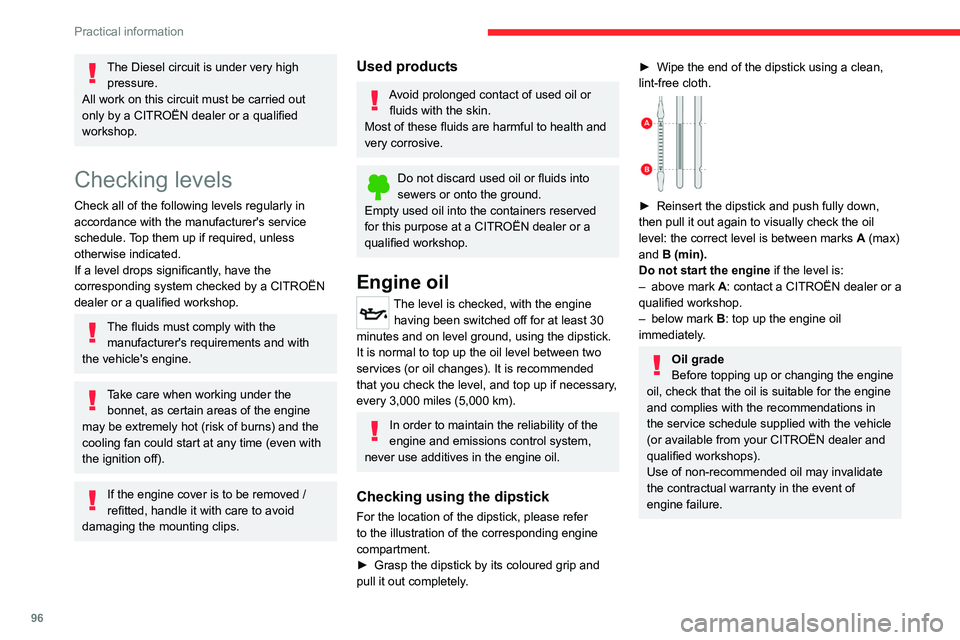
► Wipe the end of the dipstick using a clean,
lint-free cloth.
► Reinsert the dipstick and push fully down,
then pull it out again to visually check the oil
level: the correct level is between marks A (max)
and B (min).
Do not start the engine if the level is:
– above mark A: contact a CITROËN dealer or a
qualified workshop.
– below mark B: top up the engine oil
immediately.
Oil grade
Before topping up or changing the engine
oil, check that the oil is suitable for the engine
and complies with the recommendations in
the service schedule supplied with the vehicle
(or available from your CITROËN dealer and
qualified workshops).
Use of non-recommended oil may invalidate
the contractual warranty in the event of
engine failure.
Page 102 of 196

100
Practical information
reading and have an adverse effect on road
holding.
Fitting different tyres on the front and rear axles
can cause the ESC to mistime.
AdBlue® (BlueHDi
engines)
To respect the environment and ensure
compliance with the Euro 6 standard, without
adversely affecting the performance or fuel
consumption of its Diesel engines, CITROËN
has taken the decision to equip its vehicles
with a system that associates SCR (Selective
Catalytic Reduction) with a Diesel Particle Filter
(DPF) for the treatment of exhaust gases.
SCR system
Using a liquid called AdBlue® that contains
urea, a catalytic converter turns up to 85% of
the nitrogen oxides (NOx) into nitrogen and
Brake disc wear
For information on checking brake disc
wear, contact a CITROËN dealer or a
qualified workshop.
Manual parking brake
If you notice excessive brake lever travel
or decreased effectiveness, the parking
brake must be adjusted, even between two
services.
This system must be checked by a CITROËN
dealer or a qualified workshop.
Diesel fuel filter
The Diesel fuel filter is located under the bonnet,
close to the brake fluid reservoir.
If this warning lamp comes on, the filter
must be purged to remove water.
You can also purge the fuel filter regularly, every
time the engine oil is changed.
Bleeding the water in the filter
► Couple a clear hose to the bleed screw
1head.
► Place the other end of the clear hose in a
container.
► Loosen bleed screw 2.
► Switch on the ignition.
► Wait for the scavenge pump to stop.
► Switch off the ignition.
► Tighten bleed screw 2.
► Remove, then drain the clear hose and the
container.
► Start the engine.
► Check that there are no leaks.
HDi engines make use of advanced
technology. Any intervention requires a
special qualification guaranteed by the
CITROËN dealer network or a qualified
workshop .
Wheels and tyres
The inflation pressure of all tyres, including the spare wheel, must be
checked on "cold” tyres.
The pressures indicated on the tyre pressure
label are valid for "cold" tyres. If you have driven
for more than 10 minutes or more than 6 miles
(10 kilometres) at over 31 mph (50 km/h), add
0.3 bar (30 kPa) to the values indicated on the
label.
Under-inflation increases fuel
consumption. Non-compliant tyre
pressure causes premature wear on tyres and
has an adverse effect on the vehicle's road
holding - risk of an accident!
Driving with worn or damaged tyres reduces the
braking and road holding performance of the
vehicle. It is recommended to regularly check the
condition of the tyres (tread and sidewalls) and
wheel rims as well as the presence of the valves.
When the wear indicators no longer appear set
back from the tread, the depth of the grooves is
less than 1.6 mm; it is imperative to replace the
tyres.
Using different size wheels and tyres from those
specified can affect the lifetime of tyres, wheel
rotation, ground clearance, the speedometer
Page 113 of 196
111
In the event of a breakdown
8Changing a bulb
The headlamps have polycarbonate lenses with a protective coating:
► do not clean them using a dry or
abrasive cloth, nor with a detergent or
solvent product,
► use a sponge and soapy water or a pH
neutral product,
► when using a high pressure washer on
persistent marks, do not keep the lance
directed towards the lamps or their edges for
too long, so as not to damage their protective
coating and seals.
Changing a bulb must only be done with
the ignition off and after the lamp has
been switched off for several minutes - Risk
of serious burns!
► Do not touch the bulb directly with your
fingers, use a lint-free cloth.
It is essential only to use anti-ultraviolet
(UV) type bulbs, so as not to damage the
headlamp.
Always replace a failed bulb with a new bulb
with the same type and specification.
In some weather conditions (e.g. low
temperature or humidity), the presence
of misting on the internal surface of the glass
of the headlamps and rear lamps is normal; it
disappears after the lamps have been on for a
few minutes.
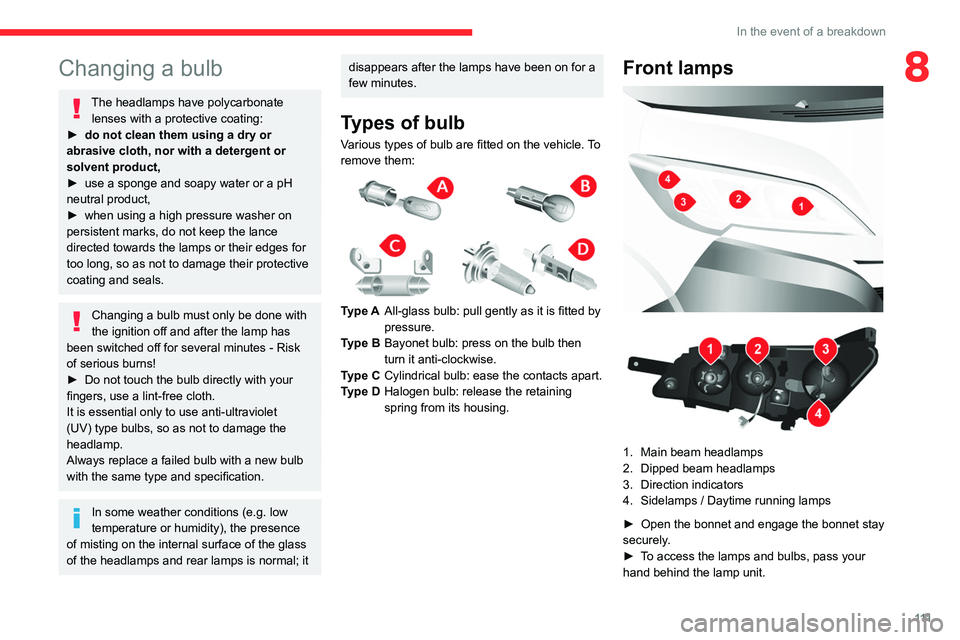
Types of bulb
Various types of bulb are fitted on the vehicle. To
remove them:
Type A All-glass bulb: pull gently as it is fitted by
pressure.
Type B Bayonet bulb: press on the bulb then
turn it anti-clockwise.
Type C Cylindrical bulb: ease the contacts apart.
Type D Halogen bulb: release the retaining
spring from its housing.
Front lamps
1. Main beam headlamps
2. Dipped beam headlamps
3. Direction indicators
4. Sidelamps / Daytime running lamps
► Open the bonnet and engage the bonnet stay
securely.
► To access the lamps and bulbs, pass your
hand behind the lamp unit.
Page 114 of 196

11 2
In the event of a breakdown
If necessary, you can remove the lamp unit:
► Depending on the country of sale, remove
the winter protection foam by sliding it sideways
towards the outside.
► Disconnect the electrical connector by
removing its locking ring.
► Remove the two fixing screws of the lamp
unit.
► Move the lamp unit towards the centre of the
vehicle to extract it from its slides. Pay attention
to the bonnet stay on the left-hand side.
Main beam headlamps
Type D, H7 - 55W
► Remove the cover by pulling on the rubber
tab.
► Disconnect the electrical connector. ►
Release the locking spring by pressing the
central clamp.
► Change the bulb taking care to align the
metal part with the groove on the lamp.
Dipped beam headlamps
Type D, H7 - 55W
► Remove the cover by pulling on the rubber
tab.
► Disconnect the electrical connector.
► Release the locking spring by pressing the
central clamp.
► Change the bulb taking care to align the
metal part with the grooves on the lamp.
Direction indicators
Type A, WY21W - 21W
► Remove the cover by pulling on the rubber
tab.
► Turn the bulb holder a quarter turn
anti-clockwise.
► Change the bulb.
Sidelamps/Daytime running lamps
Type B, W21/5W - 21W and 5W
► Remove the cover by pulling on the rubber
tab.
► Turn the bulb holder a quarter turn
anti-clockwise.
► Change the bulb.
LED daytime running lamps
These light-emitting diodes (LEDs) are used both
as daytime running lamps and as sidelamps.
If your vehicle is equipped with LED daytime
running lamps, contact a CITROËN dealer.
Front foglamps
Type D, H11-55W
► Completely turn the wheel inwards.
Page 178 of 196
176
Alphabetical index
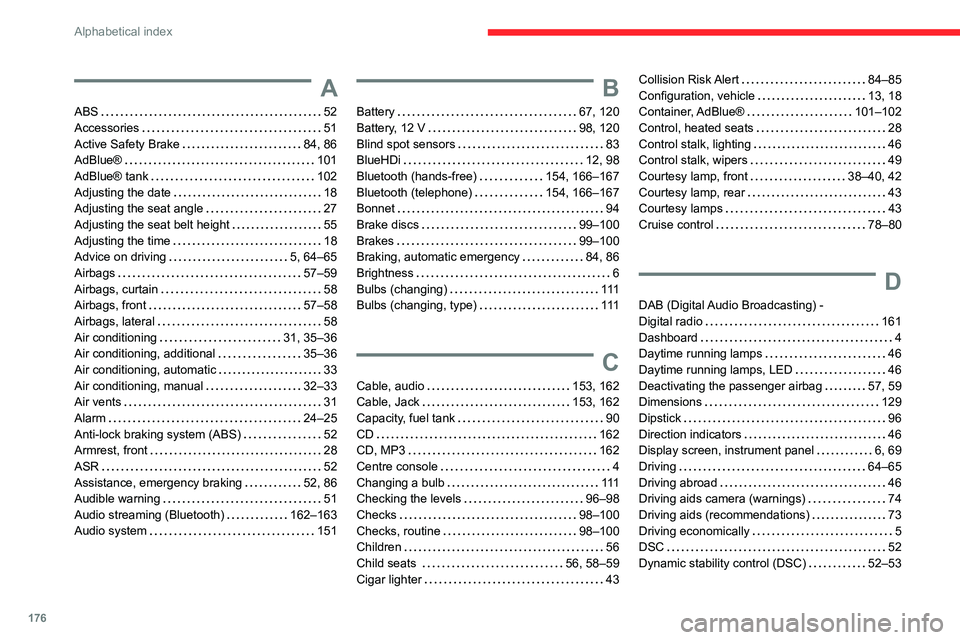
A
ABS 52
Accessories 51
Active Safety Brake 84, 86
AdBlue® 101
AdBlue® tank 102
Adjusting the date 18
Adjusting the seat angle 27
Adjusting the seat belt height 55
Adjusting the time 18
Advice on driving 5, 64–65
Airbags 57–59
Airbags, curtain 58
Airbags, front 57–58
Airbags, lateral 58
Air conditioning 31, 35–36
Air conditioning, additional 35–36
Air conditioning, automatic 33
Air conditioning, manual 32–33
Air vents 31
Alarm 24–25
Anti-lock braking system (ABS) 52
Armrest, front 28
ASR 52
Assistance, emergency braking 52, 86
Audible warning 51
Audio streaming (Bluetooth) 162–163
Audio system 151
B
Battery 67, 120
Battery, 12 V 98, 120
Blind spot sensors 83
BlueHDi 12, 98
Bluetooth (hands-free) 154, 166–167
Bluetooth (telephone) 154, 166–167
Bonnet 94
Brake discs 99–100
Brakes 99–100
Braking, automatic emergency 84, 86
Brightness 6
Bulbs (changing) 111
Bulbs (changing, type) 111
C
Cable, audio 153, 162
Cable, Jack 153, 162
Capacity, fuel tank 90
CD 162
CD, MP3 162
Centre console 4
Changing a bulb 111
Checking the levels 96–98
Checks 98–100
Checks, routine 98–100
Children 56
Child seats 56, 58–59
Cigar lighter 43
Collision Risk Alert 84–85
Configuration, vehicle 13, 18
Container, AdBlue® 101–102
Control, heated seats 28
Control stalk, lighting 46
Control stalk, wipers 49
Courtesy lamp, front 38–40, 42
Courtesy lamp, rear 43
Courtesy lamps 43
Cruise control 78–80
D
DAB (Digital Audio Broadcasting) -
Digital radio 161
Dashboard 4
Daytime running lamps 46
Daytime running lamps, LED 46
Deactivating the passenger airbag 57, 59
Dimensions 129
Dipstick 96
Direction indicators 46
Display screen, instrument panel 6, 69
Driving 64–65
Driving abroad 46
Driving aids camera (warnings) 74
Driving aids (recommendations) 73
Driving economically 5
DSC 52
Dynamic stability control (DSC) 52–53