trip computer control CITROEN RELAY 2020 Handbook (in English)
[x] Cancel search | Manufacturer: CITROEN, Model Year: 2020, Model line: RELAY, Model: CITROEN RELAY 2020Pages: 196, PDF Size: 34.07 MB
Page 4 of 196

2
Contents
■
Overview
■
Eco-driving
1Instruments
Instrument panel 6
Warning and indicator lamps 6
Indicators 10
Vehicle configuration (MODE)
13
Touch screen audio and multimedia system 18
Setting the date and time 18
Trip computer 19
Trip computer 19
2Access
Key 20
Remote control 20
Front doors 23
Sliding side door 23
Rear doors 23
Alarm 24
Electric windows 25
3Ease of use and comfort
Front seats 27
Front bench seat 28
Rear seats 29
Rear bench seat 29
Steering wheel adjustment 30
Mirrors 31
Heating and Ventilation 31
Heating / Manual air conditioning 32
Automatic air conditioning 33
Additional heating systems 34
Rear heating/air conditioning 35
Additional programmable heating 36
Front demist - defrost 38
Rear screen de-icing 38
Cab layout 38
Rear fittings
42
Exterior fittings 45
4Lighting and visibility
Lighting control stalk 46
Direction indicators 46
Automatic headlamps 47
Headlamp beam height adjustment 48
Wiper control stalk 49
Changing a wiper blade 50
5Safety
General safety recommendations 51
Hazard warning lamps 51
Horn 51
Electronic stability control (ESC) 52
Seat belts 55
Airbags 57
Child seats 58
Deactivating the front passenger airbag 60
ISOFIX seats 61
Child lock 63
6Driving
Driving recommendations 64
Starting-switching off the engine 67
Battery standby system 67
Parking brake 68
Gearbox 68
Gear shift indicator 69
Stop & Start 69
Hill start assist 70
Tyre under-inflation detection
71
Pneumatic suspension 72
Driving and manoeuvring aids - General
recommendations
73
Speed Limit recognition and
recommendation
75
Speed limiter 76
Cruise control - particular
recommendations
78
Cruise control 78
Cruise control (3L HDi engine) 79
Lane Departure Warning System 80
Blind Spot Monitoring System with trailer
detection
83
Active Safety Brake with Collision Risk
Alert and Intelligent emergency braking
assistance
84
Rear parking sensors 87
Reversing Camera 87
7Practical information
Fuel 90
Page 6 of 196

4
Overview
Instruments and controls
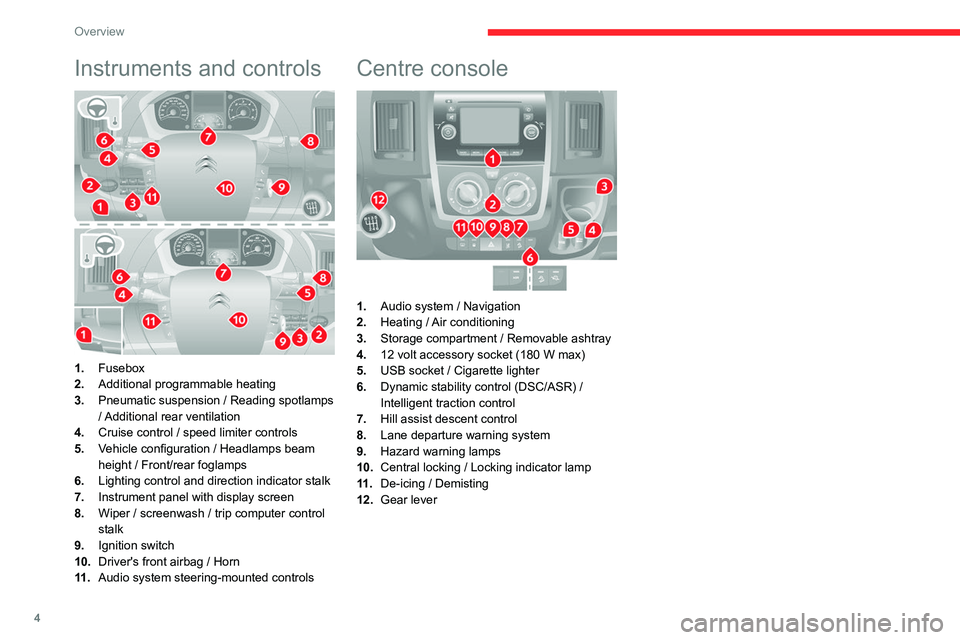
1.Fusebox
2. Additional programmable heating
3. Pneumatic suspension / Reading spotlamps
/ Additional rear ventilation
4. Cruise control / speed limiter controls
5. Vehicle configuration / Headlamps beam
height / Front/rear foglamps
6. Lighting control and direction indicator stalk
7. Instrument panel with display screen
8. Wiper / screenwash / trip computer control
stalk
9. Ignition switch
10. Driver's front airbag / Horn
11 . Audio system steering-mounted controls
Centre console
1.Audio system / Navigation
2. Heating / Air conditioning
3. Storage compartment / Removable ashtray
4. 12 volt accessory socket (180 W max)
5. USB socket / Cigarette lighter
6. Dynamic stability control (DSC/ASR) /
Intelligent traction control
7. Hill assist descent control
8. Lane departure warning system
9. Hazard warning lamps
10. Central locking / Locking indicator lamp
11 . De-icing / Demisting
12. Gear lever
Page 8 of 196

6
Instruments
Instrument panel
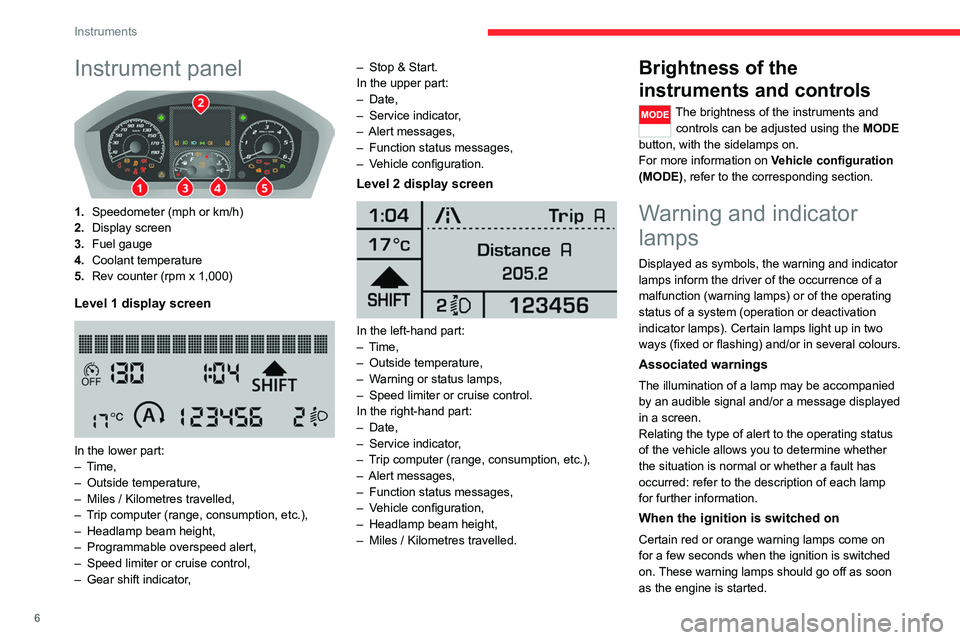
1.Speedometer (mph or km/h)
2. Display screen
3. Fuel gauge
4. Coolant temperature
5. Rev counter (rpm x 1,000)
Level 1 display screen
In the lower part:
– Time,
– Outside temperature,
– Miles / Kilometres travelled,
– Trip computer (range, consumption, etc.),
– Headlamp beam height,
– Programmable overspeed alert,
– Speed limiter or cruise control,
– Gear shift indicator, –
Stop & Start.
In the upper part:
– Date,
– Service indicator,
– Alert messages,
– Function status messages,
– Vehicle configuration.
Level 2 display screen
In the left-hand part:
– Time,
– Outside temperature,
– Warning or status lamps,
– Speed limiter or cruise control.
In the right-hand part:
– Date,
– Service indicator,
– Trip computer (range, consumption, etc.),
– Alert messages,
– Function status messages,
– Vehicle configuration,
– Headlamp beam height,
– Miles / Kilometres travelled.
Brightness of the
instruments and controls
The brightness of the instruments and
controls can be adjusted using the MODE
button, with the sidelamps on.
For more information on Vehicle configuration
(MODE), refer to the corresponding section.
Warning and indicator
lamps
Displayed as symbols, the warning and indicator
lamps inform the driver of the occurrence of a
malfunction (warning lamps) or of the operating
status of a system (operation or deactivation
indicator lamps). Certain lamps light up in two
ways (fixed or flashing) and/or in several colours.
Associated warnings
The illumination of a lamp may be accompanied
by an audible signal and/or a message displayed
in a screen.
Relating the type of alert to the operating status
of the vehicle allows you to determine whether
the situation is normal or whether a fault has
occurred: refer to the description of each lamp
for further information.
When the ignition is switched on
Certain red or orange warning lamps come on
for a few seconds when the ignition is switched
on. These warning lamps should go off as soon
as the engine is started.
Page 20 of 196

18
Instruments
Touch screen audio and telematics system
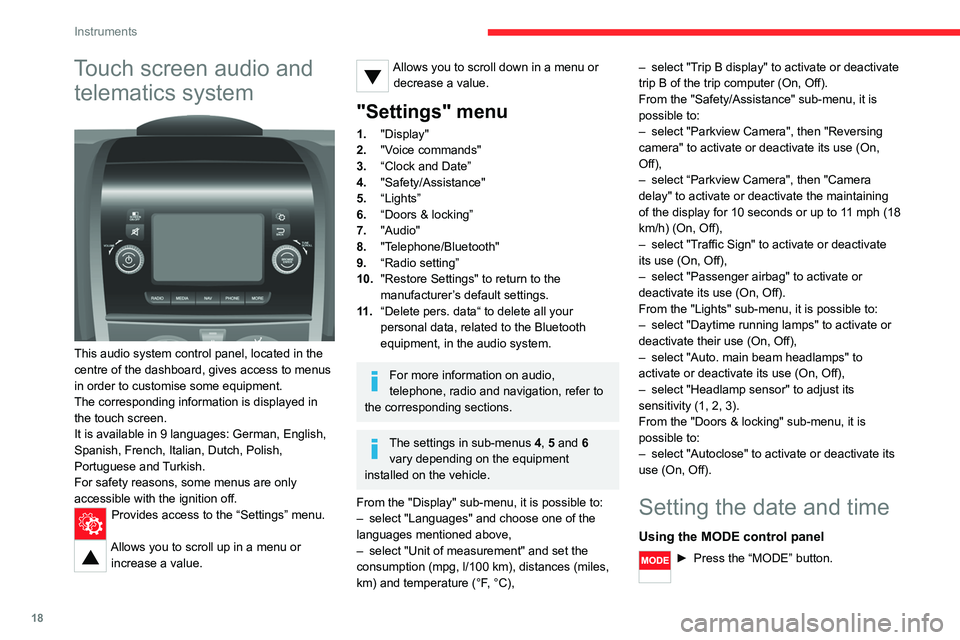
This audio system control panel, located in the
centre of the dashboard, gives access to menus
in order to customise some equipment.
The corresponding information is displayed in
the touch screen.
It is available in 9 languages: German, English,
Spanish, French, Italian, Dutch, Polish,
Portuguese and Turkish.
For safety reasons, some menus are only
accessible with the ignition off.
Provides access to the “Settings” menu.
Allows you to scroll up in a menu or
increase a value.
Allows you to scroll down in a menu or decrease a value.
"Settings" menu
1. "Display"
2. "Voice commands"
3. “Clock and Date”
4. "Safety/Assistance"
5. “Lights”
6. “Doors & locking”
7. "Audio"
8. "Telephone/Bluetooth"
9. “Radio setting”
10. "Restore Settings" to return to the
manufacturer’s default settings.
11 . “Delete pers. data“ to delete all your
personal data, related to the Bluetooth
equipment, in the audio system.
For more information on audio,
telephone, radio and navigation, refer to
the corresponding sections.
The settings in sub-menus 4, 5 and 6
vary depending on the equipment
installed on the vehicle.
From the "Display" sub-menu, it is possible to:
– select "Languages" and choose one of the
languages mentioned above,
– select "Unit of measurement" and set the
consumption (mpg, l/100 km), distances (miles,
km) and temperature (°F, °C), –
select "Trip B display" to activate or deactivate
trip B of the trip computer (On, Off).
From the "Safety/Assistance" sub-menu, it is
possible to:
– select "Parkview Camera", then "Reversing
camera" to activate or deactivate its use (On,
Off),
– select “Parkview Camera", then "Camera
delay" to activate or deactivate the maintaining
of the display for 10 seconds or up to 11 mph (18
km/h) (On, Off),
– select "Traffic Sign" to activate or deactivate
its use (On, Off),
– select "Passenger airbag" to activate or
deactivate its use (On, Off).
From the "Lights" sub-menu, it is possible to:
– select "Daytime running lamps" to activate or
deactivate their use (On, Off),
– select "Auto. main beam headlamps" to
activate or deactivate its use (On, Off),
– select "Headlamp sensor" to adjust its
sensitivity (1, 2, 3).
From the "Doors & locking" sub-menu, it is
possible to:
– select "Autoclose" to activate or deactivate its
use (On, Off).
Setting the date and time
Using the MODE control panel
► Press the “MODE” button.
Page 21 of 196

19
Instruments
1► Select the "Time setting" menu to set the time
and the clock format (24h or 12h) or select the
"Date setting" menu to set the day, month and
year.
For more information on Vehicle configuration
(MODE), refer to the corresponding section.
Using the touch screen audio and
telematics system
From the "Clock and Date" sub-menu:
► Select "Time setting and format" to set the
hour, minutes and seconds and choose the
format (24h, 12h with am or pm).
► Select "Date setting" to set the day, month
and year.
To set the time manually, "Time Synchro" must be deactivated (Off).
Trip computer
Information displayed about the current journey
(range, current fuel consumption, average fuel
consumption, etc.).
► To access trip computer information, press
the TRIP button, located at the end of the wiper
control stalk.
Range
This indicates the distance which can still be
travelled with the fuel remaining in the tank,
depending on the average fuel consumption over
the last few miles (kilometres) travelled.
Distance A
This indicates the distance travelled since the
last trip computer zero reset.
Average consumption A
This is the average fuel consumption since the
last trip computer zero reset.
Current consumption A
This is the average fuel consumption over the
last few seconds.
Average speed A
This is the average speed calculated since the
last trip computer zero reset (with the ignition
on).
Trip A duration
This indicates the cumulative time since the last
trip computer zero reset.
If TRIP B is activated in the MODE menu:
– Distance B
– Average consumption B
– Average speed B
– Trip B duration Tachograph
If your vehicle is equipped with it, this stores in
the device and on an inserted card all the data
relating to the vehicle.
Example: at the beginning of each trip or shift
change.
When the card is inserted, all the data can be:
– displayed on the tachograph screen,
– printed,
– transferred to external storage media via an
interface.
For more information, refer to the documents
provided by the tachograph manufacturer.
If your vehicle is equipped with a
tachograph, it is recommended that the
(-) terminal of the battery (located under the
floor on the left-hand side, in the cab) be
disconnected during a prolonged stop of the
vehicle of more than 5 days.
Page 181 of 196

179
Alphabetical index
Tools 105–110
Topping-up AdBlue® 102
Touch screen 158, 173
Touch screen audio-telematic system 158, 173
Towball, quickly detachable 92–94
Towbar with quickly detachable towball 92–94
Towed loads 124
Towing another vehicle 122
Traction control (ASR) 52–53
Traffic information (TA) 152
Trip computer 19
Type of bulbs 111
Tyres 100
Tyre under-inflation detection 71–72
U
Under-inflation (detection) 71–72
USB 152–153, 161–162
V
Ventilation 31–33
Voice commands 155–157, 169–171
W
Warning and indicator lamps 6–7
Warning lamps 7
Warning lamp, seat belts 55
Warnings and indicators 6–7
Washing 74
Weights 124
Wheel, spare 100, 105–110
Window controls 25
Wipers 49
Wipers, automatic rain sensitive 49