service indicator CITROEN RELAY 2020 Handbook (in English)
[x] Cancel search | Manufacturer: CITROEN, Model Year: 2020, Model line: RELAY, Model: CITROEN RELAY 2020Pages: 196, PDF Size: 34.07 MB
Page 7 of 196
5
Eco-driving
Eco-driving
Eco-driving refers to a range of everyday
practices that allow the motorist to optimise their
fuel consumption and CO
2emissions.
Optimise your use of the gearbox
With a manual gearbox, move off gently and
change up promptly. While accelerating, change
up early.
The gear efficiency indicator prompts you to
engage the most suitable gear: whenever this
indication is displayed on the instrument panel,
follow it straight away.
Drive smoothly
Maintain a safe distance between vehicles, use
engine braking rather than the brake pedal and
press the accelerator gradually. These attitudes
help to save fuel, reduce CO
2 emissions and
decrease general traffic noise.
If the vehicle has the steering-mounted
"CRUISE" control, use cruise control at speeds
above 19 mph (30 km/h) when traffic is flowing
smoothly.
Use electrical equipment wisely
Before moving off, if the passenger compartment
is too warm, ventilate it by opening the windows
and air vents before using the air conditioning.
At speeds above 31 mph (50 km/h), close the
windows and leave the air vents open. Consider using equipment that can help keep
the temperature in the passenger compartment
down.
Unless automatically regulated, switch off the air
conditioning as soon as the desired temperature
has been reached.
Switch off the demisting and defrosting functions,
if they are not managed automatically.
Switch off the heated seat as soon as possible.
Switch off the headlamps and foglamps when
the visibility conditions do not require their use.
Avoid running the engine before moving off,
particularly in winter; your vehicle will warm up
much faster while driving.
As a passenger, avoid connecting your
multimedia devices (film, music, video game,
etc.) to help reduce consumption of electrical
energy, and hence fuel.
Disconnect all portable devices before leaving
the vehicle.
Limit the causes of excess consumption
Spread loads throughout the vehicle.
Limit the loads carried in the vehicle and
minimise wind resistance (roof bars, roof rack,
bicycle carrier, trailer, etc.). Preferably, use a
roof box.
Remove roof bars and roof racks after use.
At the end of winter, remove snow tyres and refit
summer tyres.
Comply with servicing instructions
Check tyre pressures regularly, with the tyres
cold, referring to the label in the door aperture on
the driver's side.
Carry out this check in particular:
– before a long journey.
– at each change of season.
– after a long period out of use.
Do not overlook the spare wheel and, where
applicable, the tyres on your trailer or caravan.
Have your vehicle serviced regularly (engine oil,
oil filter, air filter, passenger compartment filter,
etc.) and observe the schedule of operations in
the manufacturer's service schedule.
With a BlueHDi Diesel engine, if the SCR system
is faulty, your vehicle will emit pollution. Visit
a CITROËN dealer or a qualified workshop
as soon as possible to restore your vehicle’s
nitrogen oxide emissions to regulatory
compliance.
When filling the fuel tank, do not continue after
the third nozzle cut-out, to avoid overflow.
You will only see the fuel consumption of your
new vehicle settle down to a consistent average
after the first 1,900 miles (3,000 kilometres).
Page 8 of 196
6
Instruments
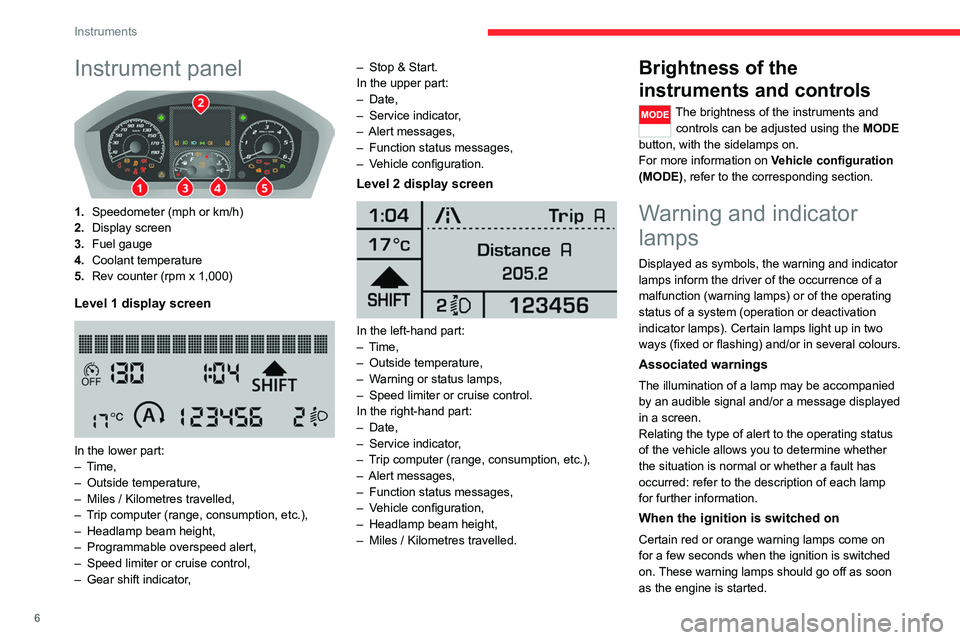
Instrument panel
1.Speedometer (mph or km/h)
2. Display screen
3. Fuel gauge
4. Coolant temperature
5. Rev counter (rpm x 1,000)
Level 1 display screen
In the lower part:
– Time,
– Outside temperature,
– Miles / Kilometres travelled,
– Trip computer (range, consumption, etc.),
– Headlamp beam height,
– Programmable overspeed alert,
– Speed limiter or cruise control,
– Gear shift indicator, –
Stop & Start.
In the upper part:
– Date,
– Service indicator,
– Alert messages,
– Function status messages,
– Vehicle configuration.
Level 2 display screen
In the left-hand part:
– Time,
– Outside temperature,
– Warning or status lamps,
– Speed limiter or cruise control.
In the right-hand part:
– Date,
– Service indicator,
– Trip computer (range, consumption, etc.),
– Alert messages,
– Function status messages,
– Vehicle configuration,
– Headlamp beam height,
– Miles / Kilometres travelled.
Brightness of the
instruments and controls
The brightness of the instruments and
controls can be adjusted using the MODE
button, with the sidelamps on.
For more information on Vehicle configuration
(MODE), refer to the corresponding section.
Warning and indicator
lamps
Displayed as symbols, the warning and indicator
lamps inform the driver of the occurrence of a
malfunction (warning lamps) or of the operating
status of a system (operation or deactivation
indicator lamps). Certain lamps light up in two
ways (fixed or flashing) and/or in several colours.
Associated warnings
The illumination of a lamp may be accompanied
by an audible signal and/or a message displayed
in a screen.
Relating the type of alert to the operating status
of the vehicle allows you to determine whether
the situation is normal or whether a fault has
occurred: refer to the description of each lamp
for further information.
When the ignition is switched on
Certain red or orange warning lamps come on
for a few seconds when the ignition is switched
on. These warning lamps should go off as soon
as the engine is started.
Page 10 of 196
8
Instruments
Release the parking brake to switch off the
warning lamp, keeping your foot on the brake
pedal.
BrakingFixed.
The brake fluid level is too low.
Carry out (1) then top up with fluid that complies
with the Manufacturer's recommendations.
If the problem persists, carry out (2).
Fixed.
The electronic brake force
distribution (EBFD) system is faulty.
Carry out (1) and then (2).
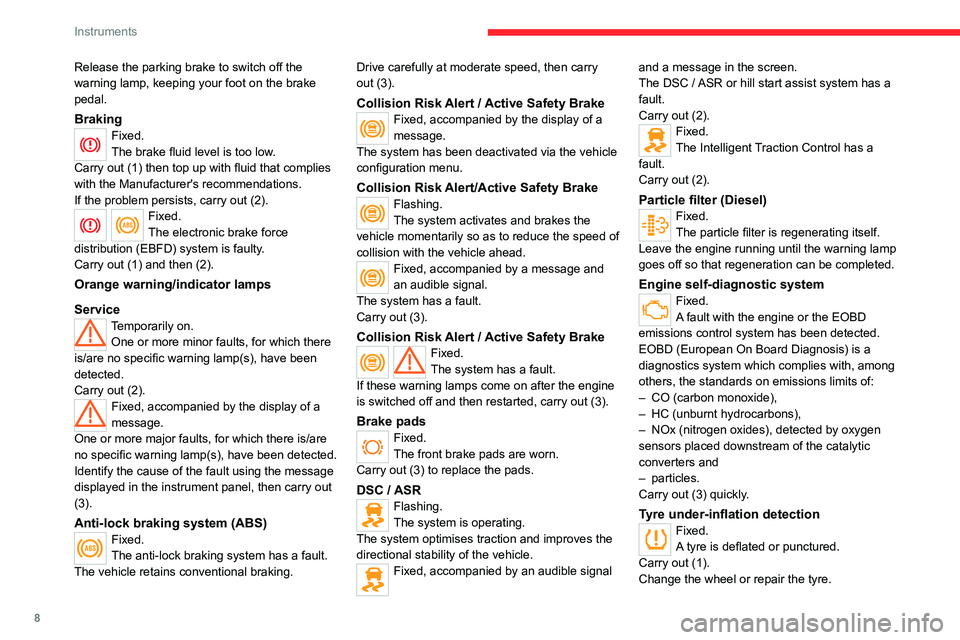
Orange warning/indicator lamps
Service
Temporarily on. One or more minor faults, for which there
is/are no specific warning lamp(s), have been
detected.
Carry out (2).
Fixed, accompanied by the display of a
message.
One or more major faults, for which there is/are
no specific warning lamp(s), have been detected.
Identify the cause of the fault using the message
displayed in the instrument panel, then carry out
(3).
Anti-lock braking system (ABS)Fixed.
The anti-lock braking system has a fault.
The vehicle retains conventional braking. Drive carefully at moderate speed, then carry
out (3).
Collision Risk Alert / Active Safety BrakeFixed, accompanied by the display of a
message.
The system has been deactivated via the vehicle
configuration menu.
Collision Risk Alert/Active Safety BrakeFlashing.
The system activates and brakes the
vehicle momentarily so as to reduce the speed of
collision with the vehicle ahead.
Fixed, accompanied by a message and
an audible signal.
The system has a fault.
Carry out (3).
Collision Risk Alert / Active Safety BrakeFixed.
The system has a fault.
If these warning lamps come on after the engine
is switched off and then restarted, carry out (3).
Brake pads
Fixed.
The front brake pads are worn.
Carry out (3) to replace the pads.
DSC / ASRFlashing.
The system is operating.
The system optimises traction and improves the
directional stability of the vehicle.
Fixed, accompanied by an audible signal and a message in the screen.
The DSC / ASR or hill start assist system has a
fault.
Carry out (2).
Fixed.
The Intelligent Traction Control has a
fault.
Carry out (2).
Particle filter (Diesel)Fixed.
The particle filter is regenerating itself.
Leave the engine running until the warning lamp
goes off so that regeneration can be completed.
Engine self-diagnostic systemFixed.
A fault with the engine or the EOBD
emissions control system has been detected.
EOBD (European On Board Diagnosis) is a
diagnostics system which complies with, among
others, the standards on emissions limits of:
– CO (carbon monoxide),
– HC (unburnt hydrocarbons),
– NOx (nitrogen oxides), detected by oxygen
sensors placed downstream of the catalytic
converters and
– particles.
Carry out (3) quickly.
Tyre under-inflation detectionFixed.
A tyre is deflated or punctured.
Carry out (1).
Change the wheel or repair the tyre.
Page 12 of 196

10
Instruments
Be extra vigilant and avoid sudden braking.
Date / TimeFixed.
It is set via the “MODE” menu.
Beam heightFixed.
The headlamps are adjusted from position
0 to 3 depending on the load transported.
Adjust with the buttons on the MODE control
module.
Service spannerFixed.
Service is due.
Refer to the list of checks in the manufacturer's
service schedule then have the service carried
out.
Stop & StartFixed.
With the vehicle stationary (traffic lights,
stop sign, congestion, etc.), the Stop & Start
system puts the engine in STOP mode.
The indicator lamp goes off and the engine
restarts automatically in START mode, as soon
as you move off.
Flashing for a few seconds, then goes off.
STOP mode is temporarily unavailable.
Gear shift indicatorFixed.
The next higher gear may be engaged.
Speed limiterFixed.
The limiter is activated.
Fixed with "OFF".
The limiter is selected and not active.
Indicators
Service information
For a few seconds after the ignition is switched
on, the spanner symbolising service information
comes on: the screen informs you when the next
service is due, in accordance with the servicing
schedule indicated in the manufacturer's service
schedule.
This information is determined in relation to the
distance travelled since the previous service.
Engine oil level
Depending on the engine, the engine oil level is
then displayed, on a scale of 1 (Min) to 5 (Max).
If no scale is displayed, the oil level is
insufficient; it is essential to top it up to prevent
engine damage.
For the measurement of this level to be valid, the
vehicle must be parked on horizontal ground,
with the engine having been off for more than 30
minutes.
If in doubt, check the oil level using the
dipstick.
For more information on Checking levels,
refer to the corresponding section.
After a few seconds, the display returns to its
standard functions.
Engine oil quality
This warning lamp flashes and, if your vehicle is equipped with this function, a
message is displayed at each start: the system
has detected a deterioration of the engine oil. It
is essential to change the oil as soon as
possible.
This 2nd warning lamp, coupled with the
1st, lights up on the instrument panel if the
oil change has not been carried out, and the
degradation of the oil has exceeded a new
threshold. If this warning lamp comes on at
Page 13 of 196

11
Instruments
1regular intervals, the oil has to be changed as
soon as possible.
For 3.0 L HDi engines, the engine speed
is then limited to 3,000 rpm, then 1,500
rpm until the oil is changed. Change the
engine oil to prevent damage.
Resetting the service
indicator
A qualified workshop, equipped with the
diagnostic tool, will stop the permanent flashing
of the warning lamp after each service.
If you have serviced the vehicle yourself, reset
the service indicator as follows:
► Insert the key into the ignition switch.
► Turn it to the MAR - ON position.
► Simultaneously depress the brake and
accelerator pedals for more than 15 seconds.
Refer to the checklist in the
manufacturer's service schedule
provided on delivery of the vehicle.
Reminder of the servicing
information
To access the service indications at any
time, briefly press the MODE button.
Use the up/down arrows to view service intervals
and engine oil quality.
Pressing the MODE button again allows you to
return to the various display menus.
A long press allows you to return to the home
screen.
Menu... Select... Allows you
to...
Service Service
(miles/
km before
service) Display the
remaining
miles/
kilometres to
be travelled
before the
next service.
Oil change
(miles/km
before oil
change) Display the
remaining
miles/
kilometres to
be travelled
before the
next oil
change.
For more information on Vehicle
configuration (MODE) , refer to the
corresponding section.
Coolant temperature
If the needle is positioned between C (Cold)
and H (Hot): normal operation.
In arduous conditions of use or hot climatic
conditions, the needle may move close to the red
graduations.
If the needle enters the red zone or if the
warning lamp lights up:
► stop immediately, turn the ignition off. The
cooling fan may continue to run for a while, up to
approximately 10 minutes.
► wait for the engine to cool down to check the
level and if necessary, top it up.
In case of topping up
Be careful, the cooling circuit is under pressure!
To avoid any risk of burns, take a cloth and
unscrew the cap two turns to relieve the
pressure.
When the pressure has dropped, check the level
and remove the cap to top up.
If the needle remains in the red zone,
contact a CITROËN dealer or a qualified
workshop.
Page 24 of 196
22
Access
Type of keyUnlocking the cabLocking the doorsUnlocking the rear doors
Direction indicators 2 flashes.1 flash.2 flashes.
Central locking control indicator
lamp on the dashboard Off.
Fixed for approximately 3
seconds, then flashing. Flashing.
Using the key in the driver's door lock does not activate/deactivate the alarm.
Locking/Unlocking from
inside
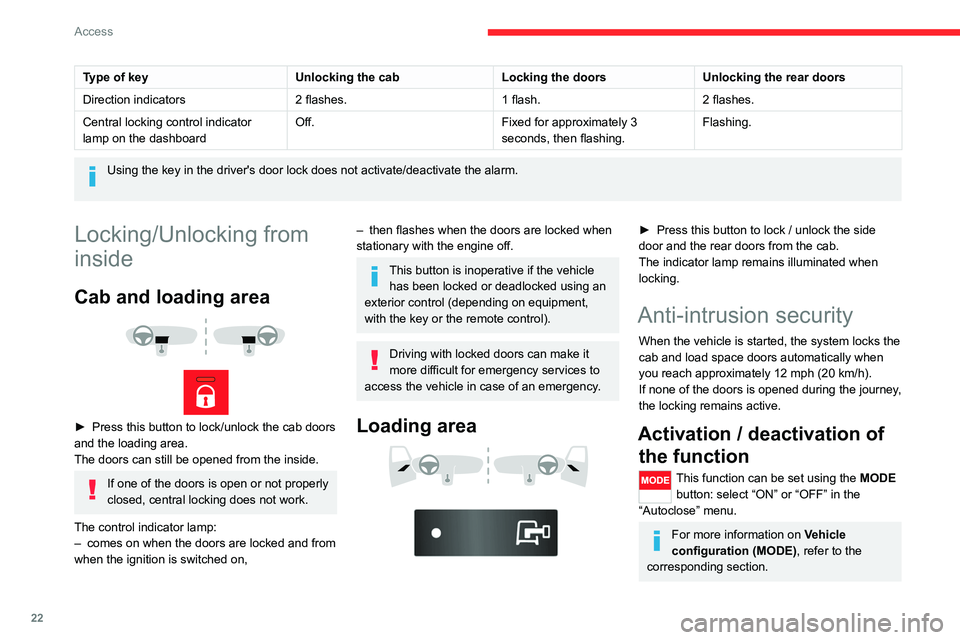
Cab and loading area
► Press this button to lock/unlock the cab doors
and the loading area.
The doors can still be opened from the inside.
If one of the doors is open or not properly
closed, central locking does not work.
The control indicator lamp:
– comes on when the doors are locked and from
when the ignition is switched on,
– then flashes when the doors are locked when
stationary with the engine off.
This button is inoperative if the vehicle has been locked or deadlocked using an
exterior control (depending on equipment,
with the key or the remote control).
Driving with locked doors can make it
more difficult for emergency services to
access the vehicle in case of an emergency.
Loading area
► Press this button to lock / unlock the side
door and the rear doors from the cab.
The indicator lamp remains illuminated when
locking.
Anti-intrusion security
When the vehicle is started, the system locks the
cab and load space doors automatically when
you reach approximately 12 mph (20 km/h).
If none of the doors is opened during the journey,
the locking remains active.
Activation / deactivation of the function
This function can be set using the MODE
button: select “ON” or “OFF” in the
“Autoclose” menu.
For more information on Vehicle
configuration (MODE) , refer to the
corresponding section.
Front doors
► Use the corresponding button on the remote
control or use the key in the driver's door lock to
unlock.
► Pull the handle towards you.
Sliding side door
Take care not to block the guide space
on the floor to allow the door to slide
correctly.
Opening
From outside
► Pull the handle towards you and then towards
the rear.
Page 53 of 196
51
Safety
5General safety
recommendations
Do not remove the labels attached in
different places on your vehicle. They
include safety warnings as well as
identification information for the vehicle.
For all work on your vehicle, use a
qualified workshop that has the technical
information, skills and equipment required, all
of which a CITROËN dealer is able to
provide.
Depending on country regulations,
certain safety equipment may be
mandatory: high visibility safety vests,
warning triangles, breathalysers, spare bulbs,
spare fuses, fire extinguisher, first aid kit, mud
flaps at the rear of the vehicle, etc.
Installing electrical accessories:
– The fitting of electrical equipment or
accessories not approved by CITROËN may
cause excessive current consumption and
faults and failures with the electrical system
of your vehicle. Contact a CITROËN dealer
for information on the range of approved
accessories.
– As a safety measure, access to the
diagnostic socket, used for the vehicle's
electronic systems, is reserved strictly for
CITROËN dealers or qualified workshops,
equipped with the special tools required (risk
of malfunctions of the vehicle's electronic
systems that could cause breakdowns or
serious accidents). The Manufacturer cannot
be held responsible if this advice is not
followed.
– Any modification or adaptation not intended
or authorised by CITROËN or carried out
without meeting the technical requirements
defined by the Manufacturer will result in the
suspension of the commercial warranty.
Installation of accessory radio
communication transmitters
Before installing a radio communication
transmitter with an external aerial, you must
without fail contact a CITROËN dealer for
the specification of transmitters which can
be fitted (frequency, maximum power, aerial
position, specific installation requirements),
in line with the Vehicle Electromagnetic
Compatibility Directive (2004/104/EC).
Declarations of conformity for radio
equipment
The relevant certificates are available on the
http://service.citroen.com/ACddb/ website.
Hazard warning lamps
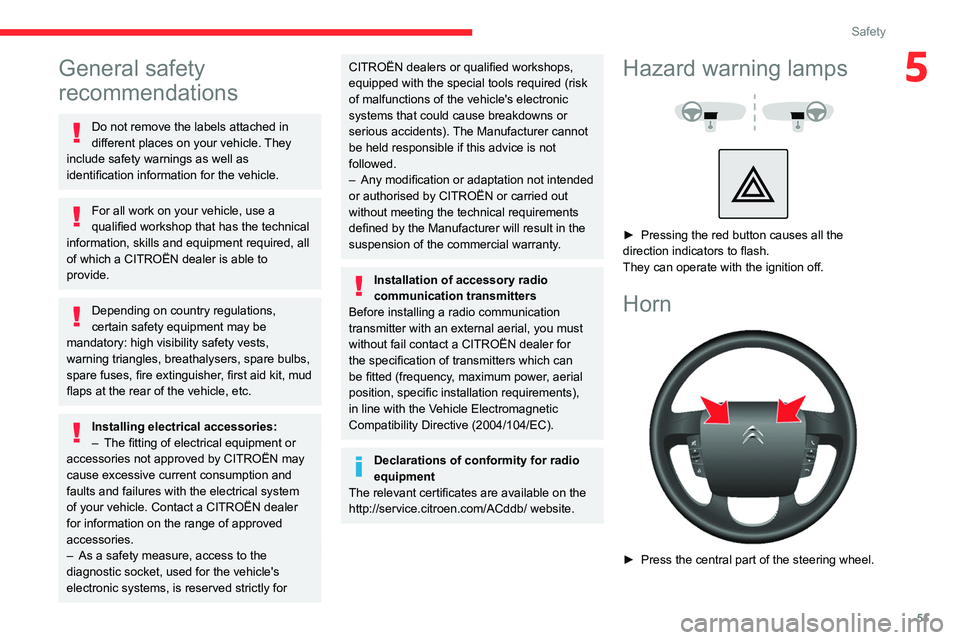
► Pressing the red button causes all the
direction indicators to flash.
They can operate with the ignition off.
Horn
► Press the central part of the steering wheel.
Page 100 of 196

98
Practical information
A clogged passenger compartment filter can adversely affect air conditioning
system performance and generate
undesirable odours.
Oil filter
Change the oil filter each time the engine
oil is changed.
Particle filter (Diesel)
In addition to the catalytic converter, this filter
actively contributes to the preservation of
air quality by trapping the unburnt pollutant
particles. Black exhaust fumes are therefore not
emitted.
Operation
This filter, inserted into the exhaust system,
accumulates the carbonaceous particles. The
engine management computer automatically
and periodically manages the removal of
carbonaceous particles (regeneration).
The regeneration procedure is triggered
according to the amount of accumulated
particles and the conditions of use of the vehicle.
During this phase, you may notice certain
phenomena - accelerated idling, triggering of
the cooling fan, increased smoke and increased
temperature at the exhaust - which have no
impact on the operation of the vehicle and the
environment.
Screenwash and headlamp
washer fluid
To check the level or top up this fluid on
vehicles fitted with headlamp washers,
immobilise the vehicle and switch off the engine.
Reservoir capacity: approximately 5.5 litres.
To access the filler cap, pull the telescopic filler
neck and unclip the cap.
Fluid specification
The fluid must be topped up with a ready-to-use
mixture.
In winter (temperatures below zero), a liquid
containing an agent to prevent freezing must
be used which is appropriate for the prevailing
conditions, in order to protect the elements of the
system (pump, tank, ducts, jets, etc.).
Filling with pure water is prohibited under
all circumstances (risk of freezing,
limestone deposits, etc.).
AdBlue (BlueHDi)
An alert is triggered when the reserve level is
reached.
For more information on Indicators and in
particular the AdBlue range indicators, refer to
the corresponding section.
To avoid the vehicle being immobilised in
accordance with regulations, you must top up the
AdBlue tank.
For more information on AdBlue
® (BlueHDi),
and in particular on the supply of AdBlue, refer to
the corresponding section.
Checks
Unless otherwise indicated, check these
components in accordance with the
manufacturer's service schedule and according
to your engine.
Otherwise, have them checked by a CITROËN
dealer or a qualified workshop.
Only use products recommended by
CITROËN or products of equivalent
quality and specification.
In order to optimise the operation of
components as important as those in the
braking system, CITROËN selects and offers
very specific products.
12 V battery
The battery does not require any maintenance.
However, check regularly that the terminals
are correctly tightened (versions without quick
release terminals) and that the connections are
clean.
For more information on the precautions
to take before any work on the 12 V
battery, refer to the corresponding section.
Versions equipped with Stop & Start are
fitted with a 12 V lead-acid battery of
specific technology and specification.
Its replacement should be carried out only by
a CITROËN dealer or a qualified workshop.
Air filter
Depending on the environment and the
use of the vehicle (e.g. dusty atmosphere,
city driving), change it twice as often, if
necessary .
Passenger compartment
filter
Depending on the environment and the
use of the vehicle (e.g. dusty atmosphere,
city driving), change it twice as often, if
necessary .
Page 102 of 196

100
Practical information
reading and have an adverse effect on road
holding.
Fitting different tyres on the front and rear axles
can cause the ESC to mistime.
AdBlue® (BlueHDi
engines)
To respect the environment and ensure
compliance with the Euro 6 standard, without
adversely affecting the performance or fuel
consumption of its Diesel engines, CITROËN
has taken the decision to equip its vehicles
with a system that associates SCR (Selective
Catalytic Reduction) with a Diesel Particle Filter
(DPF) for the treatment of exhaust gases.
SCR system
Using a liquid called AdBlue® that contains
urea, a catalytic converter turns up to 85% of
the nitrogen oxides (NOx) into nitrogen and
Brake disc wear
For information on checking brake disc
wear, contact a CITROËN dealer or a
qualified workshop.
Manual parking brake
If you notice excessive brake lever travel
or decreased effectiveness, the parking
brake must be adjusted, even between two
services.
This system must be checked by a CITROËN
dealer or a qualified workshop.
Diesel fuel filter
The Diesel fuel filter is located under the bonnet,
close to the brake fluid reservoir.
If this warning lamp comes on, the filter
must be purged to remove water.
You can also purge the fuel filter regularly, every
time the engine oil is changed.
Bleeding the water in the filter
► Couple a clear hose to the bleed screw
1head.
► Place the other end of the clear hose in a
container.
► Loosen bleed screw 2.
► Switch on the ignition.
► Wait for the scavenge pump to stop.
► Switch off the ignition.
► Tighten bleed screw 2.
► Remove, then drain the clear hose and the
container.
► Start the engine.
► Check that there are no leaks.
HDi engines make use of advanced
technology. Any intervention requires a
special qualification guaranteed by the
CITROËN dealer network or a qualified
workshop .
Wheels and tyres
The inflation pressure of all tyres, including the spare wheel, must be
checked on "cold” tyres.
The pressures indicated on the tyre pressure
label are valid for "cold" tyres. If you have driven
for more than 10 minutes or more than 6 miles
(10 kilometres) at over 31 mph (50 km/h), add
0.3 bar (30 kPa) to the values indicated on the
label.
Under-inflation increases fuel
consumption. Non-compliant tyre
pressure causes premature wear on tyres and
has an adverse effect on the vehicle's road
holding - risk of an accident!
Driving with worn or damaged tyres reduces the
braking and road holding performance of the
vehicle. It is recommended to regularly check the
condition of the tyres (tread and sidewalls) and
wheel rims as well as the presence of the valves.
When the wear indicators no longer appear set
back from the tread, the depth of the grooves is
less than 1.6 mm; it is imperative to replace the
tyres.
Using different size wheels and tyres from those
specified can affect the lifetime of tyres, wheel
rotation, ground clearance, the speedometer
Page 180 of 196
178
Alphabetical index
Low fuel level 90
Lumbar 27
M
Maintenance, routine 74, 98
Manoeuvring aids (recommendations) 73
Mat 74
Menu 13, 160–161, 163, 166, 168
Menus (audio) 160–161
Mirrors, door 31, 83
O
Oil change 96
Oil consumption 96
OIl, engine 96–98
On-board tools 105–110
Opening the bonnet 94
Overhead storage 38–41
P
Pads, brake 99
Parking brake 68, 100
Player, USB 152–153, 161–162
Port, USB 152–153, 161–162
Pressures, tyres 100
Pre-tensioning seat belts 56
Protecting children 57–59
R
Radar (warnings) 74
Radio 152, 160, 162
Radio, digital (Digital Audio
Broadcasting - DAB) 161
Range, AdBlue® 12, 98
Recovery 122
Regeneration of the particle filter 99
Remote control 20, 66
Replacing bulbs 111
Replacing the air filter 98
Replacing the oil filter 99
Replacing the passenger compartment
filter 98
Resetting the service indicator 10–11
Reversing camera 74
S
Safety, children 57–59
Screen, colour 160
Screen menu map 160–161, 163, 166, 168
Screenwash fluid 97–98
SCR (Selective Catalytic Reduction) 101
Seat belts 55–56
Seat belts, rear 56
Seats, heated 28
Seats, rear 59
Sensors (warnings) 74
Service indicator 10–11
Servicing 10–11, 98
Settings, equipment 13, 18
Sidelamps 46
Snow chains 91
Socket, auxiliary 153, 162
Socket, Jack 153, 162
Sockets, auxiliary 38–41
Speed limiter 76–77
Speed limit recognition 75–76
Speedometer 74
Stability control (ESC) 52
Stability control (ESP) 53
Starting a Diesel engine 91
Station, radio 152, 160
Steering mounted controls, audio 151, 159
Steering wheel adjustment 30
Stop & Start 32, 38, 49, 56, 69–70, 94, 98, 122
Storage 38–41
Sunshine sensor 31
T
Tables of engines 124
Table, writing 38–40
Tank, fuel 90
Technical data 124
Telephone 154, 166–168
Temperature, coolant 11